tomnic
-
Posts
1,137 -
Joined
-
Last visited
-
Days Won
51
Content Type
Profiles
Forums
Events
Downloads
Everything posted by tomnic
-
Sarebbe formalmente più corretto passare a MacPro7,1 per la GPU, tuttavia vedi se restando con iMacPro1,1 hai problemi con Apple TV o Amazon Prime o Netflix, cambia smbios solo se hai schermi neri / rossi / problemi coi drm, Apple non ama vedere macchine in rete cambiare smbios. Prestazionalmente non dovresti accusare alcun rallentamento restando così visto che con quel flag agdpmod forzi comunque il power management della scheda. Considera che lato CPU dovresti usare iMac19,2 se non ricordo male per avere il quicksync e il powermanagement "nativo", sicuramente hai tutto sistemato già lato CPU con il tuo smbios attuale, dovresti lavorarci invece passando a MacPro7,1.
-
Controlla le opzioni nel Bios relative a "PCI above 4G Decoding" e "Resize Bar" e cambiale da on a off o viceversa.
-
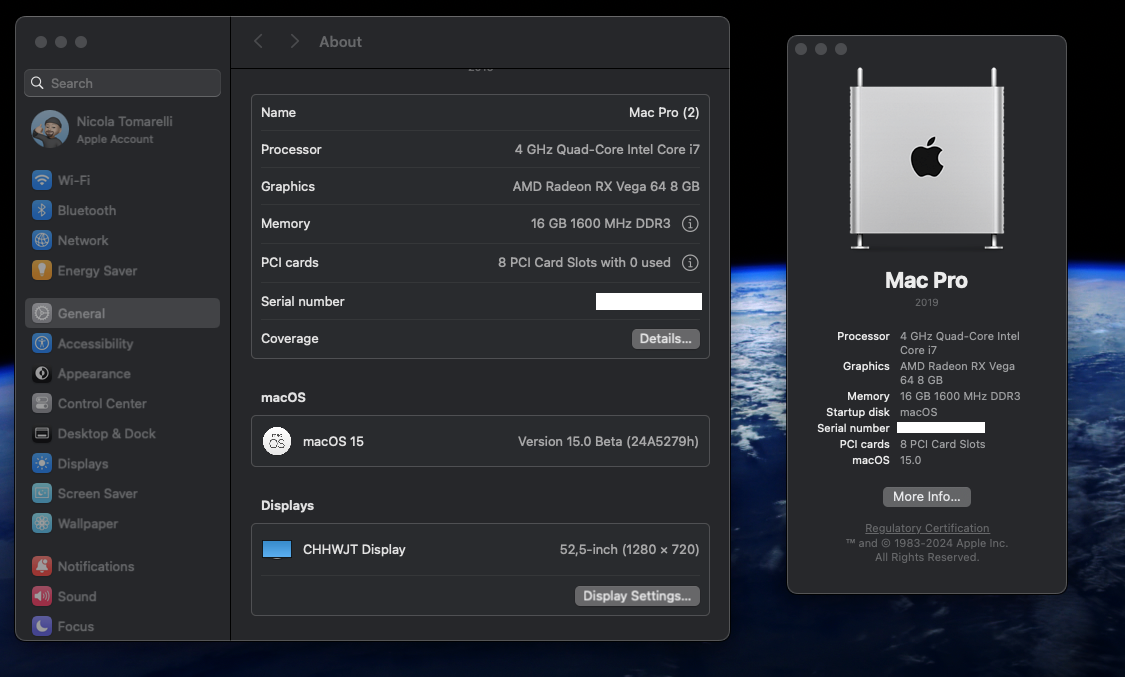
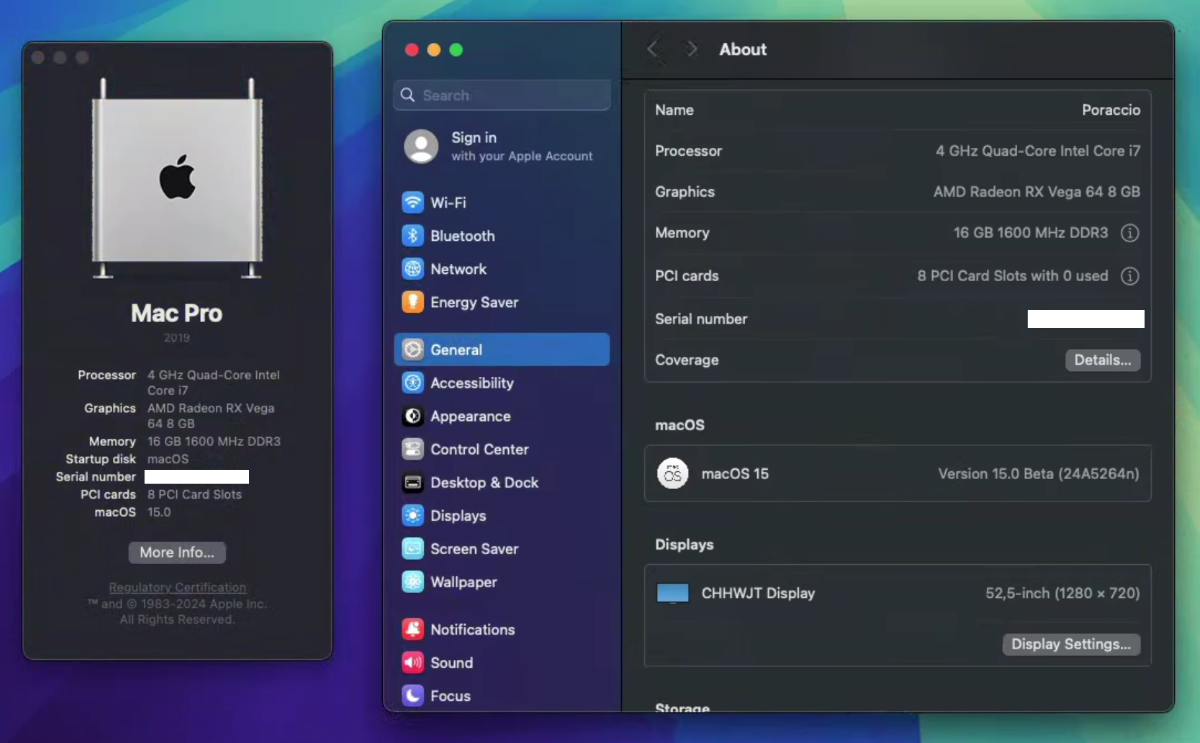
Taaac, Poraccio Beta2!

-
Ero loggato, ho fatto da quella pagina Enroll your Device poi Open Software Update mi ha fatto riloggare dentro Preferences con il mio Apple ID e puff è apparsa l'opzione mancante 😉 Grazie milleeeee
-
Allora non so perché a me non appare più la possibilità di scegliere macOS Sequoia Developer Beta ho i kext di @Lorys89 col flag apposito ma nada, che mi sfugge? Pagare no a quanto pare ehehehe
-
Ma tu hai pagato i 99 dollari annuali?
-
Non mi sta enrollando uff
-
Quasi tutte le app Adobe vanno patchate per poter funzionare correttamente su Hackintosh AMD. Il comando è il solito: sudo amdfriend --in-place --sign --directories /Applications/Adobe\ Photoshop\ 2024/Adobe\ Photoshop\ 2024.app Al solito nome e percorso dell'app vanno adattati in quanto possono variare a seconda della versione.
-
Devi solo rimettere libaccore.dylib originale perché amdfriend lo patcha per errore, è l'unico falso positivo segnalato ad oggi. Se non ce l'hai backuppato reinstalla Autocad, copialo da una parte, applica amdfriend a tutta la cartella dell'app, e poi sovrascrivi libaccore.dylib con la versione originale che ti eri appena copiato da parte. Ricorda di riapplicare il codesign all'app: sudo codesign --force --deep --sign - /Applications/Autodesk/AutoCAD\ 2024/AutoCAD\ 2024.app In alternativa reinstalla Autocad MA patcha SOLAMENTE i due files effettivamente da patchare con questi comandi specifici: sudo amdfriend --in-place --sign /Applications/Autodesk/AutoCAD\ 2024/AutoCAD\ 2024.app/Contents/Frameworks/libtbbmalloc.dylib sudo amdfriend --in-place --sign /Applications/Autodesk/AutoCAD\ 2024/AutoCAD\ 2024.app/Contents/Frameworks/libtbb.dylib sudo codesign --force --deep --sign - /Applications/Autodesk/AutoCAD\ 2024/AutoCAD\ 2024.app/Contents/Frameworks/libtbbmalloc.dylib sudo codesign --force --deep --sign - /Applications/Autodesk/AutoCAD\ 2024/AutoCAD\ 2024.app/Contents/Frameworks/libtbb.dylib Nota che i percorsi / nomi dell'app possono variare a seconda della versione dell'app Autocad usata.
-
Il SIP è il System Integrity Protection di Apple, un sistema che protegge le macchine Apple dal software "indesiderato". Disabilitandolo non dovresti più avere problemi col software "non originale". Nessuno ti bloccherà mai, l'unica cosa che può accadere è che attivando iMessage o Facetime ti neghino l'utilizzo perché hai il seriale in blacklist quindi generali bene assieme a MLB e ROM con l'apposito generator di OpenCore in modo che non esistano già ed EVENTUALMENTE per sbloccare uno di questi chiama il supporto Apple. Dovessero farti delle storie sul seriale digli che sei fuori e non puoi controllare se l'hai trascritto bene ti faranno alcune domande sul tuo account iCloud per assicurarsi che sia tu e poi ti tolgono dall'eventuale blacklist.
-
Ci sono altri casi in cui è necessario togliere l'attributo quarantine all'app: sudo /usr/bin/xattr -rd com.apple.quarantine /percorso/all/applicazione Prova anche così, in aggiunta disabilita anche il SIP
-
Ti consiglio di aprire terminal e dare i seguenti comandi per disabilitare gatekeeper, così da evitare di dover premere Ctrl per aprire programmi "non ortodossi": sudo spctl --master-disable dai la pass e dimmi
-
Mi sa che è ora passata di migrare... peccato veramente per airdrop ma almeno si ha connettività
-
La modifica pixlas all'alimentatore ti serve solo per GPU con almeno due connettori da 6 pin o due o più connettori da 8 pin, in tutti gli altri casi valgono le considerazioni di Fabio. Se vuoi visualizzare la schermata di boot su un MacPro senza opencore ti serve un bios moddato appositamente, ma una volta installato opencore in realtà non ne hai realmente bisogno se non per comodità se ti si blocca opencore stesso.
-
Ho provato col comando find da terminal ma nulla, *heic *heif *mov solo quelli che scarichi si trovano. Analizzando Activity Monitor pare che siano governati da delle appex: tomnic@Poraccio Extensions % pwd /System/Library/ExtensionKit/Extensions tomnic@Poraccio Extensions % ls Wallpaper Wallpaper.appex/ WallpaperDynamicExtension.appex/ WallpaperHeliosExtension.appex/ WallpaperIntentsExtension.appex/ WallpaperMontereyExtension.appex/ WallpaperVideoExtension.appex/ WallpaperCAPackageExtension.appex/ WallpaperGradientExtension.appex/ WallpaperImageExtension.appex/ WallpaperMacintoshExtension.appex/ WallpaperVenturaExtension.appex/ E se vado all'interno dell'appex WallpaperMacintoshExtension trovo dentro risorse tutte le icone che appaiono sia nel wallpaper che nello screensaver. Per me è tutto renderizzato da queste appex in temp reale.
-
Intanto scarica qualcosa da qua: https://www.iclarified.com/files/macos/iClarified-macOS-Sequoia-Wallpaper.zip
-
Muletto a cui ho dato un nome esemplare, PORACCIO... grandioso e immortale i7 4790k!!! E notevolissima Vega 64 con piena accelerazione
-
Onestamente MAI letto ahahahahah
-
Prova anche a disabilitare il -v perché con le RX 6xxx ogni tanto si impalla il boot / reboot a causa di WindowManager
-
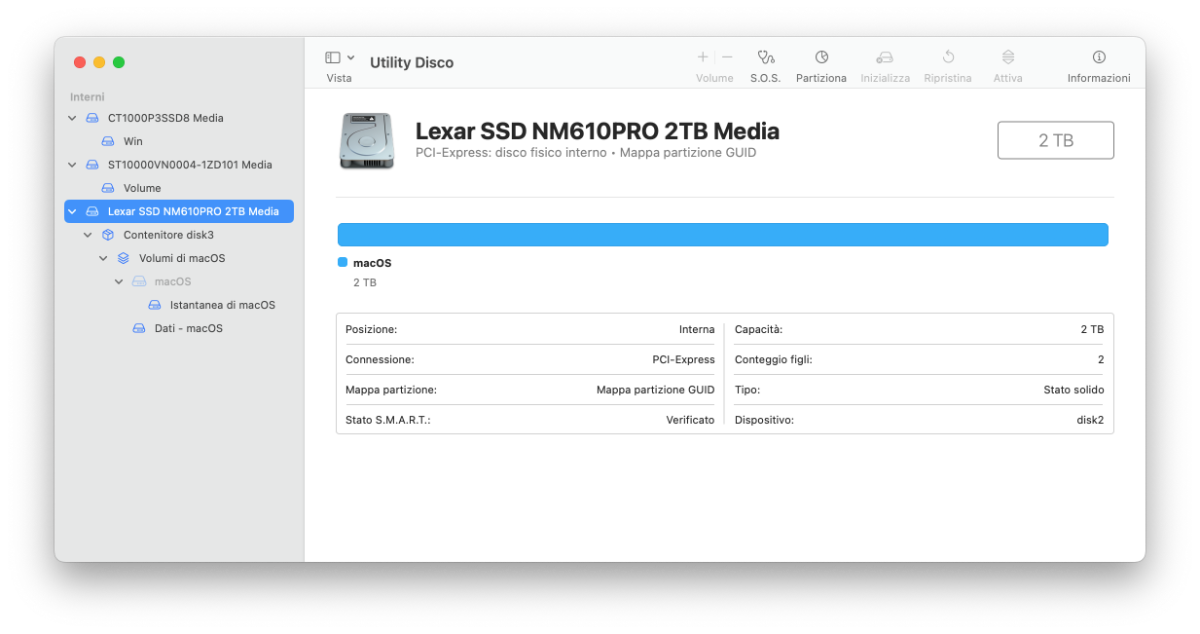
Ho capito bene che non riesce a finalizzarti il primo passaggio di scrittura su disco nvme interno? Per questo non vedrai mai altro oltre a macOS Installer della pennetta USB. Come dice Fabio, hai formattato l'intero disco in GUID e APFS prima di installare macOS? Fondamentale la mappa partizione GUID sennò non può scriverti informazioni di boot nella partizione EFI visto che non potrebbe esistere. Controlla come in figura qua sotto. Ti ho disattivato il trim ai dischi e il secureboot. Riprova rimpiazzando il config nella tua EFI. config.zip
-
Un hack fisso ha ancora senso se si vuole pompare molto la potenza grafica rispetto agli M2 Ultra, nessuno a livello di consumi, inizia ad avere poco senso con Logic
-
Provato a montarla manualmente? diskutil list e supponi che vedi: tomnic@Mac-Pro ~ % diskutil list /dev/disk0 (internal, physical): #: TYPE NAME SIZE IDENTIFIER 0: GUID_partition_scheme *1.0 TB disk0 1: EFI NO NAME 104.9 MB disk0s1 2: Microsoft Reserved 16.8 MB disk0s2 3: Microsoft Basic Data Win 999.4 GB disk0s3 4: Windows Recovery 667.9 MB disk0s4 /dev/disk1 (internal, physical): #: TYPE NAME SIZE IDENTIFIER 0: GUID_partition_scheme *2.0 TB disk1 1: EFI EFI 209.7 MB disk1s1 2: Apple_APFS Container disk2 2.0 TB disk1s2 nel mio caso quindi la partizione EFI di macOS è la disk1s1 perché nel disk0 come vedi c'è Winzozz. Ora se apri terminal digita in sequenza: sudo mkdir /Volumes/EFI sudo mount -t msdos /dev/disk1s1 /Volumes/EFI Dovresti avere montata la EFI. Se qualcosa si blocca apri Console e vedi se c'è qualche messaggino carino d'errore
-
Sono solo Stem Splitter e Chroma Glow a non funzionare... tecnicamente anche le nuove cpu intel / amd hanno una npu, tutto sta a trascrivere tali routine con le istruzioni equivalenti... forse qualche buon hacker in giro desideroso di "giustizia", anche se penso che non si muoverà nulla visto che l'm2 mini si trova anche sui 500 eur... sigh
-
Sono capitato per caso in questo vecchio thread perché ho avuto il tuo medesimo problema avendo acquistato il medesimo convertitore, dovevo riciclare il vecchio SSD interno Apple del mio vecchio MacBook Air venduto e allora con 10 eur su Aliexpress ho fatto la festa. Siccome quell'SSD usa comunque il protocollo SATA via M.2 il driver NvmExpressDxe.efi non è corretto, devi usare SataController.efi che ti allego: da mettere nella cartella Drivers di OC e da dichiarare nel config.plist tra i Drivers assieme a OpenRuntime.efi e affini. Lo sto usando e funziona molto bene, i suoi 1500 mb/s in lettura/scrittura li fa. Sicuramente avrai risolto diversamente ma questo driver potrebbe aiutare altre persone 😉 SataController.efi.zip
-
Riduci riduci 😉 Simplify, simplify!!!!