

iGPU
-
Posts
573 -
Joined
-
Last visited
-
Days Won
17
Content Type
Profiles
Forums
Events
Downloads
Posts posted by iGPU
-
-
On 9/22/2020 at 4:11 AM, fojerhar said:
Hi
I don't know if this is the good thread to ask this, I try to make alive my Firewire card for my uad sound card . Tried many things, irq conflicts, and so on, inserted at Device properties, kext loaded, but still no success. This was a native working card in my previous builds.
Software writes Driver not installed correctly, it means that I did not allowed in in security and Privacy , but there was no option for that
Did you get your Firewire card working?
I've used many types and so far, all have worked natively in bare metal in Z390, X299 and TRX40 builds with no added kexts or DevProp. If you've added anything (such as a special kext) remove them.
If still having problems, upload an IORE file.
-
 1
1
-
-
10 hours ago, fabiosun said:
this part :
4. Now type: /System/Library/Filesystems/apfs.fs/Contents/Resources/apfs_systemsnapshot -v /Volumes/BigSur -r "" (<--- again, use your disk name; the final characters are 2 double-quote marks) You'll get a response such as "Attempting tagging of snapshot on volume: /Volumes/BigSurproduces not such file directory (I have used obviously my disk name)
however, I can delete with others steps my snapshot
and then rebooting I can also execute sudo mount -uw
But also with this, Nvidia driver is not able to write on volume because it is read only
with Catalina and previous beta I didn't have this problem
I must also admit that probably when I previously managed to install the driver, very probably I was not from a clean installation like in this caseI ran these instructions on my clean install and had no problem removing the snapshot in Recovery. Once back in Big Sur ß7, I was then able to change files after executing the "sudo mount -uw /" command. I'm wondering if you had (have) more than one snapshot partition? Did you verify after deleting the first snapshot that none were remaining?
The only time I saw the an error something like "no such file or directory", when using the (/System/Library/Filesystems/apfs.fs/Contents/Resources/apfs_systemsnapshot -v /Volumes/BigSur -r "") command, was when I made a typo in the command or file name (esp if there were a space in the name), or, if there are no snapshots to tag. So if not first problem with extra snapshot, then I would guess a typo error.
EDIT:
The other thing to try is before going into Recovery, add boot-arg (it can later be removed for routine BS bootin): -no_compat_check and amfi_get_out_of_my_way=1And once in Recovery, run: nvram csr-active-config csr-active-config %7f%08%00%00
-
 1
1
-
-
1 hour ago, Driftwood said:
Which ones?
Attached is a reduced Patch set that still boots Mojave, Catalina and Big Sur ß7 (but not HS) that I used for the speed improvements above. (It is reduced from Pavo's posting.)
No Aquantia patches are present.
-
2
-
-
1 hour ago, fabiosun said:
have you understood well snapshot stuff?
/dev/disk8 (synthesized): #: TYPE NAME SIZE IDENTIFIER 0: APFS Container Scheme - +249.8 GB disk8 Physical Store disk5s2 1: APFS Volume macOS_B-M - Data 3.9 GB disk8s1 2: APFS Volume Preboot 431.1 MB disk8s2 3: APFS Volume Recovery 761.5 MB disk8s3 4: APFS Volume macOS_B-M 15.1 GB disk8s4 5: APFS Snapshot com.apple.os.update-... 15.1 GB disk8s4s1 6: APFS Volume VM 1.1 MB disk8s6this is my disk...
I cant enable well to run sudo mount -uw /
have you some advice, I see your post but it seems not work here (or better I am not able to do it 🙂 )
You can only run if you remove the Snapshot partition as I wrote about earlier in this thread here. It is possible to make a new Snapshot later, which I can write about. Today I removed the Snapshot in Recovery, did my adjustments and then made a new Snapshot in Recovery.
The other option is to carry out all removal and writing of kexts inside ß7 Recovery. See details in this post, and look inside first "Reveal hidden contents".
-
I reduced some patches and now have speeds about the same as ß6:

-
1
-
 1
1
-
-
31 minutes ago, meina222 said:
I simply looked at the git commit and the diff. I took the 4 patches he added with comment on Big Sur on top of the "minimum set" of patches Pavo referred to a few days ago found by experimentation. Perhaps, for those with problems, it's wise to try the full set found in the patches.plist file in git.
I used full set shown by Pavo, and then as noted above, disabled the last.
I saw some slight differences between the two lists: more to test tomorrow. I'd like to get the overall speed back to where it was.
EDIT:
Changes to old list:
cpuid_set_cache_info - cpuid 0x8000001D instead 0 (31C031DB 31C931D2 0FA24189 C6000000 00000000 74) was only Catalina, now Catalina and BS.
skip cpuid_cores_per_package test (833D0000 0000000F 00000000 008B00BC) was originally only Catalina, now enabled for Catalina and BS.
algrey - cpuid_set_generic_info - set microcode=186 was originally only for Catalina, now enabled for HS thru BS.
-
2 minutes ago, fabiosun said:
Unfortunately they still don't go to me, compared to the previous ones they go a little further in the verbose but then the system restarts I think after a message on the USB However it does not make a good reference here as I have other difficulties to deal with very likely using Nvidia
@meina222 the added patches have the min and max kernels set for use in Big Sur, so no problem adding all those posted by @Pavo 's link if opencore works properly, only the correct patches for the operating system in use are successfully loaded
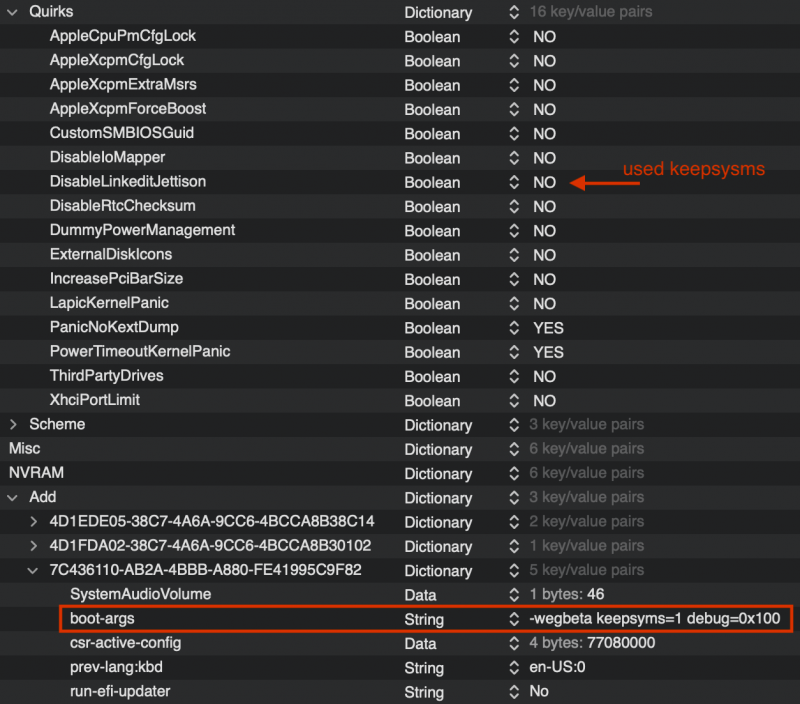
I did change config slightly. When DisableLinkeditJettison was enabled, ß7 would not boot (as it would into ß6), so I disabled and added keepsysms to boot-arg:
-
1
-
-
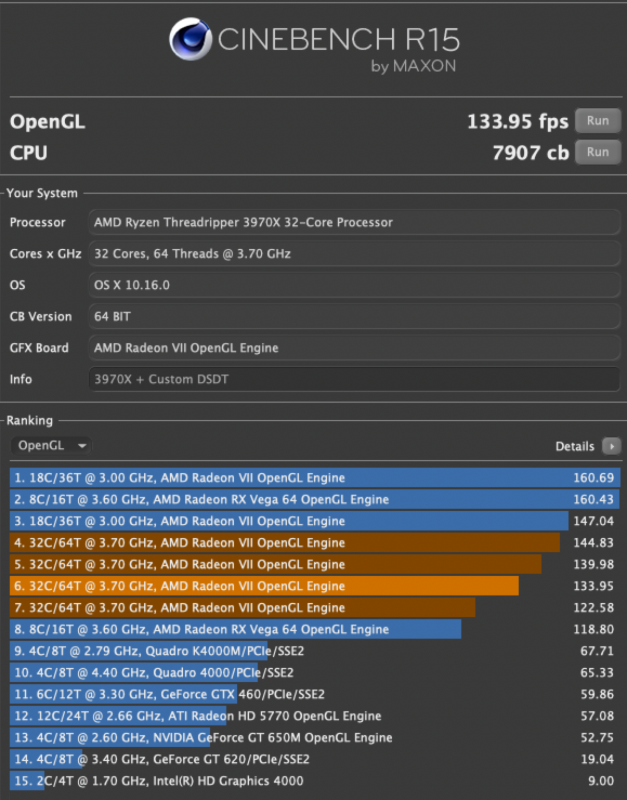
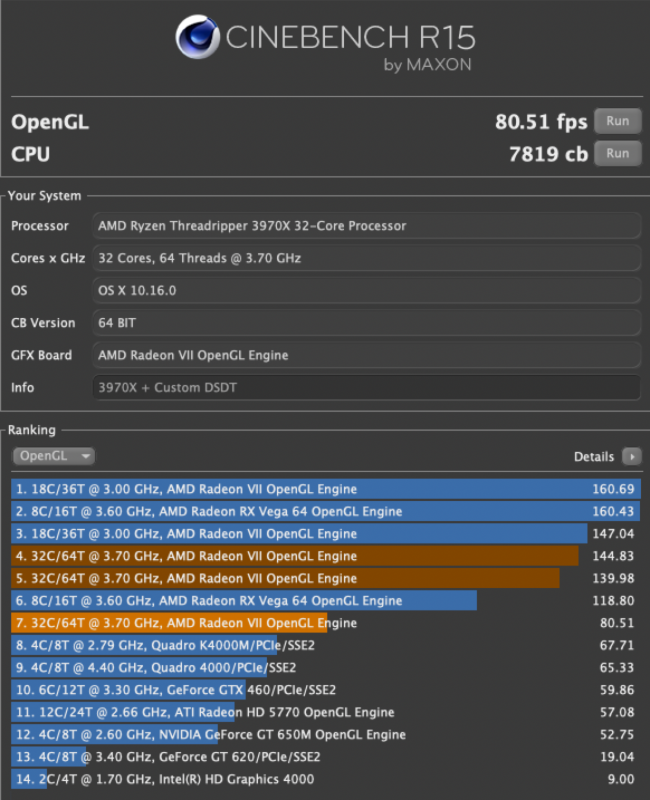
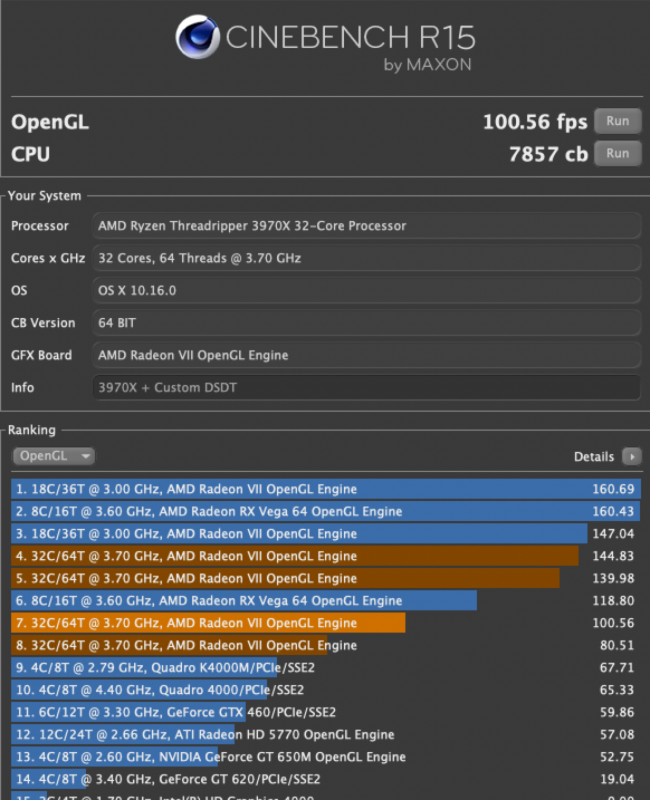
Some testing under BS ß7, not as good as ß6 (several runs all with similar values shown below).
With the final patch enabled (algrey - mtrr_update_action - fix PAT):
With it disabled (~20% improvement, but still of of the 140 fps on ß6 and old Patches):
-
I too tested. It boots Mojave, Catalina and Big Sur.
Furthermore, it allowed me to download and update ß6 to ß7 in bare metal (it required 4 re-boots for update).
So thanks Pavo (and algrey)!
-
1
-
-
24 minutes ago, fabiosun said:
said what above .... 🙂
here is my full EFI To be filled in with the data of your platform in the section relating to SMBIOS
Be careful this EFI is based on the official opencore debug version 061 with relative kexts and drivers
Attention again,
this EFI allows me to start all OSXs available as of today 16 September 2020 on my PC
Big Sur 10.11 (beta 6)
Catalina 10.15.6 (19G2021)
Mojave 10.14.6 (latest security fix)
High Sierra 10.13.6 (latest security fix)
(see the signature for exact specs of it)
I use a MMIO set that comes from a Bios version 1.60 with the 4G option enabled.
In addition to this, I use quirks that may not be useful for you, I don't use the AppleALC kext, as it is useless for using any USB audio.
I do not use any bootarg alcid as it is useless if not combined with the aforementioned kext
I don't use ssdt at the moment and the ACPI ones you see are disabled
By the way
MMIO used combination should be evaluate better (imho) because the combination of their use can lead to undesirable effects in some circumstances ... not foreseeable by anyone who does not have the same setup as youWhat you've written is important and there are 2 simple ways to go forward to keep the thread tidy, but first some prefacing.
Problems will always arise as threads progress: due to new hardware, new macOS updates, changes in OC, and differences between individual builds. These problems are what threads help to resolve; a community effort to help each other.
And while it's one thing to help someone who is confused or stuck with a particular problem. It's an entirely different issue if someone has no clue about OC or TRX40 issues and who does not want to expend any effort in learning how to get their system working (lazy), or, is trouble shooting a lousy EFI. The former, can be ignored. It's the latter problem that we should minimize (especially since it's obvious that people do not carefully read threads). So how can we limit problem EFIs?
One way to limit lousy EFIs would be for all uploads to be cleared with fabiosun. Snippets could be uploaded, but not whole EFI folders. Only fabiosun would upload EFIs. This would allow greater consistency, but be time-consuming for fabiosun.
The other approach would be to continue as is, but request that the individual who wants to upload an EFI have greater self-control. In other words, only upload EFIs if you: a) know what you're doing (truly understand the ins and outs of OpenCore), and b) are willing to support questions regarding it entirely on your own (since you claim to know what you are doing).
Further, only upload EFI folders with full explanations (as fabiosun did above), describing which macOS it can boot (have you truly tested your EFI with various macOS versions or just thrown something together with no testing), what hardware it is meant for (a specific mobo or all mobos?), what are its limitations (e.g, 'no MmioWhitelist is included'), and what is unique or helpful about your EFI that warrants its posting (e.g., 'this EFI fixes such and such a problem'). Someone who uploads an EFI must have sufficient perspective to view their EFI in relation to other TRX40 systems (especially important for new-comers will also download it).
If such guidelines cannot be followed, then perhaps fabiosun or a moderator can contact the poster to ask them to remove the EFI, or if necessary, the moderator can delete the post.
Another suggestion would be to have the latest, or recommended EFIs, posted in a first post of this thread. (This would requires work on fabiosun's part to keep it updated). There may be even more than one EFI, such as one for installation, another for a special mobo, or perhaps one for each mobo commonly discussed in the thread. fabiosun could recruit contributions. There could be a sub-section in this first post of SSDTs, special kext files, and so forth.
If there is no consistency, the thread will continually require trouble-shooting problematic EFIs, which to me is a waste of time.
-
2
-
1
-
-
On 9/15/2020 at 7:22 PM, thebwack said:
I'm going to attach my config.plist. this was a previous @meina222 EFI that i've simplified for my setup but am curious what y'all think. I think there might still be things I do not need that @meina222 needed for specific hardware or was playing with. There is a lot in the Patch section that i don't understand or have seen in my other OpenCore builds but not sure if i need it as it might be TRX40 specific.
So, about audio. This config file is where I'm at with working onboard RealtekUSB audio and Radeon VII. If I remove Whatevergreen then two of my Display ports quit working. I am currently using two 4k monitors and I was using the HDMI port and the display port next to it. Without WEG I can only use the port furthest from the HDMI port. Also, after a reboot audio was distorted again with Whatevergreen removed. What should be my next combo to try? Apple ALC is in the OC/kext folder but i'm not calling it so not sure its being used.
You mentioned WIFI and distorted audio. I don't have WIFI working from the Designare (do I need to disable it in BIOS?) I was planning to buy the latest FENVI card that is compatible with BigSur. Will the FENVI cause audio to distort?
1) You've not read the thread carefully or you'd not have downloaded a config with all of the original patches. We talked about this several days ago and most of us are running only 13 patches.
***
EDIT:
See this post for better Patches.
***
2) your config file shows that you're using an older version of OC. You should be updated to v061 for best function. When I started using OC in early 2019, I spent days studying all the posts at the Insanelymac thread, reading the docs and looking at the sample.config plist. Now, I'd instead recommend going to the Dortania guide as the best resource to learn OC (here) and how to keep it current. Then on each update, study the Docs section, specifically, the Changelog.md and Differences.pdf files.
3) your config file is a little short on kexts. AppleALC and ethernet kext are usually a good idea on most Hackintoshes. (Do you understand that your boot-arg of "alcid=11" doesn't work if you don't load the AppleALC kext?) In the Kernel/Quirks section should disable the DummyPowerManagement; it's not needed for TRX40 (discussed before). There is also a new addition for v061, specific for Big Sur (discussed before, here).
4) The WEG/RadeonVII DP issues you describe are known to happen when WEG is disabled with Radeon VIIs (and I think 5700XT too) On the Intel side this was found to be necessary (starting with Catalina) to prevent crashes (that is, +WEG with Radeon VII led to crash), so it was rec'd to disable WEG but knowing that you'd lose some ports. ( I've discussed this several times on this and the VM thread.) On Big Sur, I run Radeon VIIs and now keep WEG enabled. My only boot-arg is "-wegbeta".
5) If you don't want the on-board wifi, I uploaded some time ago an SSDT to disable. You need a proper SSDT to re-inject SB.S0D2.D2A0.BYUP.BYD8/XHC (address 0x03) and leave out PRT5 which supplies power to the BT/Wifi device on the Desginare mobo.
6) In your MmioWhitelist, I'd recommend adding Comments, so you know at some later date what the heck you did and how to trouble shoot (as shown below). Commenting in code is always a good idea. I've already seen this section before and you copied someone else's no-comment section instead of deriving your own (a how-to was posted here).
Yours:Mine:
7) The FENVI has recently on other forums been found to have various problems. The YOUBO card (here), now seems to be the preferred choice.
***
TO ALL:
Reading the thread carefully, at least the last 2 or 3 weeks of posts, will avoid us all having to re-address old topics for each new person who comes to work on this build.
But part of the problem isn't the new-comer naively downloading files. Instead, it is the fault of posters who don't self-edit their old posts and leave tantalizing files available to new-comers. I would encourage all of us who've upload files to removed those which are no longer valid, or amend some explanation. (I did this with the Mmiowhitelist Instruction, removing an earlier upload and explaining how an easier method was developed and provided links back and forth from the old to new post.)
I think if an EFI is faulty or has been superseded, it should be removed. Unless posters self-edit, old EFI's and other uploads will haunt us all, as new-comers download these old uploads, have problems, then request fixes to issues that were previously solved.
-
1
-
2
-
-
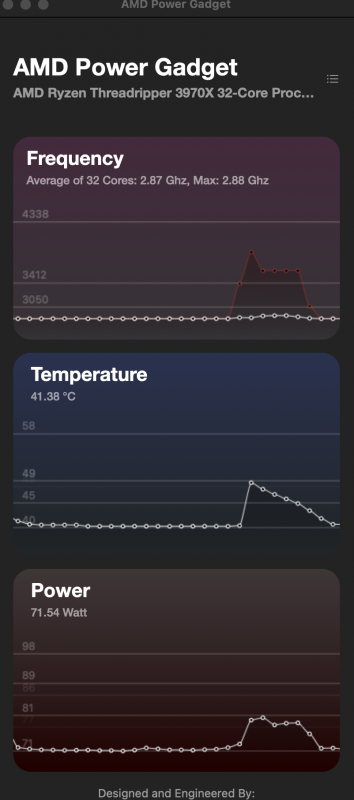
2 hours ago, fabiosun said:
hi @iGPU
I see your AMD Power Gadget temps/watt graphics
I see in idle a very low temps (about 40°) and also 70 watt of power comsumption
In Previous post (stress test you did ) I see about 85° and a TDP about 315W
I would like to know how PBO is set in your BIOS and also say in my case I see a wattage about 360 watt and a temp about 82° on stress test
But I would like to have you idle temps (wattage there is pretty the same)
TY
PBO is default, I change nothing. I even have fan curves and pump very low to keep noise to a minimum. The only difference in our systems (as I don't know if you did these things) may be that I flushed out the radiators, changing out the stock fluids, and planed the heatsink (as described on the VM thread). I think, esp with high-powered, larger CPUs, all heatsinks should be planed prior to use. I've rarely seen any that are not a bit warped. It took me around an hour to do, but it only needs to be done once.
***
As for your NVIDIA GPU, that's great. I didn't think any NVIDA GPUs worked after High Sierra. Could you explain to us how you manage to get the kexts to work and where do you source the kexts? Are other, recent NVIDIA GPUs supported too?
-
21 hours ago, Cosmin Batica said:
Of course, is Cooler Master Watercooling Kit MasterLiquid ML360 RGB TR4 Edition.
https://www.vexio.ro/coolere-si-ventilatoare/noctua/326969-nf-f12-pwm-chromax-black-swap/
Regarding audio issue, I found that the only way to ge t working my external audio card was to disable onboard audio and then reinstall Catalina.
My system's temps run just fine. Idle is shown below.
To read about details on how I prepared the cooler for this CPU, do a search in the VM thread on this forum for a couple of my posts on the subject. Many heat blocks are not flat and temperature transfer is adversely affected. I planed my flat; read the posts.
When stressed, power/temps jump up; so as not to repeat re-posting images, see this post here; the temps under those conditions are very reasonable.
-
21 hours ago, thebwack said:
That makes sense. thanks. I boot into Mac probably more and i like the idea of windows booting on its own. If i turn off the picker then, to just boot straight into Mac, is there a keystroke to show the picker if i need to clear nvram or go into shell or recovery? if not i can just do picker with timer for sure.
So i had read this thread through once, and am now going back through it in reverse, and i must have skimmed over this post:
It was definitely important. I went through and removed a lot of that stuff and it fixed some things. my audio is still distorted if i remove whatevergreen kext so i kept that even without its boot args. i might mess with that some more to make sure i have the right combination
i'm currently using -v alcid=11 keepsyms=1 and audio is working.
iMacPro1,1 is working great for me
If you turn off picker, OC is on it's own. I've not tried it, but if Misc/Boot/PollAppleHotKeys is enabled (I always leave on; presently, p 36 Docs) and Misc/Security/AllowNvramReset is enabled, you might be able to CMD+P+R before Apple logo appears to get into NVRAM when ShowPicker is No.
I leave ShowPicker on (Yes), and have TimeOut set to 0 (disable) so I can control what happens.
The distorted audio has been discussed: turn off Wifi (or try only using 5G). alcid seems to have little effect, but then I use a USB Audio interface (USB-C port) and not the internal audio.
-
17 minutes ago, thebwack said:
thanks! that makes a lot of sense. I'm switching a lot Windows/Mac so this is great, I can hide recovery but have my two OS's visible. appreciate it.
When I want to boot into Windows (or Linux), I simply hold down the F11 (or F12, depending on mobo) key, to directly boot from BIOS into Windows (or Linux). Not very difficult. If you boot from OC, you're potentially running into problems with OC settings fouling up Windows (or Linux). I just don't see the advantage of using OC for booting into anything but macOS.
The other thing that is commonly done, which also makes no sense to me, is setting the SMBIOS to MacPro7,1. The latter has no current advantage with respect to performance (I've tested several times over the past year both in VM and bare metal, in both Catalina and BS, and on Intel and AMD platforms) and only leads to various errors in memory and PCIe lanes issues that some add-on kexts don't fully fix. Why bother?
-
2
-
-
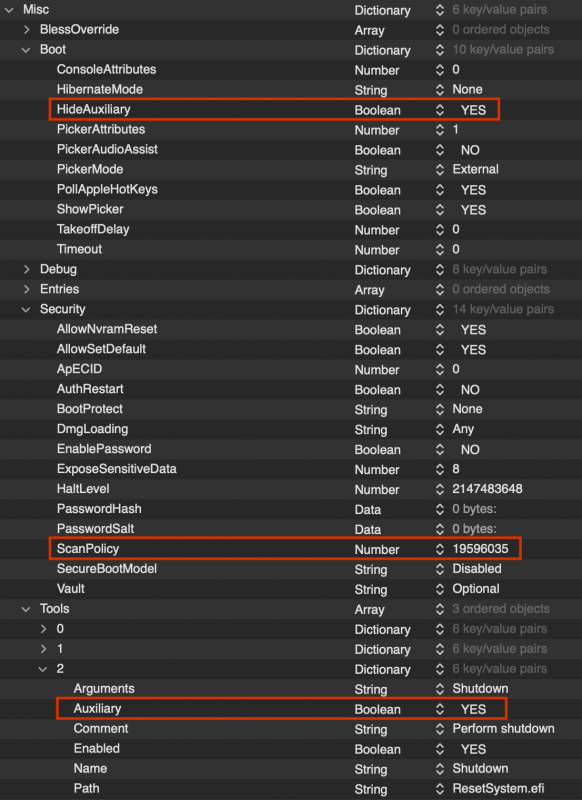
25 minutes ago, thebwack said:
scan policy = 0 seems to have made windows visible but i don't see my repair volume. Thanks @Ploddles I'll look thru that link.
You need to press the Spacebar while the OC menu items are on screen to reveal your Recovery disks as well as Auxillary items.
I routinely flag items in the Tool section as Auxillary = Yes, so that they're only visible when pressing the Spacebar. But you first must enable HideAuxillary to keep these items hidden unless you want them always visible during a boot. I don't like seeing them unless I need them.
A few iterations ago, OC needed "0" for the Scan Policy to be able to boot into BS Recovery; this is no longer required. I think the ScanPolicy I've shown below is preferable to 0 so as not to see EFI folders and other garbage.
-
1
-
-
I don't know if anyone else has had this problem, but since switching to the Big Sur betas, the desktop organization does not stay in place between boots. That is, if I place things in a certain order, they return to a disorganized pattern after re-boot.
A bit of searching came up with a solution. The problem is due to a corrupted ".DS_Store" file on the Desktop; the fix is to delete this invisible file (a good copy will auto regenerate on re-boot). Organize the Desktop as you like, delete this file, re-boot, and items will remain in the locations on the Desktop where you specified.
To remove the ".DS_Store" file, use Terminal, typing the following:
1. cd Desktop
2. sudo ls
3. enter your pw
4. (verify the presence of ".DS_Store" and that you're seeing Desktop items)
5. rm -f .DS_Store
-
On 9/12/2020 at 3:25 AM, fabiosun said:
@iGPU i did same test in x299 some message above
i cant re done the same test but i would like to know if in your test you have used tb header and usb connected to your x299 motherboard or used it as we have to use in trx40 without a tb header
i would like to see if usb tree appears also without usb and tb header connection on x299
I have successfully used flashed GB TR AICs in Z390, X570 and X299 without TB headers, as long as the pins are rear of card are shorted. So it should be working in TRX40.
There was one post from 2 years ago on another forum where the poster had same issues we have (here). I've tried to nmano, asking if or how the issue was resolved, but have not yet gotten a reply.
-
13 hours ago, meina222 said:
@fabiosun, I'll attach my IOReg in a few hours as I am logged into a different computer for work at the moment.
On an unrelated topic (but related to TB SSDT) - I noticed that the TB SSDT depends on "DTGP". Does anyone know what "DTGP" is used for and what is its relation to power management and is it compatible with Pavo's AGPMInjector? When should I use the former or the latter?
There are a couple I'm interested in. I moved the process over to my laptop that runs Mojave. I was able to extract two, turning them into *.bin files, but then I could not convert to text files using the "./ifrextract file.bin file.txt" call. I was busy at work today and didn't have time to pursue more. I don't know if the *.bin files are corrupted or the text conversion routine is broken.
I will work on more this weekend.
***
On another TB front, I had the idea of connecting the TB port to a TB dock. The dock lit up, but did not connect either a USB-C drive nor the TB-drive. This is strange. I must also investigate this more.
BTW, last weekend, I moved the GB TR AIC from the TRX40 mobo and swapped it with an identical GB TR AIC in the X299 build. Both worked in the X299, giving correct TB and USB trees. Both AICs are flashed with same firmware:, they are identical. So this means both cards are working well and that the problem is in how the AIC works (or doesn't work) in the MSI TRX40 mobo.
-
13 hours ago, meina222 said:
@fabiosun, I'll attach my IOReg in a few hours as I am logged into a different computer for work at the moment.
On an unrelated topic (but related to TB SSDT) - I noticed that the TB SSDT depends on "DTGP". Does anyone know what "DTGP" is used for and what is its relation to power management and is it compatible with Pavo's AGPMInjector? When should I use the former or the latter?
It's simply a sub-routine often called by SSDTs when injecting properties. It is externalized to reduce SSDT size as the single, external DTGP can be called by many SSDTs. DTGP could be could be placed into every SSDT that calls it and you could do away with the external DTGP SSDT file.
Initially, I only called it from TB-SSDT. (KGP, the retired X299 guru, used to call it from almost every SSDT.) I'm presently calling DTGP for two SSDTs: FireWire and TB.
It's typically called when injecting properties :
Method (_DSM, 4, NotSerialized) // _DSM: Device-Specific Method
{
Local0 = Package (0x06)
{{ Inject #1 }
{ Inject #2 }
{ Inject #3 }
}
DTGP (Arg0, Arg1, Arg2, Arg3, RefOf (Local0))
Return (Local0)
}You can avoid by re-structuring the SSDT; the following is same as above without a DTGP call:
Method (_DSM, 4, Serialized) // _DSM: Device-Specific Method
{Return (Package (0x06)
{{ Inject #1 }
{ Inject #2 }
{ Inject #3 }
})}
-
13 minutes ago, Cosmin Batica said:
Ok, profile signature updated. Please help! 🙂
The help is already in this thread to construct a functional EFI. You should study it to learn how to set up your own EFI, rather than ask to be handed a fully functional one. Because no matter where you derive the EFI, some customization will be still be required.
And when you study a thread, look and see who is using either the same, or a similar, mobo, and then follow their posts (rather than immediately asking for their EFI) to see how they solved issues you wish to solve. (So far, you've asked for EFIs from people who have different mobos than you.)
If you've already carefully done this, then ask specific questions rather than requesting an EFI. Otherwise, you learn nothing.
-
1
-
1
-
-
6 hours ago, fabiosun said:
I think for us problems are due about tb header and usb header connection
I would like to see an IOREG from @meina222without those cable connected
That's a possibility.
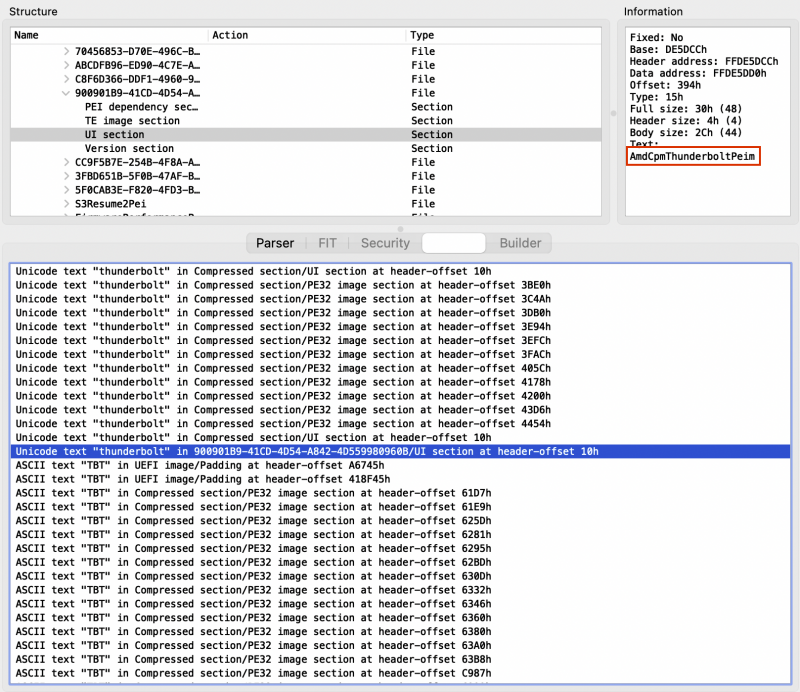
Pursuing the BIOS approach, the BIOS for MSI Creator has a number of sections devoted to TB, found when doing a search for "thunderbolt" or "TBT". This is typical of AMI bios. (Note, I'm not probing the active BIOS on the mobo, but simply looking at a copy of the downloaded BIOS ROM file.)
Unfortunately, the tool crashes when trying to extract data running under Big Sur. I'll need to transfer things over to another machine running Mojave to sort it out.
-
1
-
-
I checked out all of the files inside the SysReport on the Designare mobo where USB works on TB (thanks for sharing meina222), and found nothing useful. Sigh.
I think the next step is probably looking at BIOS.
-
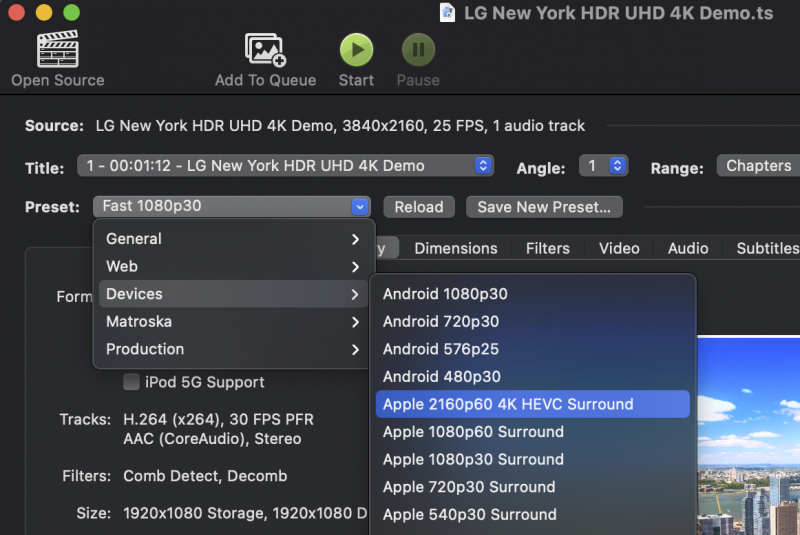
Driftwood mentioned Handbrake. I haven't used that software in years, so decided to give it a try, downloading v1.3.3 here. Next, I downloaded a 4K test file here (it was used to demo LG 4K screens).
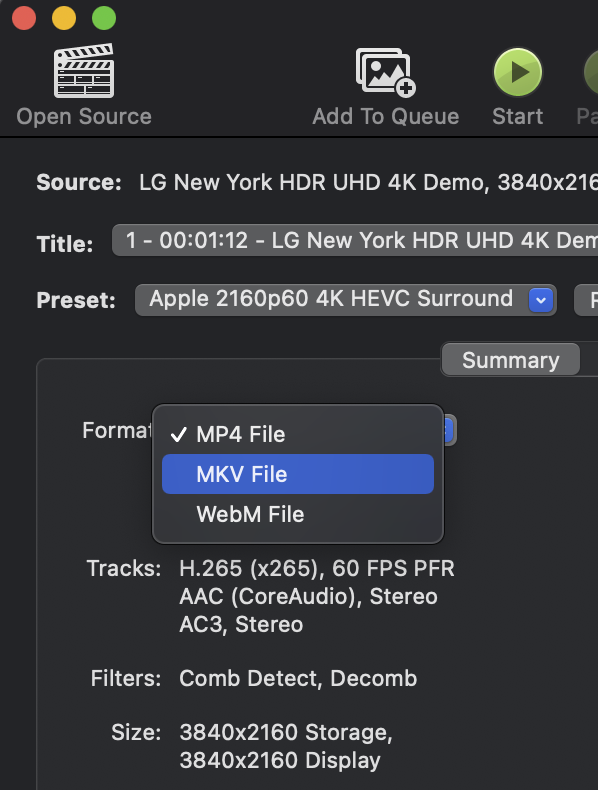
To set the test up, you want to load the 4K demo file, and on the Preset pop-up, under Devices, select Apple 2160p60 4K HEVC Surround (modified) and below that on Format, select MKV File, then press Start at the top (as shown below in spoiler).
SpoilerSelect the Preset:
Select the Format pop-up:
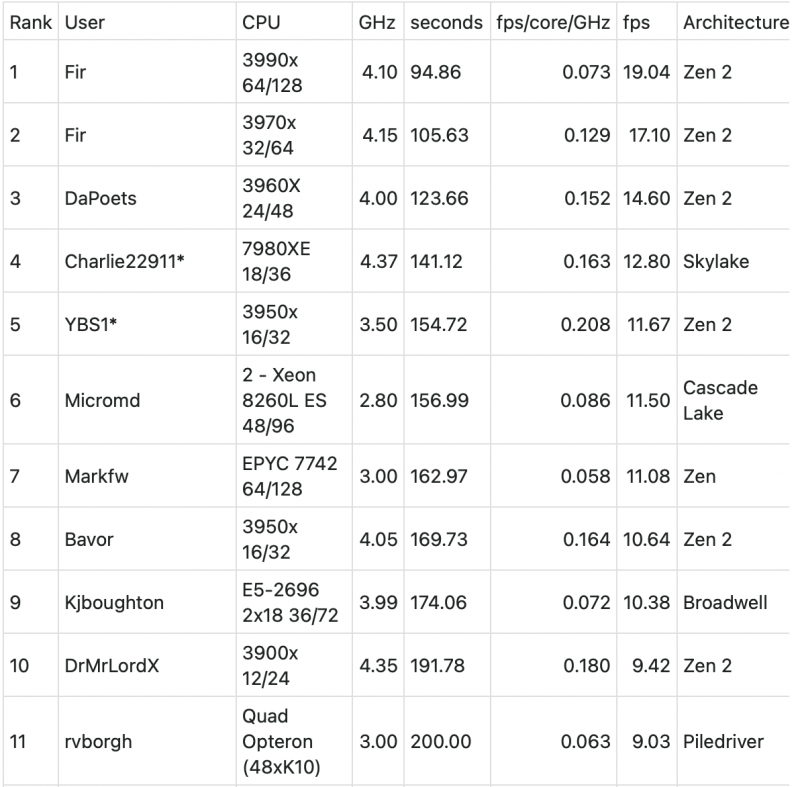
A good comparison site is here (p 12 of thread on AnandTech), which shows a table comparing results of various CPUs (mostly Linux) using the same 4K test file, shown in spoiler below:
SpoilerMy results are right in there, with an avg of 16.82 fps and a duration of 107 sec (iPhone timer). I did not do any over-clocking nor use XMP. Nevertheless, a 3970X is no slouch when using Big Sur and can keep up with Linux results.
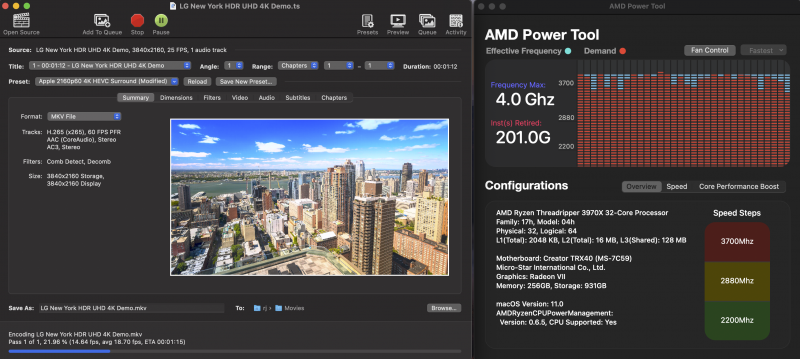
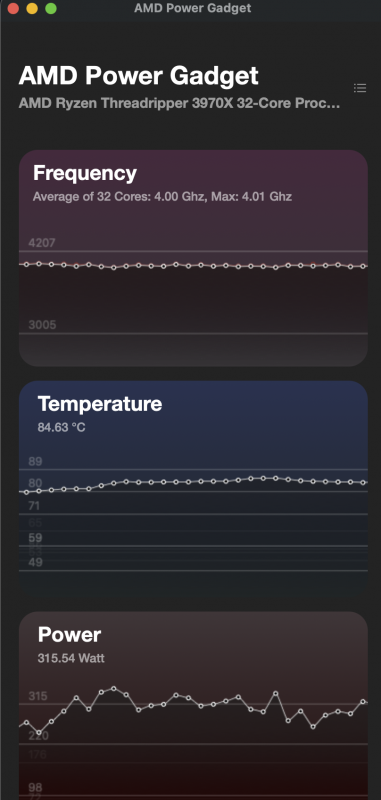
From bottom of the HandBrake window at the end of a run:
The AMD Power Tool window adjacent to the Handbrake window during a run:
During the run, power utilization averaged ~315 W with a temperature of ~80°C and a frequency averaging 4 GHz:
-
 1
1
-


[Discussion] - TRX40 Bare Metal - Vanilla Patches
in General
Posted · Edited by iGPU
While this change did not significantly raise the FPS, it increased CPU results by over 20%!!! 😁