

iGPU
-
Posts
573 -
Joined
-
Last visited
-
Days Won
17
Content Type
Profiles
Forums
Events
Downloads
Posts posted by iGPU
-
-
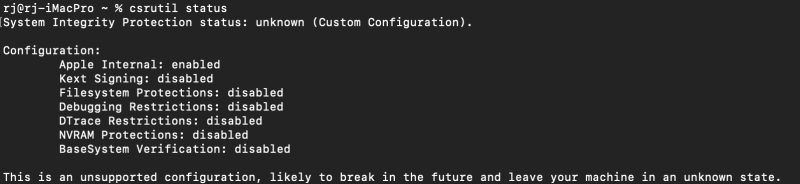
Cannot get SIP to disable in Big Sur; it only seems to disable in Catalina. (BTW, native NVRAM is still working with same set up as described in recent posts for Catalina.)
The car-active-config in OC for booting into BS was set to: FF0F0000 as described "here for Disabling SIP".
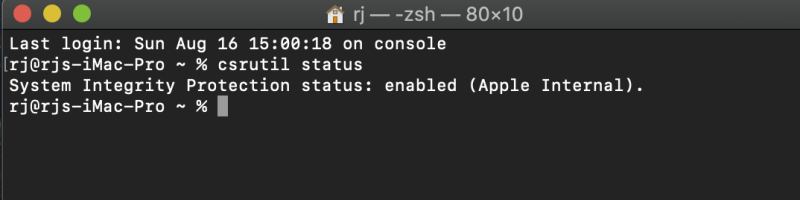
After booting into BS Recovery and disabling both csrutil and csrutil authenticated-root, the status in BS is below:

-
On 8/16/2020 at 4:06 PM, meina222 said:
I applied the files. Attached is my IO reg. Do you see anything regarding your FixShutdown SSDT?
Also don't we need to do this for every controller? XHC, XHCI etc. ?
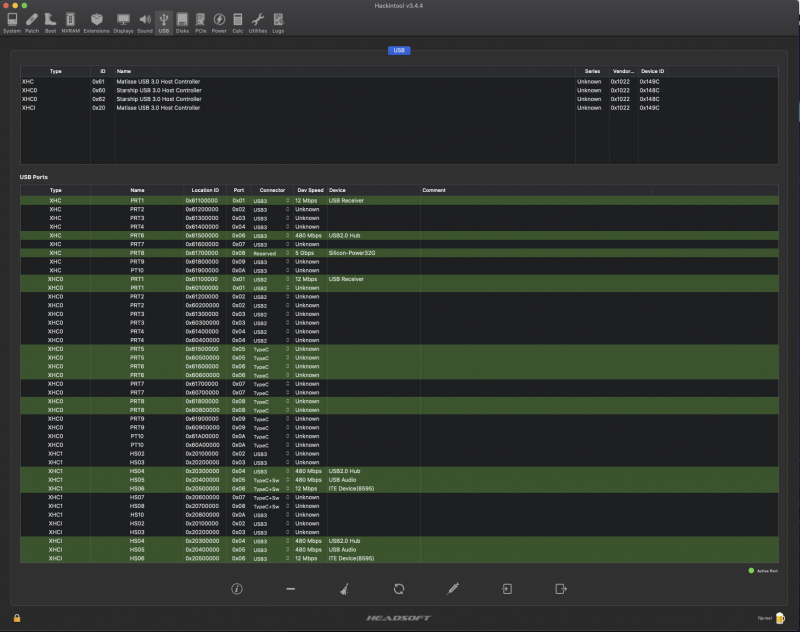
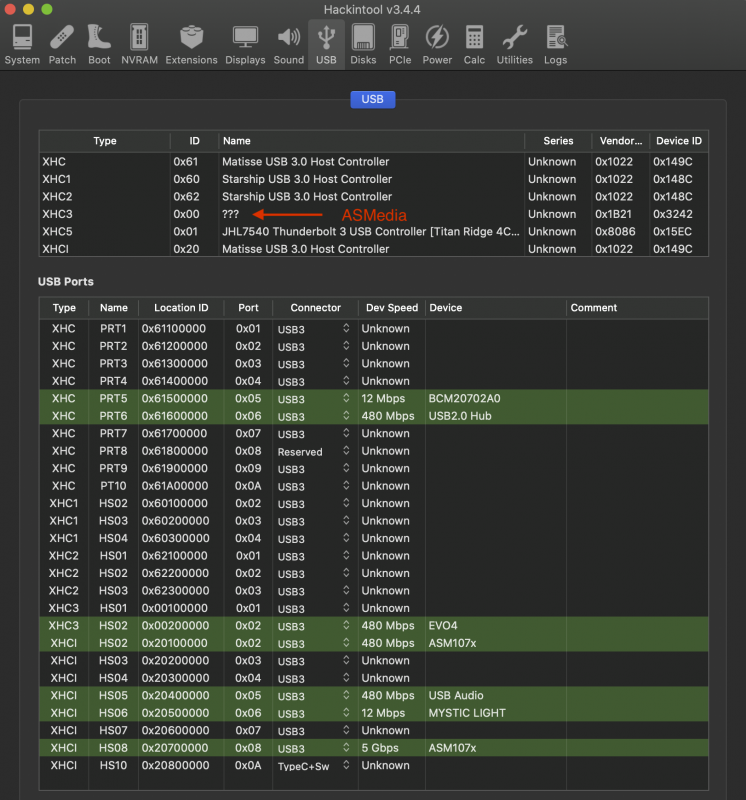
Also my USB reporting doesn't look quite right - Hackintool sees 2 XHC0 controllers
You won't see anything attached to USB devices; it's just a take off point, like PMCR which was 'attached' to MCHC, but actually appears elsewhere.
And no you do not need to enter for each USB device; it doesn't work that way.
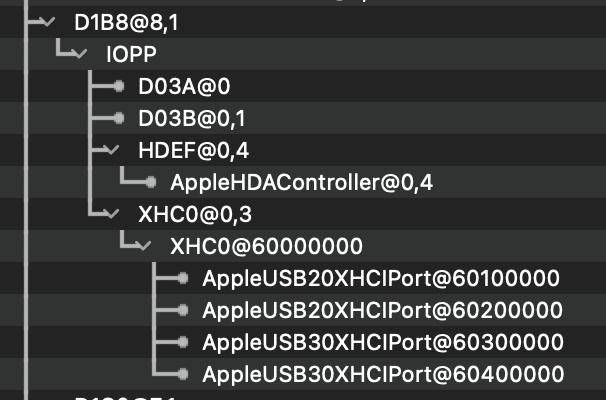
In reviewing your IORE, if you want to change this section to have USB ports, use the attached SSDT file labelled D1B8. If you want to do the same at the USB device at D0B8, use the file labelled D0B8. Each will re-name to XHC1 and XHC2.
SpoilerOn 8/16/2020 at 5:19 PM, meina222 said:For me an EFI that installed Catalina booted but failed during Big Sur installation. Let me try your config. I wouldn't think the whitelist/nvram would be critical for that so I will remove for now. My USB mappings don't seem to work in Catalina. I've attached my IOReg, but so frustrated I think I will just backup my EFI and try BigSur again clean.
p.s. to be precise the file that defines XHC and XCHI works and disables my AX200 after I delete port5. The other XHCx rename file - I don't think it works so I disabled it.
Yes, the other file may not be necessary for you, but it was for my MSI mobo. While the TRX40 has our USB devices showing up exactly the same, the responses may be a bit different.
-
 1
1
-
-
Ok, I'm posting this from Big Sur running in bare metal!
A 2nd NVMe drive in the computer contains Big Sur (the other is for Catalina). So I simply booted into a working Big Sur; no installation was done.
My current config.plist file will boot into both Big Sur and Catalina. The AMD patches were identical; I changed nothing in that section. I initially could not get a boot with WEG enabled. Now -wegbeta" is added based on information from a later post here. But you can see what kexts I had either enabled or disabled from the config file. AvoidRuntimeDefrag = enabled seemed key to getting Big Sur to boot.
You'll need to update ACPI sections, MmioWhitelist (which now blank); look at everything! Especially notice the NVRAM sections which reflect the changes for Catalina and Big Sur. You'll also need to update the PlatformInfo section with your own SNs. I've pasted in values (but not verified to be un-used).
EDIT: MmioWhitelist is very important for bare metal functionality.
-
1
-
-
17 hours ago, fabiosun said:
Uhm... my system shutdown normally
only in reboot I can see (maybe) a kp but I am not sure because it has no consequences at all
Whitelisting is useful togheter the research of a proper slide value for owned system
it is possible to calculate your exact memmap and the use a slide value
not tested for now because in my bare metal main problem is sip
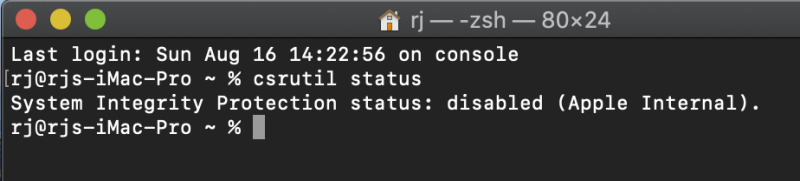
@fabiosunAfter testing FixShutdown-USB and having completed the slide calculations discussed above (meaning native NVRAM), I went into Catalina recovery, ran "csrutil disable" then "reboot" and then booted into Catalina. The OC config file does have SIP turned off (E7030000).
The following is shown in Terminal:
Re-booted into Recovery, re-enabled SIP and back into Catalina:
So I can go back and forth, disabling or enabling SIP. Since we both have MSI mobos, so I think this should work for you once you get native NVRAM working!
Also, please look over this area at this link (look near bottom, above "Post Install" for "Disabling SIP"). There are differences for OpenCore and SIP, esp with Catalina and Big Sur.
***
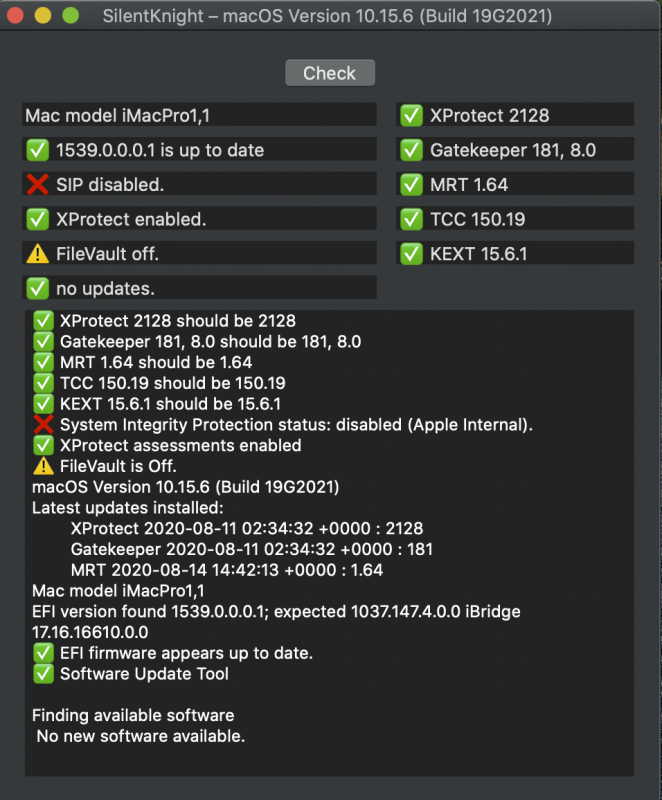
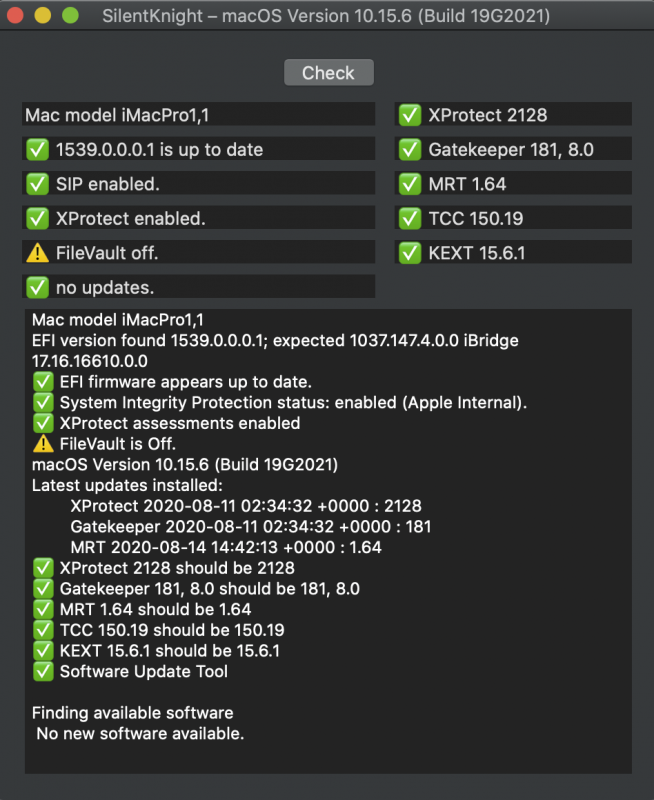
SilentKnight, a free tool to verify macOS firmware, can be downloaded from here:
SilentKnight reports in spoiler:
SpoilerAfter first disable:
After re-enabled:
-
I don't think that will matter.
I have now tested and computer shuts down, clicks off... but then immediately clicks back on again. So better, but not perfect. (This might be a USB connected device problem that I'll need to sort out; so hopefully just my problem.)
Attached is the SSDT-TRX40-FixShutdown-USB file. It must be paired with two other files and used in the ACPI section in the order shown below. The order is important because FixShutdown attaches to site XHC that is created by the other two files. All of the TRX40 mobo's IORE files, which I've seen, have these USB devices so I think everyone can use them. However, for you @meina222, you'll need to edit the BYD8 file to remove, as I recall, PRT5 in order to cancel your BT/WiFi device.Back-to-the-future: we now know that proper Shutdown requires a good MmioWhitelist for your mobo. See this post to create that list.
-
 1
1
-
-
As for SSDT-Shutdown, I've already confirmed that the patch (below) has indeed a _PTS function inside our DSDT file (bottom). So the call should work.Next step is finding attachment site for the SSDT call. The original site is "_SB.PCI0.XHC_.PMEE" which doesn't exist on our mobo. I have created an XHC, but I think wrong site for attachment. I originally tried the USB site at D0B8 and the computer would not boot.Again, the patch is enabled along with the SSDT-Shutdown file; neither by itself will work. -
13 minutes ago, meina222 said:
Thank you! Will enable the quirk. So emulated NVRAM works but shutdown fails miserably. I think this is due to my USB/onboard devices, but now I don't even get restart. So I am trying to see if the FixShutdown-USB-SSDT from OC guide will make a difference. I did a clean install after the BS failure so I haven't reapplied your USB SSDTs yet. What do you think the FixShutdown-USB-SSDT should look like for our boards?
I will definitely try to fix native NVRAM. Emulated seems easier goal for less experienced user like me (this is my 1st Hackintosh project and TRX40 seems far from beginner platform). My concern now is that even if I fix native, I'd still see these reboot freezes - I saw them when I enabled ProtectUefiServices last night.
Yes, this is the next SSDT I was going to work on. It must be paired with a patch. The problem was attaching it to a USB device. Through yesterday, I was still sorting out USB devices with custom SSDT files. I'll work on it shortly.
All ports are now accounted for and re-named. (I can provide custom SSDTs if anyone wants. I just need more recent IORE file to study).
***
As far as USB go, I seem to recall one of your posts indicating that you'd created a USB-Ports kext to limit USB ports. In my exposure to AMD platforms, I've not yet seen a USB device that has more than 10 USB connections. The 15 USB macOS limit is per device not per machine. So I've seen no need to create any USB limits for AMD to date. (Intel is different, they have sometime 20 USB connections on one device.)
-
1
-
-
2 hours ago, meina222 said:
@iGPU, thank you for the detailed guide.
Edit:
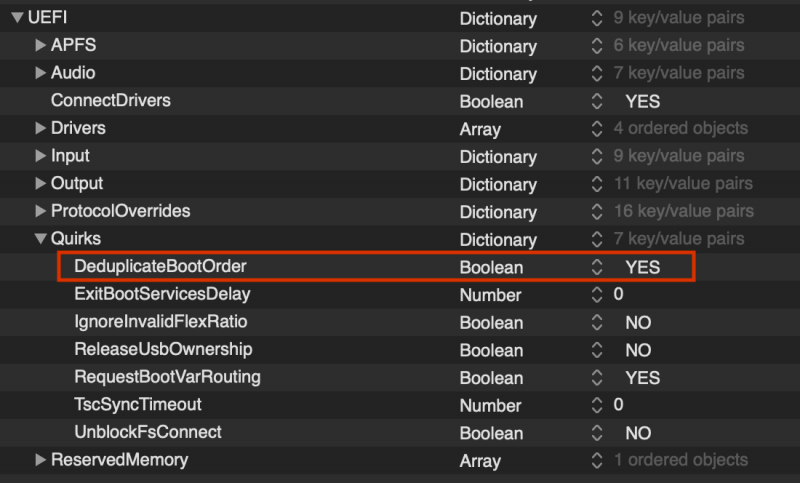
I tried to add emulated NVRAM following the OC guide. That didn't go well. My hack now hangs on shutdown or restart so I have to manully power cycle the PC to reboot. I also see duplicated boot entries in my BIOS. I did see the nvram.plist created in the EFI. The opposite of what I expected - intsead of it being safer it now seems it's messing up BIOS
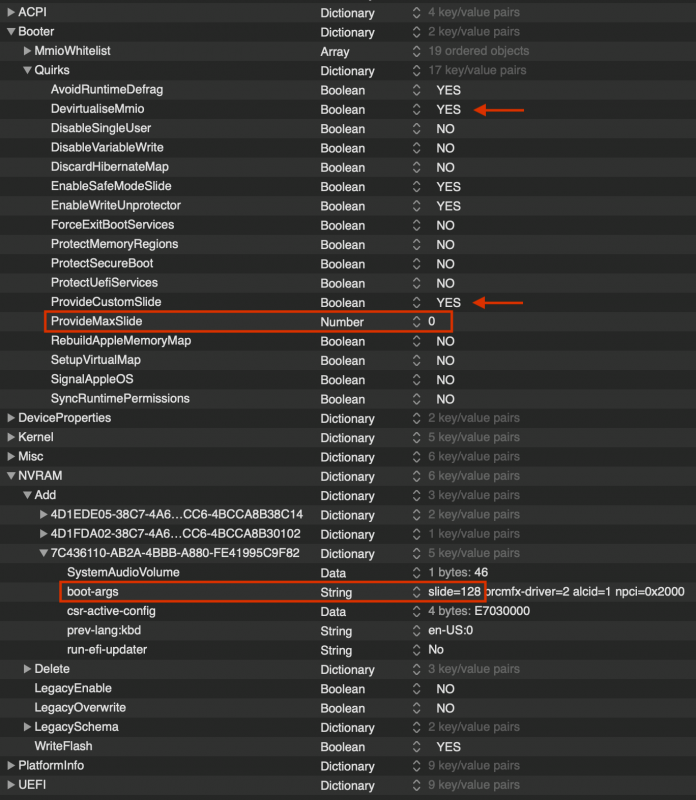
Those very duplicate boot entries is why OpenCore has this (red box) to eliminate those duplicate entries. It sounds like you should enable this Quirk.
-
1
-
-
On 8/16/2020 at 10:59 AM, meina222 said:
@iGPU, thank you for the detailed guide. May I ask - did you try to emulate NVRAM? I see this is an option from the past for X299 boards. Aside from not being able to see the nvram output from console and having to use logout hooks, I would think this is a safer and more robust option. My real concern with the white list and slide is that this is very opaque and poorly understood by me, and might be too sensitive to future hardware reconfigurations or bios updates.
After the failure of Big Sur beta installer, I am thinking that I should probably stick with Proxmox for a more "production like" environment and play with Catalina bare metal to just have something to learn configuring a bare metal hack on.
I've just finished extensive re-editing of my previous post. A notable error was fixed (Booter/Quirks/ProvideMaxSlide should remain at "0") and the
slide value placed in boot arg section.EDIT: slide not needed.
-
On 8/16/2020 at 12:34 AM, meina222 said:
Ok. I give up for the time being. I think I'm glazing over all this custom slide, custom SSDT stuff without really understanding what the differences are from board to board. I think I pretty much have the same problem as you, but it's unclear if these whitelist magic addresses will be applicable without me trying to find them myself. Is there a link where this method of finding out which values are enabled and which not, is explained? Do you mind posting a bit more on that tomorrow? Much appreciated.
I'll lay out the steps I went through to derive the MmioWhitelist. But first I want to say that aside from the slide value of 128, I'd tried various OC combinations to obtain native NVRAM including using the new SSDT-NVRAM. None worked. Only when combining the Quirks reported above and MmioWhitelist and using the SSDT-TRX40-NVRAM did native NVRAM work on bare metal.
Steps for deriving MmioWhitelist (make certain that you have an alternative bootable EFI, as you'll see below):
A. MmioWhitelist Determination
EDIT: Updated from future link at step 4. Initial steps for creating the debug file are still accurate.
1. Run OC debug version (≥ v059; even if you can't fully boot into macOS, you'll have sufficient data written out on the next boot with a non-debug, working version).
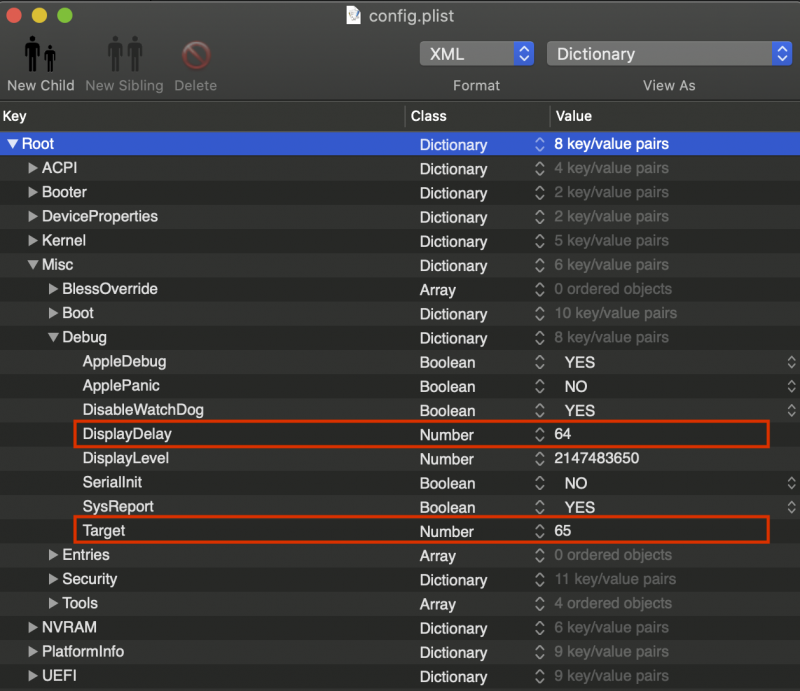
a. debug OC settings (spoiler):
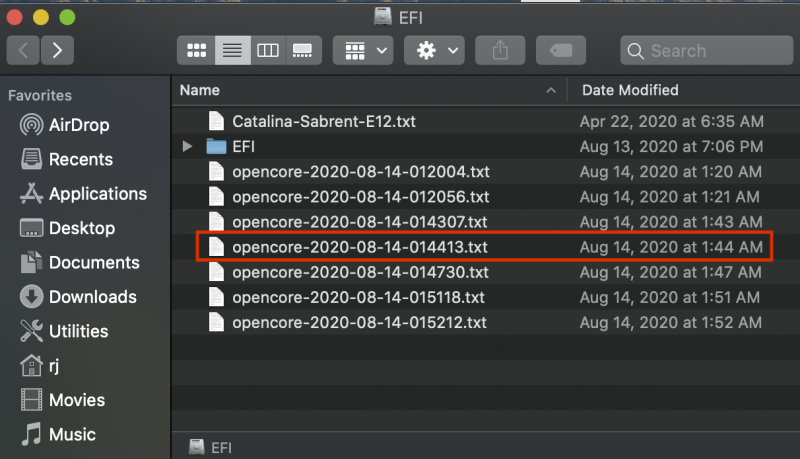
Spoilerb. after running OC-debug, you'll see following on the EFI boot partition; choose one to open (spoiler):
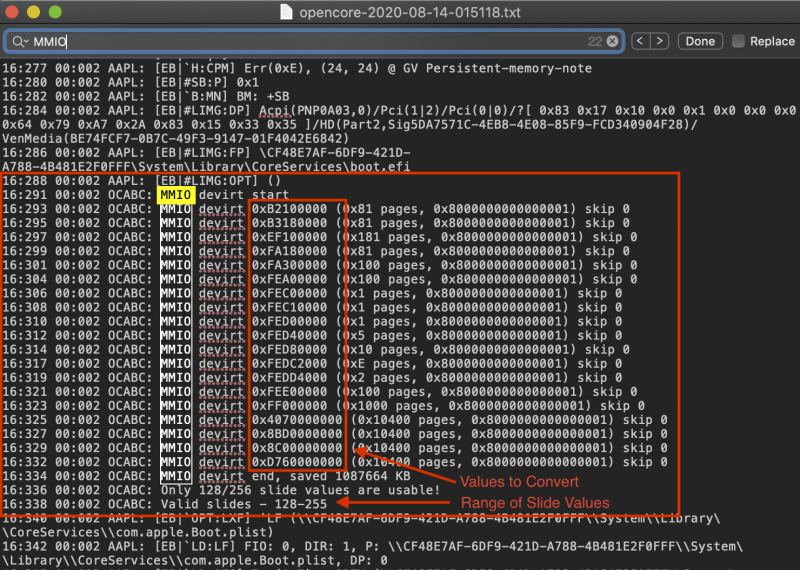
Spoiler2. Edit debug text. Once the above text file is open and search for MMIO (spoiler; press press <Cmd><f>, enter "MMIO", then repeatedly press <Cmd><g> until you see list below).
a. note the MMIO value range and the permissible Slide value range:
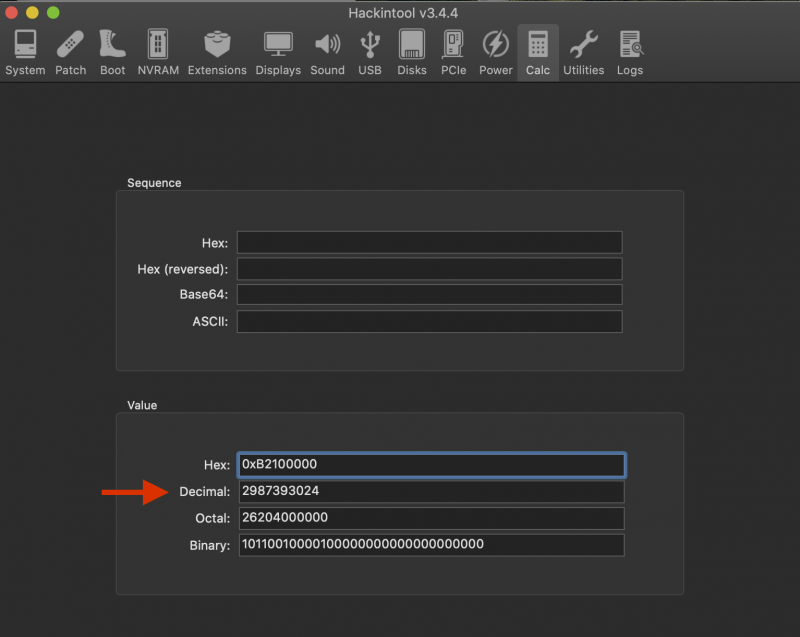
Spoilerb. the 0xYYYYYYYYYY values are copied one-by-one into a calculator (I use the calculator in Hackintool):
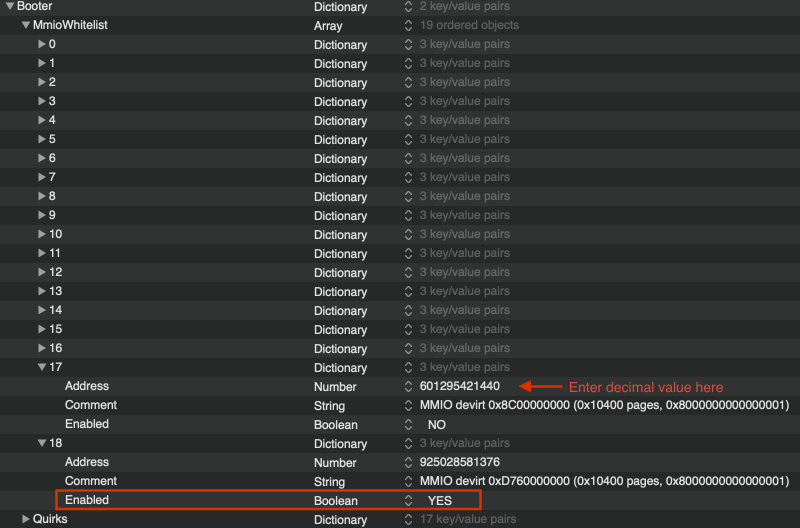
Spoiler3.After converting each of the MMIO hex values into decimals, enter those values (and any optional comments) into Booter/MmioWhilelist (spoiler). Initially, leave all entries disabled (no):
Spoiler4. Back-to-the-future: we now know a simpler way to create an MmioWhitelist for your mobo. See this to create that list. A proper MmioWhitelist is needed for proper Shutdown functionality as well as native NVRAM.
B. Slide Calculation (left as an FYI reference, but not seemingly needed, so don't waste your time with it)
1. memmap calculations
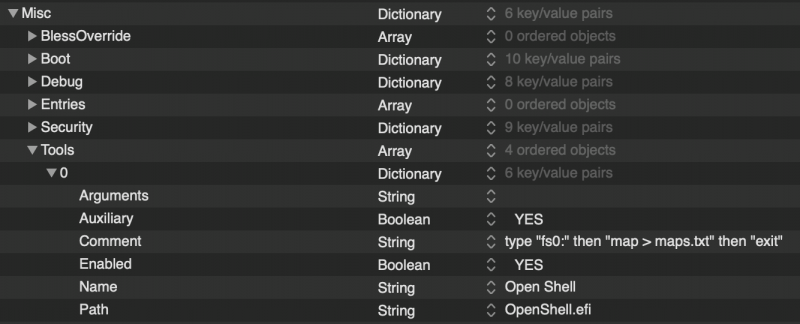
a. to run memmap, you need to have OpenShell enabled in OpenCore:
Spoilerb. boot into OC menu system and select "Open Shell" (or however you named it above).
you'll then see "shell> ", type "fs0:" then type "ls" and see if you see the EFI folder. Is so, then type: "meemap > meemap.txt"
fs0:\> meemap > meemap.txt
fs0:\> exit
c. after typing exit above, you'll return to the main OC menu and boot normally into macOS
d. open the EFI partition (if you have more than one, it may not be on the boot EFI, so look around at other drives)
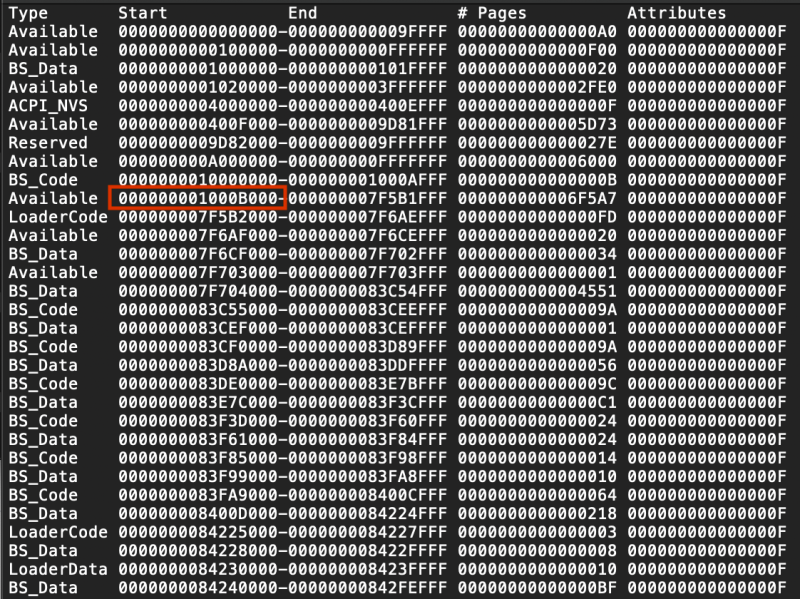
e. locate the file mammal.txt and copy to desktop. once this file is open, you'll see something like this (here, only top portion of the large file):
Spoilerf. OC guides say to start at bottom of list (Start column only). if you do, you'll calculate a slide value something like 2047; some such nonsense.
instead start near top and find the largest value that is ≤ 255. The optimum is highlighted by red box above. the value immediately below
calculates to a slide of 1018, which is also nonsense. The one in the red box will calculate to 127 as shown next, so this is the largest value
that is ≤ 255.
g. calculations are done in 2 basic steps using the macOS calculator ( type <cmd> <3> to select the Programmer mode):
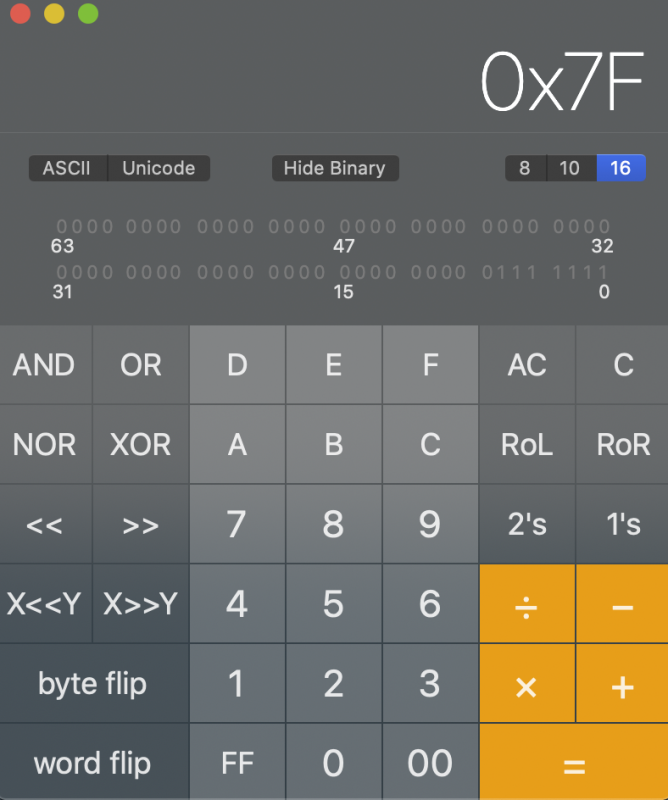
i. the value from above red box is 000000001000B000 which is 0x1000B000 in hex. we'll do all math in hex.
next, subtract and divide this value as follows (copy and paste from here; the trailing zeros are important):
( 0x1000B000 - 0x100000 ) / 0x200000 = 0xFF0B000 / 0x200000 = 0x7F ( 0x7F = 127 in decimal )
Spoilerii. the 2nd step is verifying above result to see if the decimal value of 1 needs to be added. verification means
taking the above answer, 0x7F and reversing the calculation to see if we get the original hex value. If we do,
then 0x7F is our final answer (and slide is the decimal value of this, or 127). If it calculates to a different value,
then we must add the decimal value of 1 to 127, which means the true slide value is 128.
Reversing the equation:
( 0x7F x 0x200000 ) + 0x100000 = 0xFE00000 + 0x100000 = 0xFF
since 0xFF ≠ 0x7F, the actual slide value is 127 + 1 = 128
2. Using the Slide calculation result
the result of step 1-g-ii above is your slide value to be entered into the boot arg section as shown in the spoiler below.
the ProvideMaxSlide value's default is 0, which means that OC will accept a boot arg slide value ranging from 0 to 254.
any value other than 0 will be the maximum value of a slide boot argument; best to leave as default 0.
(And oddly enough, this is the same value I'd chosen from above MmioWhiltelist section of 128.)
Spoiler-
2
-
-
35 minutes ago, meina222 said:
@iGPU - what is the last stable OC version for which to get debug?
Any from v059 will do (I think v060-final is about the best). Most data is written while booting and so even if it doesn't fully boot, you'll get this data.
***
Well, shutdown almost works. Before activating NVRAM, computer would effectively do a re-start. Now, the switches click off but then immediately it powers back on and boots (panic reboot). At this point, the panic reboot could be triggered by USB devices connected to the computer. I'll need to test some more tomorrow.
-
1
-
-
On 8/15/2020 at 11:36 PM, fabiosun said:
Mmmmh interesting..but slide value maybe differs from different pc configuration
how do you have calculated this value for your pc?
have you have done memmap calculation procedure?
I based on what I reported above. The value range came from OC's debug report associated with MmioWhitelist. I simply tried the first one, 128 and it worked.
EDIT: a Slide is not needed.
-
1
-
-
Yeehaw! I got NVRAM working (again, I do not know if the values below are CPU or mobo dependent; but worth a try).
Test in Terminal:
a) enter: sudo nvram myvar=test
b) verify: nvram -p | grep -I myvar
c) reboot
d) run nvram -p | grep -I myvar (if you only run "nvram -p" you'll see all stored values)
e) clear test: sudo nvram -d myvar
Use the following settings in OpenCore:
1. Slide =not needed2. The MmioWhitelist value (its derivative in complicated; better described in future post here).
3. DevirtualiseMmio enabled
4. SSDT-NVRAM
EDIT: we now know that proper Shutdown requires a proper MmioWhitelist for you mobo, see above link for MmioWhitelist.
-
1
-
-
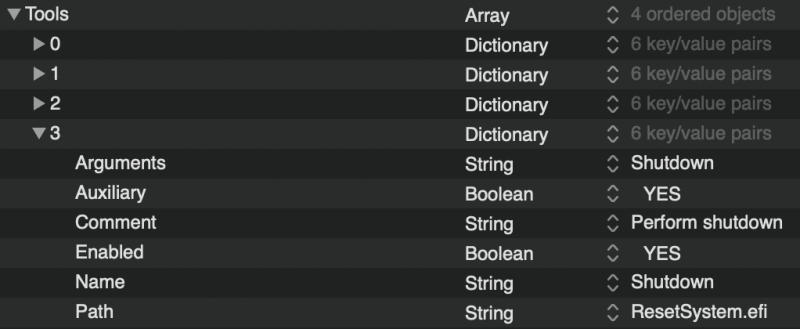
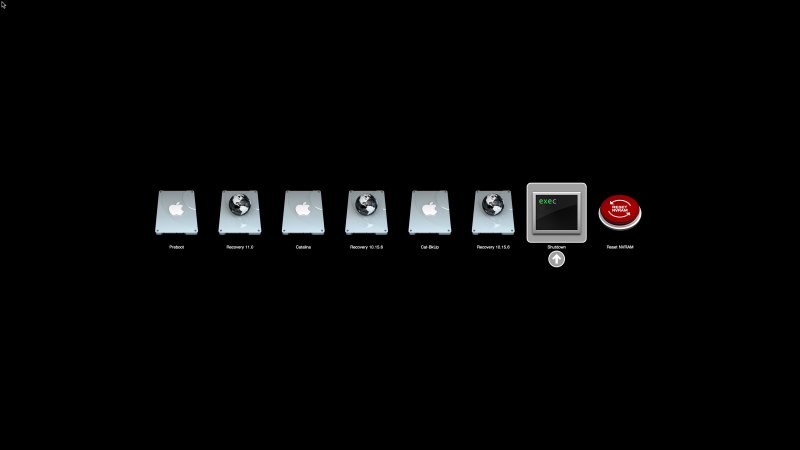
Until we get system shutdown working, using the ResetSystem.efi works:
It creates an Auxillary shutdown button:
So when macOS is shutdown, the computer starts up again, I press the space bar to reveal "Shutdown" and this turns the computer off. (BTW, those buttons are not stock but were present in the EFI I uploaded earlier in this thread.)
-
At the bottom of the MMIO debug section, it said:
18:289 00:002 OCABC: Only 128/256 slide values are usable!18:291 00:002 OCABC: Valid slides - 128-255So maybe a slide value needs to be entered? I'll give that a try too.EDIT:
SLIDE IS NOT NEEDED.
***
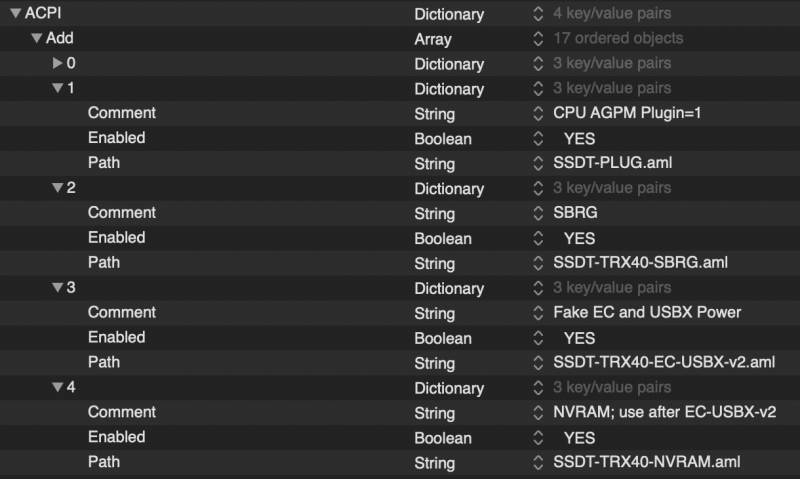
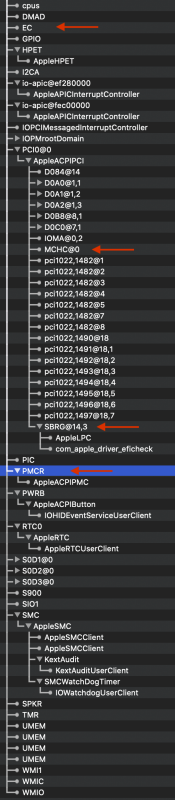
I'll try combining that with a SSDT-NVRAM. I'll upload so that you all can try too. In the Docs section, there is an SSDT-NVRAM that is used to attach PMCR to LPCB (so that it is activated before PCI devices). But in our TRX40s, LPCB does not exist. It was, as described, an arbitrary attachment site. I decided to use MCHC, since it has a similar structure in IORE (based on my studying earlier today an Intel Z390 Designare). MCHC is created in the SSDT-EC-USBX-v2 that I uploaded earlieir, and accordingly, SSDT-NVRAM must come after as follows:
The binding looks like this in IORE:
-
I did some more testing of MmioWhitelist and DevirtualiseMmio, and I don't understand it.Back-to-the-future: we now know that proper Shutdown requires a proper MmioWhitelist for you mobo. See this post (future) to create that list.
I thought the idea was to be able to disable DevirtualiseMmio, since this is supposedly confounding NVRAM. I obtained a set of MmioWhitelist that allowed booting, but while DevirtualiseMmio was enabled. I then disabled DevirtualiseMmio and used the bootable MmioWhitelist to attempt to boot into Catalina. It did not boot. I then reversed the enabled/disabled items in MmioWhitelist, and this too did not boot (DevirtualiseMmio was again disabled).So I fail to see the benefit of MmioWhitelist since no matter what their settings, DevirtualiseMmio needs to be enabled. Can someone please enlighten me? -
14 minutes ago, tsongz said:
Another thing I found, CFG-Lock doesn't seem to be supported, at least on the AsRock Creator MB, and I've read for AMD CPUs, it was something that was recommended for boot issues as well. I went through the BIOS using UEFITool.
CFG Lock doesn't apply to AMD.
-
I've been mostly working on NVRAM (which does not work) and Shutdown. No success with either, but maybe getting closer as I'll describe below.
Meanwhile, I've managed to get better creation of EC and MCHC, as compared to how they function on the Intel side. They should work on all of our TRX40 mobos.
I think I also have one for NVRAM, but I was reading on Discord (responses to fabiosun) about how our use of DevirtualiseMmio may have broken NVRAM. So I've spent most of this afternoon chasing down MmioWhitelist. I found the following using OC debug (this may only apply to the 3970X chip: I honestly don't know. The numbers to the right are the calcuated values of the hex humber on the left.
Spoiler18:245 00:002 OCABC: MMIO devirt start
0 MMIO devirt 0xB2100000 (0x81 pages, 0x8000000000000001) 2987393024
1 MMIO devirt 0xB3180000 (0x81 pages, 0x8000000000000001) 3004694528
2 MMIO devirt 0xEF100000 (0x181 pages, 0x8000000000000001) 4010803200
3 MMIO devirt 0xFA180000 (0x81 pages, 0x8000000000000001) 4195876864
4 MMIO devirt 0xFA300000 (0x100 pages, 0x8000000000000001) 4197449728
5 MMIO devirt 0xFEA00000 (0x100 pages, 0x8000000000000001) 4271898624
6 MMIO devirt 0xFEC00000 (0x1 pages, 0x8000000000000001) 4273995776
7 MMIO devirt 0xFEC10000 (0x1 pages, 0x8000000000000001) 4274061312
8 MMIO devirt 0xFED00000 (0x1 pages, 0x8000000000000001) 4275044352
9 MMIO devirt 0xFED40000 (0x5 pages, 0x8000000000000001) 4275306496
10 MMIO devirt 0xFED80000 (0x10 pages, 0x8000000000000001) 4275568640
11 MMIO devirt 0xFEDC2000 (0xE pages, 0x8000000000000001) 4275838976
12 MMIO devirt 0xFEDD4000 (0x2 pages, 0x8000000000000001) 4275912704
13 MMIO devirt 0xFEE00000 (0x100 pages, 0x8000000000000001) 4276092928
14 MMIO devirt 0xFF000000 (0x1000 pages, 0x8000000000000001) 4278190080
15 MMIO devirt 0x4070000000 (0x10400 pages, 0x8000000000000001) 276756955136
16 MMIO devirt 0x8BD0000000 (0x10400 pages, 0x8000000000000001) 600490115072
17 MMIO devirt 0x8C00000000 (0x10400 pages, 0x8000000000000001) 601295421440
18 MMIO devirt 0xD760000000 (0x10400 pages, 0x8000000000000001) 925028581376
18:287 00:002 OCABC: MMIO devirt end, saved 1087664 KB
18:289 00:002 OCABC: Only 128/256 slide values are usable!
18:291 00:002 OCABC: Valid slides - 128-255
They end up being plugged into OC:
Spoiler<key>MmioWhitelist</key> <array> <dict> <key>Address</key> <integer>2987393024</integer> <key>Comment</key> <string>MMIO devirt 0xB2100000 (0x81 pages, 0x8000000000000001)</string> <key>Enabled</key> <true/> </dict> <dict> <key>Address</key> <integer>3004694528</integer> <key>Comment</key> <string>MMIO devirt 0xB3180000 (0x81 pages, 0x8000000000000001)</string> <key>Enabled</key> <true/> </dict> <dict> <key>Address</key> <integer>4010803200</integer> <key>Comment</key> <string>MMIO devirt 0xEF100000 (0x181 pages, 0x8000000000000001)</string> <key>Enabled</key> <true/> </dict> <dict> <key>Address</key> <integer>4195876864</integer> <key>Comment</key> <string>MMIO devirt 0xFA180000 (0x81 pages, 0x8000000000000001)</string> <key>Enabled</key> <true/> </dict> <dict> <key>Address</key> <integer>4197449728</integer> <key>Comment</key> <string>MMIO devirt 0xFA300000 (0x100 pages, 0x8000000000000001)</string> <key>Enabled</key> <true/> </dict> <dict> <key>Address</key> <integer>4271898624</integer> <key>Comment</key> <string>MMIO devirt 0xFEA00000 (0x100 pages, 0x8000000000000001)</string> <key>Enabled</key> <true/> </dict> <dict> <key>Address</key> <integer>4273995776</integer> <key>Comment</key> <string>MMIO devirt 0xFEC00000 (0x1 pages, 0x8000000000000001)</string> <key>Enabled</key> <true/> </dict> <dict> <key>Address</key> <integer>4274061312</integer> <key>Comment</key> <string>MMIO devirt 0xFEC10000 (0x1 pages, 0x8000000000000001)</string> <key>Enabled</key> <true/> </dict> <dict> <key>Address</key> <integer>4275044352</integer> <key>Comment</key> <string>MMIO devirt 0xFED00000 (0x1 pages, 0x8000000000000001)</string> <key>Enabled</key> <true/> </dict> <dict> <key>Address</key> <integer>4275306496</integer> <key>Comment</key> <string>MMIO devirt 0xFED40000 (0x5 pages, 0x8000000000000001)</string> <key>Enabled</key> <true/> </dict> <dict> <key>Address</key> <integer>4275568640</integer> <key>Comment</key> <string>MMIO devirt 0xFED80000 (0x10 pages, 0x8000000000000001)</string> <key>Enabled</key> <true/> </dict> <dict> <key>Address</key> <integer>4275838976</integer> <key>Comment</key> <string>MMIO devirt 0xFEDC2000 (0xE pages, 0x8000000000000001)</string> <key>Enabled</key> <true/> </dict> <dict> <key>Address</key> <integer>4275912704</integer> <key>Comment</key> <string>MMIO devirt 0xFEDD4000 (0x2 pages, 0x8000000000000001)</string> <key>Enabled</key> <true/> </dict> <dict> <key>Address</key> <integer>4276092928</integer> <key>Comment</key> <string>MMIO devirt 0xFEE00000 (0x100 pages, 0x8000000000000001)</string> <key>Enabled</key> <true/> </dict> <dict> <key>Address</key> <integer>4278190080</integer> <key>Comment</key> <string>MMIO devirt 0xFF000000 (0x1000 pages, 0x8000000000000001)</string> <key>Enabled</key> <true/> </dict> <dict> <key>Address</key> <integer>276756955136</integer> <key>Comment</key> <string>MMIO devirt 0x4070000000 (0x10400 pages, 0x8000000000000001)</string> <key>Enabled</key> <false/> </dict> <dict> <key>Address</key> <integer>600490115072</integer> <key>Comment</key> <string>MMIO devirt 0x8BD0000000 (0x10400 pages, 0x8000000000000001)</string> <key>Enabled</key> <false/> </dict> <dict> <key>Address</key> <integer>601295421440</integer> <key>Comment</key> <string>MMIO devirt 0x8C00000000 (0x10400 pages, 0x8000000000000001)</string> <key>Enabled</key> <false/> </dict> <dict> <key>Address</key> <integer>925028581376</integer> <key>Comment</key> <string>MMIO devirt 0xD760000000 (0x10400 pages, 0x8000000000000001)</string> <key>Enabled</key> <true/> </dict> </array>
When I ran tests, turning each one on at a time and re-booting, I found that I could boot into macOS, with DevirtualiseMmio enabled, if the following were enabled: 0, 1, 2, 3, 4, 5, 6, 7, 8, 9, 10, 11, 12, 13, 14, 18 and the following disabled: 15, 16, 17. That's what's reflected in the above table. Now I'm trying to figure out what to do with this information. From the Discord comments, it sounds like we want to now disable DevirtualiseMmio to get NVRAM working. More testing later.
-
1
-
-
Has anyone been able to boot bare metal into Big Sur?
-
6 hours ago, fabiosun said:
@all
are you sure nvram is working and maintained in your trx40 system?
in guide section there is a way to verify it
very curious about it
NVRAM is not working on Catalina bare metal with OC v061.
-
1
-
-
11 minutes ago, tsongz said:
Now the only thing that's left is figuring out why MacOS won't shut down/reboot properly. I feel like it has something to do with RTC settings/flags, but haven't validated that yet. Figuring out that last step, this is a full fledged bare metal TRXintosh! Everyone here is awesome for being so helpful and responsive, and major kudos and credits to everyone involved.
I've tried a couple of SSDT/patches and so far no success in preventing the shutdown reboot loop.
I had this issue with a Z390 build. I think I fixed it by settings in BIOS and boot loader, but that was on Intel
-
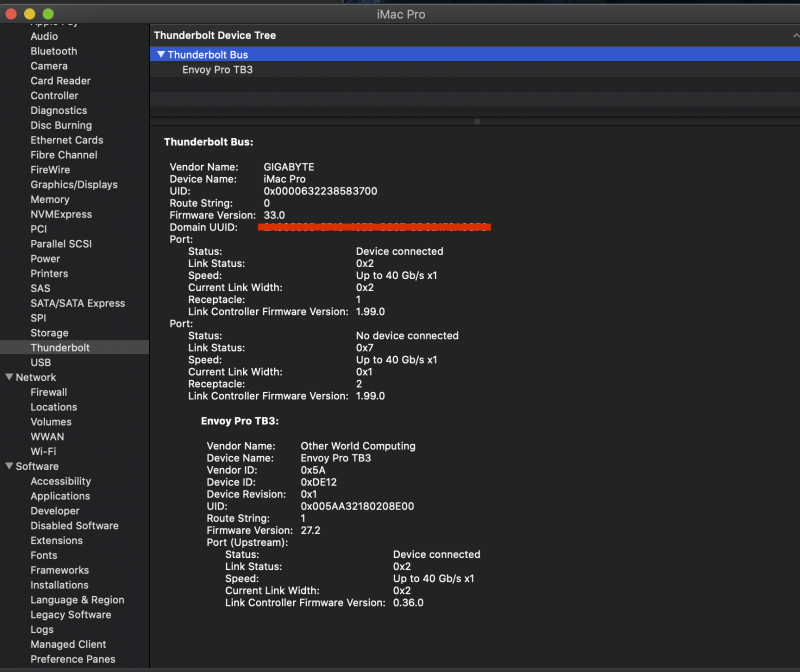
I sourced an old GB-Titan Ridge AIC (previously flashed). The TB part works great, but not the USB. Very odd.
I know that the card is good as it does have proper TB/USB when used in other machines, including an AMD X570.
Shown below is what's seen when a TB HD is connected to one port; ideal result:
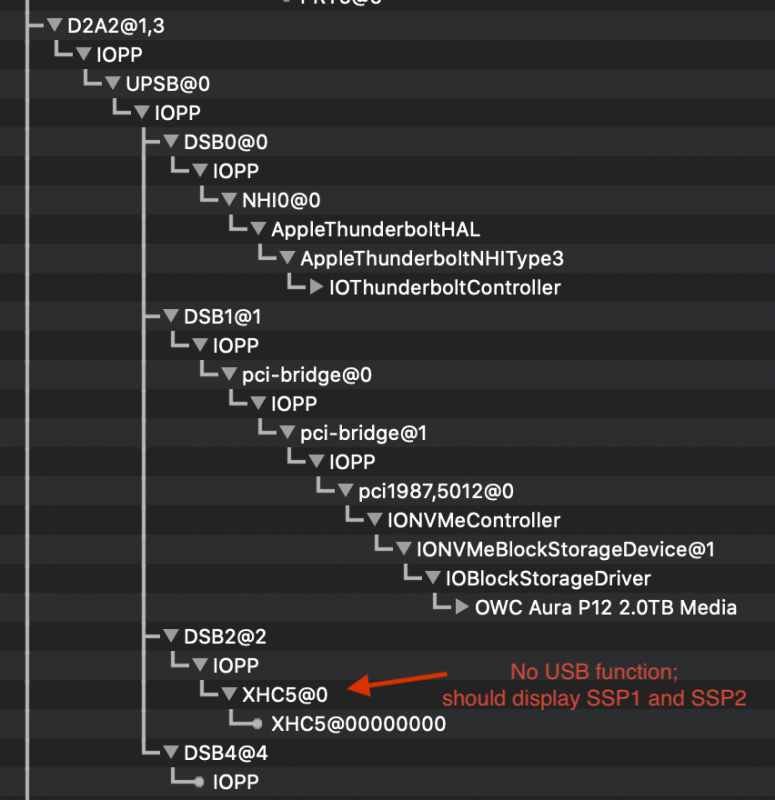
The other port has a USB-C drive connected, but the drive does not mount:
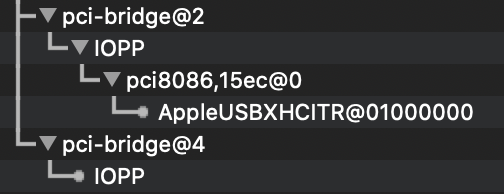
Without a TB SSDT, there is only 1 device shown under the 15ec USB section. This is not correct. There should be 4 items listed, not 1:
-
On 8/13/2020 at 8:05 PM, meina222 said:
@iGPU- thanks for the nvram tip - I'll try it. I don't experience CMOS reset but I experience slowness and funkiness of NVME on reboot. I'll try NVRAM.
Q on SDDT - I noticed in MaciASL that you added port addresses closely matching iMacPro's SSDT (I presume) - the one where you disabled the AX200. With this, is there a point of me trying to generate a kext with Hackintool and remove whatever doesn't work to bring it to a smaller set? Or should I just leave it as. Most of my ports seem to work - but I've heard that if you narrow your set and disable limit of 15 removal your system would behave more stable and with perhaps better power management on devices - myth or truth?Finally able to get some sane explanation on this:
https://aplus.rs/2020/usb-mapping-why/
https://aplus.rs/2020/usb-mapping-how/
Will study these more. I think something that may be of use for me in this guide is that I have 2 XHC0 controllers so it maybe beneficial to rename one of them.
I'd given you other re-names, but they overlapped with the AX200 eliminator SSDT. So I re-did the batch for you. I think you can safely use all of them. Note that there is a v2 of the EC-USBX SSDT file.
-
1
-
-
3 hours ago, meina222 said:
Your latest SSDT worked to disable the AX200! You got this!!
I have BT now working and enabled. I also finished the Catalina 10.15.6 suppl. update without an issue.
I was able to track down my delayed boots to one of my AIC NMVE's failing to initialize. I use the in the VM zfs pool - 4 NVMEs in the Aorus PCI riser. Not sure if this is MacOS's fault. I haven't applied your NVME SSDT yet. As switching off PSU power switch recovers it, it's not a faulty NVME but rather some power mismanagement.
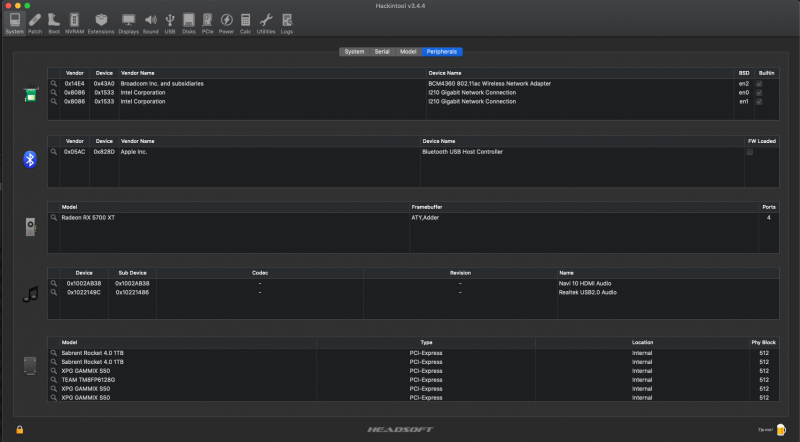
Attached is latest IOReg explorer file and screenshot of Hackintool confirming disappearance of AX200.
I happy this worked!
This is technique I'd used on the X570 build. Basically, the SSDT simply re-defines all of the USB ports as is done in DSDT file, but leaving out PRT5. PRT5 then disappears.
I also re-named the 2 USB devices XHC and XHCI, but did not try to re-name PRTx or HS0x.
If you study the SSDT you'll understand how it works. If you ever wanted to re-activate PRT5, just enter it into the list, being careful of the port numbers.
-
1
-
[Discussion] - TRX40 Bare Metal - Vanilla Patches
in General
Posted
I think that a fresh install is tricky. It was easy to install via VM. I kept an EFI on an external USB drive and used that to repeatedly attempt to boot into Big Sur. When it didn't work, I shut down computer and transferred the USB drive (1 TB SSD) to my laptop where I edited the EFI/config file. And cyclically repeated this process until it booted into Big Sur.
For first boot, I'd disable most SSDT and kexts. One key were the Booter/Quirk settings. I've since removed most of the boot arg (only using slide=128 brcmfx-driver=2) and have still gotten into BS.
That reminds me, what is your SMBIOS? I have things set up for iMacPro1,1. If you're running as MacPro7,1 things may be more finicky. (I personally think iMacPro1,1 is much better and more reliable; but to each their own.)
From readings, having car-active-config in the delete section is important for OC NVRAM behavior, shown highlighted below: