

iGPU
-
Posts
573 -
Joined
-
Last visited
-
Days Won
17
Content Type
Profiles
Forums
Events
Downloads
Posts posted by iGPU
-
-
8 minutes ago, Pavo said:
All good now, now.... has anyone tried install BigSur from installer? I can boot already installed BigSur, but remember trying earlier and couldn't get past second install phase.
The EFI works for installation. I've installed from both USB and applications folder. Original here. But you have same EFI with extra SSDTs, so no advantage re-downloading.
If you want to remove Snapshot partition see here. For removal of seal during install, see here. (Remove seal during install, then remove Snapshot.)
-
5 minutes ago, Pavo said:
Ok cool thanks, all I needed was the PMCR SSDT, all good now.
Let me know how it works. I've certainly enjoyed using your software, so a pleasure if I can return a favor.
If you were to read through the old posts, I initially used a calculated slide value (slide=128 as boot arg), but saw no advantage and stopped using. The MmioWhitelist, WriteFlash=Yes, and other Quirk settings are all that seem to be needed for native NVRAM on our TRX40.
-
3 minutes ago, Pavo said:
When you do the MMIOWhitelist do you disable the DisableVariableWrite quirk? If I disable that stupid quirk, macOS boots but I don't get any video. Only with it enabled do I get video.
Here I whipped this up for you just now. Only need to fill-in SSN stuff. I included my SSDTs for this board, only changing the fact that you use 1 Radeon VII and I have 2. This could change some DevProp stuff I left in place as I don't know your exact NVMe set up. So please re-check those.
I removed TB references since I think you're not using.
(EFI deleted after download.)
-
2 hours ago, Ploddles said:
Happy to report that I managed to install BS onto an NVMe thanks to @iGPU's EFI. No issues with it at all at the moment.
The only remaining problem I have is the lack of any SATA drives once Catalina or BS load up. I can see them at the Opencore Picker and within Windows and Mint, so it is restricted to macOS. As I have pretty much no idea when it comes to SSDTs, I'm guessing the problem, and solution, will be in there somewhere.
Attached is my IOREG if anyone can point me in the right direction.
Thanks.
I'm not certain why you're not seeing a SATA drive. I do nothing special for SATA drives. I only use the basic EFI I've previously uploaded with some customized SSDTs. However, none of the SSDT or anything I've done to the EFI or config.plist file specifically address SATA drives.
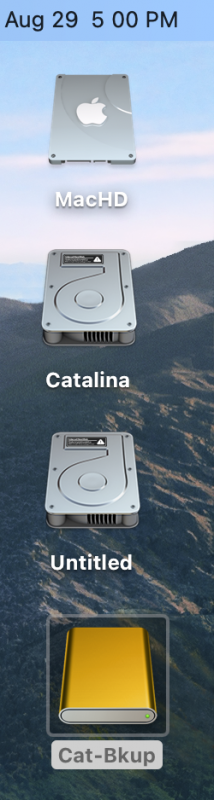
I can see the 1 of the 3 SATA drives I presently have running (there is a 4th 10TB drive I use for backup but it's a bit noisy and I only connect when backing up things). I have a Catalina back on a SATA drive as shown below. The "Untitled" drive is a Win10 NVMe drive (and Win10 is somehow corrupted and and won't boot... annoying but I dislike Windows so expect nothing less). The bottom drive is Cat-Bkup, the SATA drive (ignore the fact that it's yellow suggesting an external drive; it is not external).
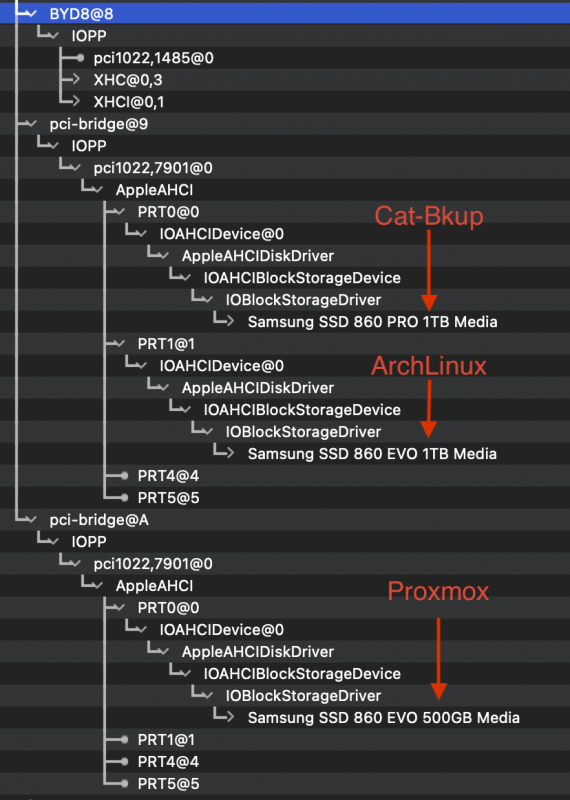
The other 2 SATA drives contain Linux. They're described in bottom image.

All of my SATA drives appear under BYD8 (below XHC and XHCI). Since the bottom two are Linux. they don't appear on the macOS desktop (unless you add some extra software, but not worth the effort as it is risky to edit from a Mac).
PAVO:
25 minutes ago, Pavo said:So.... you has working NVRAM for TRX40? How did you get it working? This stupid Booter > Quirks > DisableVariableWrite variable is pissing me off.
Yes, I got it working several days ago. It required setting up MmWhitelist. Since you and I have same set up, I'll send you my EFI for a trial run.
-
3 hours ago, meina222 said:
@iGPU, My attempt to define my ports (and remove that PRT5 that is the AX200 BT as you showed me earlier) is attached.
That's weird - file was there (forgot to add .aml but I don't think that matters if name matches).
Update: BT fixed. I erased and reapplied the SSDT and changed its name to have .aml (latter wasn't the issue I think but better for consistency). Must have had some subtle typo.
I still do get occasional failures to boot as if my MMIO is not correct but it is non-deterministic.
OK, I changed a few things, re-arranging SSDTs. I also commented out 2 DevProp entries. If DevProp are wrong, they'll mess up a boot; better none than wrong. (I'd need a PCI.txt output from Hackintool to verify. In fact, when I work up stuff I use that file and IORE to work on config.plist entries.) The newer SSDTs are more streamlined than what I'd uploaded earlier (now removed) in this thread (the 'renaming' SSDT is no longer required).
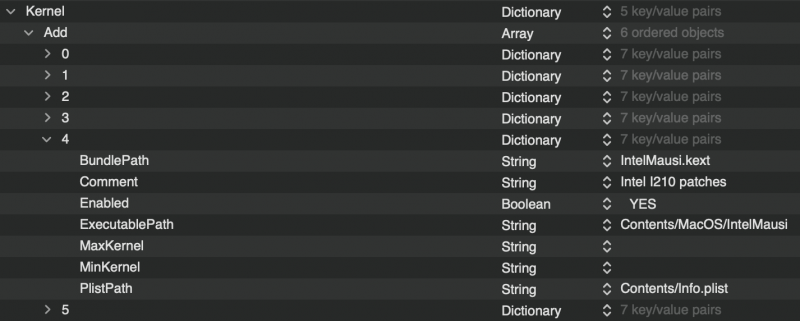
and I disabled the Aquantia patch since it's not applicable to your mobo:
I also removed un-used kext entries and swapped out the I211, replacing it with the I210 kext (IntelMausi).
EFI deleted.
-
 1
1
-
-
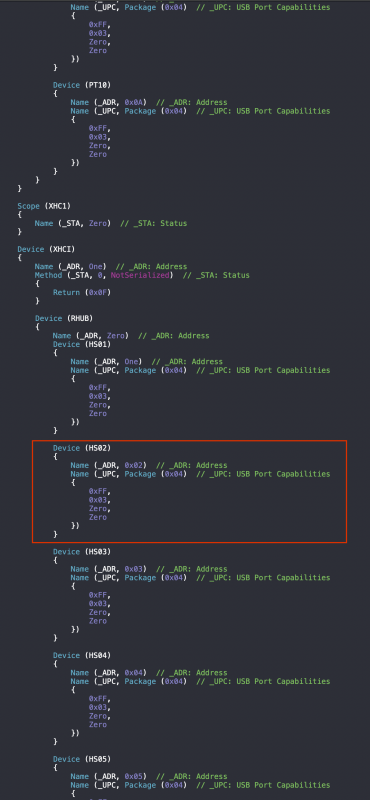
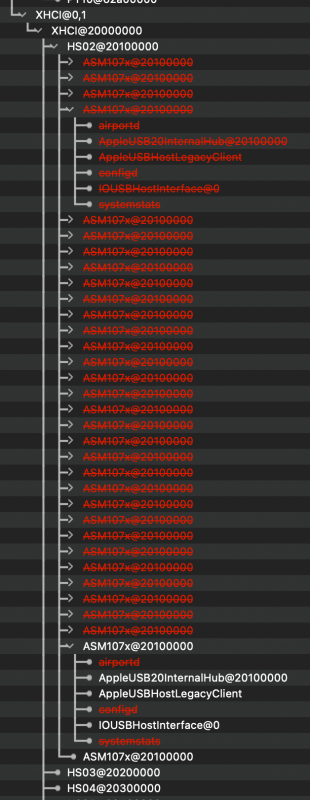
This is a follow up on how to remove HS02 from XHCI. You cannot remove HS02 until you define something. The attached SSDT (8-SSDT-TRX40-BYD8-XHC-XHCI-complete.aml) defines all ports in both XHC and XHCI located at S0D2/DYB8.
Again, the SSDT defines all of the ports. If you need to remove any other port, such as for BT/Wifi, be my guest. I would suggest duplicating this SSDT and not actually using it. That is, delete whatever you wish from the duplicate and re-name the modified duplicate to something like 8-SSDT-TRX40-BYD8-XHC-XHCI.aml
Needless to say, only load the modified SSDT (not the *-complete version).
The "8-" in the file name is because I have others SSDTs to load and like to define an order of loading. This is a holdover from Clover, which loads files based on file name; OpenCore forces you to specify the order of ACPI and Kext file loading based on file entry order in the ACPI/Add and Kernel/Add sections. So the "8-" is superfluous.
Shown below is an excerpt from the attached SSDT. Only the XHCI section is shown (the XHC section extends above with only the last PR10 port revealed).
Highlighted is the HS02 port that needs removing (based on my post above; your requirement may differ!). Simply delete the entire HS02 definition (or whatever other port on your system that needs removal). Re-save the file as described above and load that SSDT in OpenCore. On re-boot HS02 will no longer be displayed in IORE. Please note that this is reversible: if you add HS02 back to the SSDT and re-boot, HS02 will re-appear as these mods are non-destructive to hardware.
8-SSDT-TRX40-BYD8-XHC-XHCI-complete.aml.zip
-
4 minutes ago, meina222 said:
One more thing to report after some testing the shiny new BS install. Every once in a while I fail to boot and instead of getting deep into the log, my PC just reboots. Next time it usually succeeds. So there is still some quirk around maybe slides that causes this instability.
As I mentioned, I'm not using any Slide value. Look at post above, maybe you have a similar USB issue.
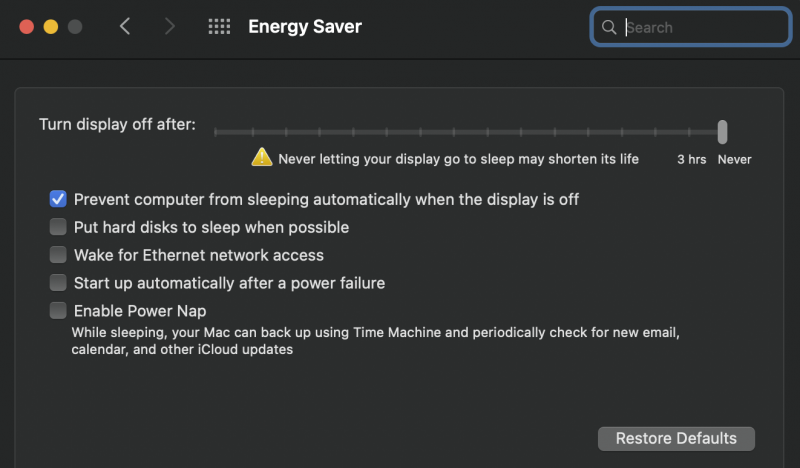
On a related issue, I think all desktop Hackintoshers should disable Energy Saver as shown below. This can reduce oddball crashes and reboots in many systems (Intel or AMD).
-
1
-
-
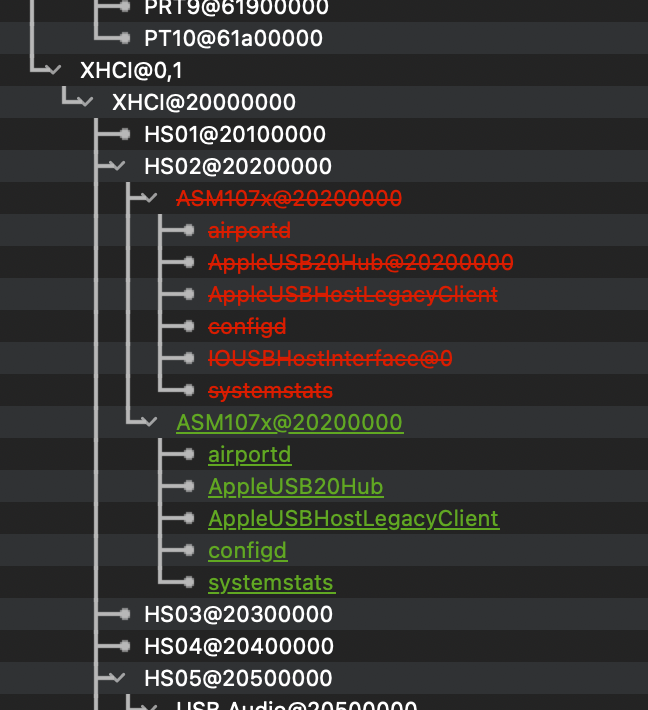
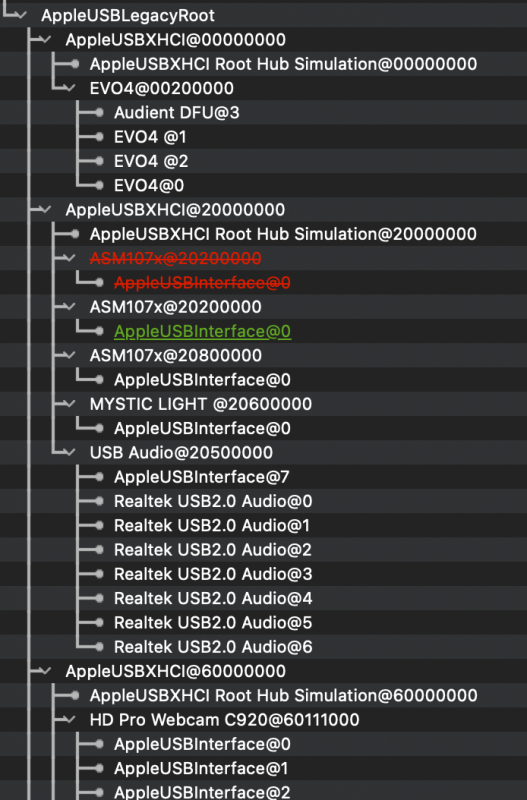
While working on the TB USB problem, I'd left IORE open for some time on my desktop. I noticed that. one USB device in particular had a lot of activity: something was repeatedly attaching and de-attaching to XHCI/HS02 (the spoiler below shows how it goes on and on; if left to itself, the cycle would repeat dozens of times).
Now why I think this important is that I found an error when shutting down in both Catalina and Big Sur that said "Restart waiting on HS02". At the time, I didn't know which HS02 it was referring and put the idea in the back of my mind. But now seeing this failed attachment attempt and knowing that USB problems can affect sleep and shutdown I thought it worthwhile to pursue. I do not yet know if will will affect Shutdown.
To see if you have such a problem, open IORE and left run for a few minutes then study the USB ports, primarily those under S0D2/BYD8 that is common to all of our TRX40 mobos. I can help you generate an SSDT should you have a similar problem: below is posted a generic SSDT (here) with instructions on how to modify it.
SpoilerOn inspecting further down IORE, I saw that it was a problem of AppleUSBInterface trying to interact with ASMedia (ASMedia has a bit of bad reputation on the Intel side). See spoiler below showing AppleUSBXHCI (this list too went on hundreds of times, so what's shown is just a few cycles).
SpoilerThe fix was to re-define the USB ports within the XHC-XHCI SSDT, similar to how I showed earlier to delete the BT/Wifi port (as I recall it was XHC/Prt5). After re-booting with this new SSDT, the following was seen with no more failed attachment attempts by AppleUSBInterface. Spoiler shows AppleUSBXHCI is free of AppleUSBInterface.
Spoiler-
1
-
-
14 minutes ago, meina222 said:
So in Big Sur - is there a way without going through avoiding the sealing of volumes to copy the boot EFI to the disk instead of USB?
When I try dd, I get
udo dd if=/dev/disk8s1 of=/dev/disk1s1
dd: /dev/disk1s1: Resource busy
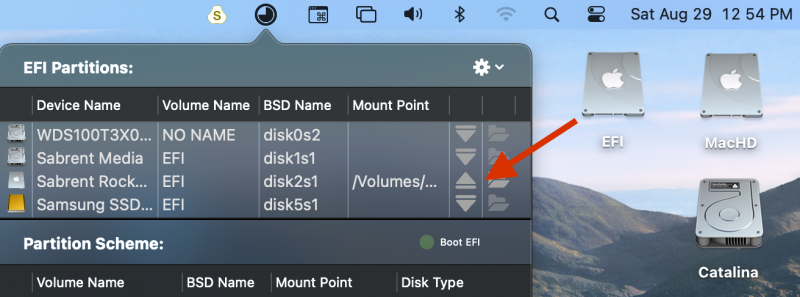
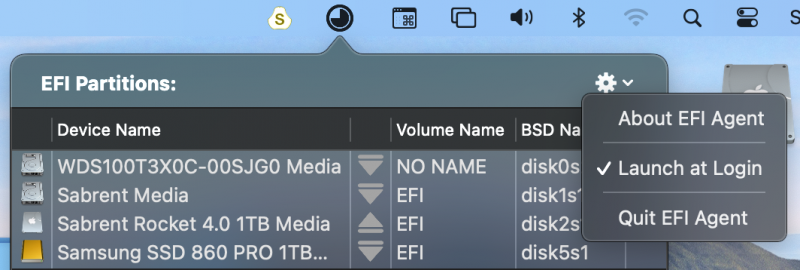
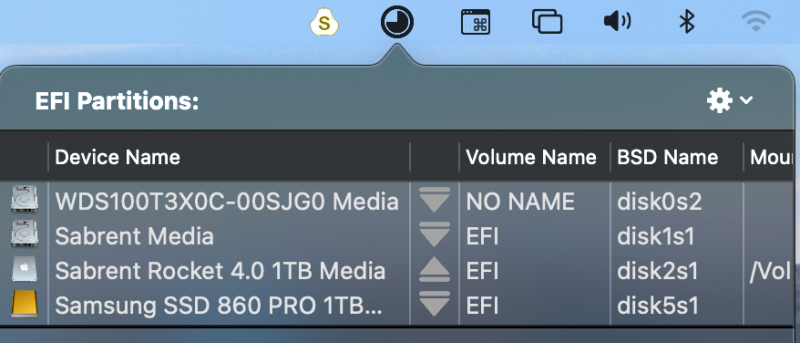
Yes, I routinely copy EFI folders all over the place. I use the EFI Agent app. I never mention as I thought all Hackintoshers use it! (attached below). All of this can be done without any sealing issues. Even if on a old macOS you can still see all EFI partitions.
Click on triangle to mount EFI partition (and I disallow notifications). The arrow is pointing to the triangle I'd just clicked which, after entering my pw, mounted the EFI partition at the end of the arrow. This EFI partition is for the MacHD, which contains BS and is on the Sabrent Rocket NVMe drive.
Once the EFI partition has mounted, copy and paste to your delight.
I add it to auto start on boot, by using the gear pop-up:
You can move column (I wish a moved column would 'stick' between boots). To move, hold mouse arrow on column top for triangles and slide adjacent to Device names as shown below. This helps in locating which drive has which EFI you might want. As mentioned in a previous post, I keep a 'safety' EFI that I know will boot on one of the drives.
-
3
-
-
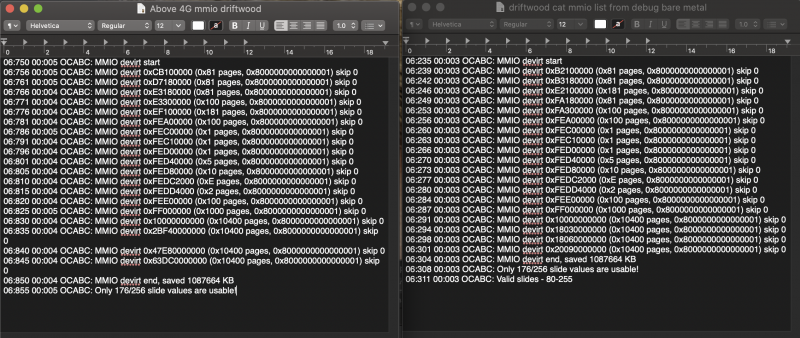
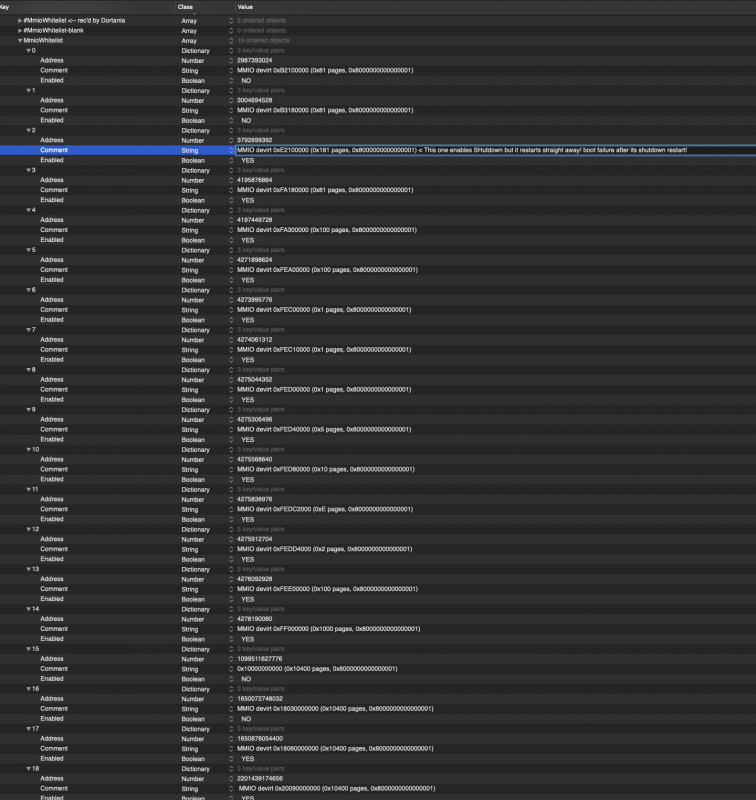
10 minutes ago, meina222 said:
I feel the answer to my weird experiences has to do with this MMIO black magic. So last night I succeeded with these values.Notice how my slides are exactly the same as @Driftwood's. Something about our board MMIO is common as he also experiences the click shutdown/restart and install corruption issues.
35:415 00:054 OCABC: MMIO devirt start
35:472 00:056 OCABC: MMIO devirt 0xE2100000 (0x81 pages, 0x8000000000000001) skip 0
35:529 00:057 OCABC: MMIO devirt 0xE3180000 (0x81 pages, 0x8000000000000001) skip 0
35:587 00:057 OCABC: MMIO devirt 0xEF100000 (0x181 pages, 0x8000000000000001) skip 0
35:643 00:056 OCABC: MMIO devirt 0xFA180000 (0x81 pages, 0x8000000000000001) skip 0
35:700 00:056 OCABC: MMIO devirt 0xFA300000 (0x100 pages, 0x8000000000000001) skip 0
35:757 00:057 OCABC: MMIO devirt 0xFEA00000 (0x100 pages, 0x8000000000000001) skip 0
35:814 00:056 OCABC: MMIO devirt 0xFEC00000 (0x1 pages, 0x8000000000000001) skip 0
35:871 00:057 OCABC: MMIO devirt 0xFEC10000 (0x1 pages, 0x8000000000000001) skip 0
35:928 00:056 OCABC: MMIO devirt 0xFED00000 (0x1 pages, 0x8000000000000001) skip 0
35:986 00:057 OCABC: MMIO devirt 0xFED40000 (0x5 pages, 0x8000000000000001) skip 0
36:043 00:057 OCABC: MMIO devirt 0xFED80000 (0x10 pages, 0x8000000000000001) skip 0
36:096 00:053 OCABC: MMIO devirt 0xFEDC2000 (0xE pages, 0x8000000000000001) skip 0
36:150 00:053 OCABC: MMIO devirt 0xFEDD4000 (0x2 pages, 0x8000000000000001) skip 0
36:205 00:054 OCABC: MMIO devirt 0xFEE00000 (0x100 pages, 0x8000000000000001) skip 0
36:260 00:055 OCABC: MMIO devirt 0xFF000000 (0x1000 pages, 0x8000000000000001) skip 0
36:315 00:054 OCABC: MMIO devirt 0x10000000000 (0x10400 pages, 0x8000000000000001) skip 0
36:370 00:054 OCABC: MMIO devirt 0x3CB90000000 (0x10400 pages, 0x8000000000000001) skip 0
36:425 00:055 OCABC: MMIO devirt 0x3CBC0000000 (0x10400 pages, 0x8000000000000001) skip 1
36:483 00:057 OCABC: MMIO devirt 0x69750000000 (0x10400 pages, 0x8000000000000001) skip 1
36:537 00:054 OCABC: MMIO devirt end, saved 555184 KB
36:592 00:055 OCABC: Only 176/256 slide values are usable!
36:647 00:054 OCABC: Valid slides - 80-255Your slide values are different than what I'd found (posted some days ago) for my MSI mobo. But, I've temporarily stopped using a slide value, but I do keep MmioWhitelist active. I've tested my list and I must a different sequence as No vs Yes than you find with your mobo, or I cannot boot. Unfortunately, we cannot share this info due to our different set-ups.
3 hours ago, fabiosun said:@iGPU ended for now my serious tests in bare metal because I can't figure out Nvidia problem, so I did a Catalina fresh instal to avoid classic high Sierra problem with old usb driver
attached my IOREG
when you have time the goal could be usb function activation in TB device 🙂
TY
Yes, I'm actively working on TB USB. I've spent hours on it, but I've not given up. I'm working on It now.
-
1
-
-
14 minutes ago, meina222 said:
Can someone tell me how is the following possible?
1. Launch Mac OS BS installer
2. Erase the entire volume group of the target drive
3. Complete a clean installation
4. Boot into "Preboot" partition to check on the new bare metal install
5. Find out from Hackintool that my previous EFI with O.C. 0.6.0 and the ACPI files from before are found - how??? Hackintool bug or erase didn't happen.
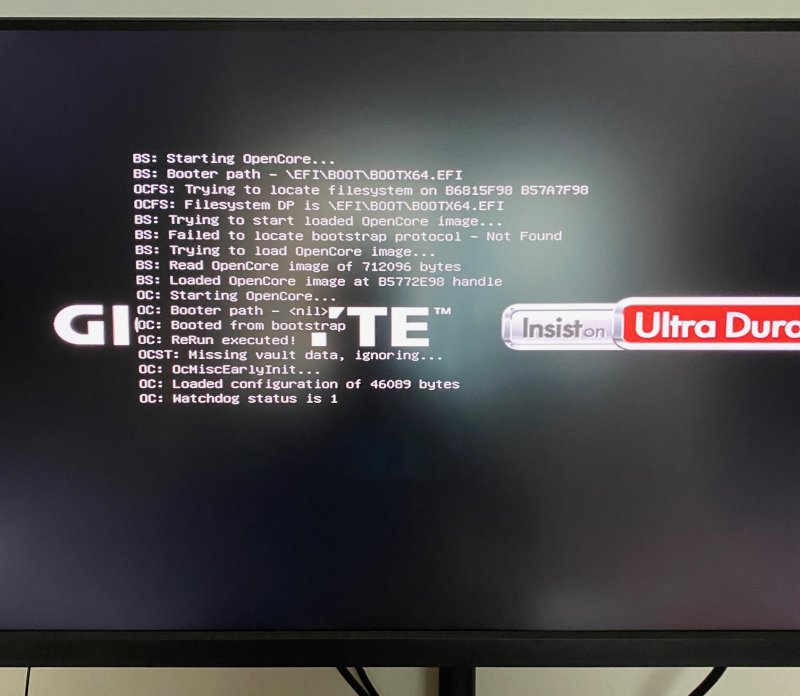
Also, there is clearly something non-deterministic going on with my system as the same USB I did finally manage to do an install with last night, now goes into a black screen after running though some logs. And I get the corrupted text over my BIOS splash:
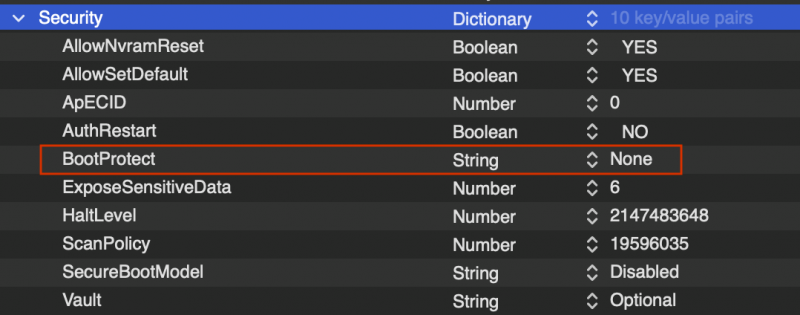
That's a little strange. Normally, you'll only see bootstrap issues if you've set BootProtect to "Bootstrap". I don't use and set to "None". Did you change this value? In the sample plist you uploaded early it was "None" (and everyhing else looked okay).
If you enable by entering "Bootstrap" instead of "None", this will place an OpenCore entry in the boot menu of your BIOS, setting it as the first entry to boot. Since I want to use different EFI's that all contain OpenCore, but different versions in case the one I'm testing is corrupt, I wouldn't know which EFI was then booting. Therefore, I keep BootProtect as "None" and select the EFI partition from which I wish to boot. (See ~ p 38 of OC Docs/Configuration/Misc/Security/BootProtect for description.)
If you've still got it as "None", then I'd check your BIOS. Boot into BIOS and look at your bootable partitions. If you see an OpenCore entry, it is a holdover from whenever you'd left BootProtect as "Bootstrap". Delete or Hide this entry (or re-flash BIOS) to remove from the boot sequence.
***
As for WEG, this is what I found early on: BS does not like current WEG. I left in kext folder and partially disabled to allow people to be able to boot into both BS and Catalina.
I normally don't even use WEG as it does not often play nicely with Radeon VII and Navi AMD GPUs and does not seem to be very necessary for our builds which have no iGPU on the CPU. The only thing I've noticed when WEG is completely turned off (the boot arg "-wegoff" completely disables if you wish to leave in kext folder vs disabling inside config file Kernel/Add/WEG), is that you'll see pink/purple lines at top of screen. This has been a GPU artifact since mid-Mojave and WEG added some code to suppress these artifacts. Without WEG, the artifacts simply show through; they're no big deal.
-
2 minutes ago, meina222 said:
Here is my OC txt log saved on the EFI. If you see anything off let me know, but OC boot itself worked. The MacOS installer then fouls up.opencore-2020-08-29-050354.txt.zip
Nothing jumps out. Have you turned off most ACPI and kexts?
Any changes to any Quirks?
(I'm signing off for the night~)
-
2 minutes ago, meina222 said:
Yes -wegbeta is there (I believe your EFI had it, I made sure). I will disable it completely next but I have a feeling it's something else related to my hardware. To be precise - boot is fine, and install starts and goes on for 5 min. Then at 12 min left hard freezes. Mouse doesn't move, I need to power cycle.
Is it a 3990X thing? I have no experience but do too many cores have impact on boot or install?
-
17 minutes ago, meina222 said:I must be bare metal cursed. Got so much further than last time but my installation hard freezes halfway. Clean reformat and install.
Starting to wonder if it is the video card or BIOS. I am the only using 5700XT so I have to add pikera boot arg. I disabled all memory overclock for this install so it's not that. Next I may try to disable Whatevergreen but I doubt that's it.
WEG must be disabled to boot Big Sur.
Disable one of 3 ways: by setting Kexts/Add to No, or adding -wegoff or -wegbeta to OC boot arg. I've been using -wegbeta.
-
8 hours ago, meina222 said:
For the record - I changed my GB BIOS from f4c to f4j (not officially available on GB site) - stemming from a lengthy attempt to find a way for my TB to work in Slot 4 while AIC is installed. This changed ALL of my PCI device id's. Every MMIO group other than non-AIC NVME got shifted - VGA from 000:23:00 to 000:43:00 etc, as I found out by being greeted by black Proxmox screen on VM start. So almost surely this scrambled my MMIO's and I'll have to do it from scratch.
Not on-topic, but I am so disappointed with GB's BIOS support and inability to provide updates and fixes, that I think I'll buy another board - got an RMA approved already.
BigSur beta5 USB is ready. I will try bare metal again tomorrow. @iGPU, I am bit confused on one thing - how important is to not have the sealed volumes - should I bother with that, or should I try to 1st get it running without trying to unseal it?
Sealed volume only important if you wish to access Big Sur drive from older macOS. I don't think if affects any other functionality. But it cannot be done at a later date, only during the installation step. I wouldn't sweat it.
Removing the Snapshot partition in more interesting to me and can be done at any time.
Good luck!
-
26 minutes ago, fabiosun said:
Anonymous UUID:       2CE76937-9343-6F88-DEC0-48AD53215D43

Thu Aug 27 21:25:28 2020

*** Panic Report ***
panic(cpu 25 caller 0xffffff801797d694): "Spinlock acquisition timed out: lock=0xffffff8018099698, lock owner thread=0xffffff81e7fe42c8, current_thread: 0xffffff81e37a6590, lock owner active on CPU 0x24, current owner: 0xffffff81e7fe42c8, time: 51995834162"@/BuildRoot/Library/Caches/com.apple.xbs/Sources/xnu/xnu-4570.71.82.5/osfmk/i386/locks_i386.c:465
Backtrace (CPU 25), Frame : Return Address
0xffffffdb970abc40 : 0xffffff801786ae56
0xffffffdb970abc90 : 0xffffff8017994434
0xffffffdb970abcd0 : 0xffffff8017986604
0xffffffdb970abd40 : 0xffffff801781ce60
0xffffffdb970abd60 : 0xffffff801786a8cc
0xffffffdb970abe90 : 0xffffff801786a68c
0xffffffdb970abef0 : 0xffffff801797d694
0xffffffdb970abf30 : 0xffffff80178893b5
0xffffffdb970abf80 : 0xffffff80178898f0
0xffffffdb970abfa0 : 0xffffff801781c557

BSD process name corresponding to current thread: kernel_task

Mac OS version:
17G14019

Kernel version:
Darwin Kernel Version 17.7.0: Thu Jun 18 21:21:34 PDT 2020; root:xnu-4570.71.82.5~1/RELEASE_X86_64
Kernel UUID: 3D729EED-3C15-378F-AFE5-9BF3B0C87369
Kernel slide:     0x0000000017600000
Kernel text base: 0xffffff8017800000
__HIB  text base: 0xffffff8017700000
System model name: iMacPro1,1 (Mac-7BA5B2D9E42DDD94)

System uptime in nanoseconds: 51995955573
last loaded kext at 9917059802: com.nvidia.CUDA	1.1.0 (addr 0xffffff7f98de9000, size 12288)
loaded kexts:
com.nvidia.CUDA	1.1.0
com.nvidia.web.GeForceWeb	10.3.3
com.nvidia.web.NVDAGP100HalWeb	10.3.3
com.nvidia.web.NVDAResmanWeb	10.3.3
com.nvidia.NVDAStartupWeb	10.3.3
com.smalltree.driver.SmallTreeIntel82576	1.0.6
as.vit9696.VirtualSMC	1.1.5
as.vit9696.AppleALC	1.5.1
as.vit9696.Lilu	1.4.6
com.apple.filesystems.autofs	3.0
com.apple.filesystems.exfat	1.4
com.apple.filesystems.ntfs	3.13
com.apple.driver.AppleTyMCEDriver	1.0.3d2
com.apple.driver.AppleIntelPCHPMC	2.0.1
com.apple.AppleEthernetAquantiaAqtionFirmware	1.0.34
com.apple.driver.AppleHDAHardwareConfigDriver	281.52
com.apple.driver.AppleHDA	281.52
com.apple.driver.AppleGraphicsDevicePolicy	3.20.18
com.apple.AGDCPluginDisplayMetrics	3.20.18
com.apple.driver.AppleUpstreamUserClient	3.6.5
com.apple.driver.AppleHV	1
com.apple.driver.AppleMCCSControl	1.5.5
com.apple.iokit.IOUserEthernet	1.0.1
com.apple.iokit.IOBluetoothSerialManager	6.0.7f22
com.apple.driver.pmtelemetry	1
com.apple.Dont_Steal_Mac_OS_X	7.0.0
com.apple.nvidia.NVDAStartup	10.3.2
com.apple.driver.AppleFIVRDriver	4.1.0
com.apple.driver.AudioAUUC	1.70
com.apple.driver.AppleIntelSlowAdaptiveClocking	4.0.0
com.apple.driver.ACPI_SMC_PlatformPlugin	1.0.0
com.apple.driver.AppleOSXWatchdog	1
com.apple.driver.AppleThunderboltIP	3.1.1
com.apple.driver.AppleFileSystemDriver	3.0.1
com.apple.filesystems.hfs.kext	407.50.6
com.apple.AppleFSCompression.AppleFSCompressionTypeDataless	1.0.0d1
com.apple.BootCache	40
com.apple.AppleFSCompression.AppleFSCompressionTypeZlib	1.0.0
com.apple.AppleSystemPolicy	1.0
com.apple.driver.PioneerSuperDrive	439.70.3
com.apple.iokit.SCSITaskUserClient	404.30.3
com.apple.driver.AppleAHCIPort	329.50.2
com.apple.filesystems.apfs	748.51.0
com.apple.driver.AppleHPET	1.8
com.apple.driver.AppleACPIButtons	6.1
com.apple.driver.AppleRTC	2.0
com.apple.driver.AppleSMBIOS	2.1
com.apple.driver.AppleAPIC	1.7
com.apple.driver.AppleIntelCPUPowerManagementClient	220.50.1
com.apple.nke.applicationfirewall	186
com.apple.security.TMSafetyNet	8
com.apple.security.quarantine	3
com.apple.driver.AppleIntelCPUPowerManagement	220.50.1
com.apple.kext.triggers	1.0
com.apple.driver.DspFuncLib	281.52
com.apple.kext.OSvKernDSPLib	526
com.apple.driver.AppleGraphicsControl	3.20.18
com.apple.iokit.IOAVBFamily	683.1
com.apple.plugin.IOgPTPPlugin	680.15
com.apple.iokit.IOEthernetAVBController	1.1.0
com.apple.driver.AppleSMBusController	1.0.18d1
com.apple.iokit.IOSMBusFamily	1.1
com.apple.driver.AppleSSE	1.0
com.apple.iokit.IOSerialFamily	11
com.apple.iokit.IOBluetoothFamily	6.0.7f22
com.apple.iokit.IOAcceleratorFamily2	378.28
com.apple.iokit.IOSurface	211.15
com.apple.iokit.IONDRVSupport	519.21
com.apple.AppleGPUWrangler	3.20.18
com.apple.AppleGraphicsDeviceControl	3.20.18
com.apple.driver.AppleHDAController	281.52
com.apple.iokit.IOHDAFamily	281.52
com.apple.driver.AppleSMBusPCI	1.0.14d1
com.apple.iokit.IOGraphicsFamily	519.23
com.apple.iokit.IOSlowAdaptiveClockingFamily	1.0.0
com.apple.driver.IOPlatformPluginLegacy	1.0.0
com.apple.driver.IOPlatformPluginFamily	6.0.0d8
com.apple.driver.AppleThunderboltEDMSink	4.1.4
com.apple.driver.usb.AppleUSBHub	1.2
com.apple.driver.usb.IOUSBHostHIDDevice	1.2
com.apple.driver.AppleUSBAudio	312.6
com.apple.iokit.IOAudioFamily	206.5
com.apple.vecLib.kext	1.2.0
com.apple.driver.usb.cdc	5.0.0
com.apple.driver.usb.networking	5.0.0
com.apple.driver.usb.AppleUSBHostCompositeDevice	1.2
com.apple.filesystems.hfs.encodings.kext	1
com.apple.driver.AppleUSBMergeNub	900.4.1
com.apple.driver.AppleUSBHostMergeProperties	1.2
com.apple.driver.usb.AppleUSBHostPacketFilter	1.0
com.apple.iokit.IOUSBFamily	900.4.1
com.apple.driver.AppleThunderboltDPOutAdapter	5.5.5
com.apple.driver.AppleThunderboltPCIDownAdapter	2.1.3
com.apple.driver.AppleThunderboltDPInAdapter	5.5.5
com.apple.driver.AppleThunderboltDPAdapterFamily	5.5.5
com.apple.driver.AppleHPM	3.1.3
com.apple.driver.AppleIntelLpssI2CController	3.0.60
com.apple.driver.AppleIntelLpssDmac	3.0.60
com.apple.driver.AppleIntelLpssI2C	3.0.60
com.apple.iokit.IOSCSIMultimediaCommandsDevice	404.30.3
com.apple.iokit.IOBDStorageFamily	1.8
com.apple.iokit.IODVDStorageFamily	1.8
com.apple.iokit.IOCDStorageFamily	1.8
com.apple.iokit.IOAHCISerialATAPI	267.50.1
com.apple.iokit.IOAHCIBlockStorage	301.40.2
com.apple.iokit.IOAHCIFamily	288
com.apple.driver.AppleThunderboltNHI	4.7.3
com.apple.iokit.IOThunderboltFamily	6.7.10
com.apple.driver.AppleEthernetAquantiaAqtion	1.0.55
com.apple.driver.mDNSOffloadUserClient	1.0.1b8
com.apple.driver.AppleXsanScheme	3
com.apple.driver.usb.AppleUSBXHCIPCI	1.2
com.apple.driver.usb.AppleUSBXHCI	1.2
com.apple.iokit.IONVMeFamily	2.1.0
com.apple.driver.AppleEFINVRAM	2.1
com.apple.driver.AppleEFIRuntime	2.1
com.apple.iokit.IOHIDFamily	2.0.0
com.apple.security.sandbox	300.0
com.apple.kext.AppleMatch	1.0.0d1
com.apple.driver.DiskImages	480.60.3
com.apple.driver.AppleFDEKeyStore	28.30
com.apple.driver.AppleEffaceableStorage	1.0
com.apple.driver.AppleKeyStore	2
com.apple.driver.AppleUSBTDM	439.70.3
com.apple.driver.AppleMobileFileIntegrity	1.0.5
com.apple.iokit.IOUSBMassStorageDriver	140.70.2
com.apple.iokit.IOSCSIBlockCommandsDevice	404.30.3
com.apple.iokit.IOSCSIArchitectureModelFamily	404.30.3
com.apple.iokit.IOStorageFamily	2.1
com.apple.driver.AppleCredentialManager	1.0
com.apple.driver.KernelRelayHost	1
com.apple.iokit.IOUSBHostFamily	1.2
com.apple.driver.usb.AppleUSBCommon	1.0
com.apple.driver.AppleBusPowerController	1.0
com.apple.driver.AppleSEPManager	1.0.1
com.apple.driver.IOSlaveProcessor	1
com.apple.iokit.IOReportFamily	31
com.apple.iokit.IOTimeSyncFamily	680.15
com.apple.iokit.IONetworkingFamily	3.4
com.apple.driver.AppleACPIPlatform	6.1
com.apple.driver.AppleSMC	3.1.9
com.apple.iokit.IOPCIFamily	2.9
com.apple.iokit.IOACPIFamily	1.4
com.apple.kec.pthread	1
com.apple.kec.Libm	1
com.apple.kec.corecrypto	1.0

EOF
Model: iMacPro1,1, BootROM 1554.40.9.0.0, 32 processors, 3,7 GHz, 256 GB, SMC
Graphics: NVIDIA TITAN Xp COLLECTORS EDITION, NVIDIA TITAN Xp COLLECTORS EDITION, PCIe
Memory Module: P0 CHANNEL A/DIMM 0, 32 GB, DDR4, 3200 MHz, Unknown, 3200 C16 Series
Memory Module: P0 CHANNEL A/DIMM 1, 32 GB, DDR4, 3200 MHz, Unknown, 3200 C16 Series
Memory Module: P0 CHANNEL B/DIMM 0, 32 GB, DDR4, 3200 MHz, Unknown, 3200 C16 Series
Memory Module: P0 CHANNEL B/DIMM 1, 32 GB, DDR4, 3200 MHz, Unknown, 3200 C16 Series
Memory Module: P0 CHANNEL C/DIMM 0, 32 GB, DDR4, 3200 MHz, Unknown, 3200 C16 Series
Memory Module: P0 CHANNEL C/DIMM 1, 32 GB, DDR4, 3200 MHz, Unknown, 3200 C16 Series
Memory Module: P0 CHANNEL D/DIMM 0, 32 GB, DDR4, 3200 MHz, Unknown, 3200 C16 Series
Memory Module: P0 CHANNEL D/DIMM 1, 32 GB, DDR4, 3200 MHz, Unknown, 3200 C16 Series
Serial ATA Device: ST6000VX0023-2EF110, 6 TB
Serial ATA Device: ST6000VX0023-2EF110, 6 TB
Serial ATA Device: PIONEER BD-RW   BDR-207M
Serial ATA Device: Samsung SSD 840 EVO 250GB, 250,06 GB
Serial ATA Device: ST10000VX0004-1ZE101, 10 TB
Serial ATA Device: ST10000VX0004-1ZE101, 10 TB
USB Device: USB316Bus
USB Device: USB PnP Audio Device
USB Device: USB 3.0 Bus
USB Device: USB316Bus
USB Device: USB-PS/2 Optical Mouse
USB Device: USB Keyboard
USB Device: USB316Bus
USB Device: MYSTIC LIGHT
USB Device: USB Audio
USB Device: USB332Bus
USB Device: VLI Product String
USB Device: USB316Bus
USB Device: USB2.0 Hub
Thunderbolt Bus:
This is my kp
So main issue is KP due to NVIDA/kexts, High Sierra (HS) or other devices.
(If you've already performed the following, please excuse me as I may have loss track over the various posts.)
In HS + NVIDIA, have you booted without any externally connected USB devices (noUSB; except keyboard/mouse) and no PCI cards (noPCI)? If so, does KP stop? This might show if there's an interaction with USB and NVIDIA-HS.
Do you have any AMD GPU to try (like an inexpensive, used RX580)? If you do, you can test HS ± (noUSB noPCI) vs Mojave ± (noUSB noPCI) for KP. This helps to remove NVIDIA as culprit and also compares HS vs newer macOS.
If you go through all of these permutations, it may systematically show whether issue is a complex interaction of macOS, NVIDIA and other devices.
-
2 hours ago, Driftwood said:
OK Im back up after a re-clone of my Proxmox M2 nvme MacOS Catalinaa drive to the corrupted EFI/OS SSD 2tb drive. We begin again...
Ive been using most of Fabiosun's EFI suggestions and his config recommendations, but note Im still using MacPro 7,1 like my Proxmox boot. I didnt want to use Mac1,1. All is good and GfX in Davinci, Final Cut, Logic is up to speed of Proxmox. NO real difference. However, the firewire Fireface card is rock solid now it seems.
All good. RESTART cause s a quick KP Restart and wont boot back in.
Shutdown gives me a Restart which will boot back in but doesnt click shutdown.
Now here's the interesting news. A comparison of MMIO with Above 4G selected: (Above 4G Left, Above 4G Disabled on Right).
I've attached my config (fill in your serials/UUIDs) for Asrock Creator users. Ensure Above 4G is on and this is PRE MMIO configurations. Later if Im successful in getting the MMIO stuff working Ill post the final config.
From my readings, I wouldn't be surprised if MmioWhitelist needs adjustments if one changes BIOS versions, changes BIOS settings, or changes AICs. If true, more reasons why none of us can share MMioWhitelist data unless everything is exactly the same.
I don't know about getting Shutdown on Catalina. I only had it happen sporadically, while Shutdown on Big Sur is very consistent, but rather drawn out.
I don't understand the fascination with MacPro7,1. The hardware similarities are greater between the iMacPro1,1 and our builds; there are less memory and PCI issues without resorting to kext kludges. (I found on the X570 builds more instability issues which users only resolved once they returned to using the iMacPro1,1 SMBIOS.) Testing on TRX40 with CPU and GPU speeds showed no difference. , But to each their own.
-
 1
1
-
-
6 hours ago, fabiosun said:
Thank you for your offer but now I have lost again my GPU acceleration..Nvidia is very hard to configure in bare metal
Nvram/sip is a big problem
to understand some problem I have I have resetted my nvram via opencore boot menu option..and now some Nvidia kexts loaded again ..and Nvidia web driver is checked
I hope to fix it..but I can't find a clear way to reproduce a working situation
fabiosun,
Are you enabling "Above 4G decoding"? While researching TB issues, I came across a recommendation for a user of NVIDA card to enable it, esp with the TB card in place to avoid KP.
If you do keep it enabled, the SSDT-TB will possibly need adjustment as it could shift the device location. Let me know.
-
 1
1
-
-
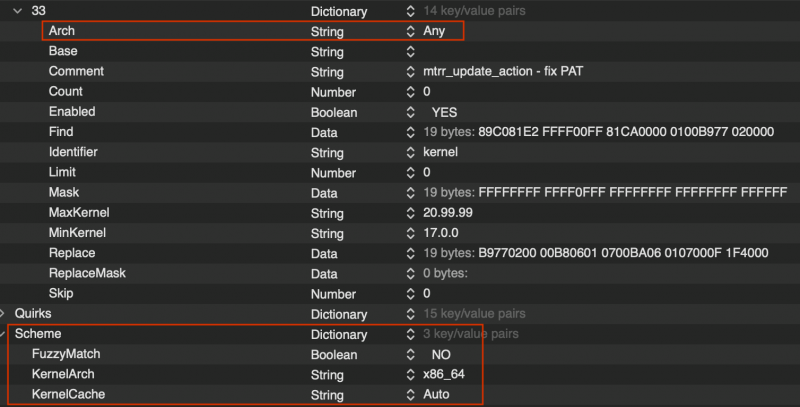
FYI
As of yesterday, OpenCore has with latest commits made some notable structural changes to the config file. So unless one studies it carefully there'll be errors in the config file if one simply adds in the latest commit without adjusting the config.plist file. These changes are primarily architectural indicating strings ("Arch") being stored in the Kext section in many locations as well as adding a "Scheme" to the Kext section.
#33 below is a Kext patch entry. Each Add, Block and Patch entry within the Kext section now has an "Arch" element. The choices for this string are Any, i386, x86_64. I can imagine an Apple kernel architecture being an option in the future, which is why I'm setting them all to "Any" (the only other choice for our machines would be "x86_64").
I adjusted the config file, tested last night and it's working. However, the changes presently offer nothing for the TRX40, so no need to update any EFIs.
-
2
-
-
6 hours ago, fabiosun said:
@iGPUhave you mounted in your TRX40 a Titan Ridge card?
I am not be able to adapt the old SSDT used in Proxmox with new ACPI address...
Yes, I tried the Titan Ridge card a couple of weeks ago. Same response: good TB behavior, no USB functionality. I know that this card works well in other builds, so the problem is now the TRX40 is interacting with the TB AIC. I tried many variations of SSDT without success in activating the USB ports.
The only thing I can think to do next is look at modifying the DSDT. That's going to take me some time...
I can fix your SSDT (for TB function), just show me your IORE file.
-
PREVENT SEALING DURING BIG SUR INSTALLATION
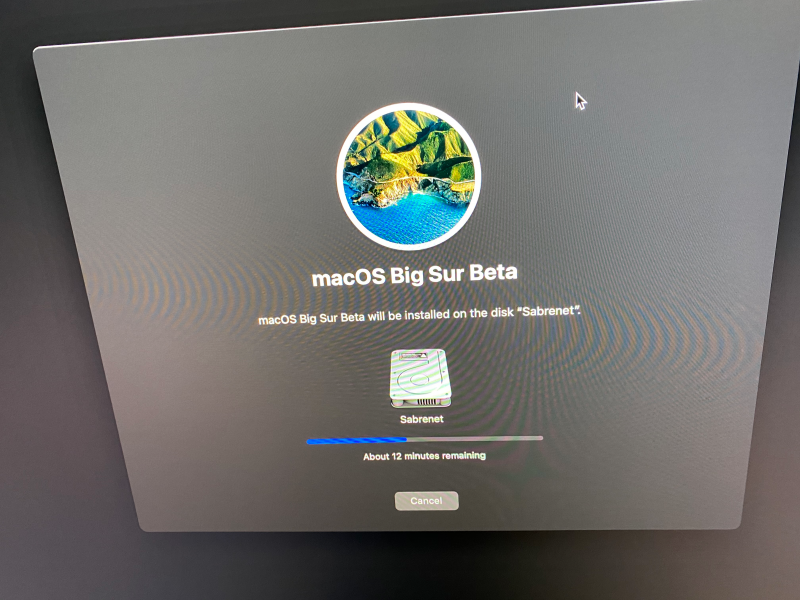
This is part 2 of the 'subsequent' post on preventing a Big Sur drive being 'sealed'. Presently, this step can only be done during Big Sur installation.
Up until BS ß4, there was a technique for avoiding the sealing step that involved stopping the installation of Big Sur during the 3rd re-start (literally pressing the power button and shutting off the computer). However, with BS ß5, this technique reportedly does not work (I did not try it to verify).
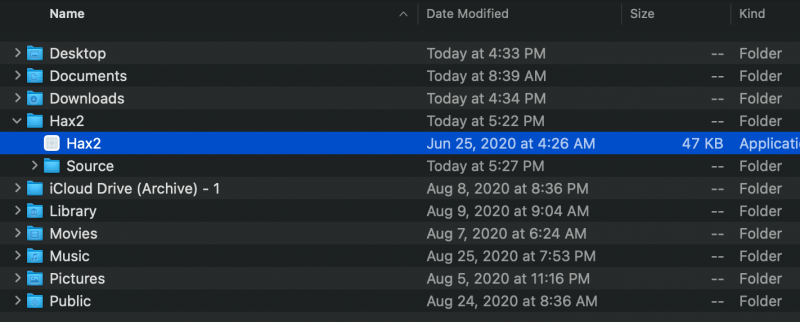
Instead, it is recommended (again by fusion71au on the InsanelyMac forum here) to use the app Hax2 (attached below), which was derived from ASentientBot's post on MacRumors. This app, along with it's associated files are to be placed on the root section of your macOS drive (ex: MacHD/User/myName/Hax2/) used to run the installation.
While it reportedly can use an installer placed on a mounted USB thumb drive, I could only get Hax2 to work by placing the BS ß Installer in the applications folder where it normally is located.
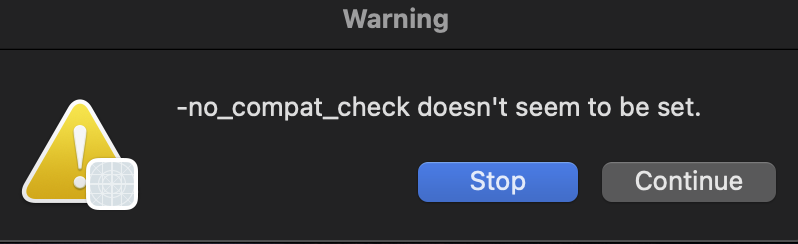
Prior to using, as mentioned in part 1 of this 'subsequent' post (here), you need to have the following in the OC boot arg section: -no_compat_check and amfi_get_out_of_my_way=1
as well as 77080000 for car-active-config. I also when into Recovery on the drive containing the Hax2 and ran csrutil disable and csrutil authenticated-root disable and then rebooted into the drive containing Hax2.
At this point, the drive destined for the Big Sur installation should be erased using Disk Utility.
Next, run Hax2 (you'll need to give permission by <Control> clicking on Hax2 and selecting Open. Hax2 will do some processing and then open the BS Installer. However, if you have not properly used the boot arguments noted above, Hax2 will give you an error window as shown in Spoiler below; select Stop, fix the boot issue in your EFI, re-boot the computer and try again.
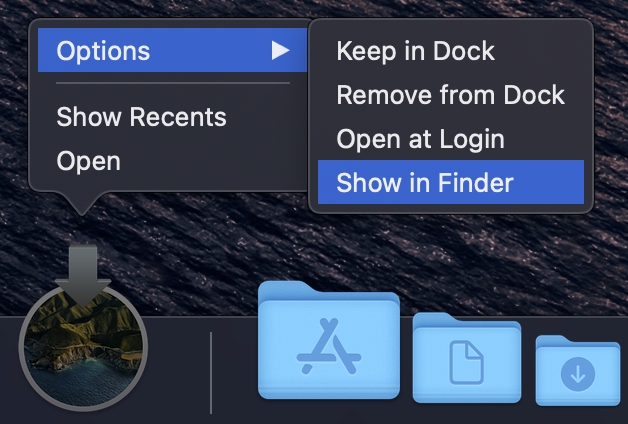
SpoilerOnce Hax2 is running without an error window, and after the Big Sur Installation window has opened, do not yet run the Installer. Instead, look at the Installer icon in the menu bar and make certain that it's the ß5 and not some other BS Installer you may have inadvertently left on another drive by opening it in the Finder (Spoiler below):
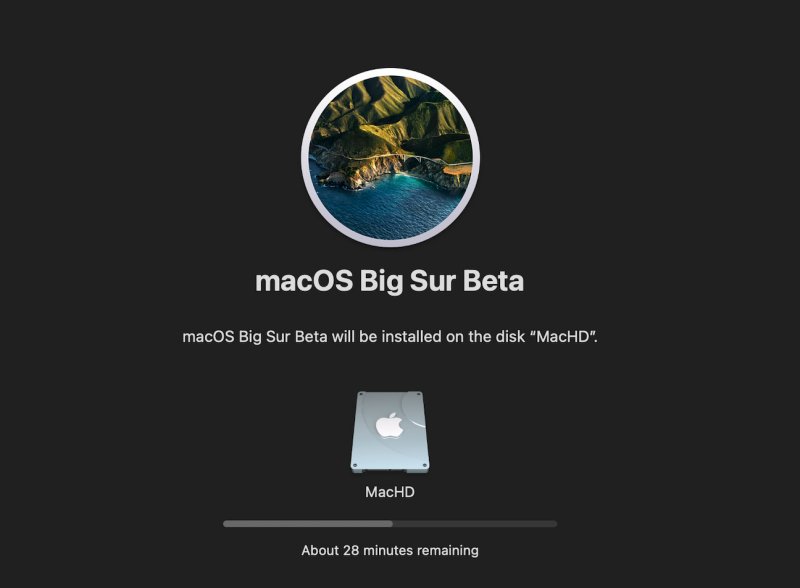
SpoilerIf it's the correction version, run the Installer and select the proper destination drive. I re-ran all of this tonight and repeated the installation:
At each re-boot do make certain that the booting EFI contains those same boot arguments noted above ( -no_compat_check and amfi_get_out_of_my_way=1 )
After the Installation is complete and you've finally logged into Big Sur, re-start the computer and log into the Big Sur Recovery 11.0. At this point, you'll want to run the first part of this post to remove the Snapshot partition (see a synopsis in the Spoiler below).
SpoilerNote the several steps from mounting the disk (diskutil list step not shown) to giving the disk read/write permission.
The Snapshot partition was then tagged and a list command was attempted. Since I made a typo there was an error response. Once I realized what had happened, and entered the corrected phrasing, the correct response was seen. This response gave the UUID which allowed deletion of the Snapshot partition. A confirmation step was repeated to confirm that no Snapshots were remaining.
Once the Snapshot partition was removed, re-boot back onto the desktop.
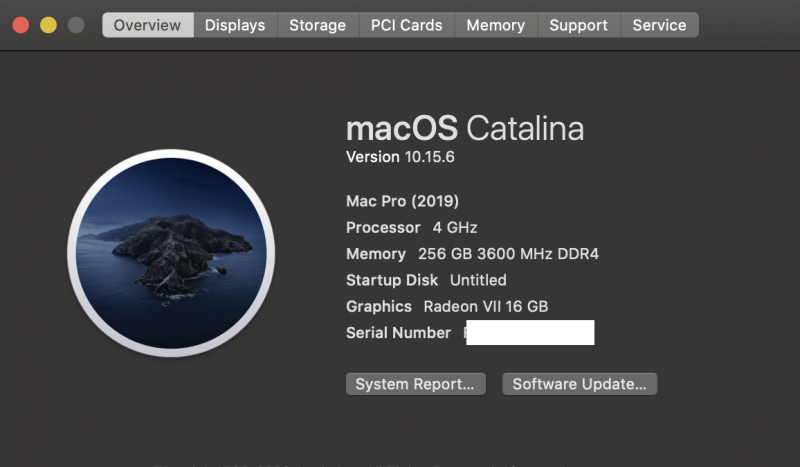
When you're back on the Big Sur desktop, you can now run in Terminal: sudo mount -uw / and then diskutil info / (mentioned in the first post) and you'll see the following, showing that the Big Sur installation is not sealed:
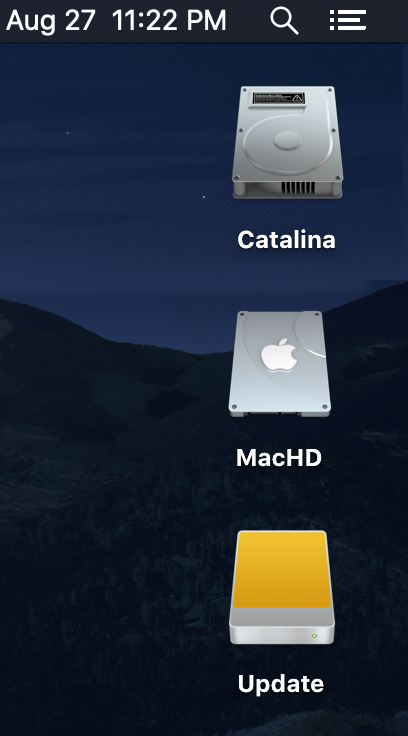
The main advantage of removing the seal is that the Big Sur drive will now be visible when the computer is booted into an older macOS. The image below was booted into Catalina and shows one Catalina drive and two Big Sur drives. One Big Sur drive has had the seal removed and is visible as "MacHD". The other Big Sur drive is only visible as "Update" since this drive is still sealed.
-
1
-
-
2 hours ago, Driftwood said:
Yes, but iGPUs was good initially until I went thru the process of doing MMIO.whitelist. This was all good until I reached child 2. Shutdown attempt, it restarted. AND something happened to the Cat drive.
I also replaced the EFI with an earlier EFI I did days ago but even that will NOT boot anymore.
The prelinked stuff could be from using different EFIs and its got confused! Who knows?!
I'm sorry to hear about your problems, but it's not related to my uploaded EFI, but a result of whatever you did with MmioWhitelist.
The process I went through for MmioWhitelist was documented earlier in this thread, but was simply a more fleshed-out version of what's on Dortania's OC guide. I didn't invent any of those things. It was tedious to go through, but uneventful for me.
While it's obvious there was a problem in how you processed MmioWhitelist, as I've mentioned several times, since every mobo's MmioWhitelist is different, few of us can help you. (And this is why I didn't activate mine in the EFI, but only left as a reference.) Once you get your system back up running, I think you should stay away from using MmioWhitelist. Things will work without it. Or, if you definitely want NVRAM, use NVRAM.plist following Dortania's guilde and OC documentation.
The EFI I uploaded was to help for BS Installation and debugging. I view it as a tool, not necessarily a daily driver: this is why I uploaded a basic, stripped down version without fancy SSDTs. I mentioned in the upload post, that Shutdown only seemed to be working in BS, not Catalina. All kexts and drivers were latest commits (drivers and other OC efi files must match for current commit; any substitution of a different commit dated efi file could crash a system: this is esp important for BOOTx64.efi, OpenCore.efi, and OpenRuntime.efi).
A few Hackintosh caveats:
1. Hackintoshes are fun to experiment with; they can be changed unlike a real Mac; but they're not real Macs.
2. And since these are Hackintoshes, they're guaranteed not to be as stable as a real Mac. If you want reliable and stable, buy a real Mac from Apple.
3. If your system is working and you have a relatively stable machine and it's needed for your work, don't update anything (this includes BIOS, boot-loader, kexts/SSDTs, drivers, and esp a beta OS).
4. Always have a back of your main drive. (I use CCC to keep a clone of everything I work on. If something fouls up, I clone the backup to the main drive.)
5. Have back up EFI's ready for alternative access booting.
6. If things seem unstable, re-flash BIOS. BIOS can become corrupted with crashes and hard reboots. This is not uncommon on Hackintoshes (even on the Intel side). It only takes a few minutes (and if you have a saved configuration, only seconds to re-load all settings as long as the BIOS is the same version.)
7. AMD is the most unstable Hackintosh platform and the TRX40 platform the least supported of all.
-
2
-
1
-
-
3 hours ago, Driftwood said:
Ok, a couple problems @iGPU
I went thru the MMIO input into Bootloader one by one starting from the back. Everything looked good, and got to this result upto MMIOWhitelist child number 2, where it booted all good, tried shutdown (like the previous) and it was the first time I get the click, but it was quickly followed by a restart!
The result was it would no longer boot with 2 enabled or disabled and, with trying the last two, 0 and 1 Childs in any combination of Yes/No.
So Enabling (YES) 3792699392 MMIO devirt 0xE2100000 (0x181 pages, 0x8000000000000001) < This one enables SHutdown but it restarts straight away!
Following this 'restart' the external USB Catalina boot drive no longer worked - even after disabling rogue child 3.
Here's the result of the other Childs before I got down to child number 2. SO even though I tried 0 and 1 Childs, it was an unfair test as child 2 probably corrupted something resulting in unable to reboot back into the Cat External SSD.
Thankfully I still have Proxmox m2 drive untouched!
Note that my only other 'No's were 15 & 16 : (rest up until 1, 0 were Yes including 2 which booted but after its shutdown/reboot now fails)
1099511627776 N 15 time 01:55
1650072748032 N 16 time 01.44
First, I just re-tested the EFI I uploaded, leaving it exactly the same with no entry for MmioWhitelist, and it booted into Catalina without any problem.
Second, in your first post here, you mentioned things were working well with the EFI. What exactly did you change from that point where it was working, to the point when it did not? (No matter what, not booting doesn't mean the drive's contents are affected.) And what you've shown does not indicate a problem with BIOS.
Where it stops suggests some change in settings, particularly with one of the Quirk settings. Did you change any of those or anything else?
To try and get you "re-set", I included 2 extra config.plist files in the EFI folder as an internal backup. First re-name your current config.plist file to save your MmioWhitelist work. This way you can access that list later. Then, duplicate the extra named "config-basic-genPI.plist", then rename this duplicate "config.plist". This new config file should boot as it re-sets things to what I originally uploaded.
As for the MmioWhitelist, since few of us have the exactly the same mobo with the same components, no one can work up an MmioWhitelist for anyone else. Each person has to do it on their own, but only if you want native NVRAM. If you don't want to go the MmioWhitelist route, leave the MmioWhitelist array empty and setup an NVRAM plist by reading the OC Docs.
Assuming you ran the MmioWhitelist test correctly, and you wish to try it once more, I would suggest that you set all entries in the list you displayed to 'Yes', except set 15, 16 and 17, setting those to 'No'.
*****
And here I would remind anyone else that one always should have an alternative method of booting into a drive (even running a VM). With bare metal, at the very least, you want to have a USB thumb drive with a known, good EFI for access to your drives. Personally, I have 2 NVMe drives (1 Catalina, 1 BS), 1 SATA with Catalina and an external USB with BS. Each can have a unique EFI, but one has an older, working EFI so that there is always bootable access. The known, working EFI is how I tested the MmWhitelist. When a boot failed, I simply forced a shutdown and re-booted using the alternative EFI. Furthermore, the external drive can be connected to my laptop to work on a problematic EFI separate from the Hackintosh.
-
 1
1
-
-
REMOVING THE SNAPSHOT PARTITION FROM BIG SUR
Now, the 'subsequent' post on removing Snapshots... what I'm about to post is based on the posts of fusion71au on the InsanelyMac forum here. I've adapted it for the limitations I've found in how Recovery behaves on the TRX40 builds, especially with regards to Big Sur.
There are 2 parts to this section, and so I'll divide into 2 posts. This post will deal with removing Snapshots, the other how to try to prevent a sealed Big Sur install. The 2nd part is here.
The key to getting this to work is disabling both csrutil and csrutil authenticated-root as discussed in my EFI post. In fusion71au's post, he recommends disabling these in Recovery. I could not get csrutil to persist being disabled after one re-boot (csrutil authenticated-root remained disabled after re-boot). Accordingly, I turned to using 77080000 for csr-active-config to keep these two disabled after disabling them in Big Sur Recovery (listed as 11.0). These same OC NVRAM settings are used for both booting into Big Sur as well as Recovery. (The boot arguments -no_compat_check and amfi_get_out_of_my_way=1 will be important for the 2nd part dealing with sealing.) To clarify, keep using 77080000 throughout and attempt to disable both csrutil and csrutil authenticated-root in Recovery, and then return to Recovery 11.0.
Once you've then re-booted back into Recovery 11.0, there are several steps required to remove the Snapshot partition(s). In order, type the following into Terminal. Note that when in Recovery, you are automatically the Administrator, so adding "sudo" is not needed for Recovery-based terminal commands.
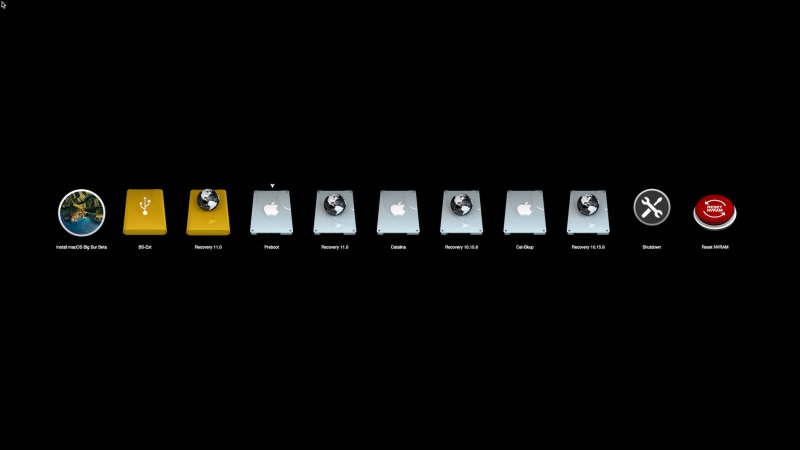
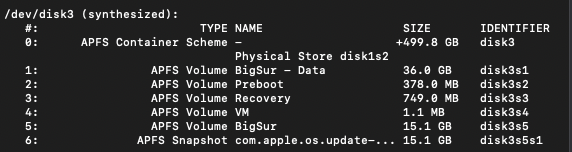
1. Run: diskutil list which will show sometime like the following. What you're after is the main Big Sur disk "BigSur" (not "BigSur - Data") and the <disk identifier> which here is "disk3s5". The Snapshot partition, here shown as "disk3s5s1", may or may not be visible at this stage.
2. Next, open a 2nd window in Terminal (so you can easily refer to the listing made in step 1) and type: diskutil mountDisk <disk identifier> (such as diskutil mountDisk disk3s5) You should get a response: "Volume(s) mounted successfully".
3. Then type: mount -uw /Volumes/BigSur (<--- using your disk name without a trailing "/" symbol) You'll get no response unless there's an error.
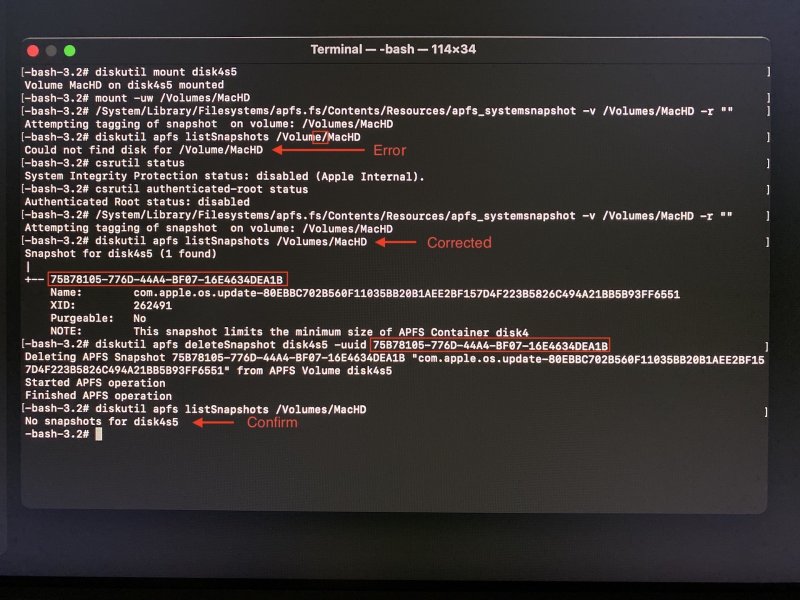
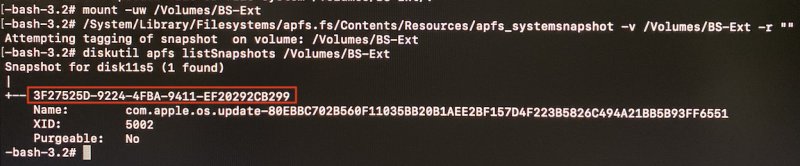
4. Now type: /System/Library/Filesystems/apfs.fs/Contents/Resources/apfs_systemsnapshot -v /Volumes/BigSur -r "" (<--- again, use your disk name; the final characters are 2 double-quote marks)
You'll get a response such as "Attempting tagging of snapshot on volume: /Volumes/BigSur
5. Next, type: diskutil apfs listSnapshots /Volume/BigSur
You'll get a response shown below; what we're interested in is the <uuid of snapshot> highlighted in the red box:
6. Then type: diskutil apfs deleteSnapshot disk3s5 -uuid 3F27525D-9224-4FBA-9411-EF20292CB299 (repeat this for each snapshot seen on that disk; remember that you can copy and paste inside terminal, making it easy to enter the uuid)
7. Optionally, verify that you've removed all of the Snapshots from your Big Sur disk by typing: diskutil apfs listSnapshots /Volume/BigSur
You should get a response "No Snapshots for disk" if all were deleted; otherwise, you'll see something like the image in step 5 again.
8. Once you've deleted all of the partitions, re-boot into Big Sur desktop and run the following in Terminal (now you need to use "sudo"):
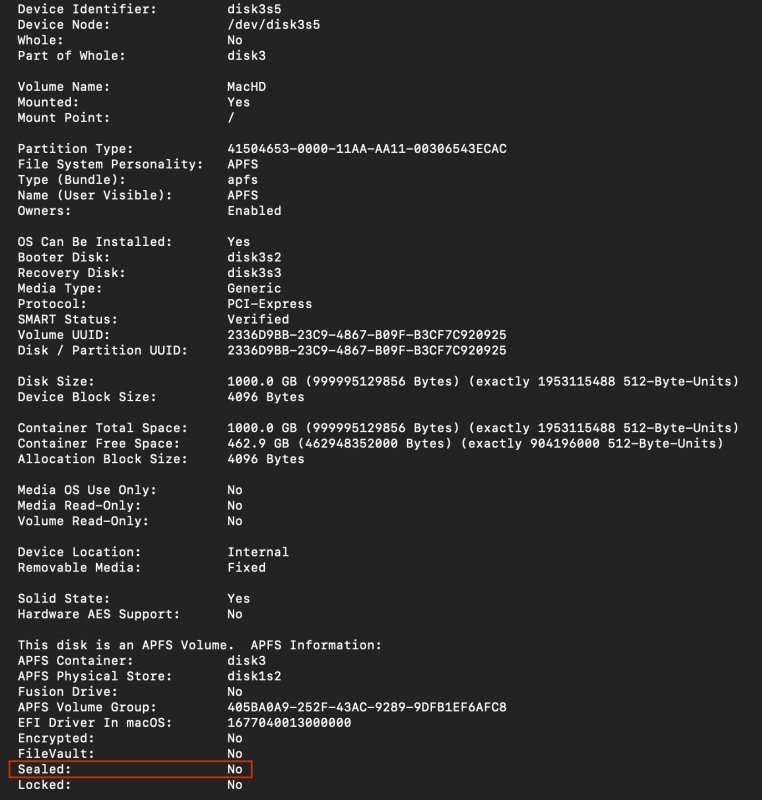
a. sudo mount -uw / (this should return no errors)
b. diskutil info / (this should return something like "disk3s5" and not return a Snapshot partition like "disk3s5s1")
At this point you can change files and folders for which you've previously had no access. For example, I copied a file from the desktop that contained the description for the AMD processor used in the window "About Mac" from a file that I'd altered from a similar folder in Catalina, using the command:
sudo cp /Users/<username>/Desktop/AppleSystemInfo.strings /System/Library/PrivateFrameworks/AppleSystemInfo.framework/Versions/A/Resources/en.lproj/AppleSystemInfo.strings
Normally, you'd have no access to this folder as it is read-only. However, since we removed the Snapshot and gained access to read-write, I could make this change to the "About Mac" window as shown below. (And while this isn't profound, it does show you how you can get access to files and folders that are otherwise off-limits in Big Sur.)

[Discussion] - TRX40 Bare Metal - Vanilla Patches
in General
Posted · Edited by iGPU
This is simply not true. My pattern is totally different.
Each mobo, BIOS ver and who knows what else will be different. I wouldn't give recommendations unless you truly know by having tested it, which, of course, is impossible due to our different mobos.