

iGPU
-
Posts
573 -
Joined
-
Last visited
-
Days Won
17
Content Type
Profiles
Forums
Events
Downloads
Posts posted by iGPU
-
-
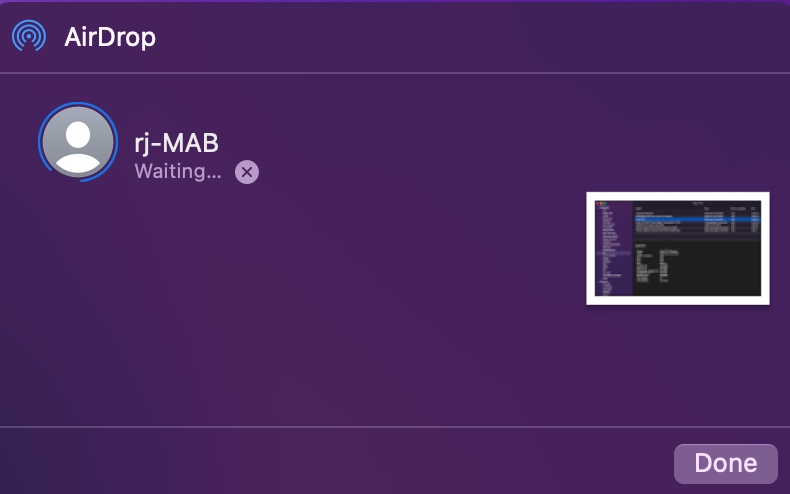
I'm working on Monterey ß1. While the patch list is not yet reduced, I did, despite reading complaints about BT not working, have Airdrop working just fine as shown in Spoiler below. (See this previous post about how to get Airdrop to work.) All of this is under OC v071.
[So far, patches list for Big Sur + Monterey (ß1) is reduced to
242217 + 2 for Aquantia, from the initial 46+2. See next post for file.]When booting, Monterey is slow with the Apple progress stalling about 1/2 way through, requiring some patience.
AirDrop is working:
Spoiler
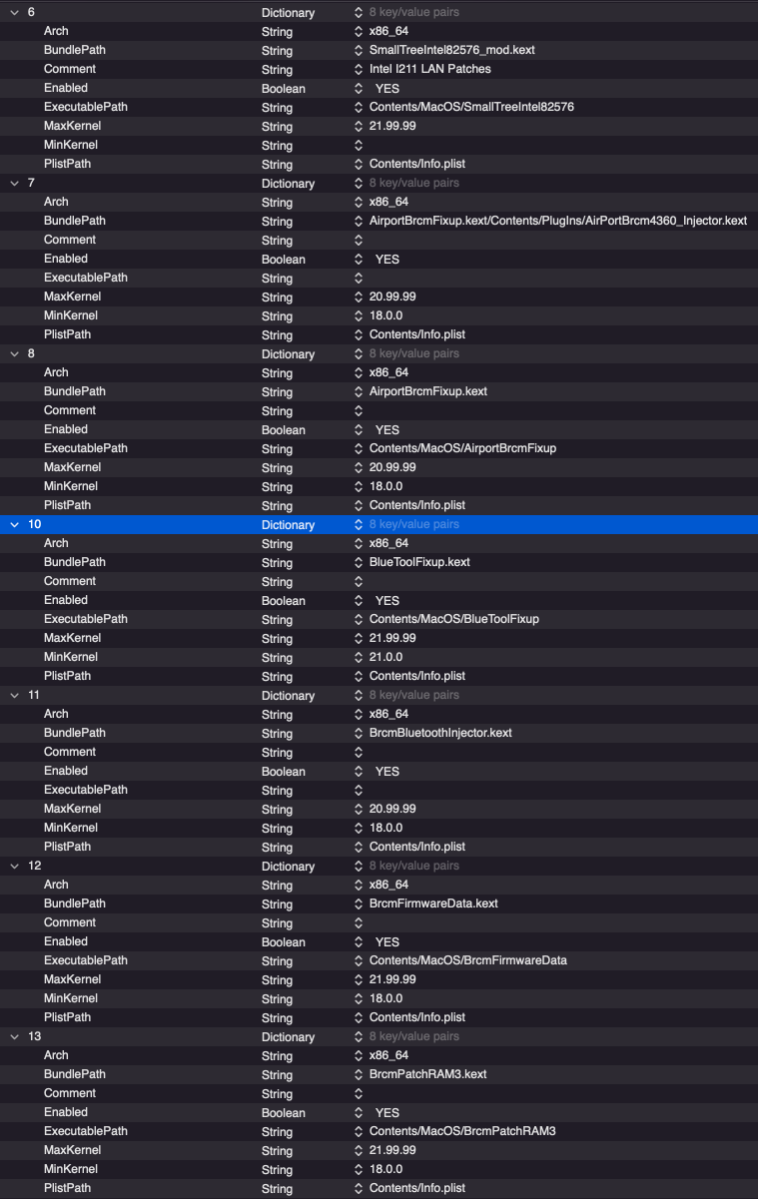
First, below are kexts used (note that some are limited to Big Sur by MaxKernel 20.99.99). The AirportBrcmFixup.kext does not need to be loaded for the 4360 as this work OOTB under Monterey, unlike in Big Sur, which requires this kext to be injected for Airdrop to work.
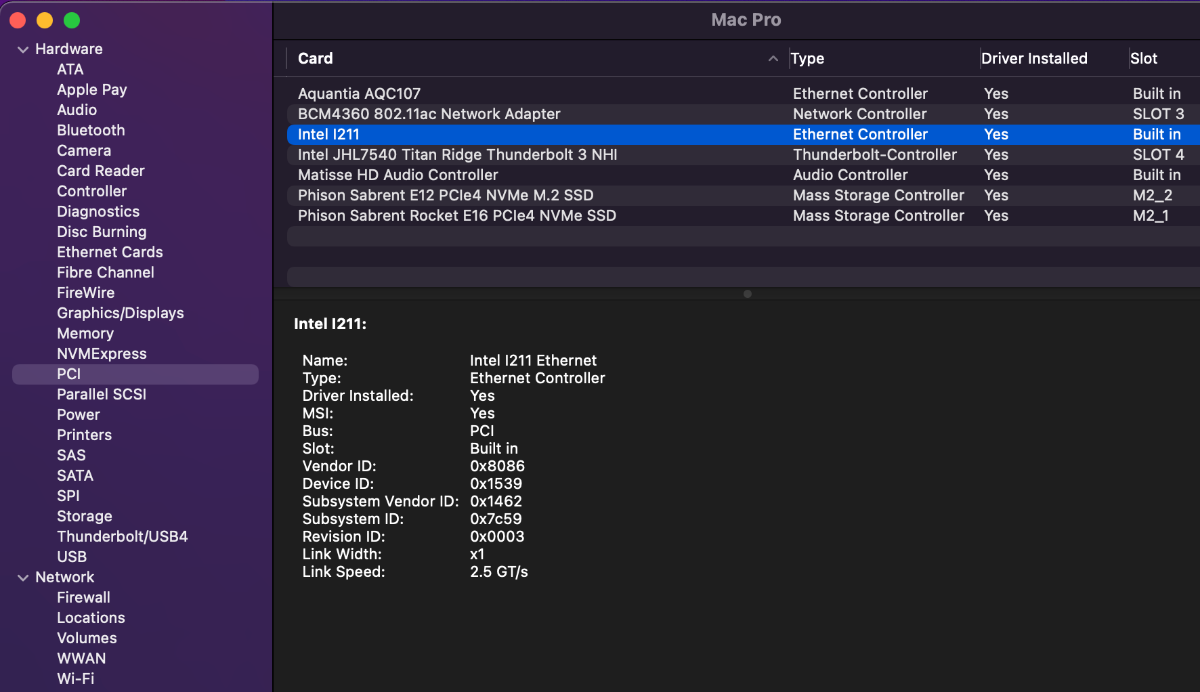
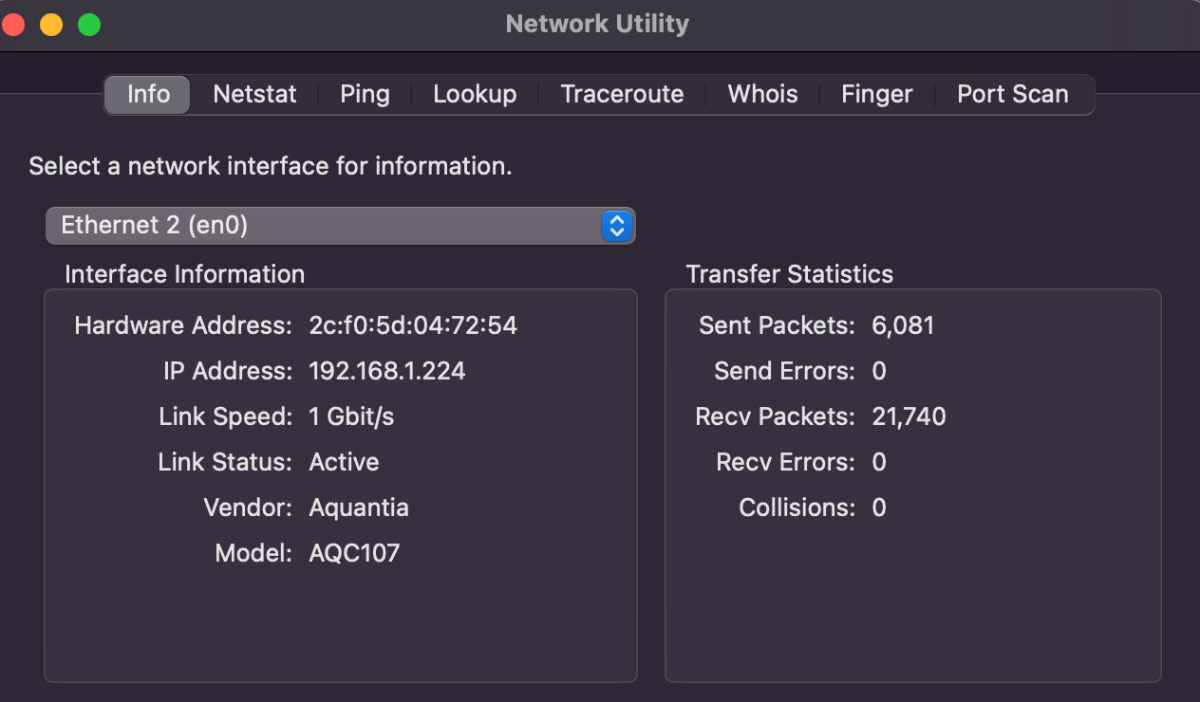
While the driver for I211 is loaded:
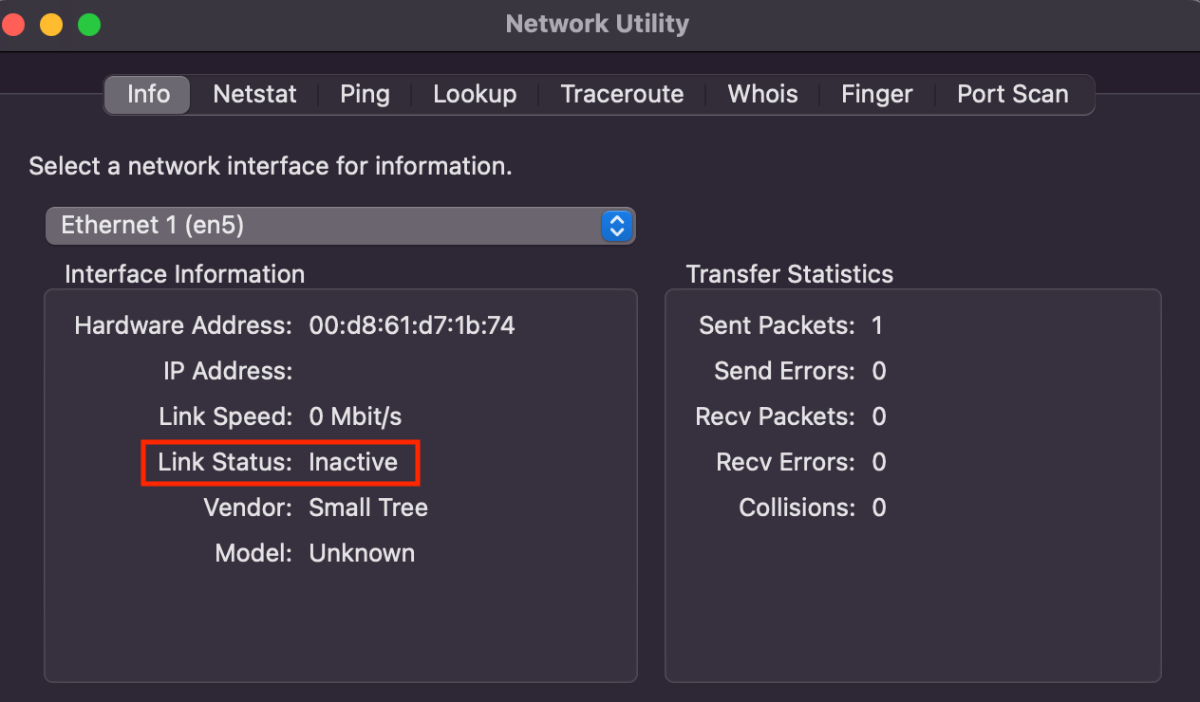
The port is not active (an ethernet cable is plugged in and works under Big Sur) as shown in Spoiler below (along with the active Aquantia port).
Spoiler
The Aquantia port is working well, but uses a new Patch just for Monterey (this was uploaded with previous BS-minimum patch plist file):
While the SmallTree kext is apparently loading, it must not be attaching to the correct location. Attached is the log for all kext files loaded.
-
 2
2
-
-
10 hours ago, fabiosun said:
Hi @jsl2000
i am trying to reduce patches I use on my trx40 system
they should work also for you
if it works or not it is also a combination of quirks you use and bios parameters
important thing to say is that people could try to add some others official patches using the same nomenclature I used in posted patches
if you want post your debug log when your system hangs or check by yourself if inside it you see GetOS string with right os data version
it should be also an old clover bug😉
I tried the PS Poropopo edition patches. It boots into Big Sur, but not into Monterey beta-1.The Quirk settings were:
-
1
-
-
31 minutes ago, Gengik84 said:
Yes.
-
Actually, the idea was not from reading OC documentation.
Instead, I found out about using "2F" as a null entry for editing SSDT files a couple of years ago when working on Find/Replace SSDT patching problems going, ironically, from Clover to OC on the Z390 system. And so I thought it might work here too.
-
 2
2
-
-
2 hours ago, valmeida said:
@ fabiosun I installed your patches and I can boot BS beta 4 but not Monterey . Here is my config.PLIST and the error message I get when trying to install Monterey .
Some of the BT stuff I commented upon here.
I211 is not working in Monterey (the SmallTreeIntel82576.kext is broken) and if used will crash the system. This is true for both Intel and AMD. To avoid crash, either disable the kext or don't plug anything into the I211 ports. Aquantia ports are working just fine, but do need a different kernel patch that I posted earlier.
And no patches are yet working for Monterey beta 2 on AMD.
-
4 hours ago, Jaidy said:
hello you wonderful people,
I am facing an interesting problem. My EFI, while boots just fine, does not show me the macOS installer, (the external one) to boot from to do an installation from scratch at the OC's picker menu. Can some one please take a look at my EFI and fix the config.plist? I would be eternally grateful.
Here is the link to the EFI.
I answered this already, here. Change your scan policy, yours is 3481 (try to carefully read the thread). And "SecureBootModel" is best left "Disabled".
Your should also look at the Quirk settings I posted on same page here.
AppleMCEReporterDisabler.kext is not necessary. I still use AppleALC.kext and WEG (but limit with "agdpmod=pikera"on the 6900XT). I've not seen anyone use "RtWlanU.kext" or "RtWlanU1827.kext" on the TRX40 builds, but perhaps you have add-on hardware of which I'm unaware.
-
1
-
-
1 hour ago, Jaidy said:
I tried updating to the latest beta 4, but it somehow is stuck. Boots back to the beta 3 for me. Hopefully you would have better luck..
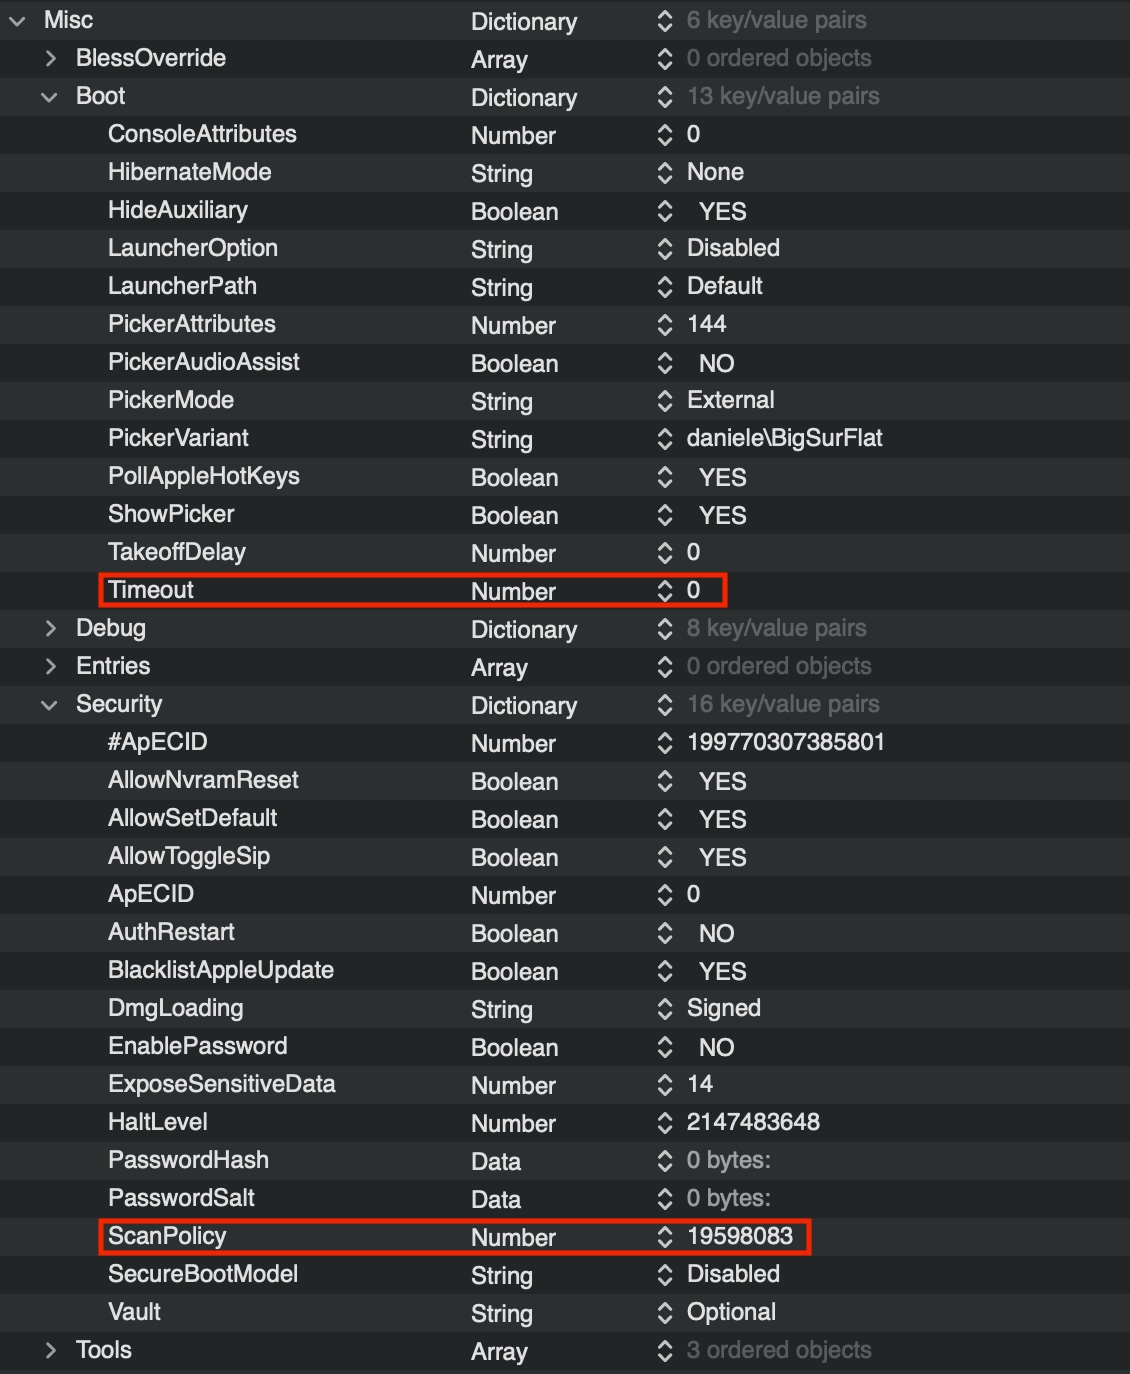
As Ploddles was alluding, the timer may be going too fast. Change Timeout to 0 and there will be no auto-boot until you select the drive and press Enter.
Also, use the ScanPolicy value below to ensure that all devices are properly seen in the menu for selection.
-
1
-
-
7 hours ago, tomnic said:
This is what I've understood starting from the debug log of clover, I think it is similar with OC.
For example, let's pick the patch algrey - cpuid_set_info - jmp to calculations and set cpuid_cores_per_package - 10.15/10.16 it is complete because we have a hex find, a mask find, a hex replace and a mask replace. It says:
Find: 7571E800000000488B050000000048890500000000
Mask: FFFFFF00000000FFFFFF00000000FFFFFF00000000

     Replace: 744E000000000090890D00000000E97E0000006690
Replace Mask: FFFF0000000000FFFFFF00000000FFFFFFFFFFFFFF
How does the patch engine work? We are searching a hex pattern, the "find" one, but we're using a byte mask: this changes a bit our search criteria:
7571E8 00000000 488B05 00000000 488905 00000000 (find)
FFFFFF 00000000 FFFFFF 00000000 FFFFFF 00000000 (mask find)
-----------------------------------------------
7571E8 xxxxxxxx 488B05 xxxxxxxx 488905 xxxxxxxx
So we're effectively searching 7571E8 xxxxxxxx 488B05 xxxxxxxx 488905 xxxxxxxx ... where xxxxxxxx is a wildcard! Every hex combination found in place of xxxxxxxx of its exact bytes lenght is good.
Looking in the clover debug log we can find some precious info about the patches:
55:733  0:010  OC: Kernel patch [9] algrey - cpuid_set_info - jmp to calculations and set cpuid_cores_per_package - 10.15/10.16
55:749  0:015  Replace 7571E800000000488B050000000048890500000000/FFFFFF00000000FFFFFF00000000FFFFFF00000000(7571E8B6090000488B0577EAED0048890538EBED00) by 744E000000000090890D00000000E97E0000006690/FFFF0000000000FFFFFF00000000FFFFFFFFFFFFFF(744EE8B609000090890D77EAED00E97E0000006690) at ofs:1273
The effective code found in the kernel is:
7571E8B6090000488B0577EAED0048890538EBED00
7571E8 B6090000 488B05 77EAED00 488905 38EBED00

7571E8 xxxxxxxx 488B05 xxxxxxxx 488905 xxxxxxxx
...a nice match with our find mask!!!
So now in the replace side we do the same calculations:
744E000000000090890D00000000E97E0000006690
FFFF0000000000FFFFFF00000000FFFFFFFFFFFFFF

744E 0000000000 90890D 00000000 E97E0000006690
FFFF 0000000000 FFFFFF 00000000 FFFFFFFFFFFFFF
----------------------------------------------
744E xxxxxxxxxx 90890D xxxxxxxx E97E0000006690
We must replace in the actual found hex bytes "string" found with the previous calculations, 7571E8B6090000488B0577EAED0048890538EBED00:
7571E8B6090000488B0577EAED0048890538EBED00 (actual found code)

744E000000000090890D00000000E97E0000006690 (replace data)
FFFF0000000000FFFFFF00000000FFFFFFFFFFFFFF (replace mask)

744E 0000000000 90890D 00000000 E97E0000006690 (replace data)
FFFF 0000000000 FFFFFF 00000000 FFFFFFFFFFFFFF (replace mask)

7571 E8B6090000 488B05 77EAED00 48890538EBED00
744E xxxxxxxxxx 90890D xxxxxxxx E97E0000006690
----------------------------------------------
744E E8B6090000 90890D 77EAED00 E97E0000006690
The xxxxxxxx hex "string" must be left exactly as it has been found, the other bytes must be replaced... so the final actual replace is 744EE8B609000090890D77EAED00E97E0000006690.
Offsets are calculated and applied automatically by OC / Clover kernel patch engine.
tomnic ,
Thanks, the is a very clear explanation of the mask function.
***
Now, leading from this is the 'what'? That is, what exactly are we replacing? Does the substituted data make this section inoperable, avoiding the panic and boot failure?
The other questions, stemming from the initial link by fabiosun, that is still unclear to me is: how is this location even chosen? Is it found by looking at the error log during a failed boot?
In the link fabiosun provided there is a discussion about XCPM and locating ”_xcpm_init:". (I don't what to talk about XCPM in detail but use this as a model of how we're to approach the topic of patch creation.) What wasn't clear in that link was what lead to looking at ”_xcpm_init:" in particular? Again, was there an error code from a log that pointed out this particular section as causing the panic?
Next, there is an extraction from the kernel: "xxd -s 0x2283c0 -l 28 -psu /S*/L*/Kernels/kernel”. I'm assuming that without a drive reference, this is doing an extraction of the boot kernel. However, during patch creation, by definition, we are not working on a boot kernel since it won't boot. So we need to reference a drive with the problematic macOS already installed, or can this be extracted from the macOS Installer app?
The other confusing issue was the chosen offset of 0x20000. Why this value? (Maybe Piker discussed it elsewhere and it was common knowledge at the time, but I don't understand why this value was chosen.)
To summarize:
how are the patch locations located, via error logs?
how is the value to be substituted determined (the replacement value)?
which file is examined for this section, an already installed drive with the new macOS, or the installation app for this new macOS?
***
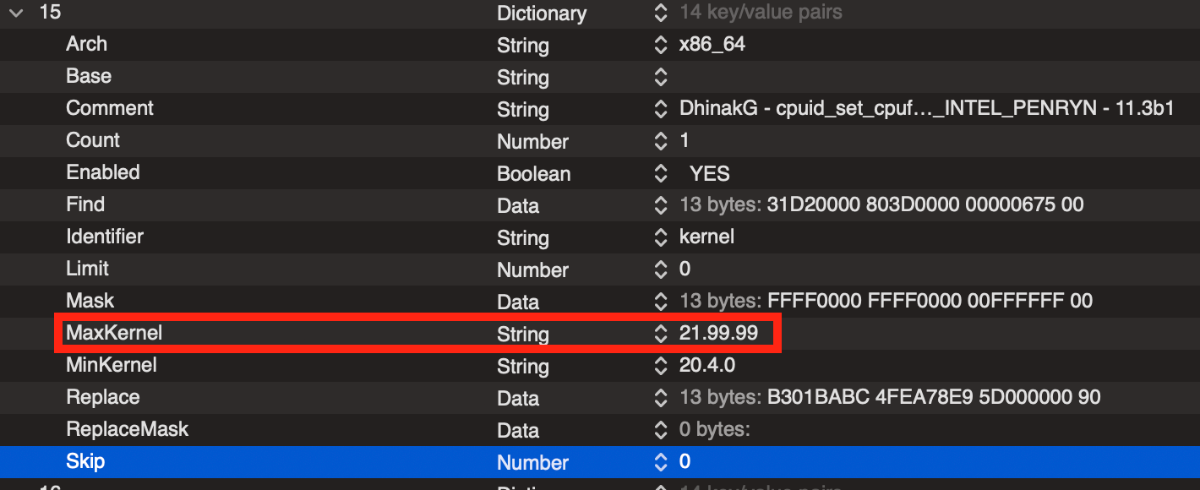
One target for how this is worked out may be the new code needed for Big Sur 11.4.0. There was a change in the "DhinakG - cpuid_set_cpufamily - force CPUFAMILY_INTEL_PENRYN - 11.3b1" after 11.3.0 Maybe this is a good place to start to see how this all is done? (And it seems that Monterey 12.0 broke this and needs a different, but similar value to 11.4.)
-
I downloaded the patches from the AMD OSX github site and through OC was able to finally finish the Monterey install on an external USB NMVe drive.
It did appear to hang during the installation 2nd re-boot with a frozen Apple logo and no progress bar. I turned off computer after waiting ~5 min, re-booted and the install finished without further problems. (I've seen the same odd install behavior with the occasional Big Sur update, so nothing surprising.)
I studied each patch; most are the same, but quite a few new ones specific for Monterey. (I want to pursue the patch issue on your other thread, fabiosun.)
-
1
-
2
-
-
7 hours ago, fabiosun said:
@iGPUthank you for your minimal patches set
I have tried to disabled in clover those two you say and system hangs on beta 11.5.3 on ++++++++++ stage
as side note I can say you can disable also algrey - cpuid_set_cpufamily - force CPUFAMILY_INTEL_PENRYN because bet 11.5.b3 has a Darwin version of 20.6.0 and it should be skipped based on max kernel parameter in use
to compare , maybe it is useful also to specify boot quirks used for kernel and boot part..
but I have to find a better and logic way to test this..ie many of trx40 users need of Dummypowermangement quirk that I do not use and other differences that could come into play in these tests,
I would leave MMIOs aside otherwise it becomes a mess the definition of a common pattern 🙂
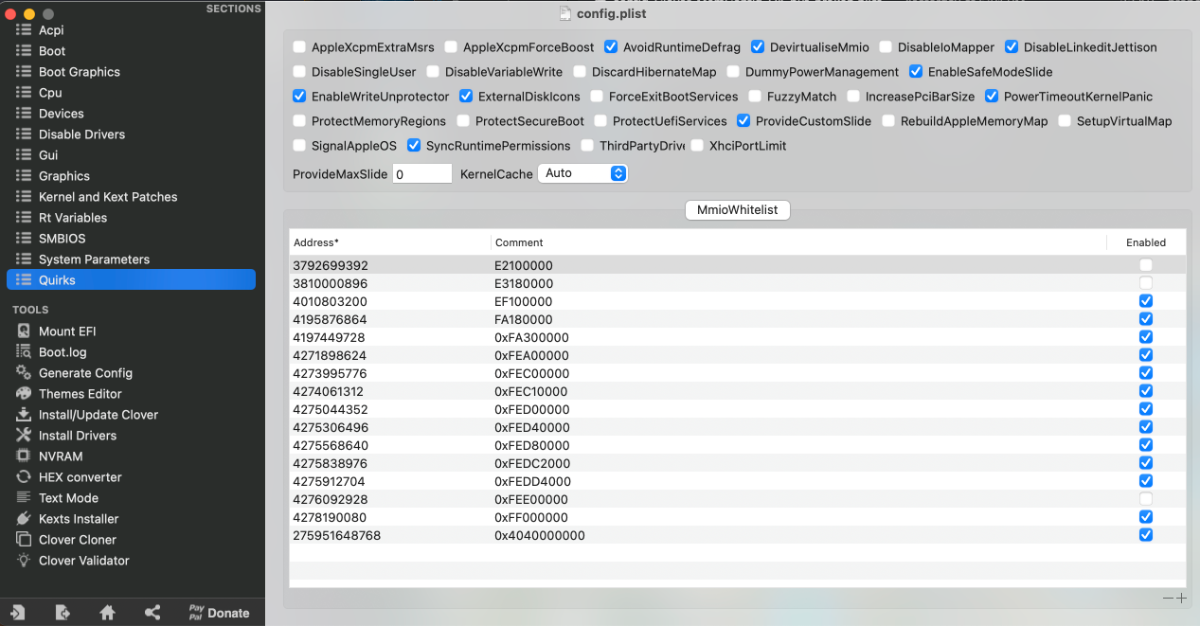
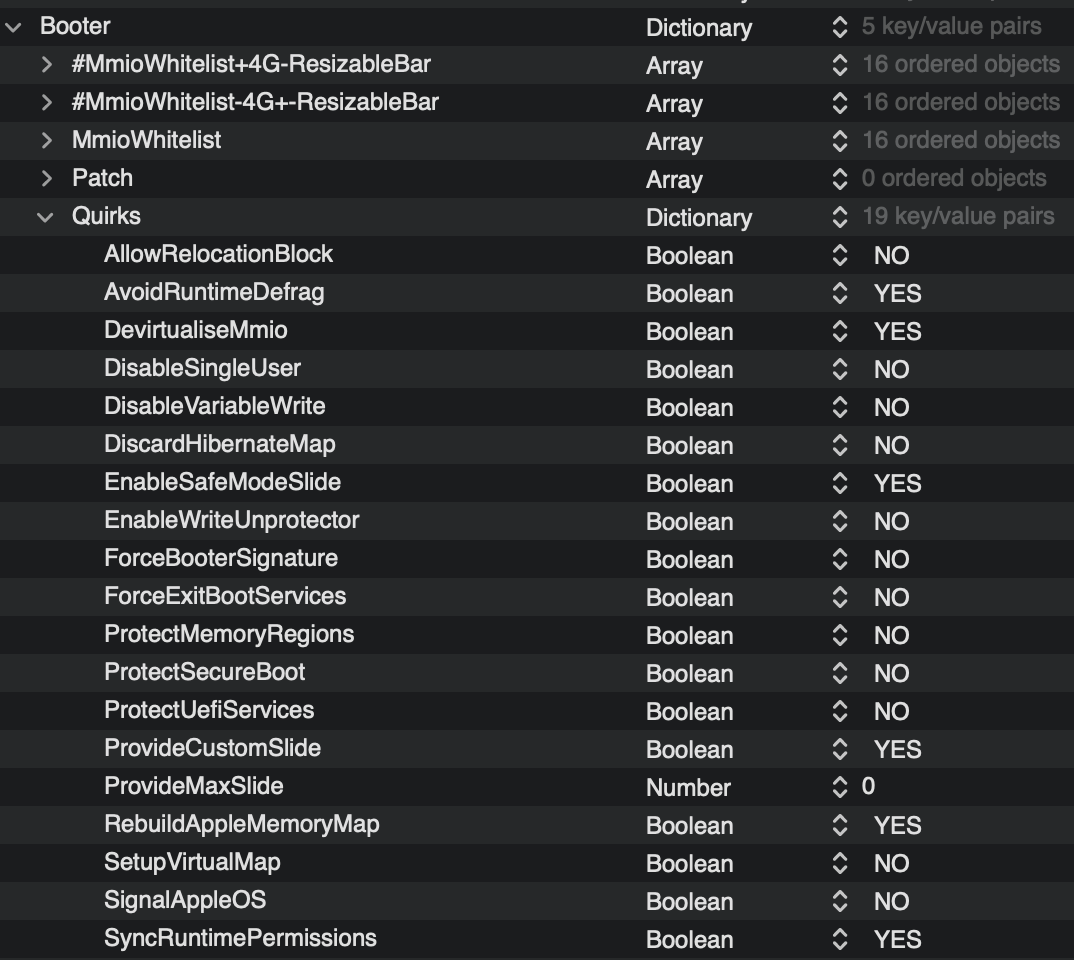
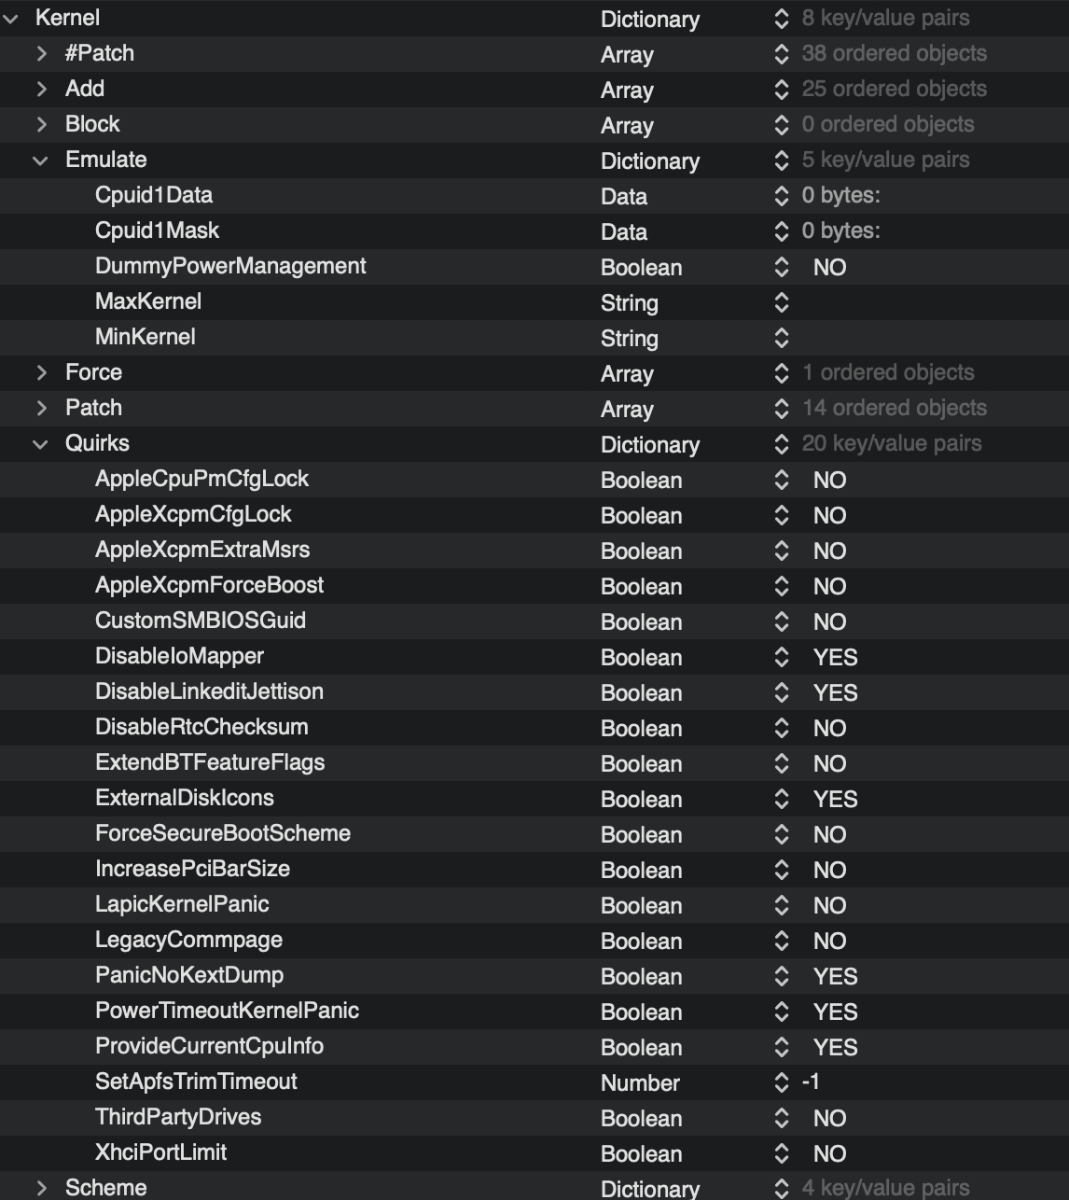
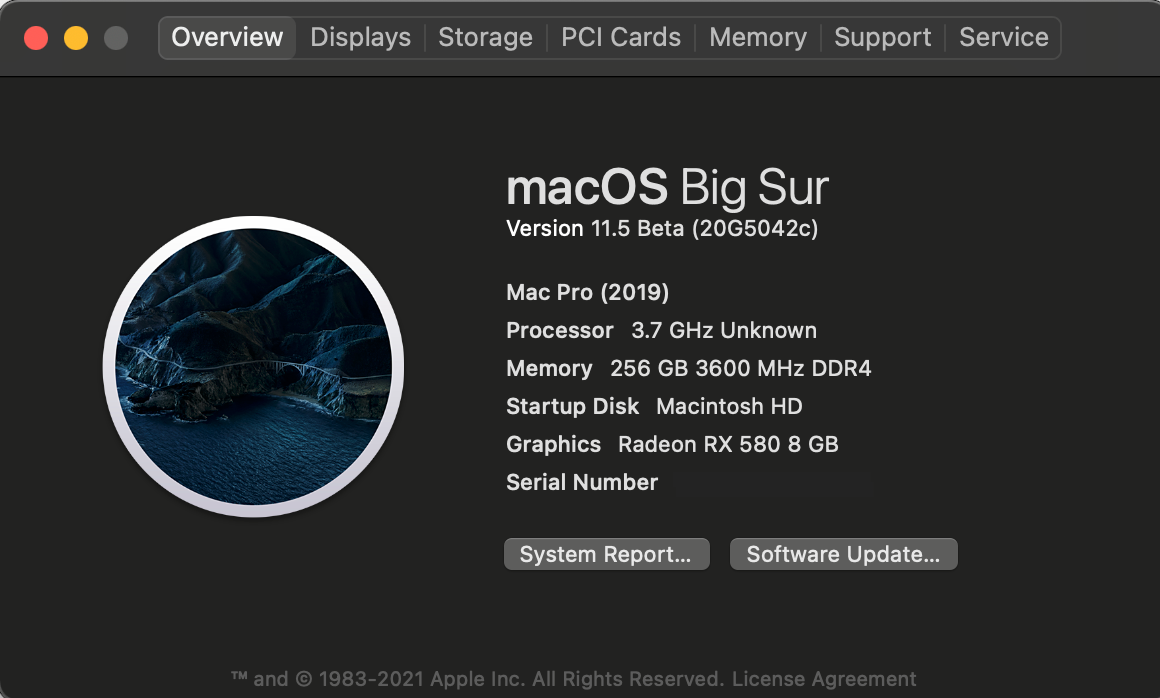
Shown are the settings used for Quirks in OC with the minimal Patch list presented earlier. As for BIOS, both Above 4G and ResizableBar are disabled.
-
1
-
-
4 hours ago, Ploddles said:
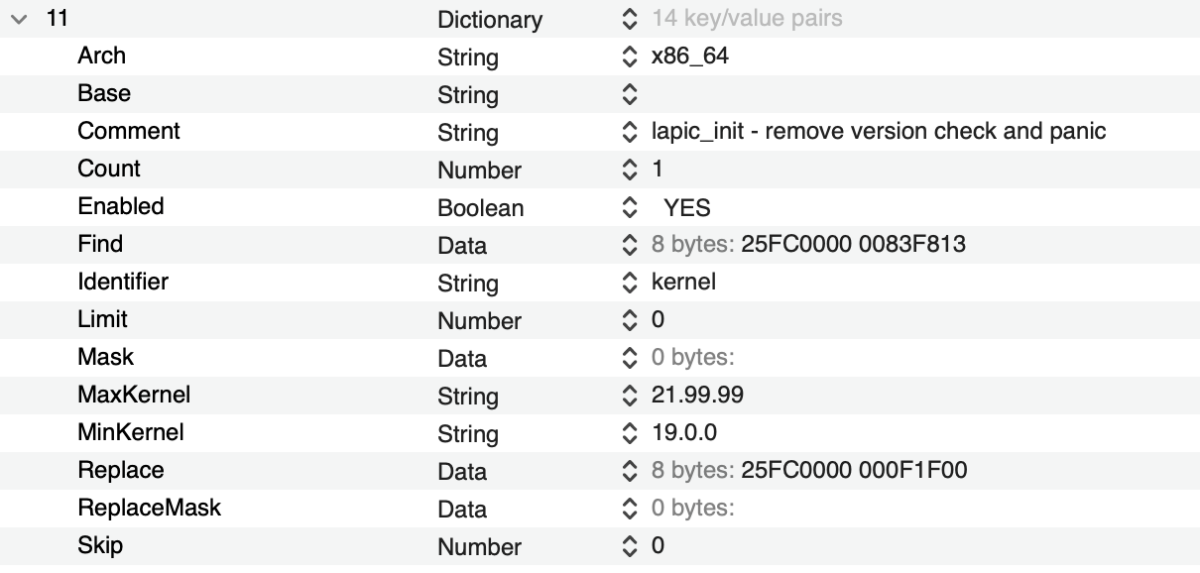
I have not had your patch 11 enabled in my config.plist for many many months now. Have you tried without it?
This must be enabled for me to boot in 11.5 beta.
-
11 hours ago, fabiosun said:
Correct, algrey - cpuid_set_generic_info - disable check to allow leaf7 is not needed at least with 11.5 beta (20G5042c).
I seem to recall this came from a couple of patches suggested by Pavo, but I may be mistaken.
I variably turned it on and off a year ago even with Catalina. I've yet to test to see if required for Mojave.
-
9 hours ago, Ploddles said:
Sorry, I did not explain fully. Disabling the patch only stops Big Sur loading but the latest Bluetooth kexts stop Big Sur and Catalina loading. I now have an updated bluetoolfix kexts to try with the new Monterey enabling kexts.
I will try disabling the other patch later as I am now away from home. I will be back in a few hours time.
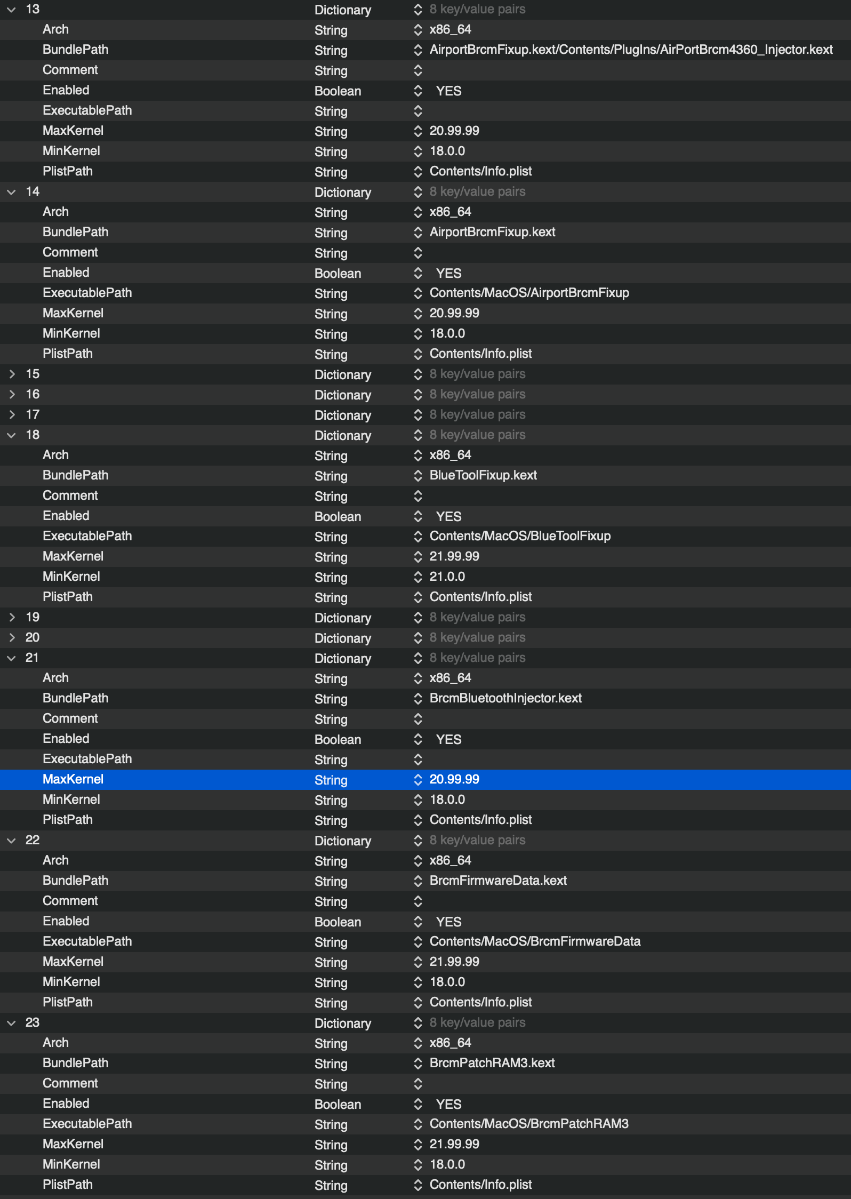
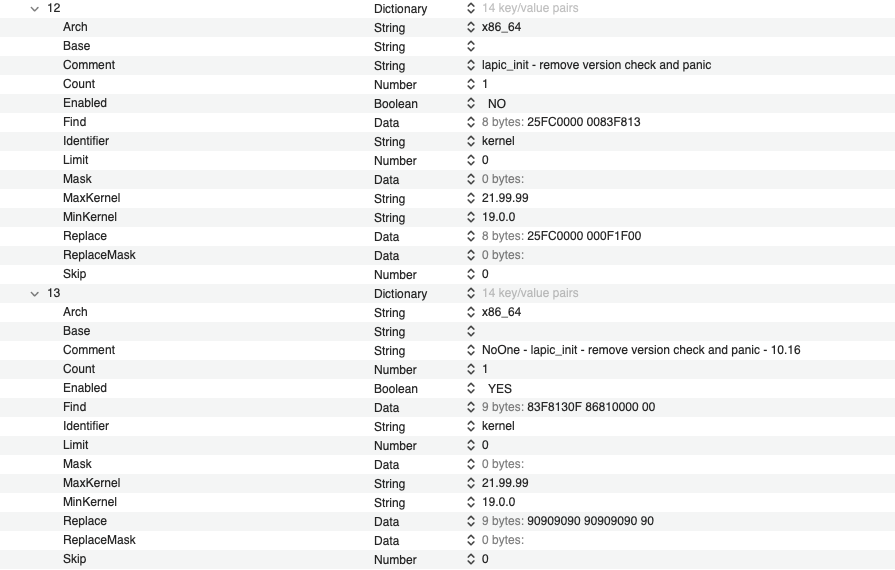
Supposedly, BlueToolFixup.kext is only needed for Monterey, and with Monterery you are NOT to use BrcmBluetoothInjector.kext.
The image below may help to explain if you carefully note the version restrictions that I've prepared in anticipation of Monterey.
-
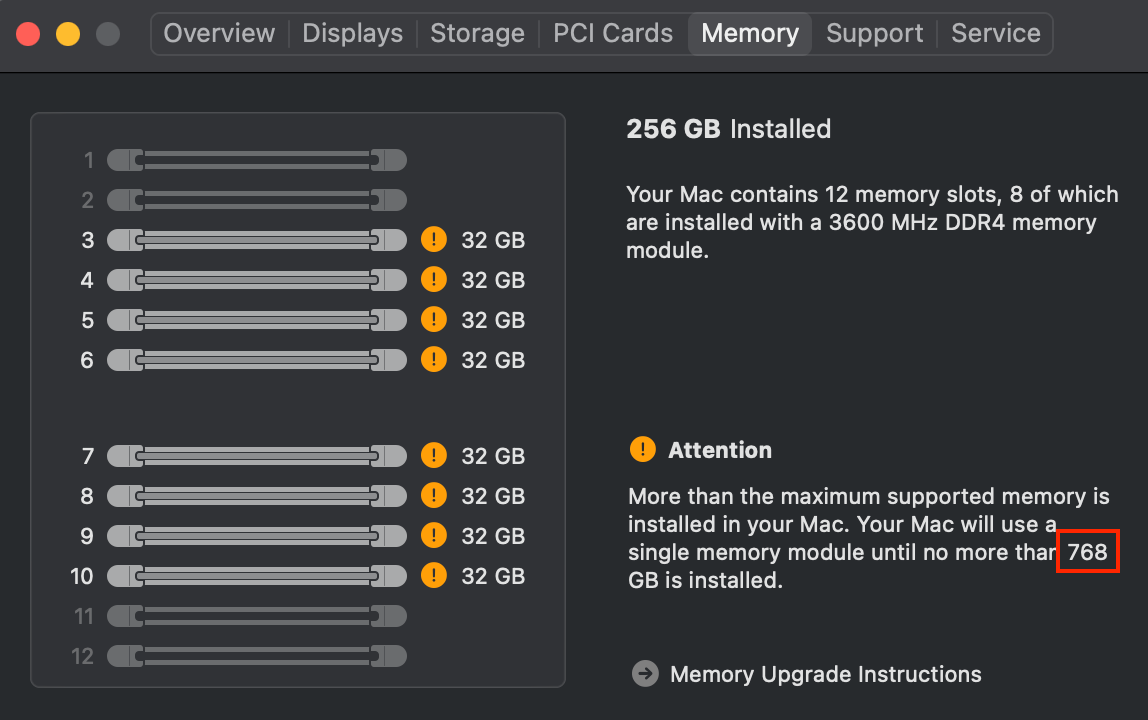
On booting with Clover, I decided to look at Memory slot issues before looking at the Patches since the Memory Error pop-up was annoying me. After several re-arrangements and re-boots, I came up with code that seems to almost work.
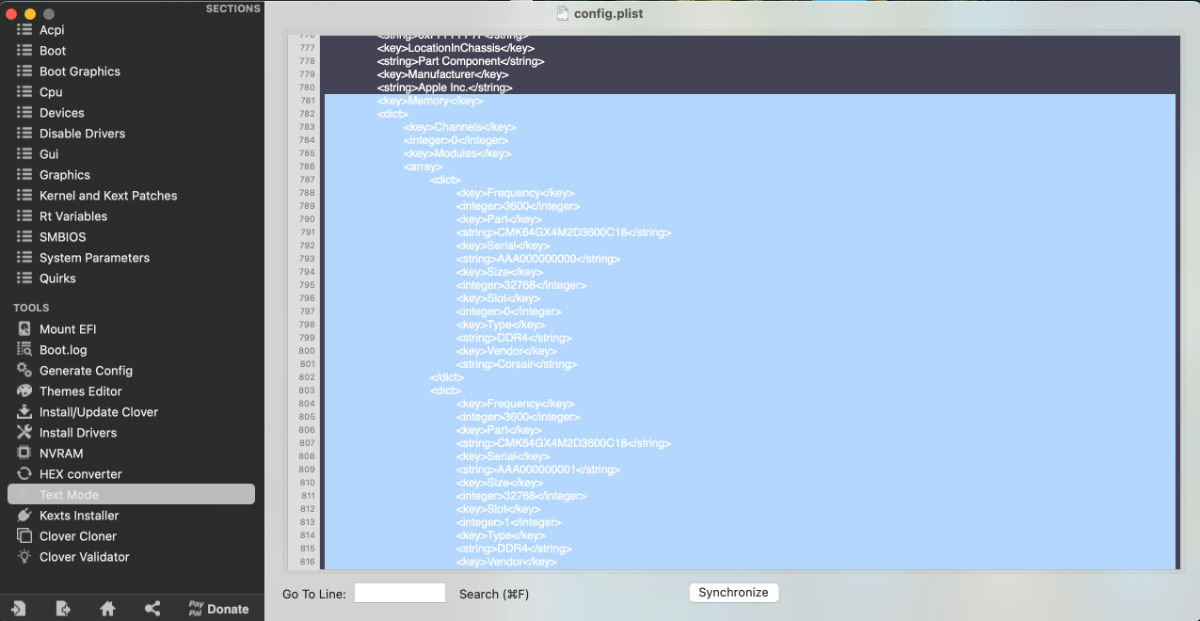
If the code in Spoiler below is copied and pasted into the Text section of Clover, it will produce the Memory window shown below.
Spoiler<key>Memory</key> <dict> <key>Channels</key> <integer>0</integer> <key>Modules</key> <array> <dict> <key>Frequency</key> <integer>3600</integer> <key>Part</key> <string>CMK64GX4M2D3600C18</string> <key>Serial</key> <string>AAA000000000</string> <key>Size</key> <integer>32768</integer> <key>Slot</key> <integer>0</integer> <key>Type</key> <string>DDR4</string> <key>Vendor</key> <string>Corsair</string> </dict> <dict> <key>Frequency</key> <integer>3600</integer> <key>Part</key> <string>CMK64GX4M2D3600C18</string> <key>Serial</key> <string>AAA000000001</string> <key>Size</key> <integer>32768</integer> <key>Slot</key> <integer>1</integer> <key>Type</key> <string>DDR4</string> <key>Vendor</key> <string>Corsair</string> </dict> <dict> <key>Frequency</key> <integer>3600</integer> <key>Part</key> <string>CMK64GX4M2D3600C18</string> <key>Serial</key> <string>AAA000000002</string> <key>Size</key> <integer>32768</integer> <key>Slot</key> <integer>2</integer> <key>Type</key> <string>DDR4</string> <key>Vendor</key> <string>Corsair</string> </dict> <dict> <key>Frequency</key> <integer>3600</integer> <key>Part</key> <string>CMK64GX4M2D3600C18</string> <key>Serial</key> <string>AAA000000003</string> <key>Size</key> <integer>32768</integer> <key>Slot</key> <integer>3</integer> <key>Type</key> <string>DDR4</string> <key>Vendor</key> <string>Corsair</string> </dict> <dict> <key>Frequency</key> <integer>0</integer> <key>Part</key> <string></string> <key>Serial</key> <string></string> <key>Size</key> <integer>0</integer> <key>Slot</key> <integer>4</integer> <key>Type</key> <string></string> <key>Vendor</key> <string></string> </dict> <dict> <key>Frequency</key> <integer>0</integer> <key>Part</key> <string></string> <key>Serial</key> <string></string> <key>Size</key> <integer>0</integer> <key>Slot</key> <integer>5</integer> <key>Type</key> <string></string> <key>Vendor</key> <string></string> </dict> <dict> <key>Frequency</key> <integer>3600</integer> <key>Part</key> <string>CMK64GX4M2D3600C18</string> <key>Serial</key> <string>AAA000000006</string> <key>Size</key> <integer>32768</integer> <key>Slot</key> <integer>6</integer> <key>Type</key> <string>DDR4</string> <key>Vendor</key> <string>Corsair</string> </dict> <dict> <key>Frequency</key> <integer>3600</integer> <key>Part</key> <string>CMK64GX4M2D3600C18</string> <key>Serial</key> <string>AAA000000007</string> <key>Size</key> <integer>32768</integer> <key>Slot</key> <integer>7</integer> <key>Type</key> <string>DDR4</string> <key>Vendor</key> <string>Corsair</string> </dict> <dict> <key>Frequency</key> <integer>3600</integer> <key>Part</key> <string>CMK64GX4M2D3600C18</string> <key>Serial</key> <string>AAA000000008</string> <key>Size</key> <integer>32768</integer> <key>Slot</key> <integer>8</integer> <key>Type</key> <string>DDR4</string> <key>Vendor</key> <string>Corsair</string> </dict> <dict> <key>Frequency</key> <integer>3600</integer> <key>Part</key> <string>CMK64GX4M2D3600C18</string> <key>Serial</key> <string>AAA000000009</string> <key>Size</key> <integer>32768</integer> <key>Slot</key> <integer>9</integer> <key>Type</key> <string>DDR4</string> <key>Vendor</key> <string>Corsair</string> </dict> <dict> <key>Frequency</key> <integer>0</integer> <key>Part</key> <string></string> <key>Serial</key> <string></string> <key>Size</key> <integer>0</integer> <key>Slot</key> <integer>10</integer> <key>Type</key> <string></string> <key>Vendor</key> <string></string> </dict> <dict> <key>Frequency</key> <integer>0</integer> <key>Part</key> <string></string> <key>Serial</key> <string></string> <key>Size</key> <integer>0</integer> <key>Slot</key> <integer>11</integer> <key>Type</key> <string></string> <key>Vendor</key> <string></string> </dict> </array> <key>SlotCount</key> <integer>12</integer> </dict>
Go to Text pane below to paste all of code into area of Memory as shown below:
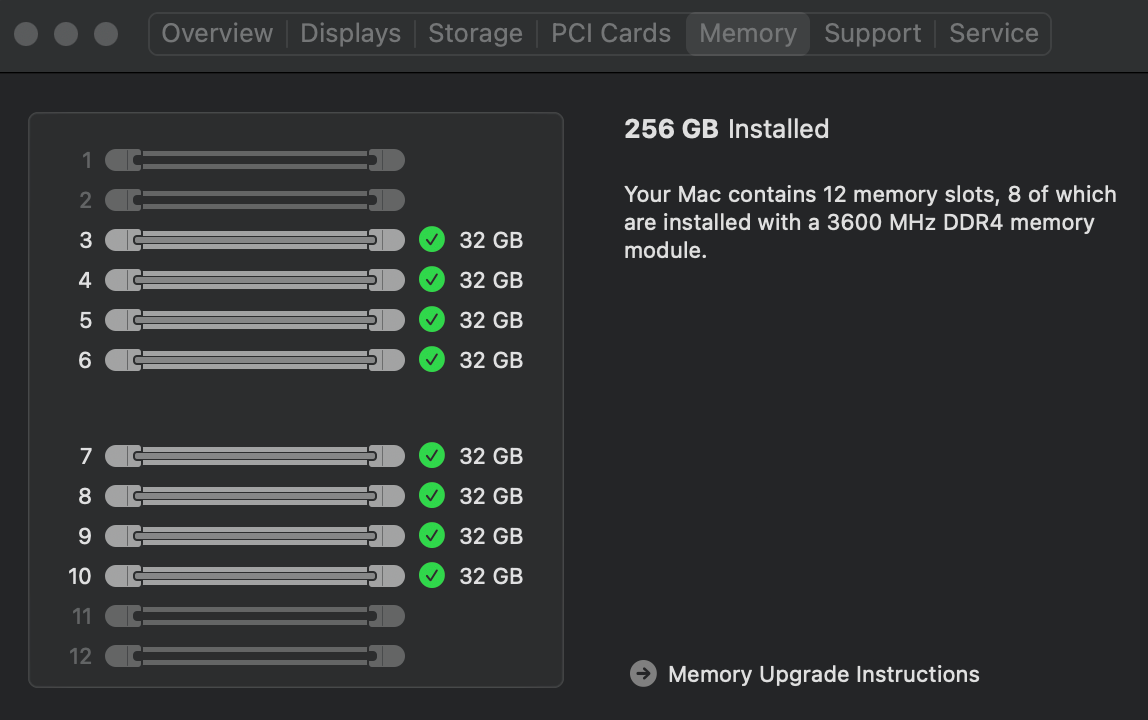
This is very similar to what is seen under OpenCore (shown below).
The above code at least shifts the DIMMs into the correct positions, mimicking what we see under OC. However, under Clover, there is a warning about single modules being too large. I think the problem is with Clover. When booting with Clover, Clover won't accept more than 16GB per DIMM (see the Size pop-up on the SMBIOS pane; it maxes out at 16384), unlike OpenCore. Clover then probably sends the wrong DIMM size data to macOS, leading macOS to generate the Memory error msg.
If I try to fool Clover by only entering 16GB instead of 32GB, the computer won't boot (I suppose it knows that 256GB are present, not 128GB).
I don't know who the developers are, but I think this should be fixable. If fixed, we could stop memory error flags.
[Now, if you have smaller DIMMs, then this may work for you. If you have fewer DIMMs and they're also smaller, you'll have to work out the pattern as I'm not pursuing further.]
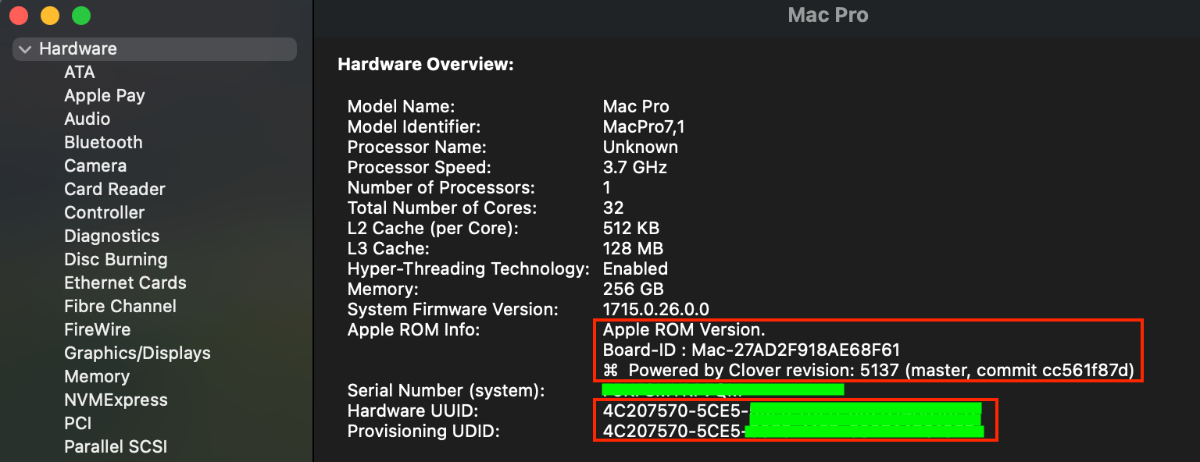
On a related matter, despite entering a consistent SN and UUID, which can be verified in Clover logs and is properly saved in the Clover config.plist file, Clover in the SysInfo window (Spoiler below), keeps the correct SN, but changes the UUID and enters it own ROM. Weird.
Spoiler
-
 1
1
-
-
12 hours ago, fabiosun said:
to be more clear , without that patch my system does not boot
it boots fine with this one (NoOne official one and it seems completely different from one I and @Ploddlesand maybe other people are using):
It would be useful to understand why 🙂
I'm using both of these two, having them both enabled. I don't remember when/where it arose, but I do vaguely remember trying to minimize the number of patches and both were needed.
But the last time I checked any of these was maybe in August or September with an older BIOS and the current Big Sur at that time.
-
fabiosun,
While waiting for Monterey patches, I decided to regress and try booting into Mojave as an exercise. But, I can't seem to get it to work. I've tried old settings that I thought worked a year or so ago, including OC v061 as well as v070 with its various updates.
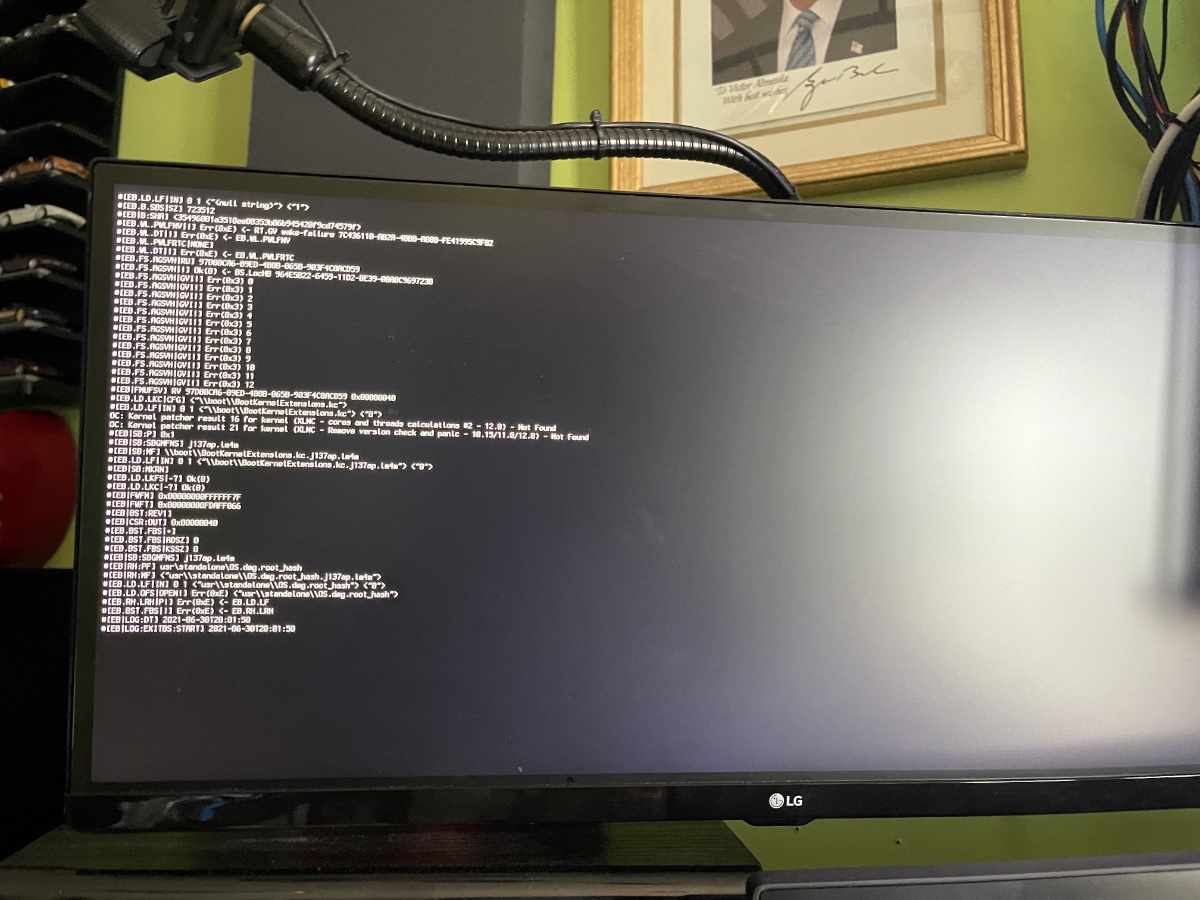
In verbose mode, I only see the following on screen and then computer freezes:
End SetConsoldeMode
Start OpenKernelRootVolume
End OpenKernelRootVolume
When looking at the debug error code, during the Mojave boot, the stoppage occurs at the XNU hook stage (shown in spoiler with comparison to same area during a successful boot into Big Sur). Once the XNU hook is successful, then the kernel patches are loaded, so this freeze occurs just before the Kernel Patch stage.
Any ideas how to fix?
SpoilerMojave boot stops here:
same position during Big Sur boot:
-
Anche io!
-
3
-
1
-
-
Soon. See this post from today.
-
 1
1
-
 1
1
-
1
-
-
5 hours ago, valmeida said:
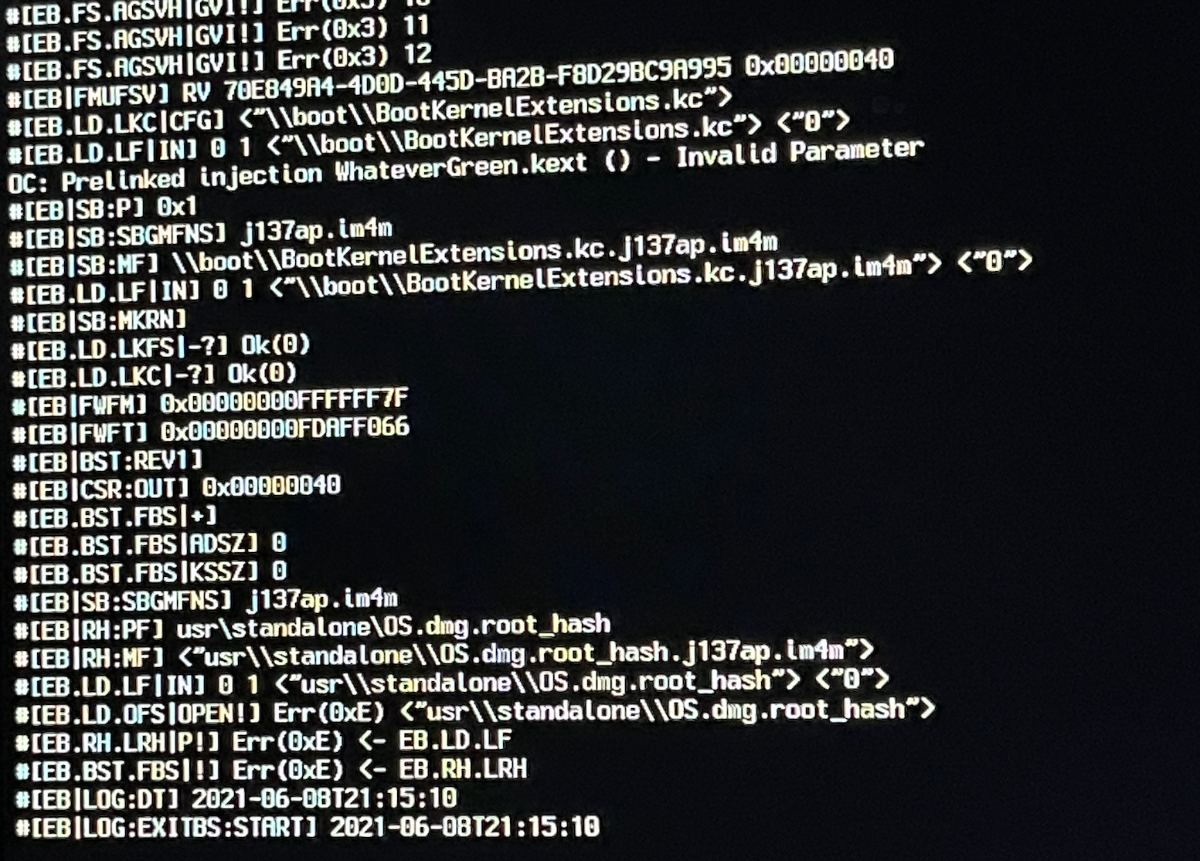
I have updated all my kext including Lilu and WEG added boot-args -wegbeta -lilubetaall and I get stuck in this point of the boot process.
Yes, me too. It is related to incorrect Kernel/Patches. We must wait until these are sorted out (I don't know how to create them).
But, remember to adjust Patches and Kexts to change any MaxKernel 20.99.99 values to 21.99.99 (20 = Big Sur; 21 = Monterey). Otherwise, nothing will load for Monterey!
-
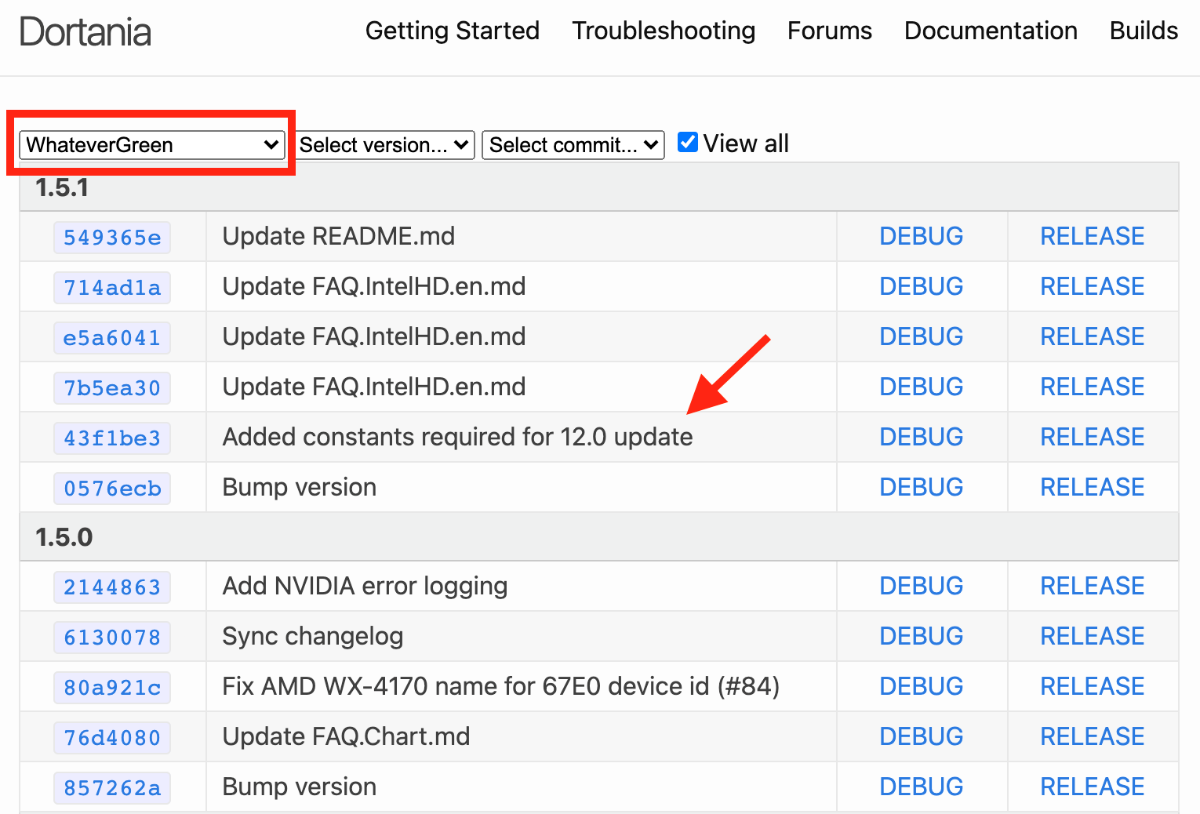
I've referred to this site before, but go here and use the pop-up in upper left corner to select the various kexts. Download the latest release versions that will now support macOS 12
without having to use various boot-args. These were all updated by PMHeart.Update: PMHeart now suggesting boot-args (-wegbeta -lilubetaall) are still needed and may not be fixed until the 2021-July release of Monterey.
-
-
Maybe post your I210 problem on the OpenCore thread here and see if someone else has any ideas. If you're lucky Vit9696 might weigh in.
You'll need to carefully itemize each test/adjustment you performed (esp detailed descriptions of the Force and patch injections) to minimize pointless suggestions which cover something you've already tried.
-
1
-
-
Activating AirDrop Guide
I've read on many threads on different forums about problems with activating AirDrop. While there are many reasons why AirDrop may not work, most of the problems are hardware related. As for hardware, there are 2 basic choices: use the installed card or use an add-in-card (AIC) that contains a Mac-compatible WLAN. With respect to the former, there are recent threads regarding the use of the Intel AX200, which is the stock WLAN card on most of our TRX40 mobos. There are also some of us who've exchanged this card for a more Mac-compatible WLAN card.
I've been experimenting with this issue and will try to present a hopefully lucid explanation. But first, some hardware ground rules: the Fenvi-919, while faster, has some MacOS crashing problems, so I settled on the Fenvi-1200M as the most reliable and Mac-friendly (AirDrop working) PCIe card. This card uses the BRCM-4360 chip (which will become important later when discussing kext files). No other WLAN AIC will be discussed.
As for the AX200, it can be left in-situ or can be exchanged for a card similar to the BRCM-4360. Since exchanging cards can be tricky (I've swapped them many times, so not so difficult), and can vary for each mobo, let's assume that the AX200 is left intact, and avoid all discussion of card swapping for purposes of this guide.
Now that the hardware is fixed, the AirDrop guide can be broken down into 2 sections: kext files and SSDT files. The kext files are divided into 2 groups: one set supports the AX200, the other set supports the Fenvi-1200M. The SSDT files are also broken into 2 groups: one to support the internal AX200 card, and the other, to inactivate the AX200 card and allow the Fenvi-1200M to properly function.
Important:
Without both of these steps, AirDrop will not work. In other words, unless both BT and Wifi are properly working, AirDrop will not work. And BT will not properly work if both the internal AX200 and the Fenvi-1200M are trying to each broadcast BT. Only one device must be allowed to broadcast BT.
As a heads-up, so you don't have to study all the details for the AX200: AirDrop presently (as of May, 2021) does NOT work when using the AX200. While BT and WLAN work with the kexts described below on the AX200, AirDrop does not yet work (perhaps with future kext updates it will). So at this time, the only advantage of using the AX200 is the speed of connection, esp regarding Wifi.
1. Kext Files
The AX200 requires a specific set of kext files known as "OpenIntelWireless" that can be downloaded here. You need both the BT set and the WLAN set.
The Fenvi-1200M requires a different set of kexts: AirportBrcmFixup, BrcmBluetoothInjector, BrcmFirmwareData, and BrcmPatchRAM3 (all provided in an attachment with this post). While there are some who claim that the Fenvi-1200M works OOTB (without any kexts), I've never, on any platform had such luck, and recommend using all of these kext files for the Fenvi-1200M.
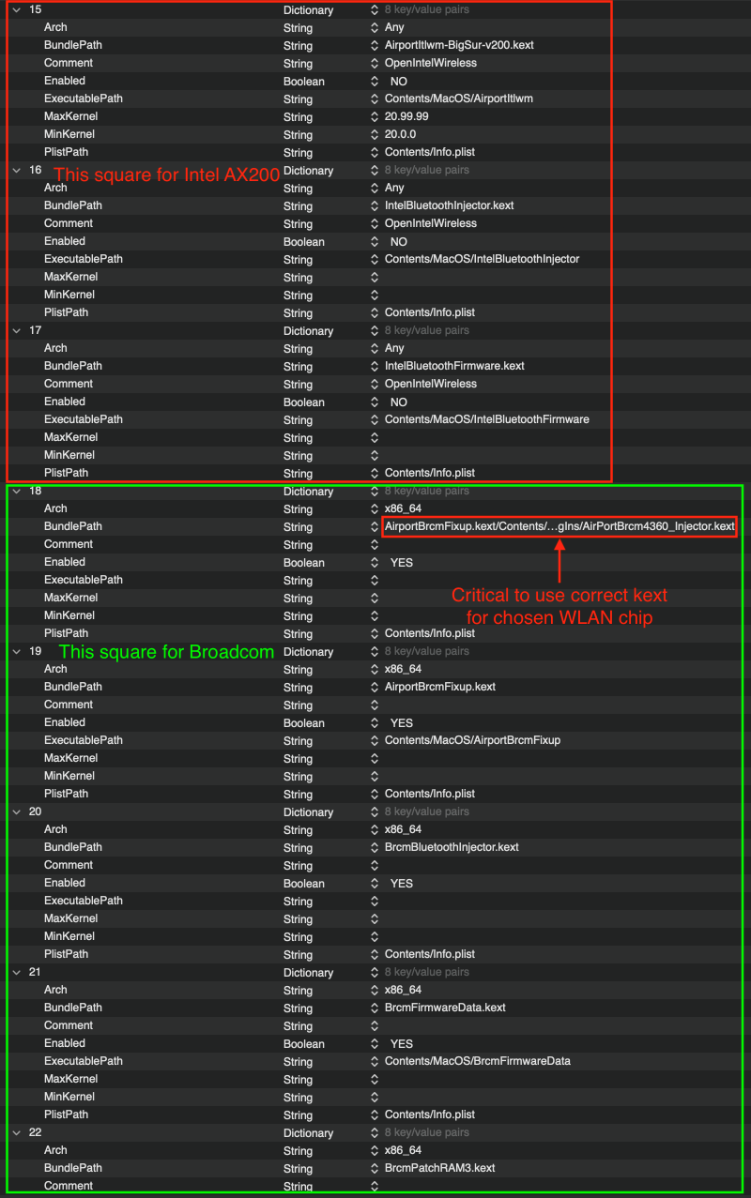
The following Spoiler shows the 2 kext setups for both the AX200 and the Fenvi-1200M. You only want to enable one or the other, not both.
Kext Setup:
Spoiler
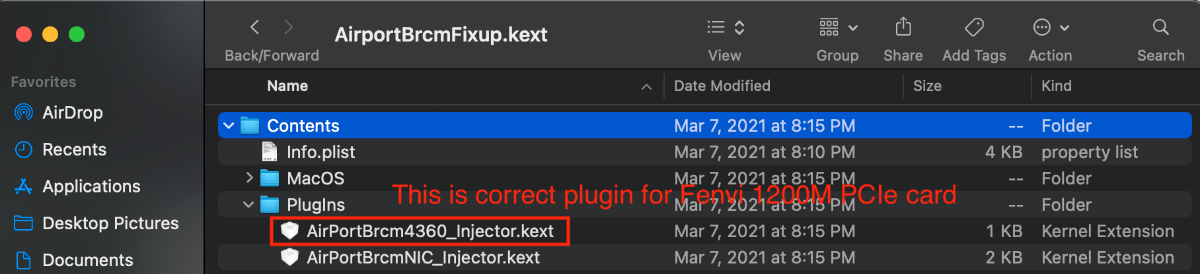
There are 2 plug-ins within the AirportBrcmFixup kext file (shown below). If you have the ~NIC-Injector chosen, the Fenvi-1200M WLAN will not be able to connect to your Wifi. Instead, if the highlighted plugin is chosen the Fenvi-1200M WLAN will connect just fine. The correct method of kext injection is shown in the above Spoiler.
2. SSDT Files
So far, the set of the kext files was fairly easy. The tricky part is getting the SSDT section correct. The SSDT files are essential in order to remove the power supply from the internal AX200. If the power is not removed, BT from the AX200 will compete with BT from the Fenvi-1200M and will AirDrop will be broken. Active power to the AX200 is only seen by examining IORE to see if there are 2 BT sources.
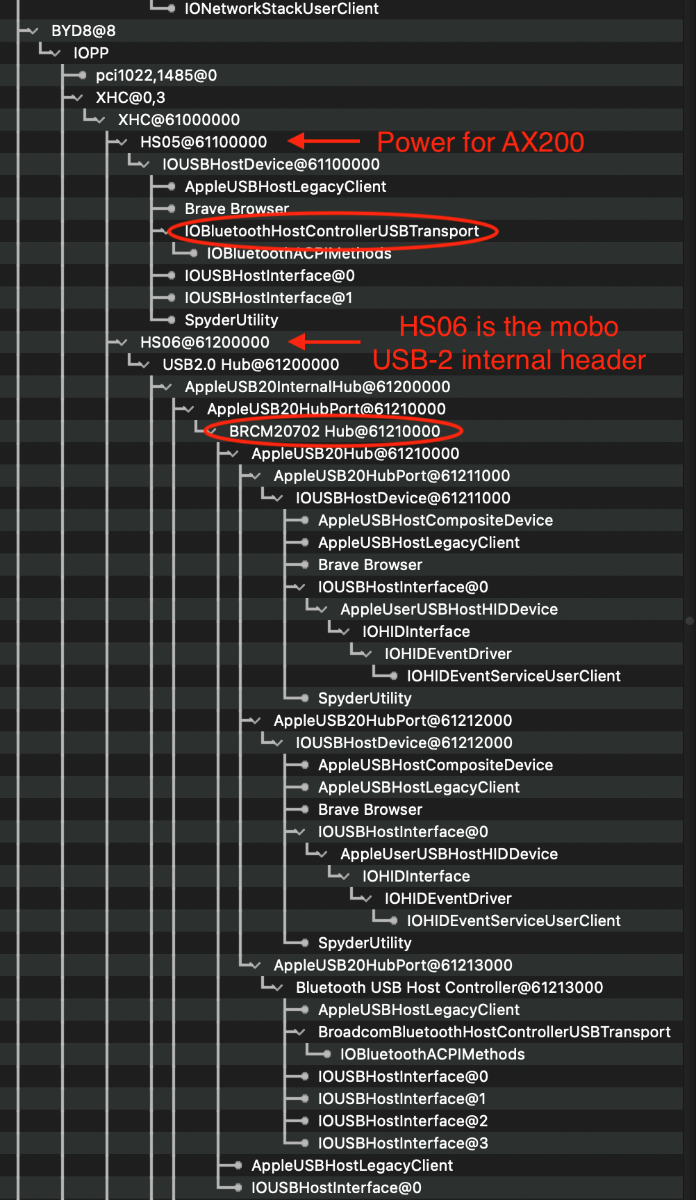
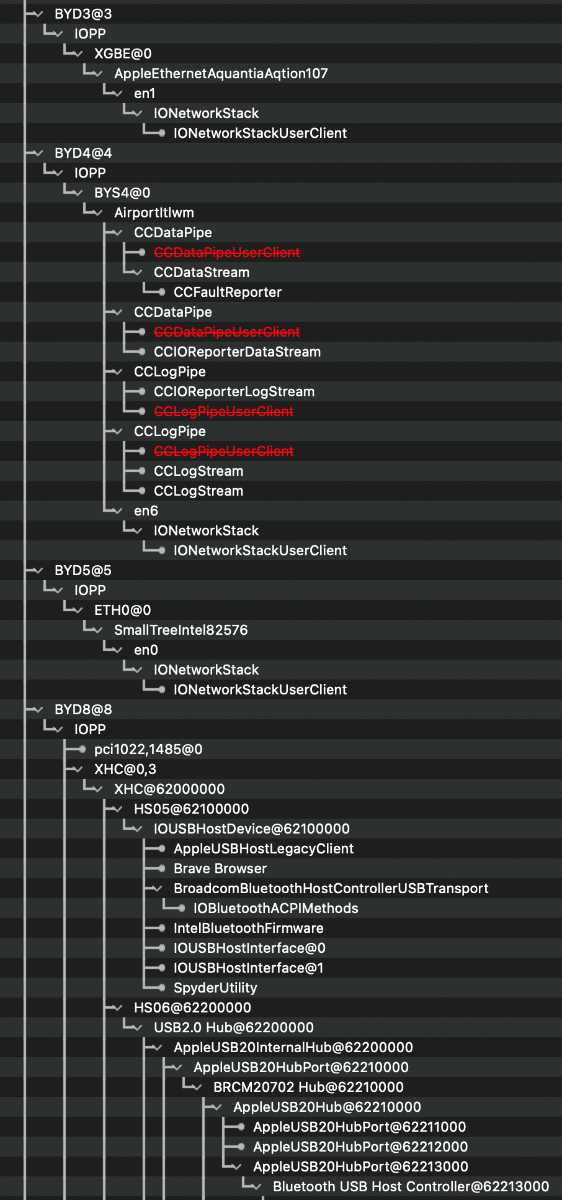
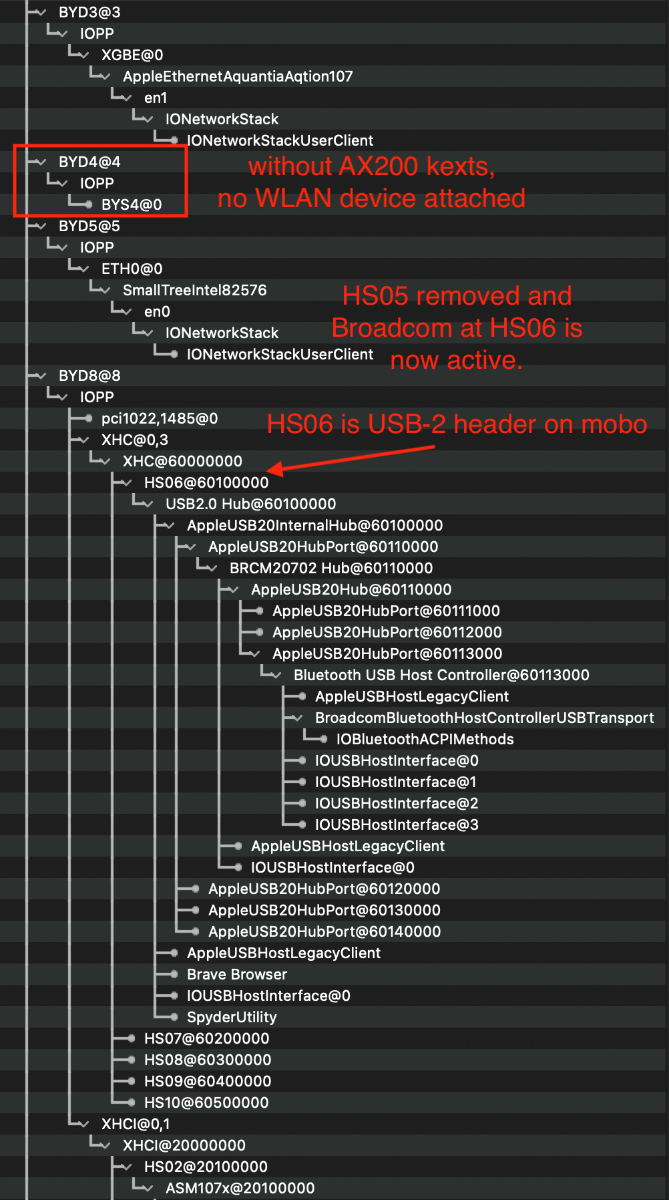
The image below from IORE shows what is seen when both are active. In the image, the port named HS05 (XHC0 was renamed to XHC by the SSDT; XHC0/XHC is under S0D2.D2A0.BYUP.BYD8 on my mobo), powers the internal AX200. Meanwhile, HS06 is the power supplied by the internal USB-2 header (again, on my mobo). This internal USB-2 header, on my mobo, also supplies the front USB ports on my chassis, along with other ports. HS06 must remain enabled.
Notice below the entry for "IOBluetoothHostControllerUSBTransport" under HS05 (where AX200 is attached) and the 2nd BT entry under HS06 for the "BRCM20702 Hub" (which is coming from the Fenvi-1200M): there are two BT sources. This will prevent AirDrop from working.
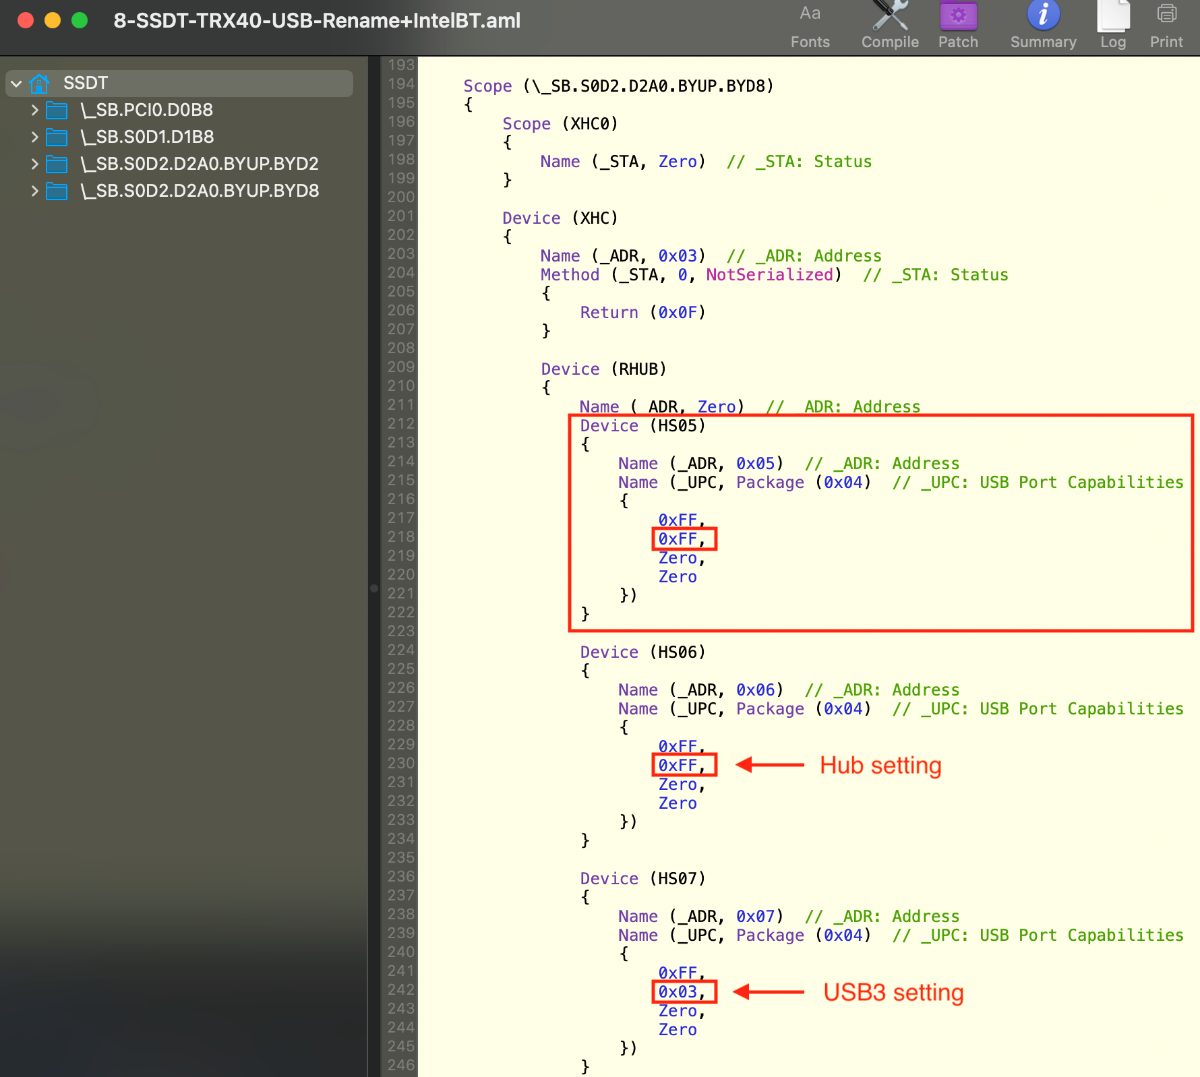
As described above, if you want the Fenvi-1200M to provide AirDrop support, you must inactivate HS05. This is done by removing it from the definition in the SSDT file. Shown in the Spoiler below, HS05 and HS06 (HS01-4 are not used and so are removed by "not" defining them). If the HS05 is simply removed, then the BT portion of the AX200 will cease to function.
SpoilerDo note that each USB device for the WLAN modules are defined as 0xFF (or 255). This means they will be assigned as an "Internal" connections, not a USB-3 port (which would be 0x03).
A. HS05 ACTIVE (supplying power to the AX200 card for BT):
What happens if both HS05 and HS06 are functional and both set of kexts are used? Then the USB power is still supplied to the internal AX200, whether or not any OpenIntelWireless kexts are used). Since both cards are active BT will be broken and AirDrop will not be functional.
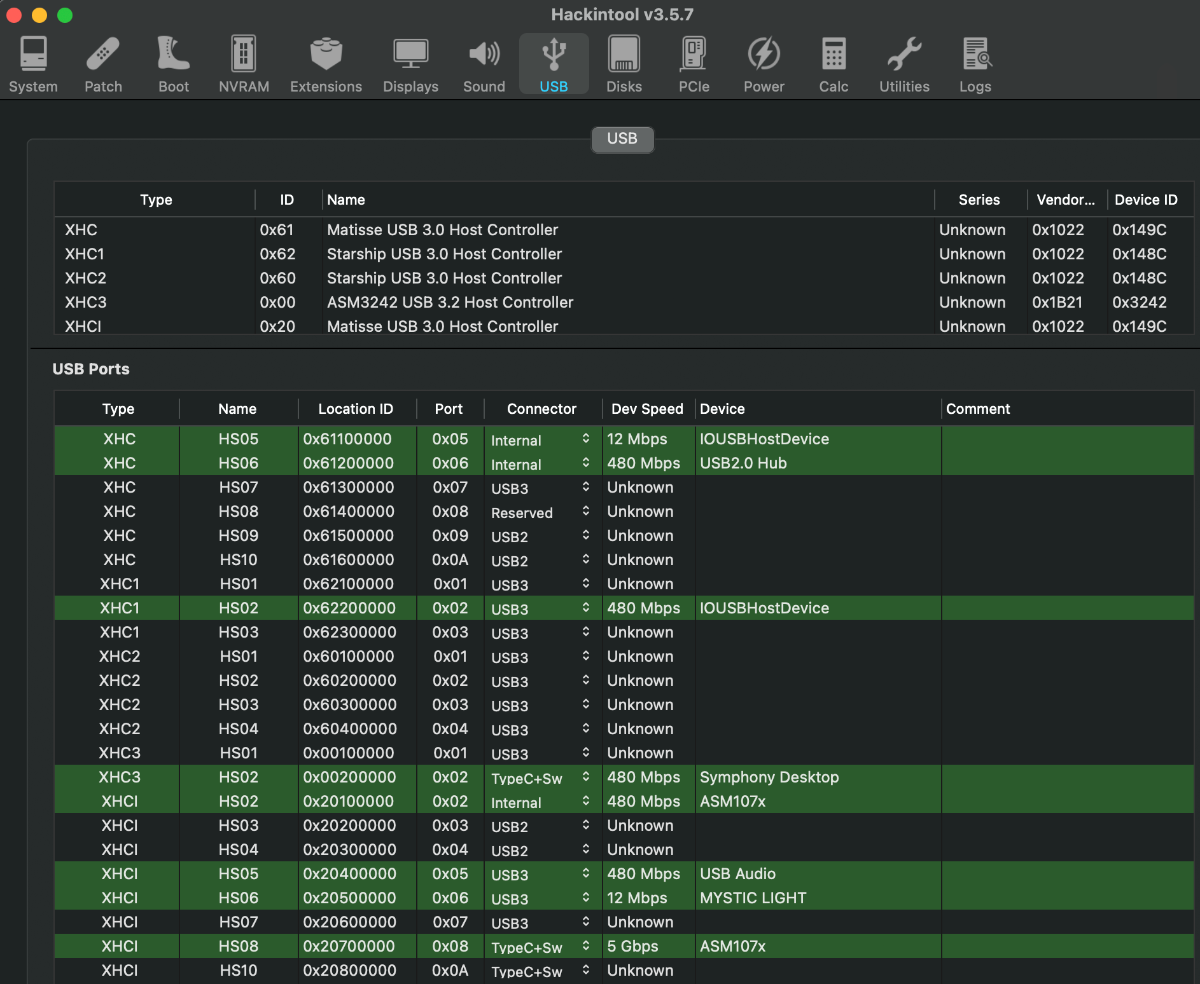
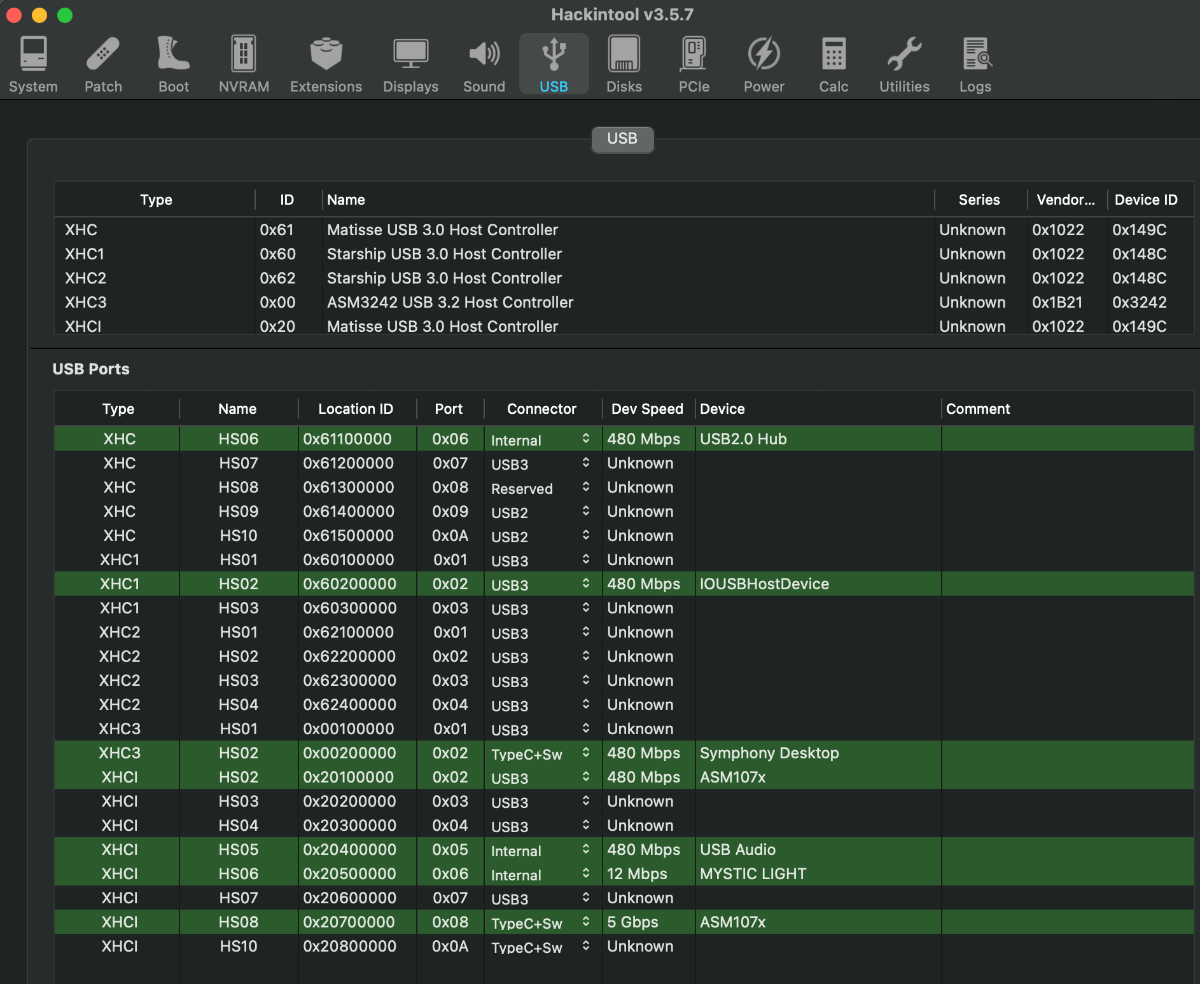
The active ports are also visible using Hackintool as shown below, along with SystemInformation and IORE findings.
SpoilerBoth XHC's HS05 and HS06 ports active as shown in Hackintool at the top of the USB Port section. AirDrop is broken under these conditions. Since both are 0xFF, both show up as "Internal" connections. Other ports on my mobo are also shown.
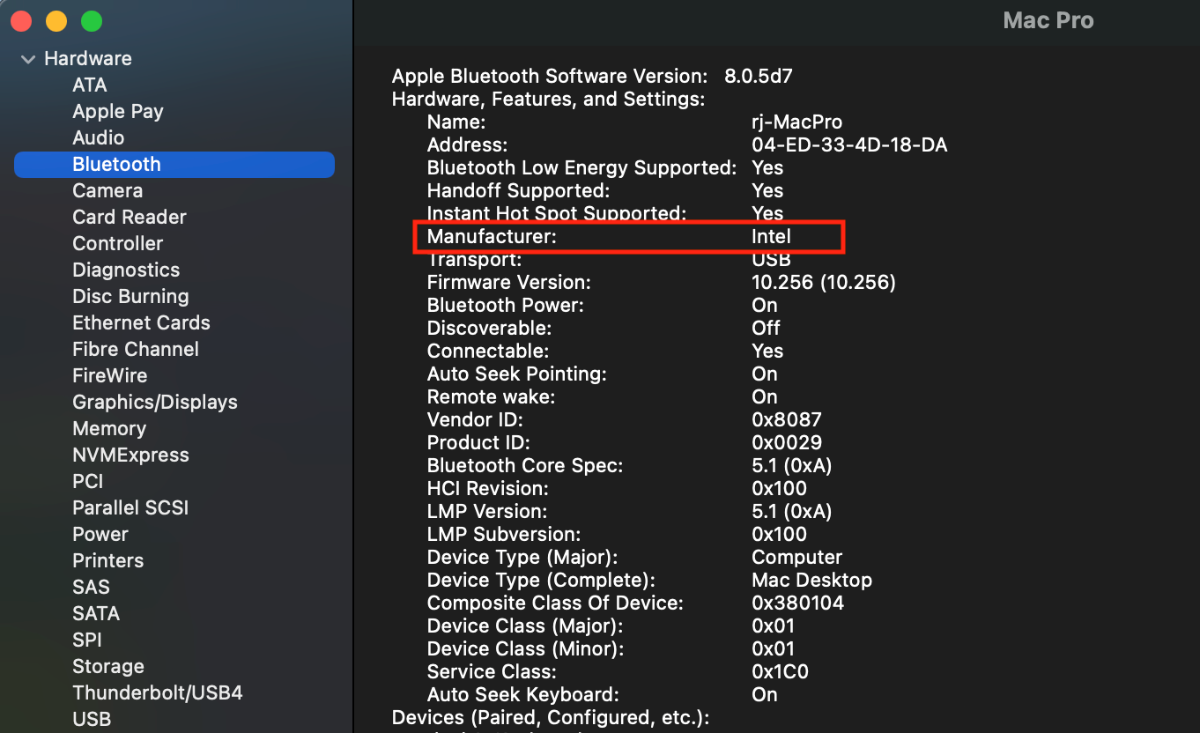
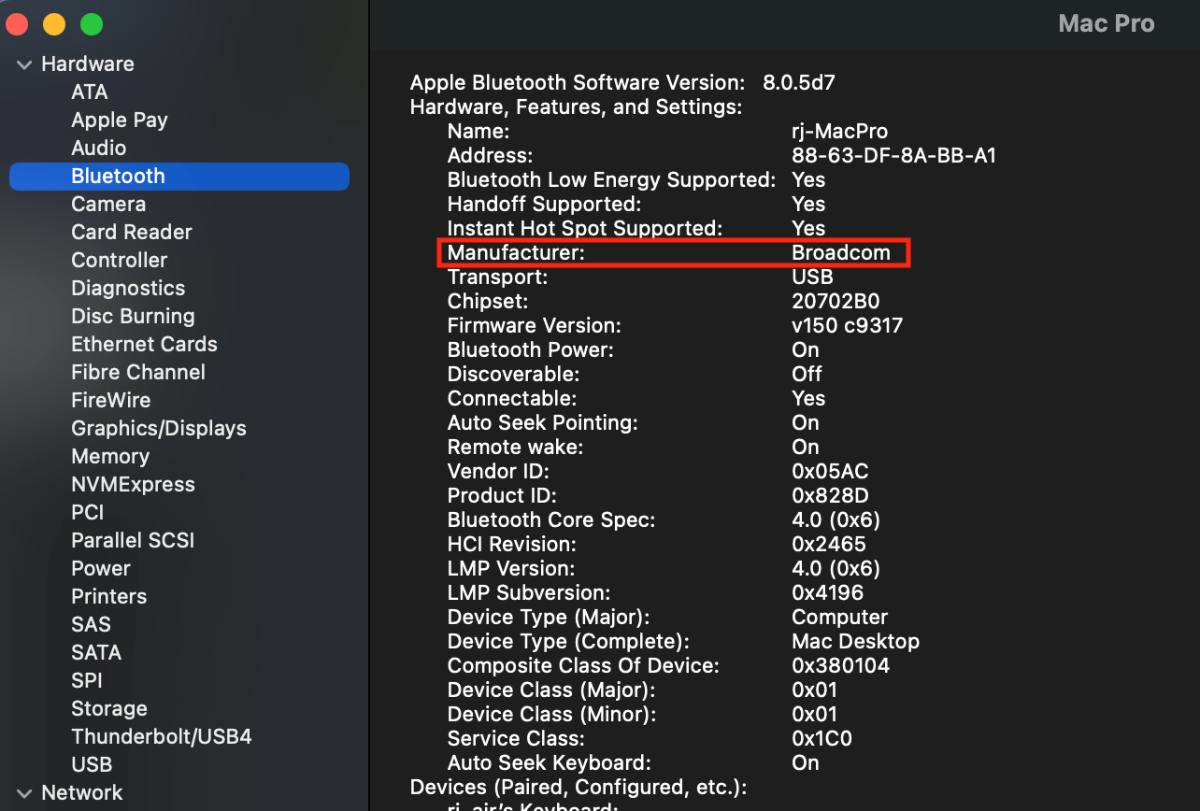
AX200 BT active (AirDrop broken):
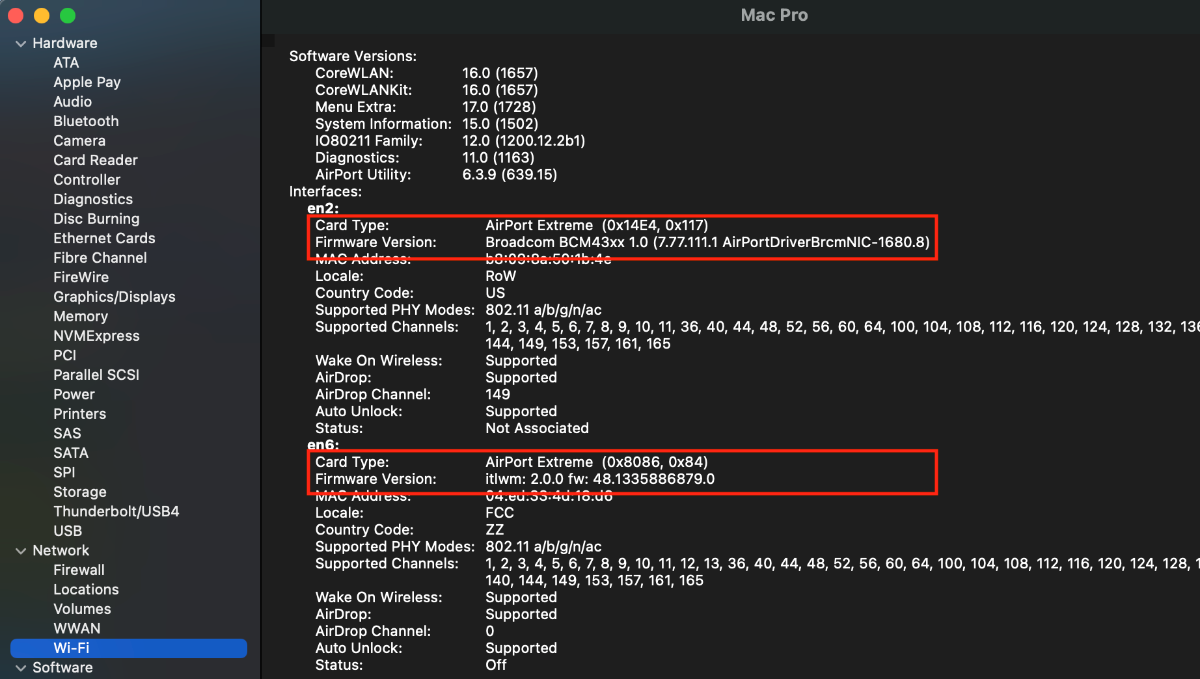
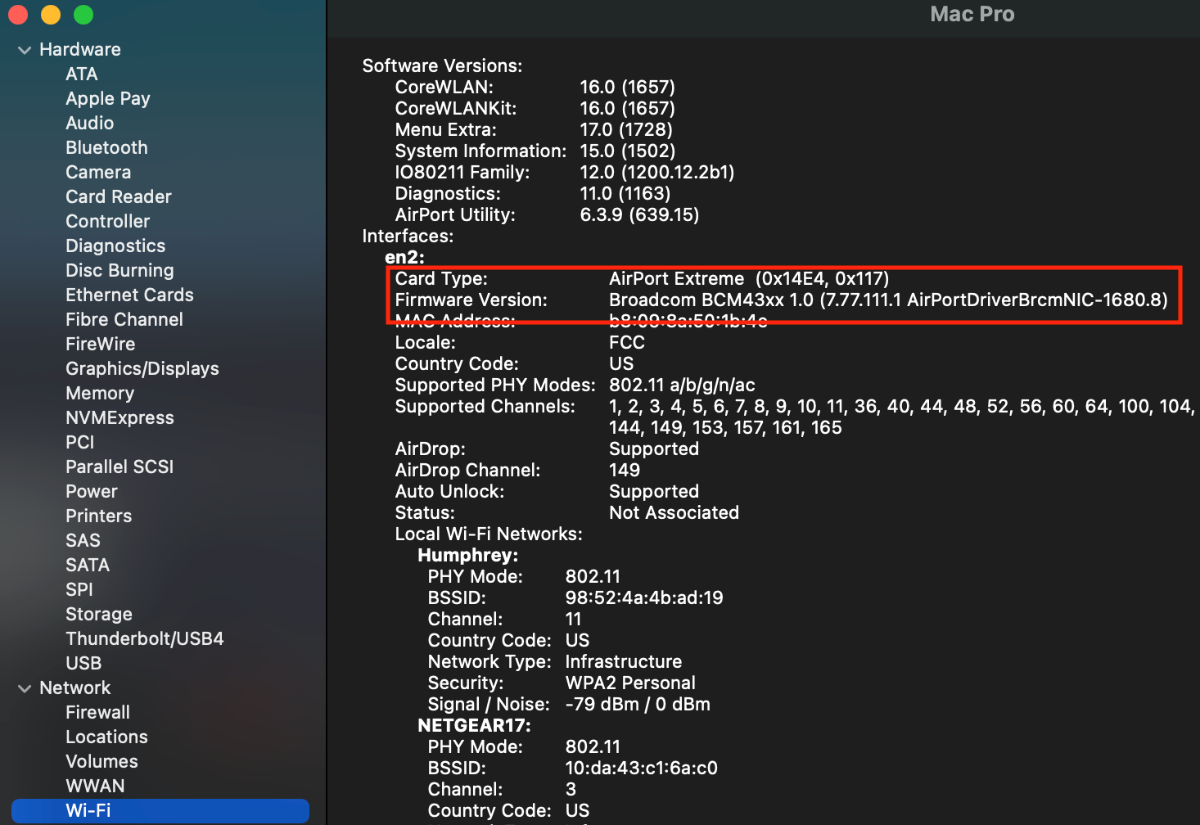
AX200 WLAN active (bottom red box) and so is the Broadcom from the 1200M (top box):
With these settings, IORE will show the AX200 being assigned to S0D2.D2A0.BYUP.BYD4.BYS4. The "AirportitLwm" is provided by the OpenIntelWireless kext. If this kext is not used, the AX200 will not be active and BYS4 will be empty.
An aside, on some forums/threads, an SSDT is used to cancel the device at its usual location in IORE. Such an SSDT does not seem to be needed for the TRX40 (simply don't use the OpenIntelWireless kexts!).
B. HS05 CANCELLED (AX200 power supply is removed):
When HS05 is cancelled, there is no longer and AX200 BT being broadcast. The above changes to the following (only the Fenvi-1200M is active) and AirDrop works. The Spoiler belows shows SystemInformation and IORE results when there is not power supplied to the internal AX200. Hackintool also reveals that HS05 has disappeared. AirDrop is now working.
SpoilerWhen HS05 is removed, only XHC's HS06 port active as shown in Hackintool.
SysInfo BT (with HS05 disabled, only the Broadcom WLAN is active):
SystemInfo WLAN:
IORE:
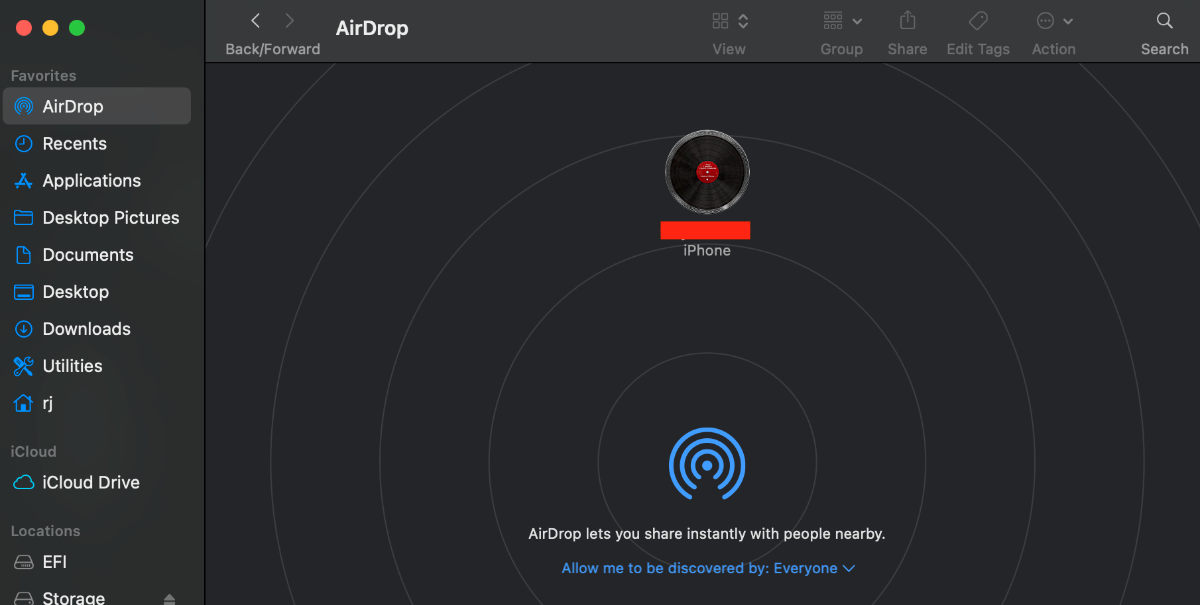
If AirDrop is working, you'll see a close-by device, such as the iPhone below. If AirDrop is not working, no device will be shown. Also notice that at the bottom is "Allow me to be discovered by: Everyone". If AirDrop is not working after following the instructions in this guide, make sure that "No One" is not selected; "No One" cancels AirDrop connections.
3. Conclusions
In summary, to get functional AirDrop, you need several things to happen.
First, you need to cancel the power supply to the internal AX200 by removing HS05 (or what ever USB port supplies your AX200). This will cancel BT from the AX200. You shouldn't have to do anything for the power supply from the internal header except perhaps re-define it as 0xFF, an internal header. (And, of course, you need to physically supply the Fenvi-1200M USB power using its enclosed USB-2 cable!)
Next, don't use any AX200 specific kext files, but do use kext files for the Fenvi-1200M as described above. This will prevent activation of Wifi from the AX200 card (prevent it from binding to S0D2.D2A0.BYUP.BYD4.BYS4), while enabling Wifi from the Fenvi-1200M.
To make things one stop shopping, I'm attaching the kext files for the Fenvi-1200M. They're up-to-date commits as the writing of this post (20 May 2021). I've also included the USBInjectAll-076 kext, which ensures injection of all ports (although I think this is probably more useful on an Intel platform and I don't use on the TRX40).
I've also attaching the SSDT files for reference, they may or may not work as is with your mobos. The SSDT that ends in "-NoIntelBT" removes HS05; the other one labelled "-WithIntelBT" leaves HS05 intact to supply the internal AX200 card.
If the SSDT files do not work, then upload an IORE file (using no USB SSDT files), and perhaps one of us can assist you with customization.
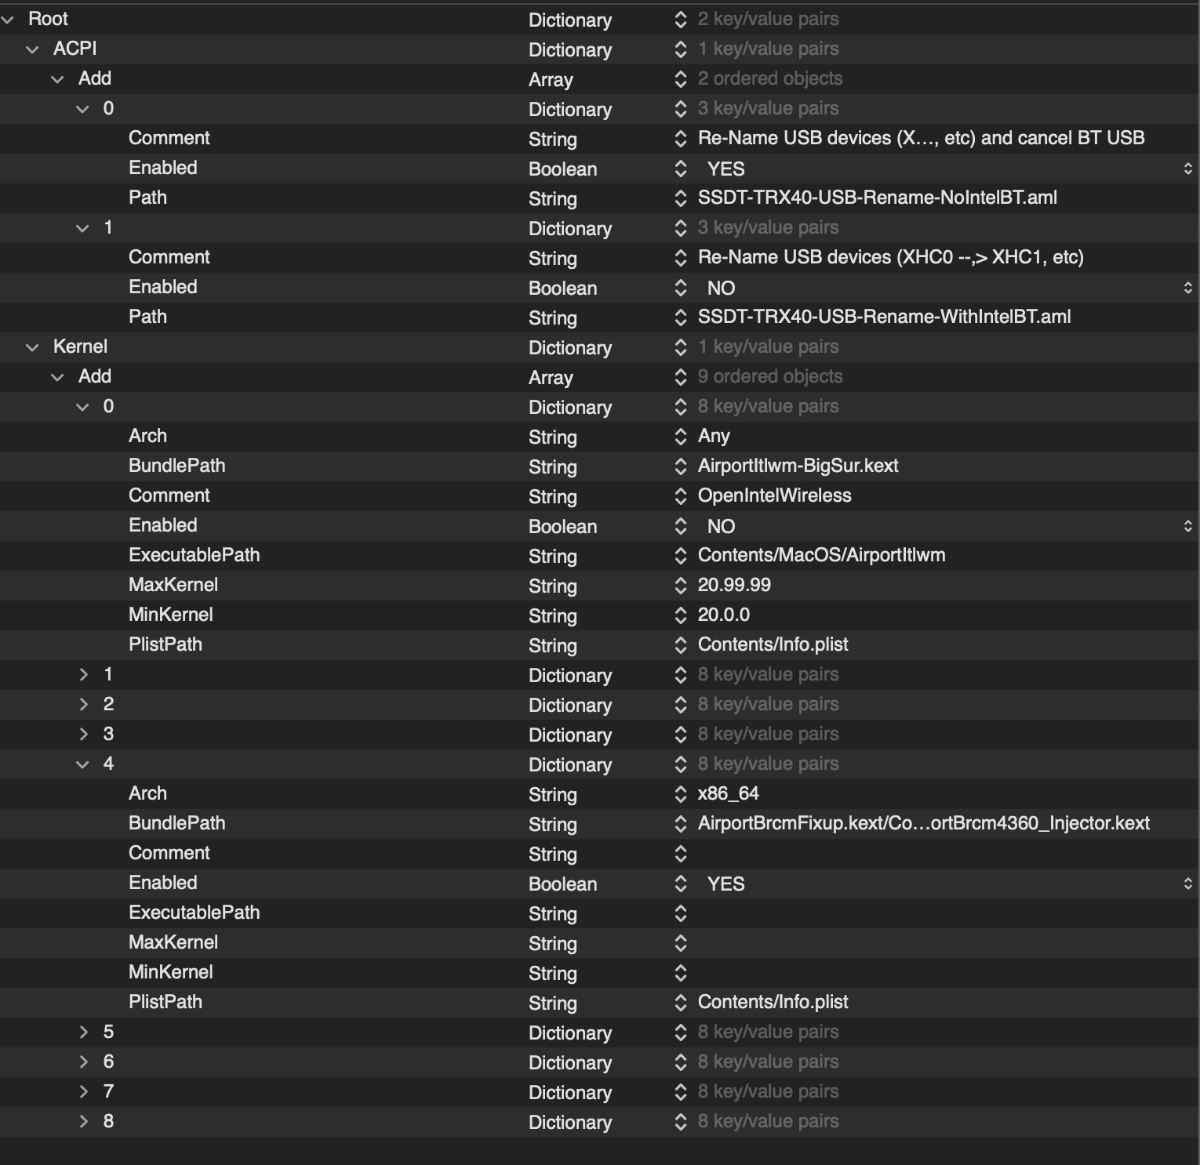
Finally, I'm attaching an ACPI/Add and Kernel/Add plist excerpt (shown in Spoiler below) that you can use to copy and paste to your own config file. (I did not supply the OpenIntelWireless kext files since they don't allow AirDrop at this time; you can retrieve on your own.)
Spoiler
-
2
-
-
4 hours ago, Arrakis said:
And one more possibility.
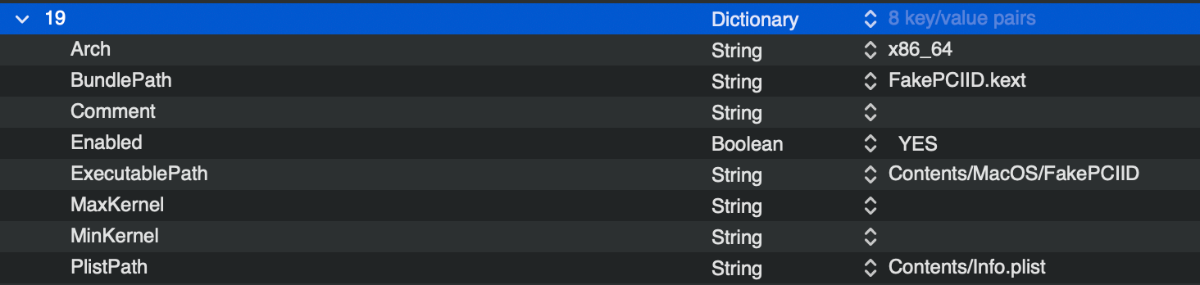
Using the DevProp injection with its 'device-id' from above post, try adding the attached FakePCIID.kext file.
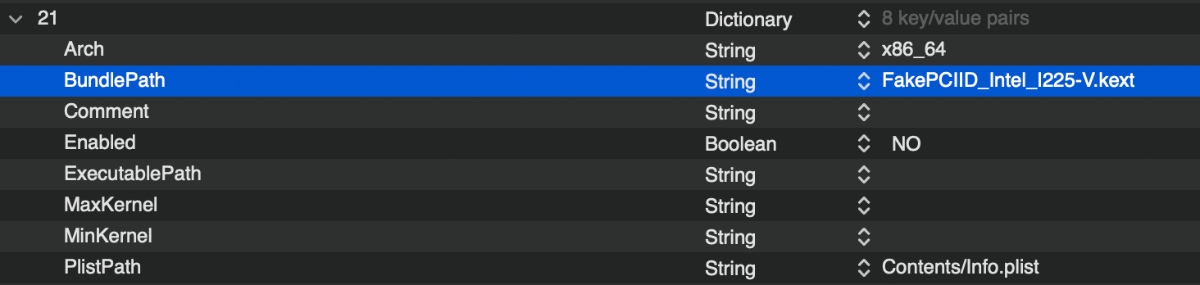
The other attachment (FakePCIID_Intel_I225-V), may work in combination with FakePCIID.kext. The new Intel 2.5G LAN commonly found on new mobos, I225-V NIC, is part of the same AppleIntelI210Ethernet kext that you're having trouble with and may help if used in conjunction with FakePCIID.
So this gives at least 2 combinations: DevProp + FakePCIID and DevProp + FakePCIID + FakePCIID_Intel_I225-V.
Note that FakePCIID_Intel_I225-V does not require an ExecutablePath entry:


[Discussion] - TRX40 Bare Metal - Vanilla Patches
in General
Posted · Edited by iGPU
@fabiosun
I've updated my above post to show that AMD-SMC kext files run, at least in my setup, with the posted minimal patches in Monterey ß1. Attached is the debug version of a recent OC v071 that I've been using for these tests. No config, ACPI, Kext (in previous post), Utility or Resources folders are included to keep size small.
As for temps, if the computer is not touched, the baseline temp is ~46 C. Moving windows about, etc, cause the temp to spike to ~63 C and then rapidly fall.