meina222
-
Posts
449 -
Joined
-
Last visited
-
Days Won
5
Content Type
Profiles
Forums
Events
Downloads
Everything posted by meina222
-
I sat down yesterday and read a thread on MacRumors. Several people there claimed "DESIGNARE-Z390-NVM33-Elias64Fr.bin" which is taken from the actual onboard controller of the GB motherboard in the name of the file, to be the "best" as it solved some issues, but details were lacking as to why it was best. So I just decided to try this 1st (actually I flashed NVM23 and verified it is detected but never tested it with SSDT or Linux). If NVM23 is better with Linux, I'd prefer that and delete the USB tree, which I don't really need. The holy grail for me would be - attach leaf devices and pass through to VM and have native TB 40gbs in Bare Metal on same firmware.
-
Might be the NVM33 rom. I don't think the Designare does anything special but who knows. I'm guessing it's the ROM but I have no experience in this area. I may experiment some more and flash back to NVM23 mod to see if Linux likes it better and will share. On the other hand a pretty IOReg is not so worthy without function :). Edit: FWIW that USB-C does charge my iPhone so not a complete waste 😂 Forgot to say - I also don't connect that TB to internal motherboard header as I only have two USB 2.0 headers. One is taken by the front USB hub of the case, the other by the Bluetooth PCI card I got. So I fished a USB adapter cable like this one https://www.amazon.com/CRJ-9-Pin-Dupont-Header-Single/dp/B07Q4QZW57/ref=sr_1_12?dchild=1&keywords=usb+2.0+adapter+cable+9+pin&qid=1599408979&s=electronics&sr=1-12 to one of my rear USB 2.0 ports. So TB is connected to cable, connected to USB 2.0 port and not internal hub. Not sure if it matters.
-
I don't think it works. Don't have a proper USB-C device to check so use my iPhone w a USB-C cable. It doesn't trigger any change in IOReg unlike onboard USB-C ports.
-
I often make this mistake and have the habit of double checking while typing, but not this time. IOReg w fix attached. It's now structured as coded. Thanks! On to testing some functionality. MyMacPro.zip System Report: Thunderbolt Bus 3: Vendor Name: GIGABYTE Device Name: Mac Pro UID: 0xA082E226C821B763 Route String: 0 Firmware Version: 33.0 Domain UUID: 3AC728ED-EC64-447D-9971-23EAADD8D456 Port: Status: No device connected Link Status: 0x7 Speed: Up to 40 Gb/s x0 Current Link Width: 0x1 Receptacle: 1 Link Controller Firmware Version: 1.99.0 Port: Status: No device connected Link Status: 0x7 Speed: Up to 40 Gb/s x0 Current Link Width: 0x1 Receptacle: 1 Link Controller Firmware Version: 1.99.0 Port: Status: No device connected Link Status: 0x7 Speed: Up to 40 Gb/s x0 Current Link Width: 0x1 Receptacle: 2 Link Controller Firmware Version: 1.99.0 Port: Status: No device connected Link Status: 0x7 Speed: Up to 40 Gb/s x0 Current Link Width: 0x1 Receptacle: 2 Link Controller Firmware Version: 1.99.0

-
@iGPU, I applied the SSDT you shared (after DTGP and a few others). Didn't get reflected in IOReg. Here is what the logs says. 1st spoiler is showing that the table by CASEY is loaded. But a bit further down I have ACPI error - AE_NOT_FOUND, SSDT:TBTITAN. I don't know ACPI well to know if this is BIOS or SSDT issue, but I think I tried very similar structure yesterday following guides so maybe not SSDT bug? 2 Attached is System DSDT (before SSDT apply) SystemDSDT.zip
-
I tried connecting my iPhone to a USB-C port and it was not detected. So I wouldn't hold my hopes high on USB, but hoping to get the TB working at full speed. Unfortunately, the ROM I flashed (A Designare 390Z onboard rom) is not liked by Linux. I wonder if NVM23 modified by elias64fr has the same issue. It'd be nice to have TB working in both the Mac and the VM so I can pass-through leaf PCIE devices when in VM (since we can't seem to make the PCI bridge passthrough there). Linux gives this error for now: thunderbolt 0000:8d:00.0: could not start ICM firmware but the devices are detected in lspci. root@designare:~# lspci -vv | grep Thunderbolt 8b:00.0 PCI bridge: Intel Corporation JHL7540 Thunderbolt 3 Bridge [Titan Ridge 4C 2018] (rev 06) (prog-if 00 [Normal decode]) Capabilities: [ac] Subsystem: Gigabyte Technology Co., Ltd JHL7540 Thunderbolt 3 Bridge [Titan Ridge 4C 2018] 8c:00.0 PCI bridge: Intel Corporation JHL7540 Thunderbolt 3 Bridge [Titan Ridge 4C 2018] (rev 06) (prog-if 00 [Normal decode]) Capabilities: [ac] Subsystem: Gigabyte Technology Co., Ltd JHL7540 Thunderbolt 3 Bridge [Titan Ridge 4C 2018] 8c:01.0 PCI bridge: Intel Corporation JHL7540 Thunderbolt 3 Bridge [Titan Ridge 4C 2018] (rev 06) (prog-if 00 [Normal decode]) Capabilities: [ac] Subsystem: Gigabyte Technology Co., Ltd JHL7540 Thunderbolt 3 Bridge [Titan Ridge 4C 2018] 8c:02.0 PCI bridge: Intel Corporation JHL7540 Thunderbolt 3 Bridge [Titan Ridge 4C 2018] (rev 06) (prog-if 00 [Normal decode]) Capabilities: [ac] Subsystem: Gigabyte Technology Co., Ltd JHL7540 Thunderbolt 3 Bridge [Titan Ridge 4C 2018] 8c:04.0 PCI bridge: Intel Corporation JHL7540 Thunderbolt 3 Bridge [Titan Ridge 4C 2018] (rev 06) (prog-if 00 [Normal decode]) Capabilities: [ac] Subsystem: Gigabyte Technology Co., Ltd JHL7540 Thunderbolt 3 Bridge [Titan Ridge 4C 2018] 8d:00.0 System peripheral: Intel Corporation JHL7540 Thunderbolt 3 NHI [Titan Ridge 4C 2018] (rev 06) Subsystem: Gigabyte Technology Co., Ltd JHL7540 Thunderbolt 3 NHI [Titan Ridge 4C 2018] a3:00.0 USB controller: Intel Corporation JHL7540 Thunderbolt 3 USB Controller [Titan Ridge 4C 2018] (rev 06) (prog-if 30 [XHCI]) Subsystem: Gigabyte Technology Co., Ltd JHL7540 Thunderbolt 3 USB Controller [Titan Ridge 4C 2018]
-
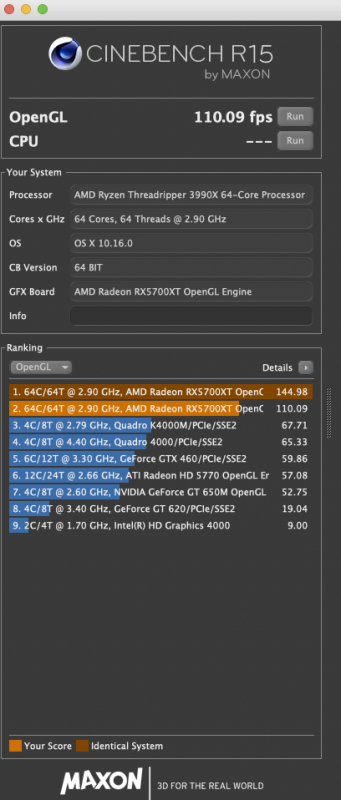
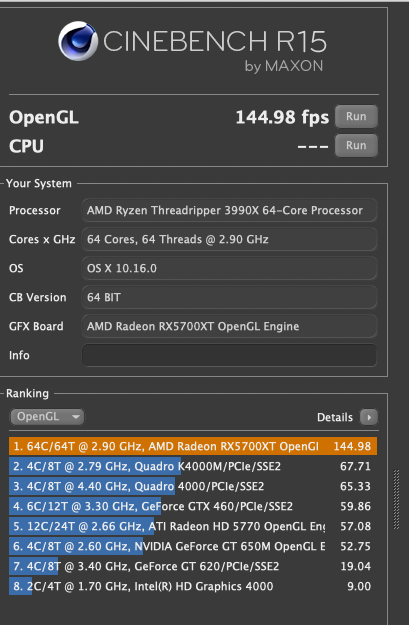
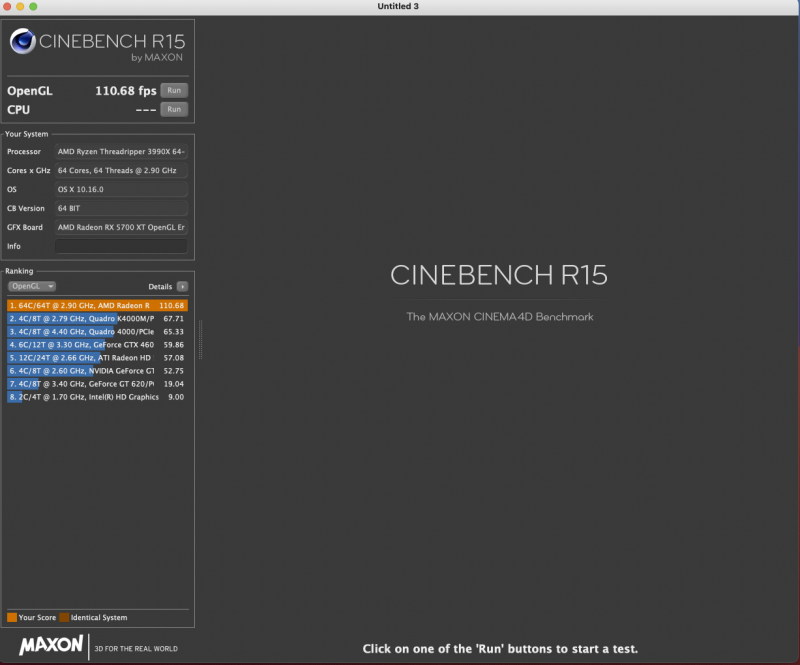
Here is the VM score. VM EFI booting into the bare metal NVMe installation. Consistent with previous marks, except for the outlier scored in the Bare Metal with "reduced" patches (dark orange vs bright orange). The 144 fps score seems anomalous. What is the story with the set of reduced patches and why are they "not recommended"?
-
I will try VM in a few hours as I'm about to sign off. Here's the reduced set of Kernel patches in BS metal (matching @Driftwood's config). For some reason, I see big jump.
- 3,995 replies
-
- 2
-

-

-
- amd vanilla patches
- amd kernel patches
- (and 3 more)
-
@iGPU - could you please help me with the TB SSDT. I tried to attach UPSB to _SB.SOD2.D2A2, but after I reboot nothing seem to change in my IOReg. I posted both SSDT I tried (with customized ROM) and IOReg in @fabiosun's TB thread. I tried to look back yours for reference to this post, but I no longer see the file. Thank you!
- 3,995 replies
-
- 1
-

-
- amd vanilla patches
- amd kernel patches
- (and 3 more)
-
@fabiosun, Here's my OpenGL CB 15 on BS bare metal + stock reference 5700XT
- 3,995 replies
-
- 2
-
-
- amd vanilla patches
- amd kernel patches
- (and 3 more)
-
I think I need @iGPU's help as I have no idea how this SSDT is supposed to work. I tried compiling one based on the link above, matching my ROM and my PCI path, but it doesn't seem to have any effect. Attaching IOReg and SSDT I tried to use. @iGPU - any input on SSDT is much appreciated. For me this is right now pattern matching without really understanding the details. SSDT-TBOLT3-2.aml.zipMyMacPro.zip
-
Trying to follow this guide to generate my SSDT: https://www.tonymacx86.com/threads/success-gigabyte-designare-z390-thunderbolt-3-i7-9700k-amd-rx-580.267551/page-2343#post-2148640 @fabiosun apologies for pasting yet another external link, but it seems these people have dived very deep into this matter so it might be useful. I am matching my ROM to this guide. We'll see what happens.
-
Ok, I will try SSDT generation using this method (taken from a tonymac thread I'm reading, to be honest I have no idea what this does besides the promise to generate unique ID for the network ROM). I need to modify PCI path too from the template. I'll report the results later when I get a chance to test. https://hackindrom.zapto.org
-
@fabiosun - I decided to try 1st DESIGNARE-Z390-NVM33-Elias64Fr.bin Initially I flashed NVM23 modified (I should have probably left it alone at this point as it showed correctly in my TB section of System Report and it showed 2 new network interfaces) but then I read several people praising the NVM33 which is an image from a on-board Designare TB and works well according to these people on the AIC ver 1.0 card I have. I still see TB 2x20 in my summary and I see network bridge in ETH, but I no longer see extra interfaces. Not too concerned about bridging, I want for now to just have it working on my TB monitor. No SSDT yet. Lots of SSDT's out there. Any consensus on what works best?
-
Yes, but I did not use the white wires he soldered on the board. Technically, you should use a volt meter and check voltage, but I got lazy and did it anyways. Flashed twice, no problem using https://www.amazon.com/gp/product/B07SHSL9X9/ref=ppx_yo_dt_b_asin_title_o00_s00?ie=UTF8&psc=1 and the clip + the 25XXX green PCB oriented correctly ('1' on the PCB facing the lever on the lever side and red wire routed from 1 to the BLUE dot on the chip). I would 1st watch this video and then check the video from the German gentleman.
-
flash worked like a charm from 1st try, no modifications. Will try it in the hack later.
-
Yeah, I read some more on it - many people were fine with that particular model. I think the one I got is OK, but I'll get a volt meter just to be safe tomorrow.
-
@fabiosun, @iGPU - time to inject some life into this topic. So I have this at hand (have had it for more than 2 weeks now waiting to finally have Gigabyte fix their BIOS and enable me to run it in the slot I wanted to - Slot 4, for aesthetic and practical reasons - and they finally delivered). https://www.amazon.com/KeeYees-SOIC8-EEPROM-CH341A-Programmer/dp/B07SHSL9X9#customerReviews So the thing of course comes with no manual whatsoever and I found a few online videos showing how to use it, but they are not perfect. Reading online and following @fabiosun's advice, I am supposed to use 3.3V and then there are at least 5 or 6 BIOS versions floating around and on top one needs SSDT and (maybe?) disable SIP? On BIOS flash 1st: I don't have voltage meter. How do you make sure you have 3.3V? By default there is a jumper shorting 2 pins on the EEPROM programmer board. Are they reliable? I read somewhere BIOS elias64f NVM33 is "best". Is that recommended? On SSDT and SIP: Do I need to unseal my Big Sur volume following @iGPU's guide to disable SIP? Is it even needed? And after that, what's the challenge? Maybe I can try it on the Designare and see if I get any different results. I can start with passing thru TB video to my TB3 monitor but later want to get TB3 external GPU for compute tasks. p.s. ugh 😞 Do I have to do this? I was hoping it'd be easier as Amazon says 3.3V/5V
-
After rebuilding w latest OC builder it's good now. I thought I had zero-ed csr-active-config before but maybe not (sometimes I get confused which EFI is which).
-
I could be the exception, but when I tried to update to beta 6, the macOS installer pick would progress through OC and rooting and then reboot before actually getting into the installation (right at handoff). The debug log of OC doesn't show anything off compared to previous successful boots. This is only when I select "macOS installer" - boot to beta 5 works normally. Next, I'll maybe try to create an install disk and try this way. Update: Tried creating a fresh installation USB with Beta 6. On the same EFI where Beta 5 installer ran without a glitch, Beta 6 installer refuses to start and auto reboots. I use a recent OC (3 days maybe) daily build. So something changed. Will try a clean OC builder release from official OC repo.
-
Still update not showing anything for me (beta dev or not) - I suppose it's done in waves and will see it tomorrow. On a different note - Gigabyte finally provided a BIOS fix f4h for my Designare that allows me to run my TB card in Slot 4 with my NVME 4x4x4x4. Before there was a bug where Slot 4 was being crippled to gen 1 and TB would cause D4 error and if I put a different card (say 2nd GPU) it would run at gen 1.0 speed as opposed to gen 3 or gen 4. After a month of back and forth and 3 BIOS versions on their part, it's now fixed and I'm upgraded. That gave me a chance to see how the bare metal hack fares on BIOS update. Booting into my installation caused a black screen with both my primary disk and back up USB EFI's. The backup USB has debug OC and it collected MMIO before it went dark, so I inspected it and sure enough it changed substantially in 8 of the 19 addresses (1st 5 and last 3). Fortunately the pattern was still similar and after I updated my MMIO whitelist and disabled the last 4, I was able to boot in without an issue. Thus, if you upgrade your BIOS be ready to have to re-gather and re-configure your MMIO. You probably won't have to go through the enable/disable 1 by 1 sequence and just disable last 4 to boot in. Will test more on the new firmware in the next few days. @fabiosun - I got the equipment to flash my TB. I can try my Display as it is TB3 for now. I heard USB doesn't work. Do you guys have SSDT that enables me to check? Much appreciated.
-
Not showing up in my Software Update yet. Will probably trickle in soon.
-
Switching between MacOS and latest Ubuntu + Cinnamon, I gotta say the latter is so much snappier and more performant and looks are almost as good, but the details and the ecosystems are still lacking. Someone needs to build a for profit desktop environment for Linux with proper API's for GUI development.
-
Intel is so toast. I don't think their Xe stuff will succeed (who knows, maybe short term it will be interesting) and they will suffer great if they don't bring their production back to the US. Maybe Intel can poach back everyone from AMD somehow and succeed this way.
-
Apple doesn't care about OpenGL. They are fully invested in low energy / mobile and now VR / AR as future devices (they hire huge groups now focusing on next generation wearable devices - in the order of thousands of people). The visual stacks they develop would be based on some future versions of Metal. I don't know much about either Metal or OpenGL, but it makes sense for Apple to want to control their software pipeline in sync with their hardware. They are so heavily invested in this, they will probably lead this field in 5-10 years and Nvidia will still lead high performance computing.