

iGPU
-
Posts
573 -
Joined
-
Last visited
-
Days Won
17
Content Type
Profiles
Forums
Events
Downloads
Posts posted by iGPU
-
-
I would not re-flash. What you have looks good. Also, USB-2 usually does not work on TB ports (don't bother testing; un-important for us).
The next step is trying to get an SSDT to work. But first let me describe the TB features seen in a properly working setup. (I sourced the images off the internet, so not mine as I'm working on different computer; I'll update once I locate better images). These features depend upon a good SSDT to show up.
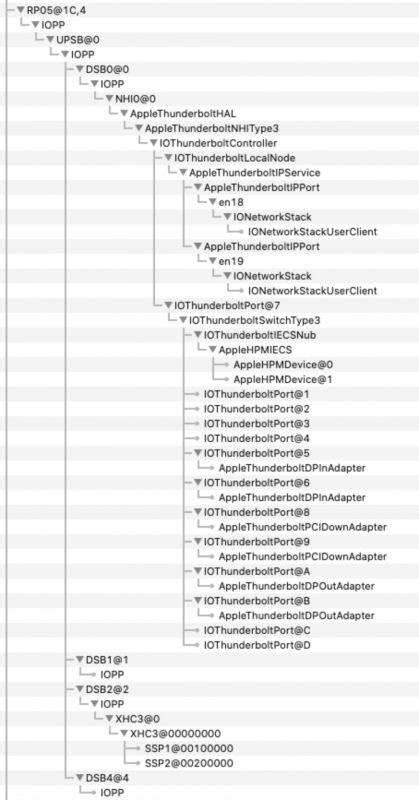
First, you want to see the following in a TB tree when using IORegistryExplore (the device shown is at RP05; this can differ for our mobos). There are a few important features: sections DSB0-DSB4, where DSB0 contains NHI (actual TB) and DSB2 contains the USB section (ideally 2 parts for AIC). IOThuderboltPort@7 (this is for TitanRidge; it will differ for other chips; eg, Alpine Ridge uses Port@5) is also important for proper TB behavior.

IOThuderboltPort@7:
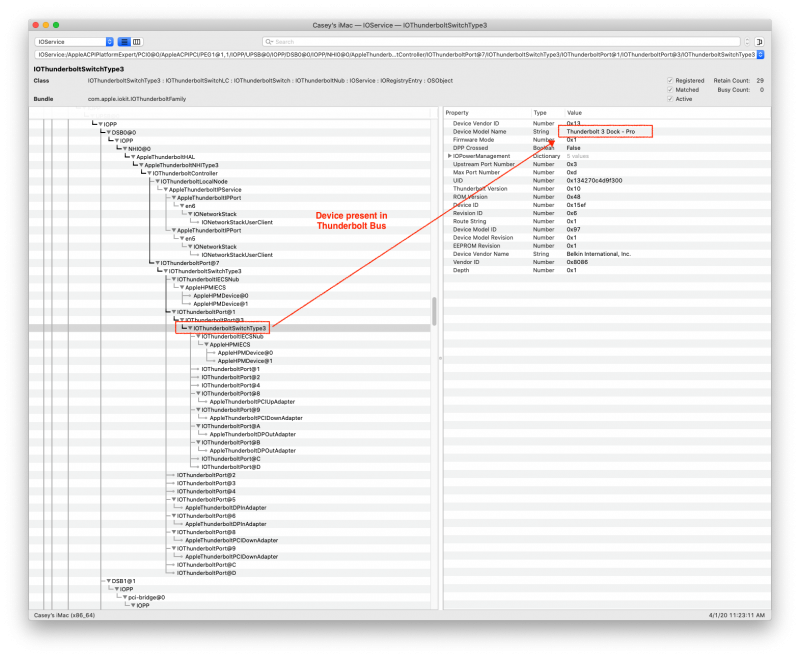
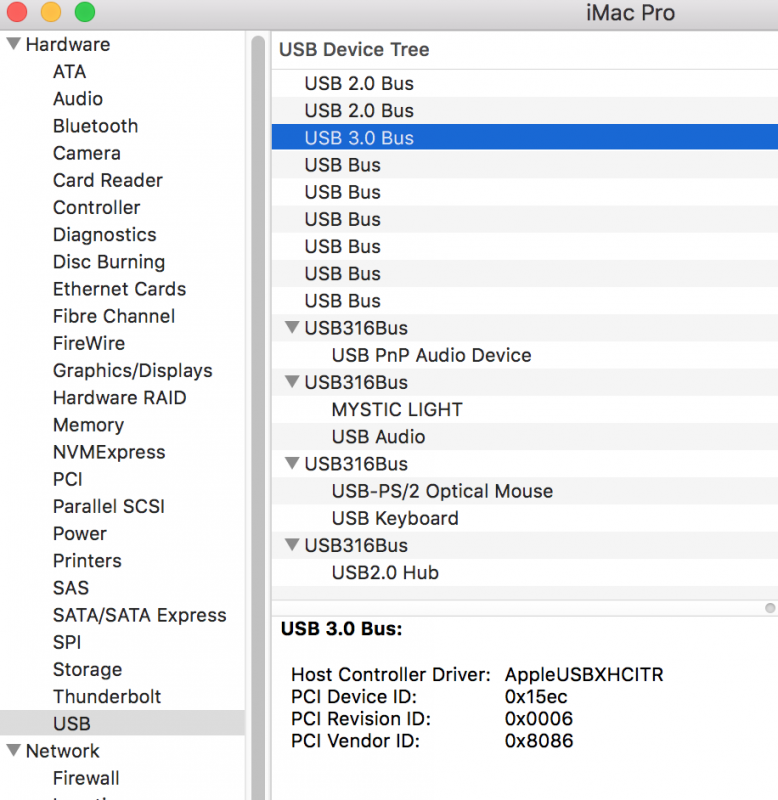
Next, for proper TB behavior, you should see entries in the following 3 areas in the System Information window.
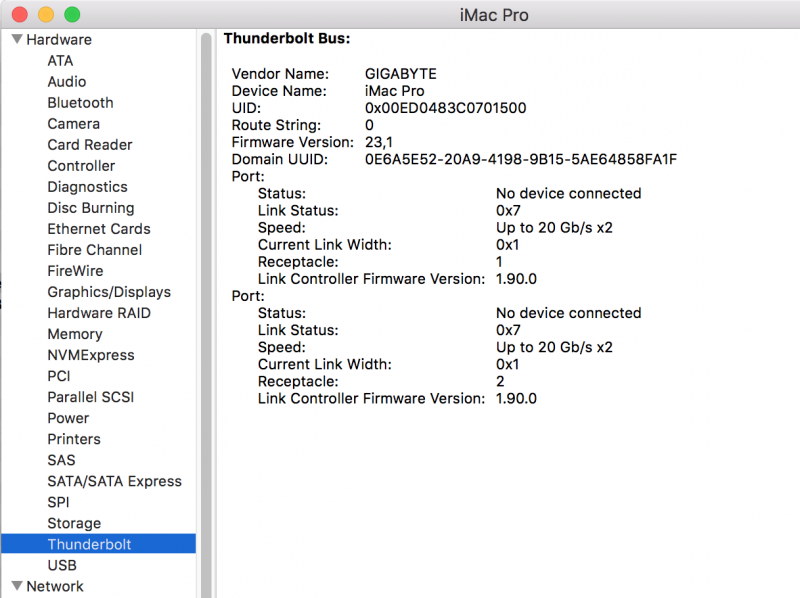
A. PCI slot pane: notice that there are entries for TB and TB-USB. These are injected through the SSDT.
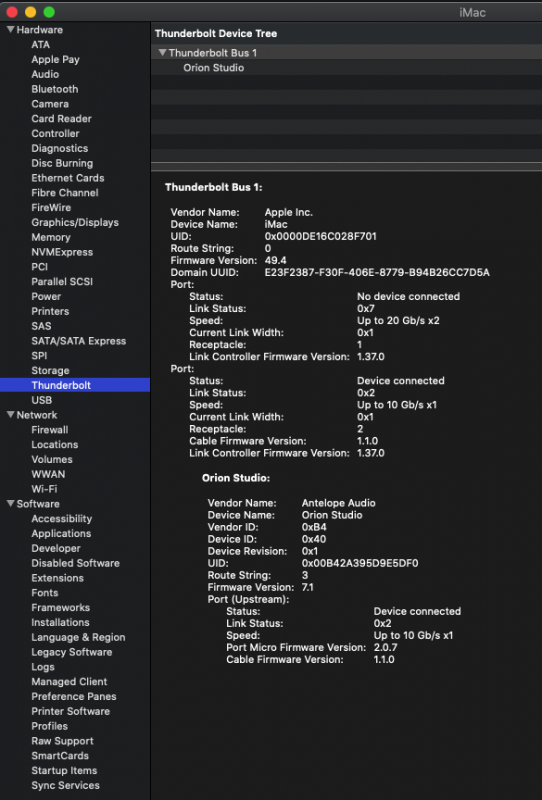
B. PCI TB. This section, even with marginally functioning TB will often be empty ("No Thunderbolt devices."). However, if a proper SSDT with flashed firmware and you'll see an entry as below. Also, the speed of the device should be 40GB/sec.
Link Speed is adjusted to 40 with this SSDT entry:
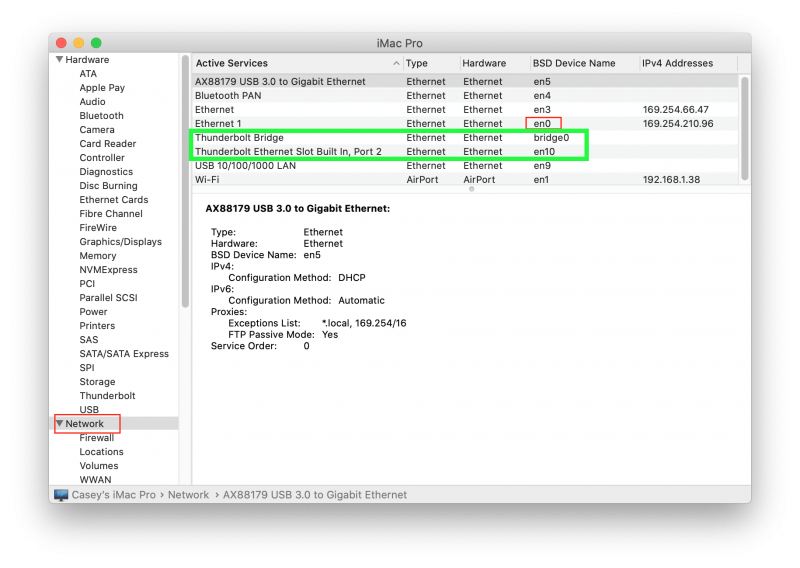
C. TB-USB. If TB and TB-USB is properly working, you'll now see a TB bridge entry in the PCI-USB pane as shown below.
If a device, like a TB external HD is connected, then the following will appear:
:
-
6 hours ago, fabiosun said:
native was in the initial post whern you said you have had similar results..i have then flashed Elias firmware..i see all that stuf but type c I have is not seen
Asmedia controller sees it well (my proxmox booting disk is there)
Attached are 2 SSDT-TB. One is set up for SF0 (0x03 as shown in image above). The other is set for S80 at 0x01. Both have descriptions of PCIe slot 4 (but this is description and does not affect function; can be changed inside file).
As I mentioned, I've never seen SF0 properly rename using an SSDT on these TRX40 mobos. Also, sometimes, when trying to re-name a device in SF0, the macOS would not boot, so keep an alternative boot EFI (which I know you do!).
-
28 minutes ago, fabiosun said:
these results are with flashed rom
Sorry, I misunderstood and thought native.
-
7 minutes ago, fabiosun said:
SSDT-TB3-RP21-4.zip 1.67 kB · 1 download
my problem is I have no tb device for testing 🙂
this SSDT is from site you advised me time ago where also I have found instructions to flash
I'd advise you not to flash just yet. Let's see how your TB device behaves natively. I'll work on SSDT later (I must leave house soon for several hours).
-
14 minutes ago, fabiosun said:
This looks promising!
For proper TB functioning, an SSDT is necessary. (I can supply one later today to test.)
The only problem that I see, is that to date, I've not been able to get any SSDT to change anything in the SF0 device. My SSDTs seemingly work on most other devices. (I've not written here about this SSDT matter.) I've gotten the feeling that SF0 is somehow formed after the SSDTs are loaded. Ideally, if you could try a different PCIe slot to move the device from SF0...
-
9 hours ago, fabiosun said:
49:00.0 PCI bridge [0604]: Intel Corporation JHL7540 Thunderbolt 3 Bridge [Titan Ridge 4C 2018] [8086:15ea] (rev 06)
        Kernel driver in use: pcieport
4a:00.0 PCI bridge [0604]: Intel Corporation JHL7540 Thunderbolt 3 Bridge [Titan Ridge 4C 2018] [8086:15ea] (rev 06)
        Kernel driver in use: pcieport
4a:01.0 PCI bridge [0604]: Intel Corporation JHL7540 Thunderbolt 3 Bridge [Titan Ridge 4C 2018] [8086:15ea] (rev 06)
        Kernel driver in use: pcieport
4a:02.0 PCI bridge [0604]: Intel Corporation JHL7540 Thunderbolt 3 Bridge [Titan Ridge 4C 2018] [8086:15ea] (rev 06)
        Kernel driver in use: pcieport
4a:04.0 PCI bridge [0604]: Intel Corporation JHL7540 Thunderbolt 3 Bridge [Titan Ridge 4C 2018] [8086:15ea] (rev 06)
        Kernel driver in use: pcieport
4b:00.0 System peripheral [0880]: Intel Corporation JHL7540 Thunderbolt 3 NHI [Titan Ridge 4C 2018] [8086:15eb] (rev 06)
        Subsystem: Gigabyte Technology Co., Ltd JHL7540 Thunderbolt 3 NHI [Titan Ridge 4C 2018] [1458:a207]
        Kernel driver in use: vfio-pci
        Kernel modules: thunderbolt
4d:00.0 USB controller [0c03]: Intel Corporation JHL7540 Thunderbolt 3 USB Controller [Titan Ridge 4C 2018] [8086:15ec] (rev 06)
        Subsystem: Gigabyte Technology Co., Ltd JHL7540 Thunderbolt 3 USB Controller [Titan Ridge 4C 2018] [1458:a207]
        Kernel driver in use: vfio-pci
        Kernel modules: xhci_pci
More or less the same @iGPUresults and conclusion
for now not all Is "passable"
Yes, same issues I found earlier. Until the pci-bridge sections (49 and the 4a's) are passed, the TB device cannot function on the Mac side.
This presently applies to all bridged devices and is a Linux/VM limitation.
-
FYI:
Catalina VM bugs reported here. I've consistently had issues with Catalina. The most stable Catalina for me was ß5 (sigh: now gone).
On a tangential note, I had better stability with Big Sur ß2 than with current ß3 under VM. ß3 went wonky a couple of days ago and is still giving me fits with Finder/desktop bugs. At least in current beta, BS has significant APFS file/partition issues with OpenCore. Yet, I don't see how OC can address those issues until BS has matured ("moving goalposts" problem).
-
 1
1
-
-
2 hours ago, fabiosun said:
maybe you have to take a look here (You AMD Navi GPU owner I mean 🙂 )
I have asked to include Navi patch on zen2 kernel 🙂
https://github.com/fabianishere/pve-edge-kernel/issues/5
Just to clarify, AMD 5700 is Navi 10 (Navi 20 or aka 'Big Navi' coming later this year). Radeon VII is Vega, not Navi.
-
1
-
-
I finally managed to get into Big Sur Recovery, which was a problem for me with both ß2 and ß3 (I never tried with ß1).
The key seemed to be in setting OC ScanPolicy to 0 and enabling AppleALC and WEG (neither of which I typically use). I did not test each combination of the above 3 settings, so maybe only 2 of the 3 are necessary. VirtualSMC was not enabled, and no boot arguments were required.
-
I had issues when updating Big Sur ß2 to ß3. It finally worked out better, when doing the Big Sur update, to work in console mode, rather than passing through the GPU. That is, using the "console" monitor on the Proxmox GUI.
This probably only applies to those of us using an AMD GPU due to the reset issue. By using console mode, the re-boots don't get fouled up by the VM not properly booting with the GPU stuck in an unusable state.
As a reminder, to revert from GPU pass-through to console mode: change the VM by commenting out the "hostpciX" for the GPU(s) and change from "vga: none" to "vga: vmware". After completing the Big Sur update, reverse these VM steps.
-
2 hours ago, Driftwood said:
Did you see any dramatic improvements with the GPU water cooling?
No. But I've not had time to tweak SoftPowerTable entries.
Also, there no way of monitoring GPU chip thermals (the best I can do is monitor water temps in cooling loop). Even on Intel CPU side, the only way to monitor AMD GPU temps is using FakeSMC (not VirtualSMC) kext together with some specialized add-on kexts. But these don't work with AMD CPU.
I have a water-cooled Radeon VII (single card) on an Intel mobo (GB Xtreme Waterforce). The GPU temps before and after water conversion were easily 20°C cooler with no GPU fans ramping up when stressing the GPU. This conversion is nice, but not essential.
-
1
-
-
8 hours ago, meina222 said:
Thanks. I'll check the many pages of posts on these threads. Maybe I can find tips to fix sleep, which is the last remaining issue to tackle.
Sleep tends not to work well on many Hackintoshes. The initial approach is to turn off settings inside Preferences/Energy Saver (shown below). This is all I do on this VM build and I can leave the computer running for days (to check for stability) without any problems.
SpoilerAfter that, another solution that I've not tested on this VM build, is using an SSDT (attached) along with an ACPI patch (shown below). Both need to be enabled within OpenCore in the ACPI section.
This was presented on CaseySJ's Golden build (GB Z390 Designare) on another forum. But even CaseySJ finally recommended to people who continually complained about sleep: if you're not going to use the computer for a long time, just turn it off (more green).
Spoiler -
8 hours ago, meina222 said:
Also, as I saw people referring to this issue in a few posts. The OC version that worked from the link above, does not indeed allow for cpu host on a fresh install. Do later OC versions resolve this?
It was not just OC, but also kexts: early on, Lilu and WEG did not allow for BS install. OC and Lilu (v1.4.6; and WEG, if needed) compiled after 28 June should be okay. But until 14 July, special arguments in NVRAM section of OC was needed for proper functioning with BS.
If all are now compiled using "OpenCore Builder", then OC and kexts should be working fine with BS (except maybe the Recovery issues I described above).
-
7 hours ago, fabiosun said:
Could you do last try for me?😊
Download with vm assistant oc efi I use
and try with it
from terminal
vm assistant -doc
it will download an uploadable iso for proxmox
i hope with this you can solve
I now think that the problem I've been having booting BS Recovery is related to how OpenCore works with the APFS partition, which has somehow changed.
I read a few posts of some people using an apfs.efi driver (which is buit into OC). So I downloaded a couple of these files that date from 2017 and 2018, and lo and behold, when selecting the BS Recovery partition in the OC menu, I get the Apple logo and a progress bar. It proceeds slowly about 2/3 of the way and if left for an 45 min or so reaches the end but never boots into Recovery.
This suggests an issue with how the APFS drive is structured in BS and how for some Recovery boots, OC isn't setting it up correctly. (Again, I can use the BS EFI to boot into Recovery for Catalina, just not BS Recovery.)Probably between getting new betas and OC improving, these issues will disappear.
-
2 hours ago, fabiosun said:
Could you do last try for me?😊
Download with vm assistant oc efi I use
and try with it
from terminal
vm assistant -doc
it will download an uploadable iso for proxmox
i hope with this you can solve
I did. Thanks for trying to help.
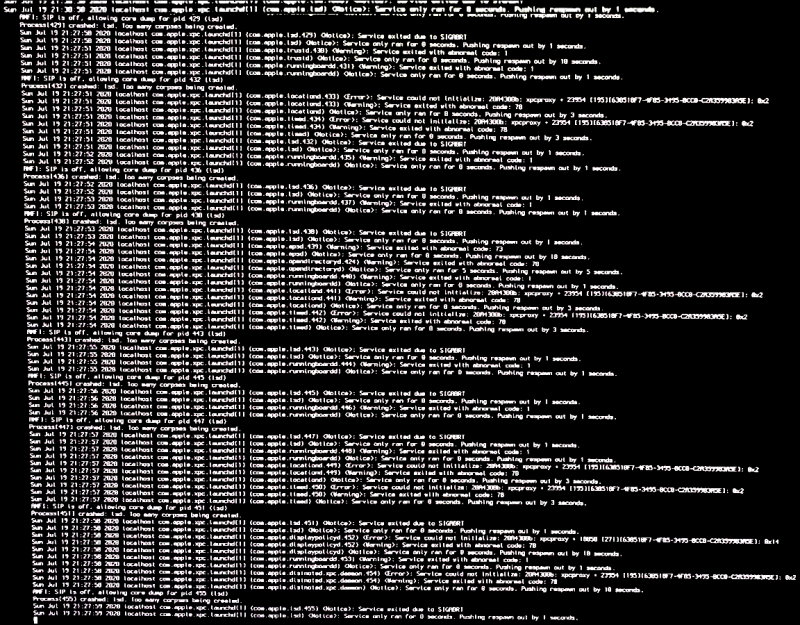
This too did not work for Recovery: it showed the longest duration of verbose printout I've ever seen. I finally stopped the endless scrolling and re-booted (Proxmox Re-set).
An excerpt in the Spoiler:
Spoiler -
21 hours ago, fabiosun said:
try this one only putting there platform data , kext and ssdt you use
I have tested your posted config above and with that oneI can't boot in recovery with the same your error.
fabiosun,
I tried using your config.plist file (with only minor changes like not using DeviceProperties for my mobo) and it too doesn't work for getting into Recovery. I don't know why this partition would be corrupted on my drive, but that's all I can reason at the moment. Hopefully, with the next beta update, I'll be able to get into Recovery.
Thanks anyway for supplying the file!
-
6 hours ago, Driftwood said:
@iGPU Really interested in how water cooling the Radeon VIIs goes for you. What coolers did u use? These: https://www.ekwb.com/shop/catalogsearch/result/?q=radeon+vii. ?
Yes, I used EKWB. They're no longer being made, but I found 2 (one two months ago and the 2nd last week; unfortunately this one has no LED connections).
[I actually have another cooler plate for a Radeon VII made by BYKSKI (who has also stopped making them). I wanted to have both GPUs with same plates, so I waited a before doing the conversion until I found a 2nd EKWB. I will re-sell the BYKSKI plate on eBay at a later date; it is NIB.]
I'm attaching photos of the set-up. First, assembly of the GPU plates, then the water loop connection with external testing and finally the internal placement. Two GPU cooling is a little trickier as a coupling is needed between the two GPUs and a third hand would have been helpful during the install.
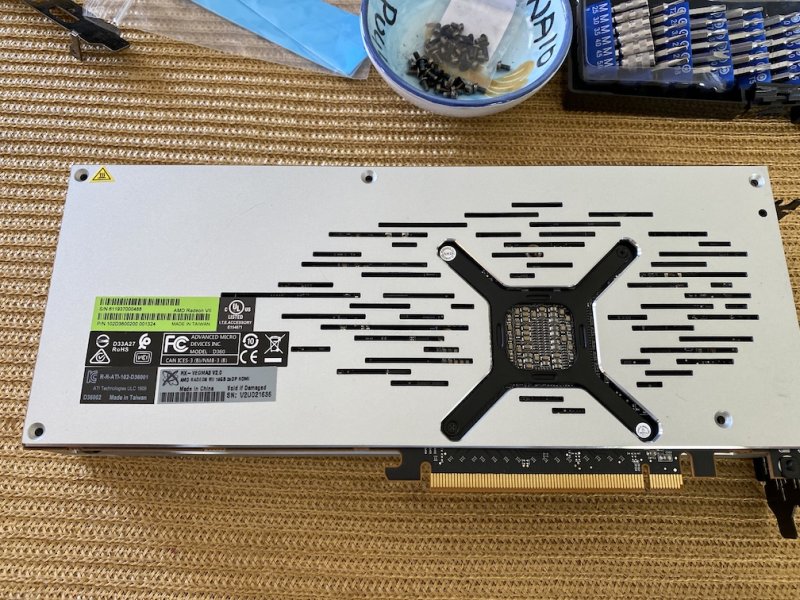
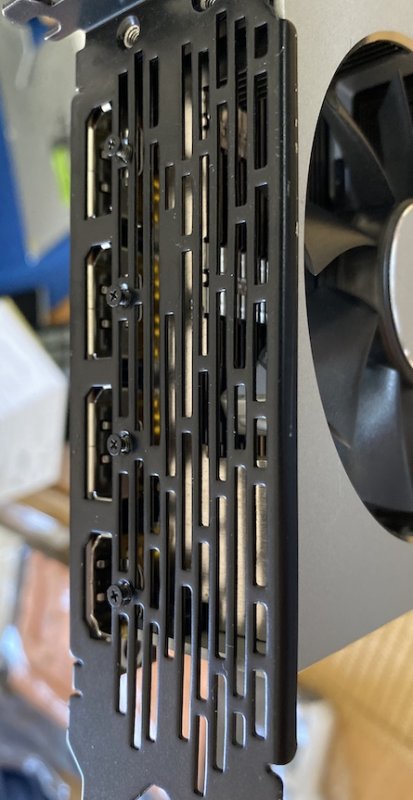
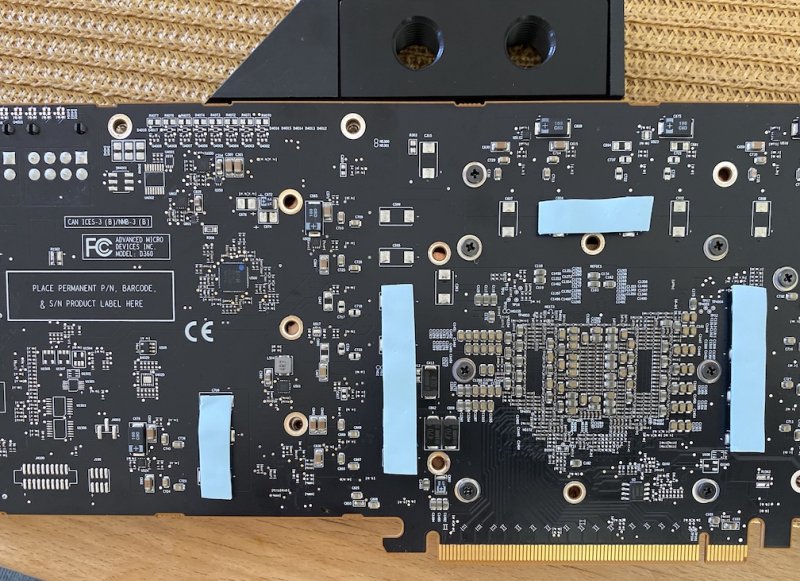
Initial photos show take-down of GPU from back side: back plate removal, removal internal screws, removal of mounting bracket screws, and disconnecting cables.
Spoiler6 screws on back of bracket need removing (and there are 2 more internal screws; keep those, see bottom of post for re-use):
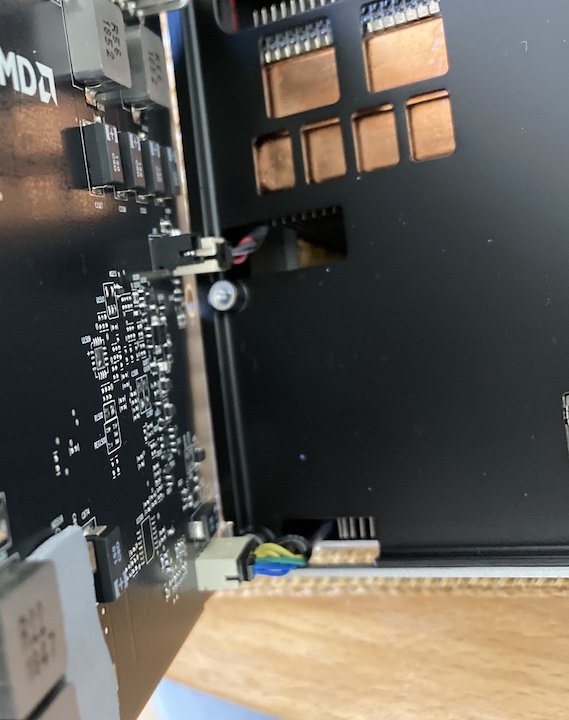
2 connectors need to be disconnected:
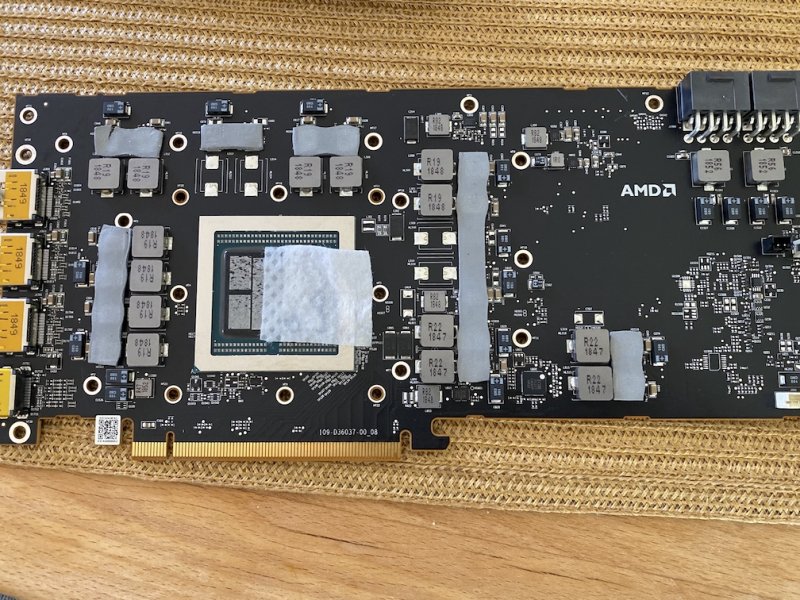
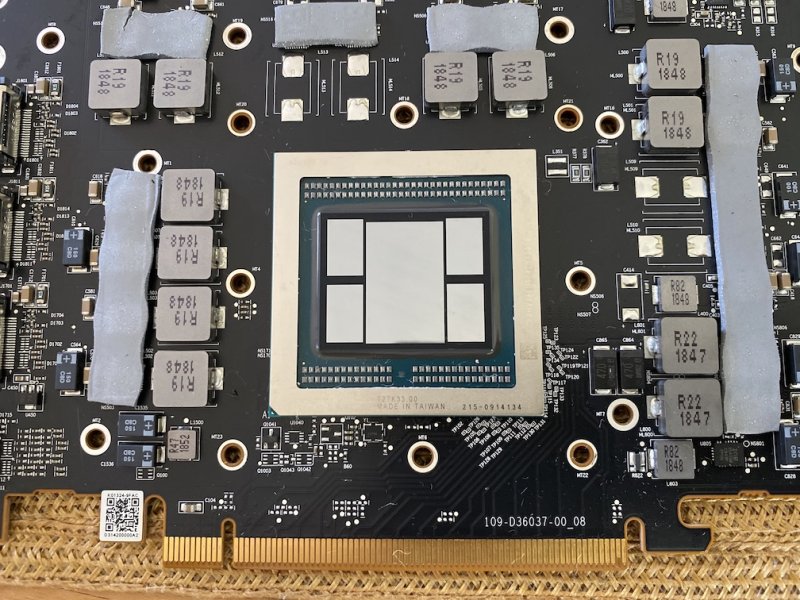
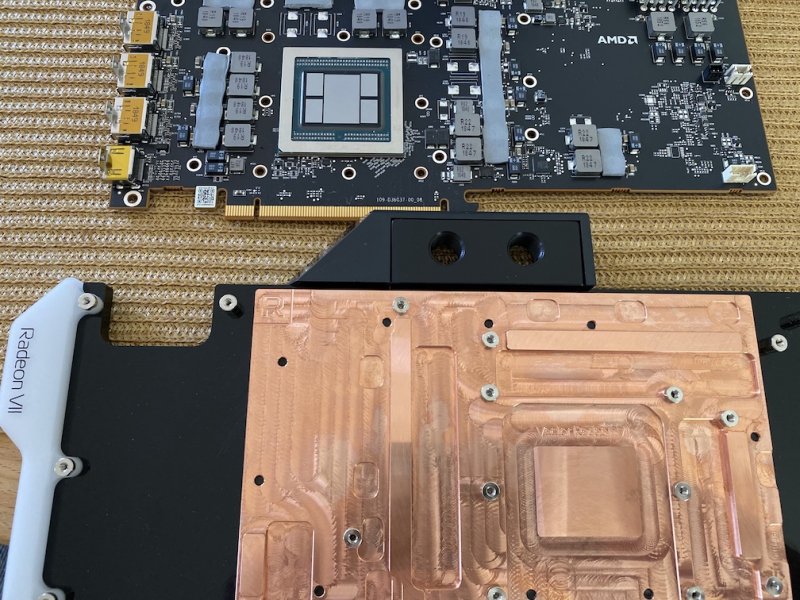
Next, the GPU chips need to be cleaned and heatpads positioned for connection to new copper frontplate.
Spoilerchips clean and ready for grease (heatpads were in good condition, so re-used):
Front panel ready for assembly to GPU (grease not yet applied); copper plate will be flipped 180 to fit):
Finally, comes addition of a back plate. This is optional but provides better heat transfer:
SpoilerActual back plate not shown here, but they can be seen on image below that shows the filling/leak checking stage):
Appearance of front (top plate) after assembly. (Upper left shows Noctua grease that was used.) The screws shown below were pre-assembled.
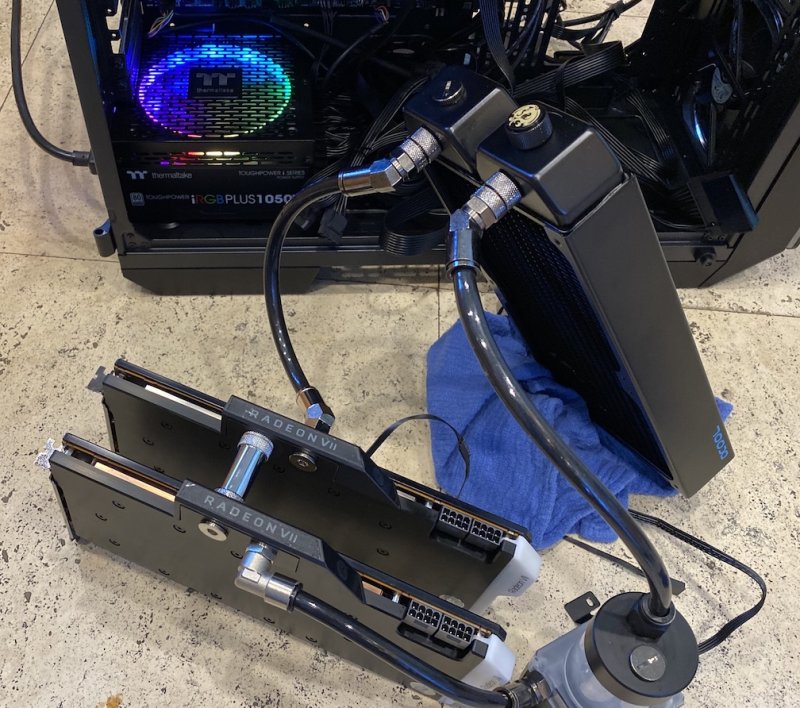
After assembly of each GPU water-cooling plates, they were connected with a sliding coupler (BYKSKI X41; 41mm allows connection for GPUs in slots 1 & 3). I use slip-on, quick connectors for ease of assembly. The tubing is 8mm ID and 10mm OD (purchased from UK). Below the entire loop is filled and then run to test for leaks. Nothing leaked from the start! The radiator is a thick 280mm (alpha-COOL) that uses two 140mm Noctua fans. This stage ran for a couple of hours. (A cheater plug is connected to the main PS connector; this prevents mobo from powering up).
SpoilerNote rear panel on each GPU cooler: they are the on the bottom, farthest from the radiator. The pump is by BYKSKI.
The yellow-labelled knob-like structure on the top-right of the radiator is an air-vent plug. Push the center and it vents out air.
N
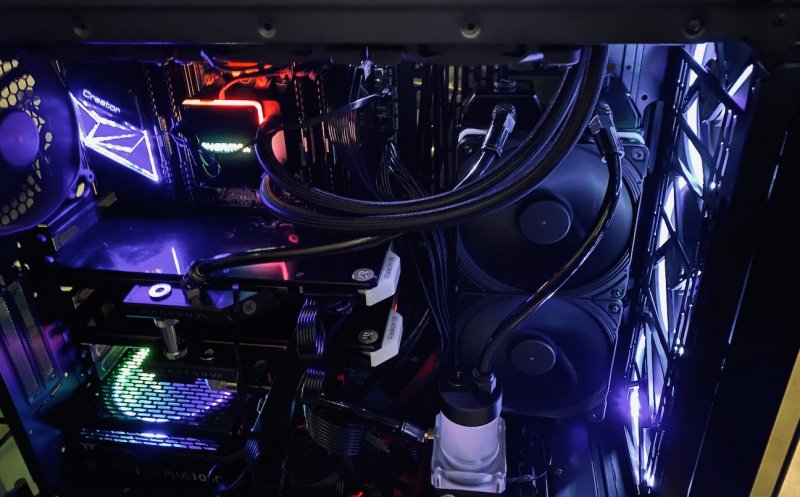
After the above is completed, only then is the cooling loop placed inside the chassis. However, it was leaked tested again and after another hour or so of testing, the mobo was finally powered up as shown below. The LED cable for the top GPU has not yet been connected (an extension is needed). It will light up. As mentioned, the other GPU cooler had no cables, so I don't think it will ever light up).
The CPU cooler has its radiator (360mm) on the top, the GPU's on the side. The front three 140mm fans are for intake. On the rear is a 140mm exhaust fan. All radiators have their fans pushing air out of the case, so as not to internalize any hot air. (I purposefully chose a case in which I could maximize use of 140mm fans for their greater air flow while using reduced speeds with less noise.)
-
2
-
-
46 minutes ago, fabiosun said:
Put your config, in particular way I would like to see your apfs config section
thank you
i am asking because I have had same error before to modify a part of it
Attached is a config.plist file for OC, v060 17 July, which is derived from Pavo's recent upload. (The PlatformInfo section was redacted.)
config-NoPlateformInfo.plist.zip
(I'm going off line for a few hours: converting both Radeon VIIs to water-cooling...)
-
1
-
-
On 7/17/2020 at 11:39 AM, Pavo said:
No problem, but to be honest I really don't see a need to boot into Recovery. With the way our systems are setup as a VM, there really is no need at all to boot into Recovery to perform any actions.
I've gotten your EFI to boot and load. Thanks!
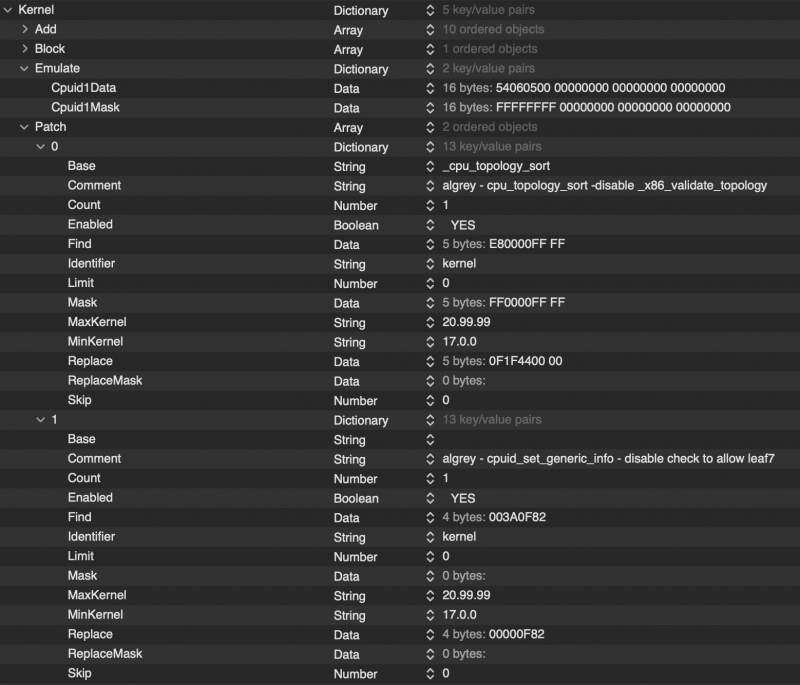
VM is set to 'host' (basically using your VM) and the Kernel/Patch section only contains two entries (what I've previously referred to as "combination #1 and #3 (leaf7)". Additionally, you're using an Emulate entries that I'd earlier removed but am using once more (see spoiler).
SpoilerI had to make a few changes to SSDT-PCI and SSDT-GFX since I'm running two Radeon VIIs (and my NVMe drives only appear within the SF0 device; yours would appear to be populated elsewhere), but basically same as what you'd uploaded.
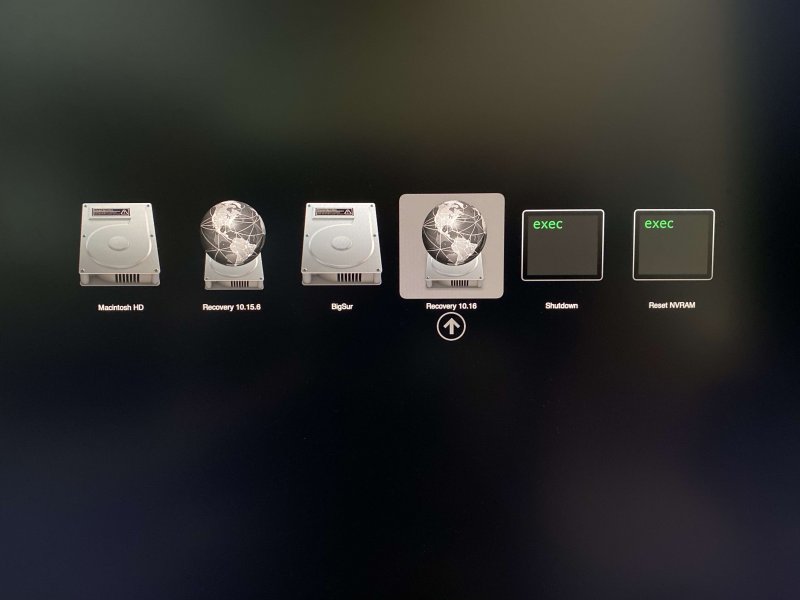
However, I still cannot boot into Recovery (10.16). When I select the Recovery drive from the OC menu (shown below), the screen changes to a black screen which in the upper left has the message: "OCB: LoadImage failed - Unsupported". Then the message disappears and it loops back to the OC menu selection.
This must either be an OpenCore problem or perhaps the BS Recovery partition is corrupted. Since I can boot into the adjacent Catalina Recovery (10.15.6), this probably supports the idea that the BS Recovery is corrupted. (The next beta update should also update the Recovery partition.)
-
22 hours ago, Driftwood said:
@iGPU Does your Aquantia work in the vm like fabiosun's?
No, it was problematic, so I leave Aquantia for Proxmox and pass I211 Intel. My network is only 1GB, so no loss I suppose.
-
49 minutes ago, Pavo said:
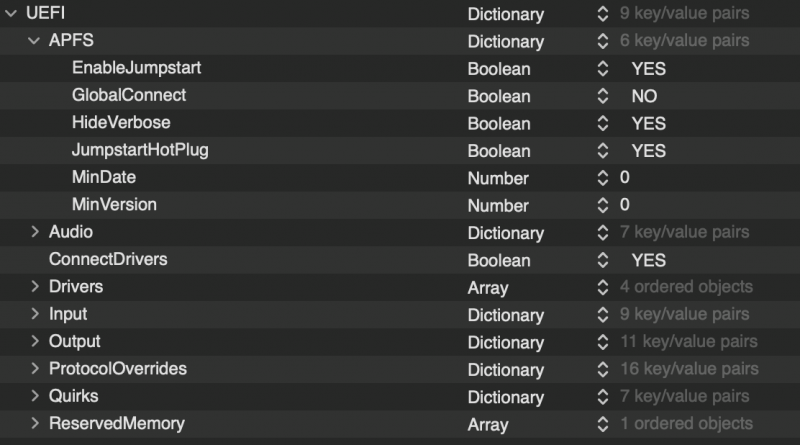
I am not sure why you have the issue with booting into Recovery, I have UEFI/APFS/JumpstartHotPlug enabled and that was all I needed to boot into Recovery. I suggest not removing anything that is vanilla built by the installation process. These extra changes that are made by the installation process are made for a reason, we might not understand what that reason is right now, but they are there for a reason.
Thanks! Since we have same mobo, CPU and GPU, I'll give your EFI a try later tonight and see if I can get into Recovery. (I too am using BS over Catalina; it already seems better.)
I was thinking along the same lines about those file removals: why remove them when we have no clear idea as to why Apple has them there.
Again, thanks for all your work. I really like using OpenCore Builder.
-
Pavo,
I still cannot boot into BS Recovery. I did set UEFI/APFS/JumpstartHotPlug to enable, but it loops out. (I'm at work and I now forget the exact, one line error I see.) Any suggestions?
And one more question. There is talk on some forums about deleting APFS snapshot disks. Do you think this is useful or necessary?
Thanks for your input.
-
2 hours ago, fabiosun said:
@iGPU also with latest kext (lilu) And drivers?
if so it is weirdyesterday I have reinstalled from high Sierra latest b2 and I have had success with my old 060 Efi with host in Vm
you can also try with:
AvoidRuntimeDefrag = NO if you have it previously to YES
Gigabyte has updated Designare bios to Agesa 1.0.0.4?
I'm on the latest BIOS for the MSI TRX40 mobo; it has Agesa 1.0.0.4. This BIOS was released in May, 2020. And yes, I'm quite obsessive about keeping kext files up-to-date, so are are the latest.
In fact, I just updated OC to v060 17 July release this morning (using Pavo's OpenCore Builder!).
(And thank you Pavo for clearing up my confusion with OCBuilder and kext files: I had not re-activating the Command Line pop-up on Pref/Location field inside XCode. It got turned off after the BS ß2 update.)
-
8 hours ago, fabiosun said:
In the stage of your latest and initial hang as you show in screen capture do you have vsmcgen =1 in your config?
No, only "-v". I'm using latest commit: v060 dated 14 July.


 N
N
Gigabyte Titan Ridge on Proxmox/OSX baremetal (WIP)
in General
Posted
I updated the images, so please re-fresh page to view. (And yes, we must sync our times! But now, I'm off to work...)