Leaderboard


Popular Content
Showing content with the highest reputation on 02/08/2021 in all areas
-
Quando il tuo Mac si “sbaglia”, viene spesso chiamato "crash". Questo è un termine breve, succinto, ma non molto utile a capire cosa è andato storto e come risolverlo. Comprendendo cosa è successo e cosa è stato esattamente quel "crash", otteniamo importanti indizi su cosa fare dopo. Uscita imprevista macOS ha aree protette, incluso il kernel stesso, che le app non dovrebbero essere in grado di influenzare. Ogni app viene eseguita in uno spazio separato, separato da altre app e dallo spazio di sistema protetto. Quindi il tipo più comune di "crash" dovrebbe essere un'app che morde la polvere quando ha fatto qualcosa di sbagliato. Di solito l'app si chiude improvvisamente, per questo viene spesso definita chiusura imprevista. Le uscite impreviste possono verificarsi per molti motivi, ma i più frequenti sono i bug nell'app. Se un'app si chiude ripetutamente in modo imprevisto quando provi a fare la stessa operazione, allora puoi essere abbastanza sicuro che si tratti di un bug in quell'app e dovresti segnalarlo agli sviluppatori dell'app. Naturalmente questo non è necessariamente una questione di colpa: molti di questi bug si verificano quando l'app si aspetta che macOS faccia qualcosa in un modo, e non è così. È quindi probabile che ci sia un periodo in cui gli sviluppatori dell'app danno la colpa a Apple, Apple dice poco e alla fine il problema viene risolto tranquillamente. Quando un'app si chiude inaspettatamente, macOS e tutte le altre app in esecuzione non devono essere interessate, ma a volte l'app, quando sta per uscire, lascia alcuni danni a macOS, ai file archiviati o altrove. Quindi, anche se dovresti essere sicuro di continuare a lavorare e riaprire l'app che si è chiusa, fai attenzione a eventuali segni di comportamenti strani che indicano danni residui. Il riavvio del Mac normalmente lo cancella. Esistono anche diversi motivi per cui macOS ha forzato la chiusura improvvisa della tua app. Se ciò accade quando l'app tenta di avviarsi, ad esempio, potrebbe essere perché si è verificato un errore di firma, ha tentato di accedere alle risorse protette dalla privacy a cui non aveva diritto o un problema con il codice oi file dell'app . Sfortunatamente, nella maggior parte dei casi, sia che si sia chiuso da solo, sia che sia stato forzato da macOS, tutto ciò che vedrai sarà un rapporto sugli arresti anomali, che potrebbe invitarti a riaprire l'app o a inviarlo ad Apple. La lettura dei rapporti sugli arresti anomali è un'attività piuttosto specializzata e normalmente necessita di informazioni dettagliate sul funzionamento di macOS e dell'app che si è chiusa. Se hai la possibilità di inviare il rapporto ad Apple o allo sviluppatore, ti preghiamo di farlo, poiché ciò potrebbe significare che il suo sviluppatore ha la possibilità di vederlo. Se vuoi capire i rapporti sugli arresti anomali, questa vecchia Nota tecnica li spiega e c'è un'intera sessione del WWDC 2018 dedicata all'argomento. Spinning beachball, o hang Più comuni delle uscite inaspettate sono gli “spinning beachball” (palloni da spiaggia che girano). Queste sono occasioni in cui un'app riscontra un problema e visualizza il puntatore come un beachball rotante per indicare che ci sta lavorando. Ciò potrebbe essere dovuto al fatto che hai chiesto all'app di intraprendere qualcosa di enorme: la maggior parte delle app mira a inserire attività di lunga durata in un processo in background e mostrare uno spinner o una barra di avanzamento occupati, ma ciò non è sempre possibile. Finché il pallone da spiaggia non viene visualizzato per troppo tempo, dovresti lasciare che l'app si risolva da sola. I beachball che girano non sono di per sé un'indicazione affidabile che un'app è in difficoltà: il loro significato è semplicemente che l'app in primo piano è troppo impegnata nell'elaborazione per interagire con l'utente al momento. In molte circostanze, questo è abbastanza benigno e l'app è semplicemente impegnata a fare quello che volevi. A volte un'app sembra incapace di riprendersi dal beachball re si blocca, non risponde, consuma i cicli della CPU e non arriva da nessuna parte. Dovresti essere in grado di forzare la chiusura dell'app, quindi puoi riaprirla e provare un approccio diverso. Per farlo, premi contemporaneamente Comando-Opzione + Esc per visualizzare la finestra di dialogo Uscita forzata. Seleziona l'app che si è bloccata, che di solito è contrassegnata in rosso segno che non risponde, quindi fai clic sul pulsante Uscita forzata. L'app verrà quindi chiusa e potrai riavviarla quando desideri e utilizzarla. Questo dovrebbe ripulire tutto correttamente dopo aver forzato la chiusura dell'app, ma come per le chiusure impreviste, a volte lascia macOS e altre app in una situazione instabile, che richiede un riavvio. Quando forzi la chiusura di un'app e, talvolta, in altre occasioni, macOS potrebbe generare automaticamente un rapporto "spindump"; genera anche rapporti "microstackshot" in caso di problemi di prestazioni. Sfortunatamente, interpretarli è davvero possibile solo se capisci come funziona l'app e cosa stava facendo in quel momento. I beachball rotanti ricorrenti in diverse app e il Finder sono una buona indicazione di problemi più generali con macOS piuttosto che con quelle app. Questi si verificano più comunemente quando hai appena aggiornato o aggiornato macOS e suggeriscono un aggiornamento non riuscito o un grave conflitto interno, forse con qualche prodotto di terze parti incompatibile. Una possibile soluzione è avviare in modalità provvisoria (con il tasto Maiusc tenuto premuto), lasciare il Mac per un minuto o due, quindi riavviare in modalità normale. Se ciò non risolve il problema, prova a scaricare e installare l'ultimo aggiornamento Combo o a reinstallare quella versione di macOS, magari in modalità di ripristino. Le estensioni di terze parti e altri software di livello inferiore sono disabilitati in modalità provvisoria, quindi potrresti scoprire che i beachball scompaiono in quella modalità. Tuttavia, anche molte estensioni Apple sono disabilitate e potresti non essere in grado di eseguire molte delle tue app. Kernel panic Le prime versioni di macOS spesso non proteggevano abbastanza bene il kernel e altre parti centrali del sistema e un bug pernicioso in un'app poteva far crollare l'intero sistema. È ora più probabile che ciò si verifichi a seguito di un errore hardware, come un problema di memoria o un guasto improvviso di un disco. Nella forma classica (OS X 10.7 e versioni precedenti), l'intero schermo del Mac diventa grigio e un messaggio multilingue ti informa che macOS ha riscontrato un errore e deve essere riavviato: questo è un kernel panic. Da OS X 10.8 in poi, questo comportamento è cambiato e potresti non essere nemmeno informato del kernel panic. Invece, il tuo Mac potrebbe bloccarsi per un minuto circa, quindi riavviarsi spontaneamente o semplicemente spegnersi del tutto. A meno che tu non gli abbia detto di riavviare o spegnere, questo può essere solo il risultato di un kernel panic. Se il tuo Mac ha un kernel panic, deve riavviare e caricare macOS da zero: il kernel ha subito così tanti danni che non può ripristinarsi in nessun altro modo. Puoi saperne di più su come riconoscere e gestire un panico del kernel qui. Freeze Quando il kernel di macOS e le parti centrali del sistema collassano completamente, potrebbero non essere in grado di continuare abbastanza a lungo da avvisarti con un kernel panic, né da riavviare prontamente. Invece, il tuo Mac si ferma semplicemente come un morto nell'acqua: l'orologio si ferma, non puoi navigare tra le finestre, anzi normalmente non puoi nemmeno muovere il puntatore. Un sintomo interessante che potrebbe avvisarti di un tale blocco è che un Apple Magic TrackPad 2, che è gestito dal software, perde la capacità di fare clic e si sente "morto". Se incappi in un blocco, lascia stare il Mac per un minuto o due, poiché è probabile che si riavvii automaticamente. In caso contrario, è necessario premere e tenere premuto il pulsante di accensione fino a quando non lo si è forzato a spegnersi, attendere alcuni secondi, quindi riavviarlo. Non scollegare o spegnere mai l'alimentazione di rete, tranne in caso di grave emergenza, poiché ciò comporta un alto rischio di causare danni permanenti al tuo Mac, sia al suo software che possibilmente al suo hardware. Come il kernel panic, dovresti vedere un blocco solo se hai un problema hardware. Tuttavia, le versioni successive di El Capitan (10.11.4 e successive) sono note per causare ripetuti blocchi sporadici su alcuni modelli di Mac, inclusi alcuni iMac e MacBook Pro. Questo è stato risolto correttamente solo con il nuovo kernel fornito in macOS Sierra, che per la maggior parte degli utenti è molto più robusto. Sono stati segnalati blocchi anche su alcuni modelli con determinate versioni di firmware. Problemi associati a eventi specifici L'arresto anomalo che si verifica durante l'avvio può essere particolarmente difficile da individuare, soprattutto se impedisce al tuo Mac di avviarsi completamente. Gravi problemi che lasciano il tuo Mac con uno schermo colorato uniforme, in genere nero o blu, di solito indicano un guasto hardware, come una scheda grafica difettosa. I problemi minori vengono spesso risolti riavviando in modalità provvisoria, con il tasto Maiusc tenuto premuto; questo disabilita la maggior parte del software di terze parti e può consentire di capire cosa si sta verificando e affrontarlo. Un altro momento critico in cui si verificano problemi è al “Wake from sleep” (risveglio dal sonno). Ciò normalmente richiede che macOS riattivi l'hardware e potrebbe essere necessario caricare driver e altro software di basso livello. Può provocare uno qualsiasi dei suddetti tipi di incidente. È più insolito andare in crash quando si va in Sleep, ma questo è un altro indicatore utile che può aiutare a restringere la causa. Gli indizi più importanti di tutti? La maggior parte degli eventi di cui sopra vengono registrati con informazioni dettagliate nei log del tuo Mac. In El Capitan e versioni precedenti, puoi sfogliare quelli che utilizzano Console, ma purtroppo Sierra ha introdotto un nuovo sistema di registrazione e Console ora ha un valore molto limitato. Se utilizzi Sierra o versioni successive, dovrai usare applicazioni di terze parti, ma questo è un’altro discorso. (Cit. EclecticLight)2 points
-
E' da un po' che sono nell'ombra, però ci sono! Tutto liscio con le ultime release di OC, inclusa la 0.6.6 e il solito workflow OCConfigCompare + ProperTree. Il prossimo passo è aggiornare a Big Sur, con moooolta calma. K.1 point
-
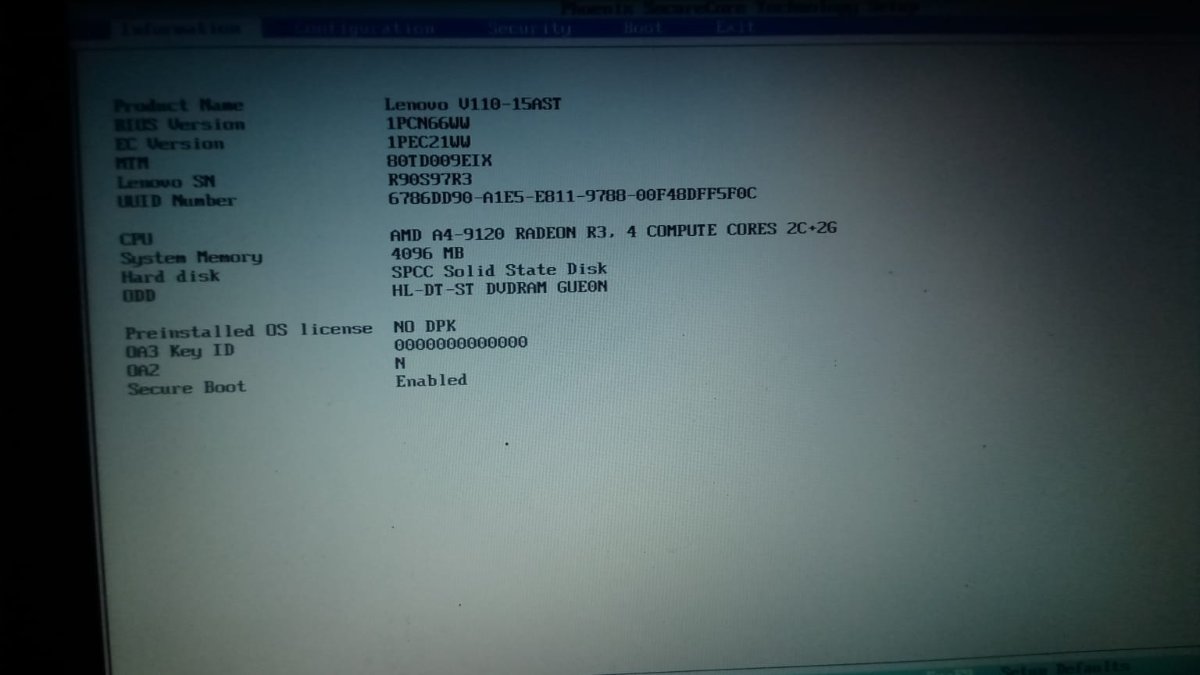
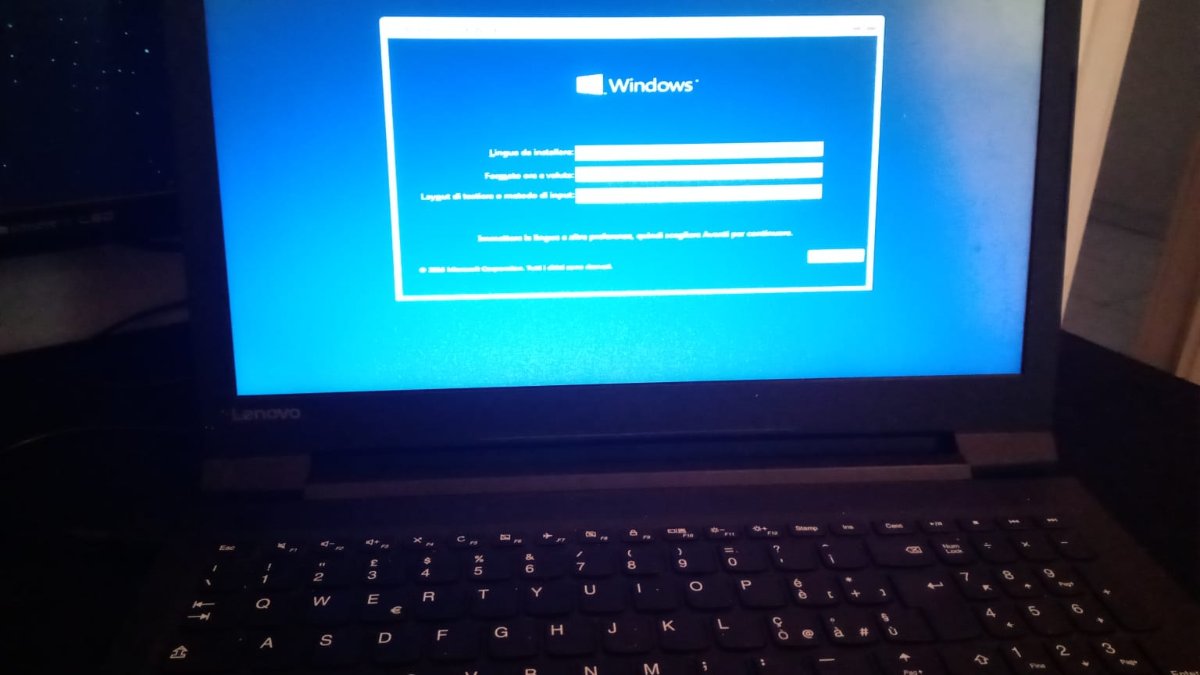
FN + F1 ed esce questa scheramtata in allegato penso sia il bios giusto? ora che faccio? GRANDEEEEEEEEE!!!!!!!!!!!!!!!!!!!!!!!!!!!!! funziona ora sta installando windows 10!!!!!!!!!! GRAZIEEEEEE!!!!!!!!!!!!!!!!!!!
 1 point
 -
Fai una foto della tastiera.1 point
-
Ciao. Di solito i Lenovo hanno un piccolo tastino laterale che se premuto (a notebook spento) ti consente di accedere al bios. Verifica i vari parametri compresa la modalità uefi1 point
-
to build latest opencore release, debug or even master ..I would like to suggest you to use this script: with this you can also download latest kext from their original devs (latest builds) also it could be useful to see this video:1 point
-
@meina222 to have a minimal log you have to put -V in boot args section of nvram config.plist1 point
-
When you say no go.. could you post error message do you see? About more than 64 cores used in your vm config thank you1 point
-
Latest is a bad news so cores limit seems to be there to download a compatible EFI you can download VM assistant from download area then in a terminal window you can type vm assistant -doc it will download an EFi converted in Iso to upload in proxmox Some people have this problem i can instal with host both from usb installer and from a direct instal from app (big Sur app)1 point
-
Hi, i many of us are booting from a nvme passed drive with a proper EFI inside it. you can find ‘how to’ in the guide you can find a link for it to first post of this thread if you want you can read from here:1 point
-
try this one only putting there platform data , kext and ssdt you use I have tested your posted config above and with that oneI can't boot in recovery with the same your error config.plist.zip1 point
-
Config is fine in that part so no idea .. I have had same your problem with Jumpstarthotplug on No with yes recovery starts here1 point
-
@iGPU I can’t read by now because I am on my mobile efi posted here miss of a yes in apfs section. I can’t verify but if you put a screenshot I can verify1 point
-
on amd-osx discord a user (ᕲᑘ'ᓰSᒪᓰᘉᘜᖇ) shared a link with latest kernel useful for Proxmox: https://github.com/fabianishere/pve-edge-kernel tested by now without problem, maybe it could be useful to solve reset bug in AMD Gfx? (I do not know) Last login: Sat Jul 18 05:56:24 CEST 2020 on tty1 Linux pve 5.7.8-1-zen2 #1 SMP 5.7.8-1-zen2 (Fri, 10 Jul 2020 15:39:00 +0200) x86_64 The programs included with the Debian GNU/Linux system are free software; the exact distribution terms for each program are described in the individual files in /usr/share/doc/*/copyright. Debian GNU/Linux comes with ABSOLUTELY NO WARRANTY, to the extent permitted by applicable law. root@pve:~# pveversion -v proxmox-ve: 6.2-1 (running kernel: 5.7.8-1-zen2) pve-manager: 6.2-9 (running version: 6.2-9/4d363c5b) pve-kernel-5.4: 6.2-4 pve-kernel-helper: 6.2-4 pve-kernel-5.4.44-2-pve: 5.4.44-2 pve-kernel-5.4.44-1-pve: 5.4.44-1 pve-kernel-5.4.41-1-pve: 5.4.41-1 pve-kernel-5.4.34-1-pve: 5.4.34-2 ceph-fuse: 12.2.11+dfsg1-2.1+b1 corosync: 3.0.4-pve1 criu: 3.11-3 glusterfs-client: 5.5-3 ifupdown: 0.8.35+pve1 ksm-control-daemon: 1.3-1 libjs-extjs: 6.0.1-10 libknet1: 1.16-pve1 libproxmox-acme-perl: 1.0.4 libpve-access-control: 6.1-2 libpve-apiclient-perl: 3.0-3 libpve-common-perl: 6.1-5 libpve-guest-common-perl: 3.0-11 libpve-http-server-perl: 3.0-6 libpve-storage-perl: 6.2-3 libqb0: 1.0.5-1 libspice-server1: 0.14.2-4~pve6+1 lvm2: 2.03.02-pve4 lxc-pve: 4.0.2-1 lxcfs: 4.0.3-pve3 novnc-pve: 1.1.0-1 proxmox-mini-journalreader: 1.1-1 proxmox-widget-toolkit: 2.2-9 pve-cluster: 6.1-8 pve-container: 3.1-10 pve-docs: 6.2-4 pve-edk2-firmware: 2.20200531-1 pve-firewall: 4.1-2 pve-firmware: 3.1-1 pve-ha-manager: 3.0-9 pve-i18n: 2.1-3 pve-qemu-kvm: 5.0.0-10 pve-xtermjs: 4.3.0-1 qemu-server: 6.2-9 smartmontools: 7.1-pve2 spiceterm: 3.1-1 vncterm: 1.6-1 zfsutils-linux: 0.8.4-pve1 root@pve:~#1 point
-
so maybe also this: AvoidRuntimeDefrag should be set to No now.. in my case is on NO1 point
-
@iGPU also with latest kext (lilu) And drivers? if so it is weird yesterday I have reinstalled from high Sierra latest b2 and I have had success with my old 060 Efi with host in Vm you can also try with: AvoidRuntimeDefrag = NO if you have it previously to YES Gigabyte has updated Designare bios to Agesa 1.0.0.4?1 point
-
In the stage of your latest and initial hang as you show in screen capture do you have vsmcgen =1 in your config?1 point
-
you're making me want to buy a Radeon VII again 🙂 🙂1 point
-
hi @Driftwood I do not know if it is related to radeon (maybe connected also to reset bug??) or bios different settings of AsRock and Gigabyte mb (which seem to have the chance to go deeper than MSI during settings cpu and others parameter) I can only say that I use a single VM config file to boot High Sierra, Mojave, Catalina and latest Big Sur Beta 2. Also my EFi is the same for all (one EFI allows to boot properly in all system above) In OSX above High Sierra I have limitation you know because I have no GPU driver for them It would be interesting if other users with MSI or Asus board have the same problem or not1 point
-
@iGPU a verbose boot said something?1 point
-
Yep no need of third patch for us only the numbers for Big Sur version and old two patches In config.plist file1 point
-
1 point
-
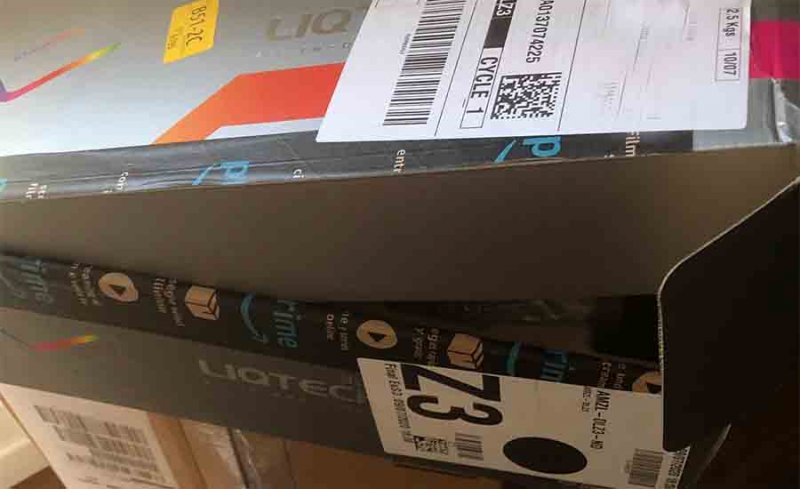
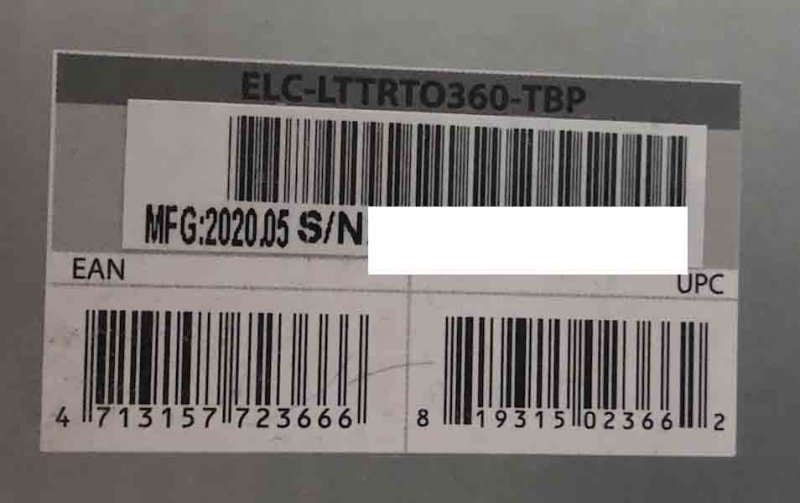
@iGPU I can't find any unboxing of this II version so I can't say..but two models I have received have different boxes on serial code I see 2020-05
1 point
-
Usually I update via Apple store/internal software update without problems @cj7501 point
-
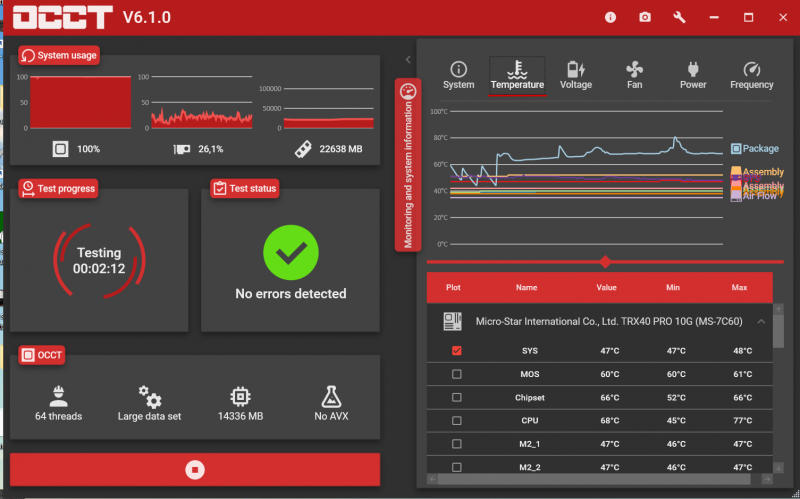
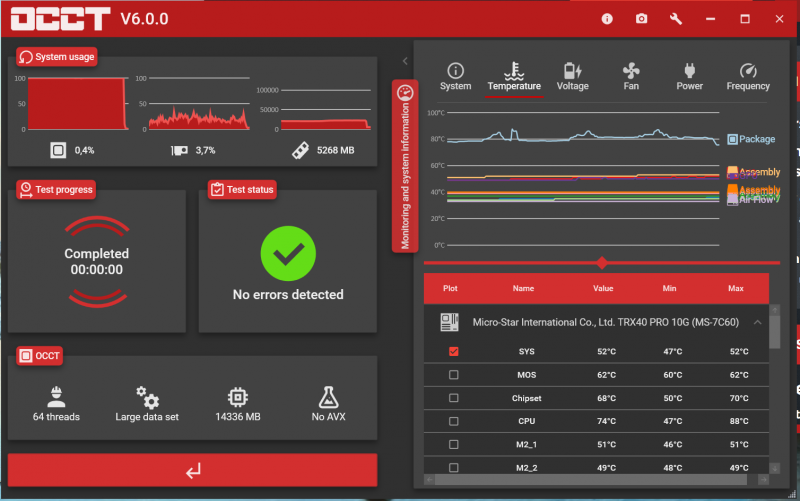
with Enermax liquid cooling temps and frequency with OCCT:
1 point
-
@iGPUwhen you have time can you post a screen capture of your BIOS settings for Cpu fan and Pump? Temperature with Enermax liquid cooler are very good, but I have a weird whistle I can hear (it seems a sort of coil wine)and also Cpu fan have too much ramping also in idle Thank you1 point
-
@Driftwood I was curious about acquantia problem with Big Sur because I have not with it. problems for first beta 1 was related to the bootloader and vm config (kernel and cpu type). with latest oc I have installed from scratch without modify my vm config which is the same for all OS X I have installed when you have done with the guide I will very happy to read and maybe with it I could improve also my old one👍1 point
-
Explain please what you are trying to do with Pavo (emulated boot??) By the way have you and Pavo published in some place a guide as you said some weeks ago? edit: which fix for acquantia? or better which problem do you have with it?1 point
-
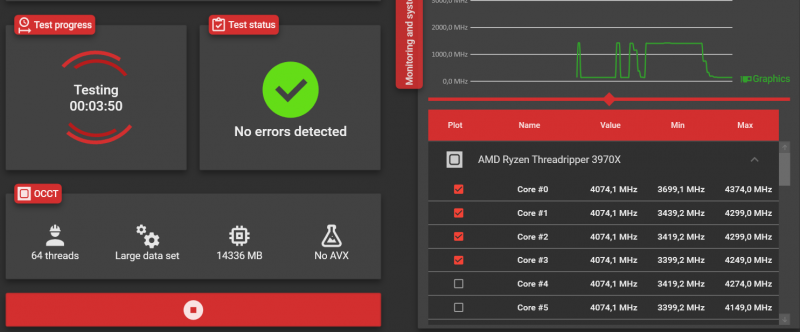
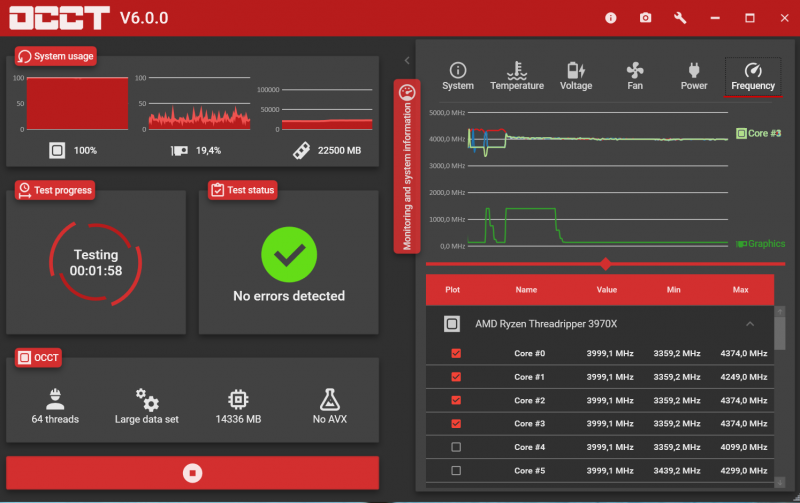
So it is correct , before you don't have this behaviour? would be also interesting for you (MSI user) art with PBO in auto mode and then in enable mode.. the second option seems to be more aggressive for frequency and it produces during OCCT test a OC about 4K for all cores... I have not verified in that condition TDP..but I think it is about 400 W in auto mode more check are there (I think) and it is more safe for a daily use1 point
-
Post your config if you want, i have installed from scratch very easily if i compare with beta 11 point
-
Audio via DP/Hdmi in Nvidia is perfect, no drop, no crakle or problem for audio Internal audio (Realtek usb 2.0) and additional USB/firewire audio card could be problematic I read also on Vanilla AMD rig some people have problem with audio in OSX..but not tested personally The only interesting things I see in morgonaut click bait site ( : ) ) is the part when she says no need of any boot loaders, but boot loader in our VM does a minimal part for the system functionality1 point
-
if you see i have asked her why she does not use internal card but cheaper HDMI/dp audio from her cheaper monitors.. she answered " i have not speaker connected" 🙂 funny 🙂 however she said an intersting thing answering to some users She does not use any bootloaders... we will see "her" methods from about ten episodes from now 🙂 🙂1 point
-
@paulthesparky I think @iGPUhave had success with his x570 rig many time ago..for now problem is with trx40/proxmox/linux combinations1 point
-
@Rox67er try to put PBO in enable from auto (if you want 🙂 ) if you see my freq is @ about 4000 on all cores (i use PBO enable button, in auto it is different in my MSI (lower))
1 point
-
with MSI boards it is possible to check temperature using internal Q-code display In my case I see very high temperature when I put in a playing loop 500 or more tracks in Logic Pro1 point
-
Big Sur installed..for now no boot 😂
1 point
-
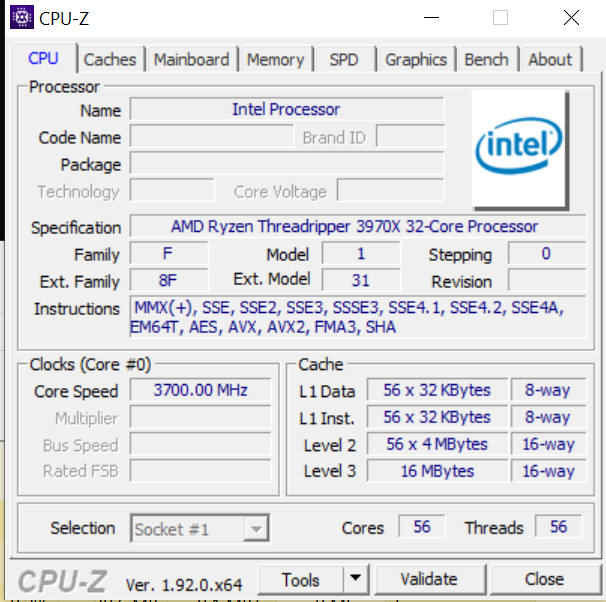
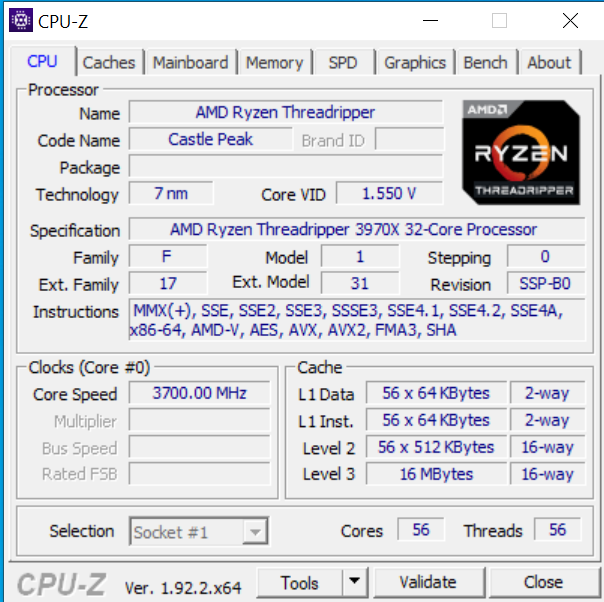
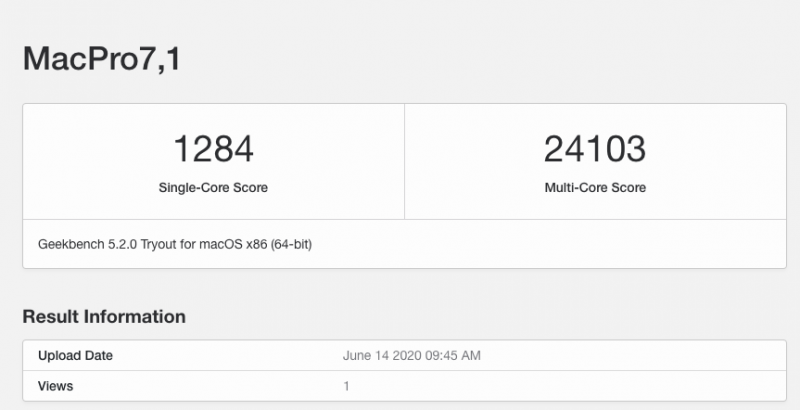
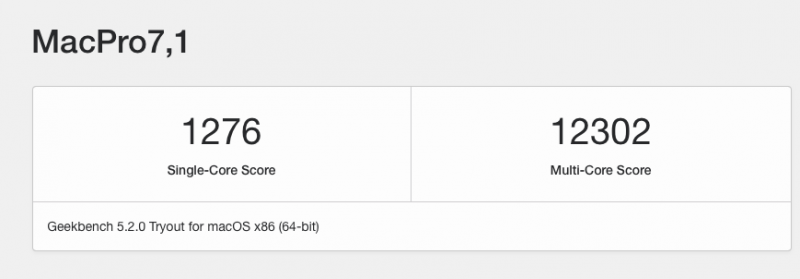
tested now both Catalina amd high Sierra hang in my case I have tested to boot in windows via opencore boot loader launched from proxmox and it starts well not tested ( I will do in a touch) my windows vm (no real disk) And second pictures is a vm disk (Proxmox Windows 10)..in both VM I have put 56 as cores number (1 socket) in VM situation first boot produces a hang , no proxmox logo. I have signals on both monitors but black screen) hard reset system restart again and it booted Intersting to see that booting with real Windows installation (I use it normally) system is seen as an intel using my vm conf file (100.conf) Using 104.conf file (windows VM config) system is seen as an AMD with 56 cores
1 point
-
Ok now it is good as it should be thank you for testing again1 point
-
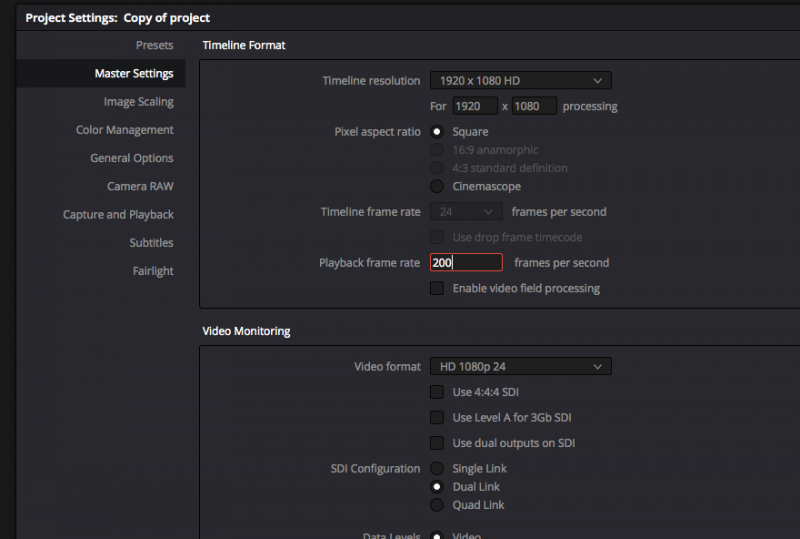
@iGPU thank you for testing have you unlocked FPS in project settings? it seems capped at 24 FPS you have to put a value different from default project FPS value like 200 FPS instead default ( it is 24 by default) You can also test with 6 Trn nodes and with 66 noise node as you did before1 point
-
@iGPU in archLinux you have no problem with audio you mean with also an OS X vm loaded with it? It could be interesting if in an intel vm with OS X is present the same problem i see many people suffering audio problem also in vanilla amd forum Someone solve it forcing all pcie slot to 3.0..1 point
-
@iGPUfor me audio problem was solved by Catalina ..I have not used it intensively in it because I have no acceleration with GFX in it (no web driver) if you are in Mojave OSX maybe you can solve with 10.15.5.. Someone solves with an USB hub independent of tsc variation of pc chipset..but it could be a serious problem I use davinci in High Sierra with HDEF audio, and there no problem at all USB audio is a problem for now1 point
-
Searching on the web for mine highsierra audio problem i have found many users using usb audio on mac with the same problems or pretty similars one i am convinced that problem is not related to Vm also because in a proxmox windows vm i have not problems at all. if you want and you have time explain which problems do you have and if they are playable also for me using same software or procedure if these problems happen randomly...it could be a difficult task.1 point
-
Could you explain how 8125 ethernet driver is related to those usb controllers that @Rox67eris asking for in above his message? i think if you are following also pavo’s github or private advice you are using some kernel patched deb...with 148c id this thing helps to pass above usb controller it is a well known patch named Flr patch and you can find it on reddit from january of this year, or better..there you can find the one useful for x570 chipset, then i have asked to Pavo to compile for me the ones useful for us trx40 users and he very kindly compiled the patch as i requested to him. waiting your guide in a few days to understand better😉1 point
-
First big decision is to choose where to install Proxmox Controller used for this disk could be problematic to pass Personally I have installed it on a SSD Samsung pro 840 pro connected to an USB 3.2 type C (as media in my mb backplate) In this way I can pass pretty easily all my SATA, NVME,USB controllers and use disks I have without problem Proxmox is better to leave it separate from other disk/os I would suggest to read well my guide and also user experiences and to familiarise with some problems people have had encountered in this configuration to be more clear..in my system I have OSX High Sierra on a Sabrent NVME disk, OS Windows 10 64 bit on a Samsung 960 pro Nvme disk (both disk passed completely and independent by Proxmox or VM stuff then I have passed my Sata controllers completely (2 10 tb disks, 2 6 tb disks , 1 dvd/BD recorder and a spare disk I use connected with and external sata device) I have also Catalina installed on a "VM file disk" but I do not use it so much because my gfx is not supported Waiting for your initial finding/test 🙂1 point
-
@GDS Could clarify better your motherboard model? Is an Asus? because Aorus master should be gigabyte 🙂 🙂 I am asking to see if you have also an USB (asmedia controller) If so to pass all controller the easy way could be to use a disk attached to that USB controller1 point
-
from project settings unlock project frame rate in this way (use a number greater of your main monitor hz refresh: then from color page tab load proper node setup try with 66 load and hit spacebar/play then try with 6 node and hit play right mouse click on miniature to see those options:
1 point
-
Catalina beta 10.15.6 High Sierra 10.13.6
1 point
-
I have this: IOMMU Group 49: 42:08.0 PCI bridge [0604]: Advanced Micro Devices, Inc. [AMD] Device [1022:57a4] 46:00.0 Non-Essential Instrumentation [1300]: Advanced Micro Devices, Inc. [AMD] Starship/Matisse Reserved SPP [1022:1485] 46:00.1 USB controller [0c03]: Advanced Micro Devices, Inc. [AMD] Matisse USB 3.0 Host Controller [1022:149c] 46:00.3 USB controller [0c03]: Advanced Micro Devices, Inc. [AMD] Matisse USB 3.0 Host Controller [1022:149c] with: 42:08.0 PCI bridge [0604]: Advanced Micro Devices, Inc. [AMD] Device [1022:57a4] Kernel driver in use: pcieport 46:00.1 USB controller [0c03]: Advanced Micro Devices, Inc. [AMD] Matisse USB 3.0 Host Controller [1022:149c] Subsystem: Advanced Micro Devices, Inc. [AMD] Matisse USB 3.0 Host Controller [1022:1486] Kernel driver in use: vfio-pci Kernel modules: xhci_pci 46:00.3 USB controller [0c03]: Advanced Micro Devices, Inc. [AMD] Matisse USB 3.0 Host Controller [1022:149c] Subsystem: Advanced Micro Devices, Inc. [AMD] Matisse USB 3.0 Host Controller [1022:148c] Kernel driver in use: vfio-pci Kernel modules: xhci_pci these results without adding lines on vfio.conf or in blacklist.conf1 point
-
Have you a link to buy also metal case because I have not it and it seems safer to mount a Wi-Fi bt in an original metal case1 point
-
@cj750 I have no answer for your problem obviusly is gpu related but if you have done all things proposed here from amd gpu user... I have no idea😢1 point