Leaderboard


Popular Content
Showing content with the highest reputation on 11/04/2020 in Posts
-
Yeah I just used your EFI and the error vanished! Thanks2 points
-
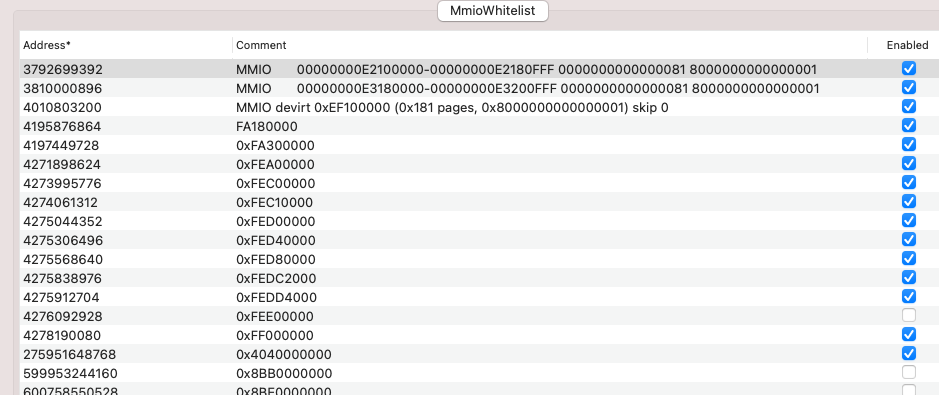
ok tested Ubuntu 19.04 It boots fine starting with Clover Bootloader so Proxmox ok Ubuntu 19.04 ok Catalina 10.15.7 ok Big Sur 11.01 ok Windows 10 64bit ok * digital license stay activated here.. No bad I am using same set of MMIO i am using in opencore bootloader, and same Kernel Patches rewritten using Clover Terminology
 2 points
 -
@jncasey, we must have been typing about the Linux bits at the same time. 🙂 Adding the new 0.6.3 kernel entry (EnableBTFeatureFlags --> True) to my config has fixed Handoff and unlocking from my Apple Watch (using Intel Bluetooth and AX200), so you may want to add and set that if you have an iPhone or Apple Watch and it isn't handing off or unlocking.2 points
-
@meina222 I also have Above 4G enabled in bios – without it I was having problems with Windows/Ubuntu using my second (NVIDIA) gpu. Thanks @Ploddles. I'll check out your 0.6.3 config in a little bit. From what I've read, nothing major has been changed this time around, right? I've customized my EFI enough for my particular hardware setup that I'm going to be better off updating myself than copying from you again, I think. @fabiosun, my machine will boot macOS with RebuildAppleMemoryMap and SyncRuntimePermissions set to either true or false. But I need to set them both to true if I want to be able to boot Ubuntu through OpenCore. If I don't, grub hangs on "Loading initial ramdisk"2 points
-
@jncasey @iosengineer @Jaidy The following link is to my working OC 0.6.3 EFI It uses the builtin Intel Bluetooth and Wifi modules, fully working including Handoff etc. NVRAM is working as are all the USB ports. The config as is is built for Big Sur. If you wish to boot Catalina then it works for that as well except for Wifi. To use Wifi in Catalina you just need to change Misc | Security | SecureBootModel --> Default i.e. Big Sur = Disabled, Catalina = Default. It uses Verbose mode (I like to see things are moving along nicely) but you can remove the -v from boot-args to get rid of that if you want. You will also need to add the pikera boot-arg if you are using an RX5700 GPU (but you already knew that 🙂) Let me know if it is working for you. LINKY to EFI2 points
-
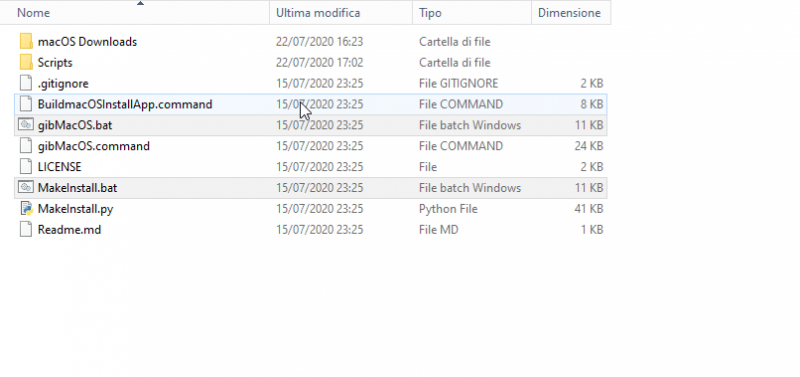
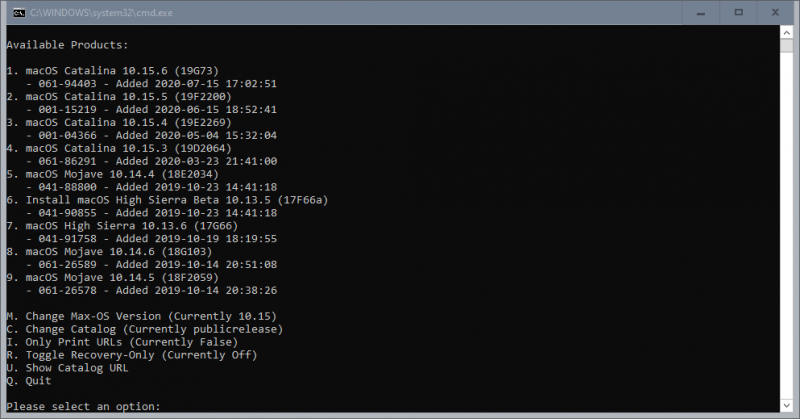
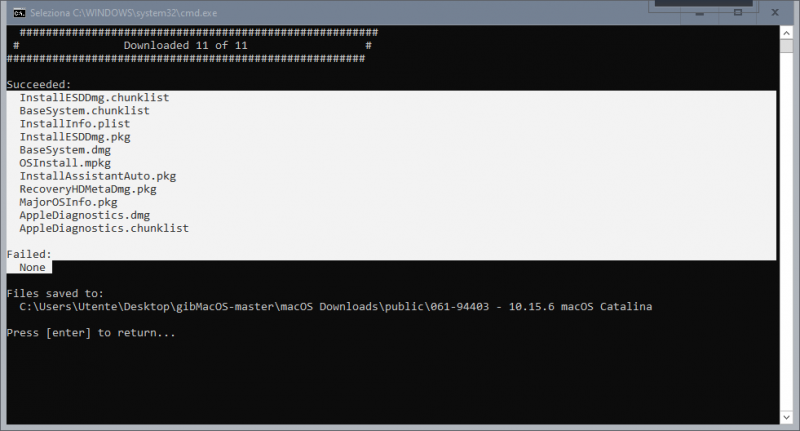
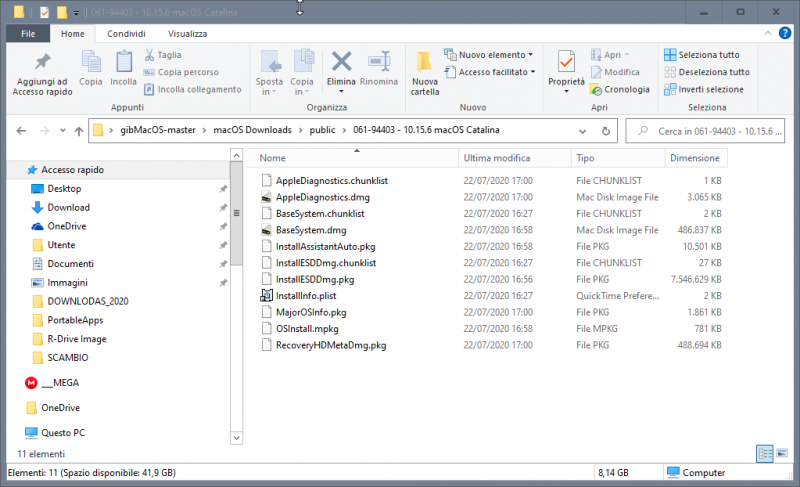
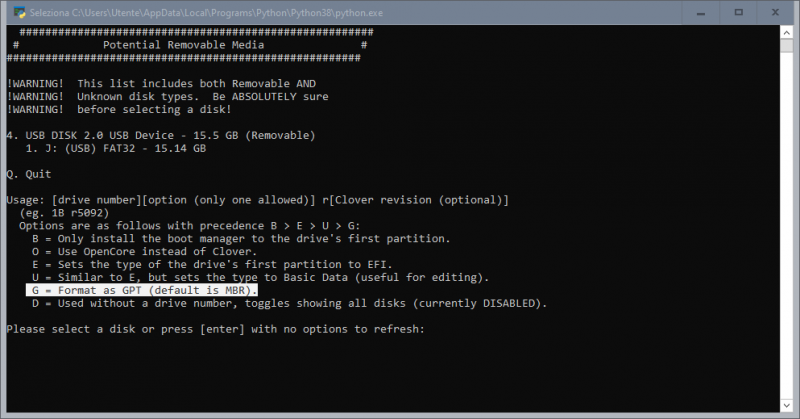
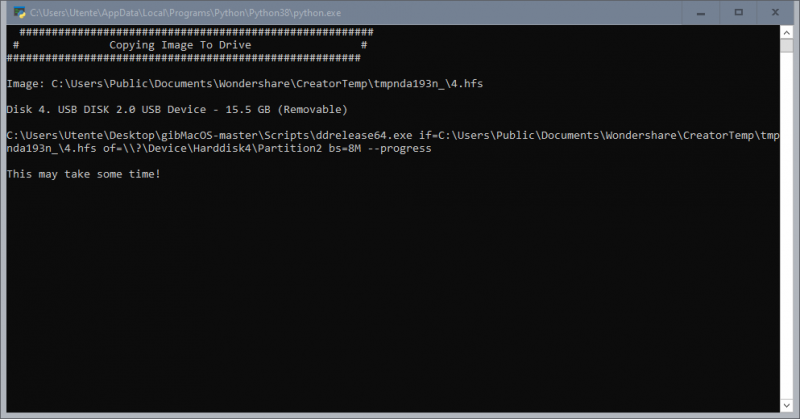
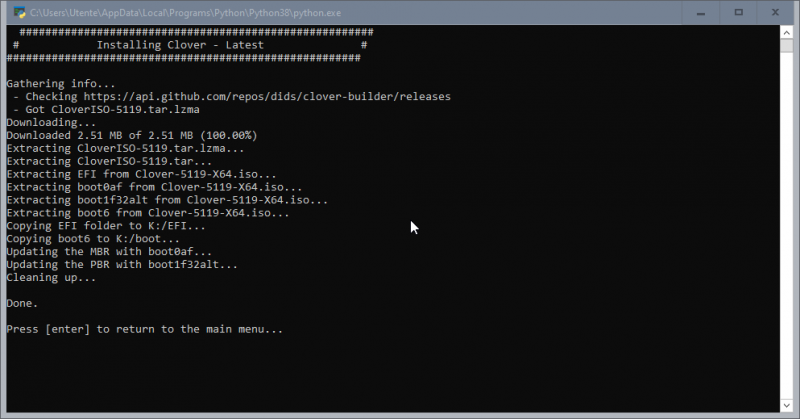
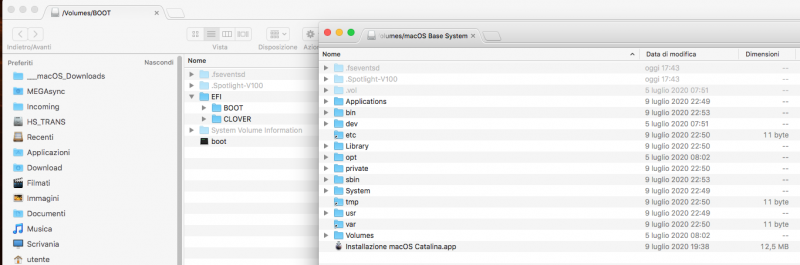
Guida sintetica Ora non ci sono più scuse, oltre alla Virtual machine, è possibile scaricare installer completo di macOS (dai server ufficiali della mela, e non distribuzioni o altra roba strampalata che si trova in giro per il web, che non supportiamo) e creare la pendrive per installazione, il tutto usando il solo windows. Il primo passo consiste nello scaricare GibMacOS https://github.com/corpnewt/gibMacOS poi si prosegue con lo scaricare ed installare python https://www.python.org/downloads/windows/ si decomprime sul desktop gibMacOS-master.zip e si esegue gibMacOS.bat normalmente dovrebbe già andare tutto bene così, ma comunque con i menù in basso è possibile cambiare impostazioni si procedede selezionando il macOS desiderato, nel mio caso ho scelto catalina 10.15.6 quindi imposto 1 in questo caso, scaricato installer completo (e non la sola recovery) e tutto proceduto regolarmente, nessuna parte fallita ora abbia in loco installer di macOS terminata questa fase, rientriamo nel menù principale, per poi uscirne. Ora prendiamo un pendrive da 16Gb e la inseriamo in una porta USB (io l'ho formattata in FAT32 ed assegnato il nome USB, ma non è importante, importante è che non vi sbagliate poi nella scelta) poi avviamo MakeInstall.bat e cosa importante, la pendrive dovrà essere formattata in GPT, quindi nel menù di scelta si dovrà inserire il numero della USB da formattare, per cui: G4 e dare invio una volta terminata formattazione, creazione EFI e partizione per installer macOS sulla pendrive, nella finestra del terminale vi verrà richiesto di incollare il path della recovery, cioè questo: selezionate il percorso copiate e incollate nel terminale poi fatto questo, dare invio, ed inizia la procedura finale ecco fatto! vediamo come si presenta da macOS la pendrive appena creata: ora abbiamo la nostra pendrive con installer completo e Clover con le impostazioni base, da windows possiamo lavorare sul config con Propertree dobbiamo inserire in EFI CLOVER KEXTS other i kext di base per installare, ovvero FakeSMC che è già presente, oppure al suo posto usare VirtualSMC, poi LILU, WathEverGreen (WEG) e USBinjectall; se notebook serve anche VoodooPS2, in ogni caso la pagina cui partire per trovare i principali kexts è questa; https://www.macos86.it/My_Utility/Kexts.html in caso di dubbi, prima di domandare è sempre meglio consultare le FAQ, che sono state scritte appositamente per i principianti: Infine se siete riusciti a creare la pendrive con installer ufficiale (non si supportano distribuzioni e bestie) avete inserito i kexts di base per installazione, ma si ha un blocco o kernel panic, nessuna paura, se non l'avete già fatto, è d'obbligo consultare come va settato il BIOS per accogliere macOS se dopo il controllo ancora non si riesce con l'installazione, aprite un thread sul forum, nella giusta sezione, per esempio se state tentando di installare catalina su AMD, la sezione sarà: Catalina Desktop AMD postate la EFI creata, appena possibile qualcuno controlla errori e dimenticanze. Magari postare anche link modello della mobo, o del notebook. Mettere in firma in modo compatto la descrizione del proprio hardware (marca modello mobo, scheda video, CPU) se in firma invece andate oltre le 4 righe, consiglio di usare lo spoiler (che sarebbe l'occhio nella barra strumenti) questo per evitare di rompere le scatole per la fruizione di una buona lettura dei thread. PS: visto che nella EFI creata con gibMacOS non è presente in EFI CLOVER la cartella ACPI origin, che è assolutamente necessaria per poter estrarre le ACPI, la allego qui, decomprimetela e copiatela dentro CLOVER nella pendrive ACPI.zip Buona divertimento novelli macachi!
1 point
-
se vuoi cambiare mobo, schiva le Z390 molto meglio le Z370 asus e asrock e vai sul sicuro o Z490 Asrock come quella di gengik che pare vada alla grande, NVRAM nativa e problemi pari a zero quella di provare senza IO80211family.kex in EFI è un buon consiglio1 point
-
Come puoi vedere, in firma, ho la rx580 e non ho nessun tipo di problema. Io cambierei solo la scheda wifi. Poi una volta che hai creata a modo la tua EFI, pialli tutto e reinstalli macOS senza lasciarti spazzatura in giro.1 point
-
Meglio la scheda wifi separata a questo punto. Quella che ti ho consigliato sopra viene riconosciuta in modo nativo, nessun kext e patch. Se vai ancora su cpu intel vai di nona generazione. La decima te la sconsiglio.1 point
-
Se hai ancora IO80211family.kext in other devi toglierlo. La tua scheda wifi non era già supportata da Mojave. La forzatura di questo driver di sistema, lo rende instabile. Dovresti valutare di cambiarla con una più adatta, tipo questa: https://www.amazon.it/Hackintosh-adattatore-compatibile-nativamente-supportato/dp/B07T9JD93Y.1 point
-
altrimenti prova qualche release precedente prelevandola da qui1 point
-
@Fish87 se posti i KP in spoiler te ne saremmo tutti grati intelmausi 1.0.4 al momento è ultima release prova questo al suo posto IntelMausiEthernet-2.5.3d1-2020-11-04 21.49.01.zip1 point
-
Sembra un problema con la scheda di rete. Hai aggiornato tutti i kext in other?1 point
-
@iGPU, where are you seeing those settings? I don't have any of it in my config. EDIT: Just looked at @Jaidyconfig, and see it in there. His config looks like an amalgamation of mine and his previous one, no idea where that section originated from. @Jaidy, have you tried with just my config as is, not adding those extra bits?1 point
-
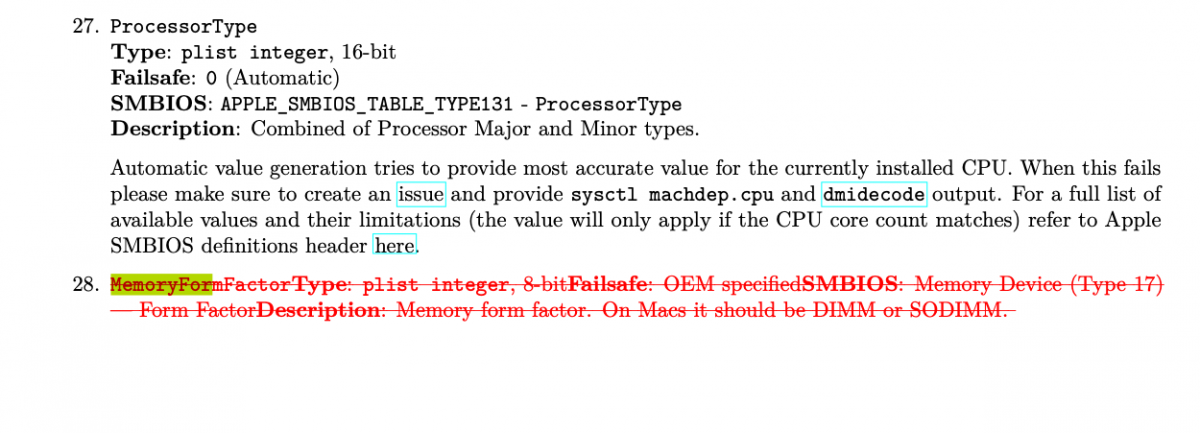
Delete the red square entry and your error pos 17 msg will be gone. No longer needed after v062.
1 point
-
Thanks @meina222 @fabiosun @Ploddles. It works now after setting the PlatformInfo -> Automatic to No 🙂 There is a crazy thing though, as noted previously by @Ploddles too, that Kext Updater, and Hackintool both still detect the version of OC to be 0.6.1, but that is fine by me. The files really have been updated to 0.6.3.1 point
-
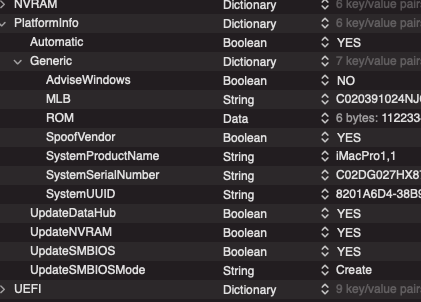
also check this: it is open core differences.pdf from previous version but if you use Automatic on Yes you can skip and delete tab I have said above Please make a config backup before! 🙂 if automatic is on yes or True as I see in @meina222post you can have only this: DataHub and SMbios are useful if automatic is set to NO and this from initial Opencore Release.
1 point
-
1 point
-
@iosengineer Our TRX40 does not need of latest Kernel patch you use (Fix pat) also you can not use some quirks in booter section, I repeat Dortania guide is a good guide, but it is not accurate for TRX40 users You can find better indication in this thread... I know it is a huge thread...but reading all we learn better 🙂1 point
-
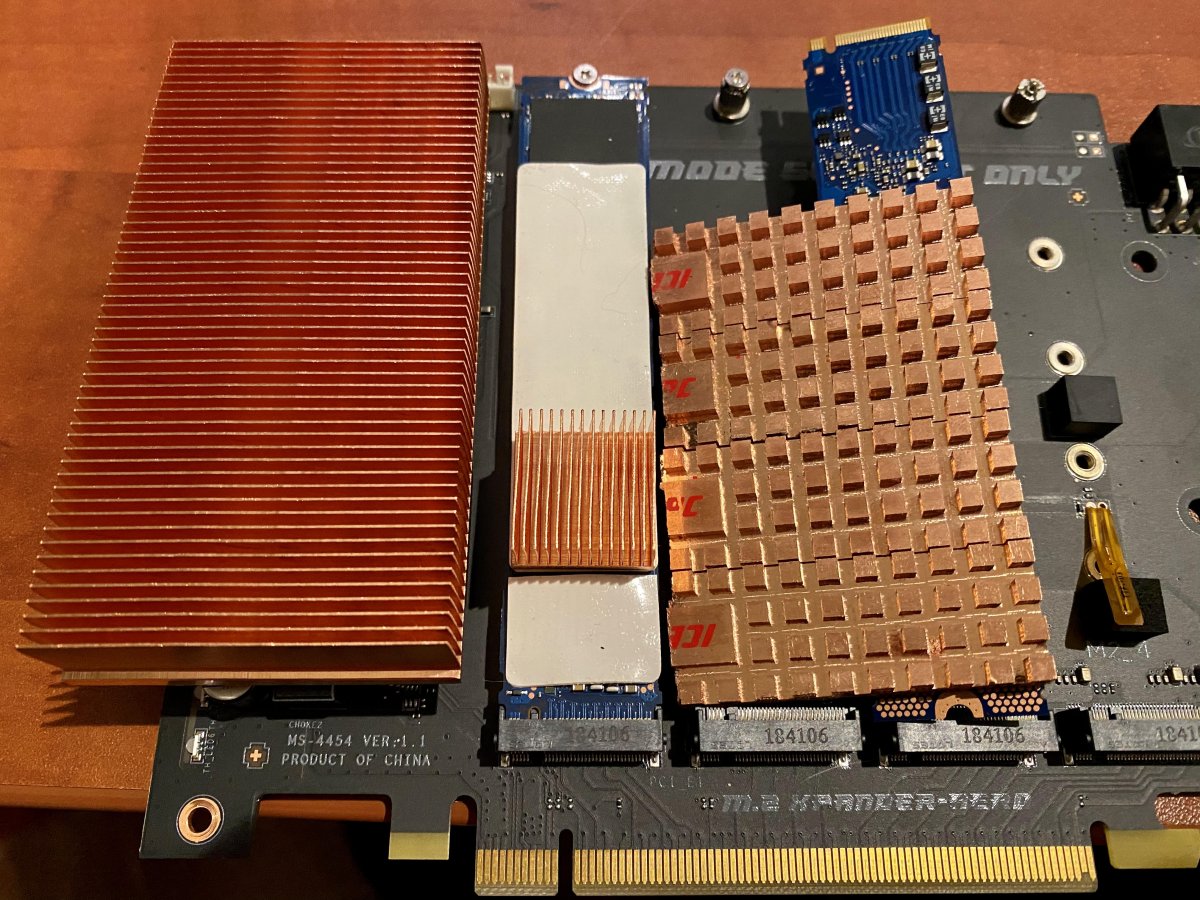
Fascinating — thank you so much @meina222 for your time sharing these details. The Above 4G discussion is interesting, as: I've had it on (both in general, and recommended by Dortania guide) I just tried disabling it, and it actually causes fail-to-boot on my crappy barebones MMIO-less config (it boots again after enabling Above 4G!) I haven't tried Above 4G disabled with your config, but may wait until I have an hour or two and validate MMIO (out of respect for all of your time). Not sure how I got an old copy! I'm 90% sure I'd downloaded it from your post just a couple days ago, but I could have made an error. While I've expressed some degree of hastiness, the last thing I want is to be another...ahem, "Clover-type" user...who doesn't care about the details. I'd been away from Hackintosh since 2006 (I had a rockin' build, lol). It was specifically OpenCore, and its rigorous first-principles-based philosophy, which I discovered almost exactly a year ago and motivated each of the C246 / W480 / TRX40 (mostly Proxmox) builds. So I apologize for any hesitancy to dive into MMIO, but especially now that I understand that it's expected for NVRAM to be broken without that memory mapping—that gives me enough confidence that I'm relatively close and it's worth the time. That said it might take me a couple days, just due to a couple life / work things going on, but I'll report back ASAP. Additionally, I'll be actively following all the posts here for the forseeable future, and deeply appreciate every one of you for your thoughtful engagement with the community! Meanwhile, one project today has been "fabricating" custom copper heatsinks for my 2x 380GB Optane 905p's, which are being used as the special vdev (in mirror) for both my 4x 970 Evo Plus "working" ZFs pool, and 16x SAS3 HDD main ZFS pool. I need to make a big cut to the large one tomorrow. The controllers are not at the same z-height, and I'd like to take my router bit to it for a monoblock fit, but found the small 20mm x 20mm ones can keep the controllers plenty cool with modest airflow. Over 9W in an M.2 form factor isn't the best idea!
1 point
-
1 point
-
I'm so happy everything works ☺️. Thanks for that. I'm experiencing the reset but now and it's quite annoying lol. Since black friday is near, I'll be on the hunt for a new GPU. Is there any decent GPU that you can recommend without the reset bug?1 point
-
It probably already has, except they have now changed the names from GM to RC (Release Candidate), otherwise why change the latest beta to 11.0.1, i.e the extra .1 on the end. They just haven't released it as they are waiting for the 'event' on the 17th.1 point
-
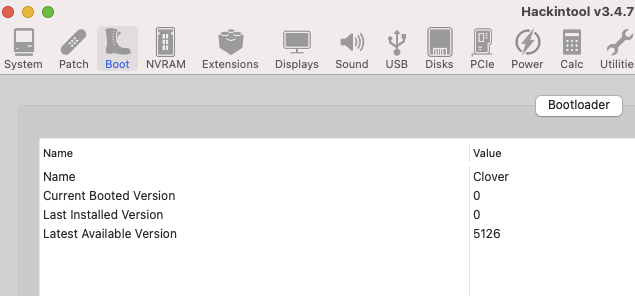
I've just updated Hackintool to the latest version. It now thinks I have booted with Clover Version 0 😀
0 points
-
@fabiosun, yes my previous comment about PS, AE etc are for the latest versions, PS 2021 (v22) etc. Liquify and Neural Filters don't work in PS but as I don't use those that isn't an issue for me. If I hear of a fix for those I'll let you know on here. I'll also test AE tracking on new Betas as they are released.0 points
-
L'utente @Itabra[/mention] ha chiesto nel nostro server discord se Sidecar funzionasse... Macity.net ha spiegato questo: "Al momento Sidecar può essere utilizzato su MacBook e MacBook Pro 2016, iMac 27” di fine 2015, MacBook Air e Mac mini 2018, sul nuovo Mac Pro 2019 e naturalmente anche modelli più recenti di tutti questi Mac. Ma il programmatore indica anche un possibile rimedio già nelle mani degli sviluppatori, un comando del Terminale che abilita il funzionamento di Sidecar anche sui Mac precedenti a quelli poco sopra indicati." Il comando in questione da digitare a mano nel Terminale del Mac è il seguente: defaults write com.apple.sidecar.display allowAllDevices -bool YES0 points