Leaderboard
Popular Content
Showing content with the highest reputation on 08/16/2020 in all areas
-
Version 1.5.1
1,314 downloads
Tools che crea la struttura della EFI per OpenCore compreso kext e driver. Permette varie tipologie Creazione EFI con OpenCore, kext e driver Release Creazione EFI con OpenCore Beta (viene compilato), kext e driver Release Creazione EFI con OpenCore, kext e driver Beta (viene tutto compilato) Possibilità di compilare OpenCore sia come Release sia come Debug1 point -
Version 1.1.0
1,117 downloads
Semplice e piccola app per creare la usb per installare macOS Il tutto è basato sul metodo ufficiale Apple --> createinstallmedia L'app nella prima parte fornisce il comando da usare, quindi chiunque voglia può prenderlo e copiarlo direttamente sul terminale. Vi è anche la possibilità di creare la usb direttamente. Credits: Apple per macOS Thx @fabiosun per l'icona 🙂 ---- This simple and tiny app is very useful to build an USB installer for OSX It is based on Apple's official installation method (createinstallmedia) It is very simple to use , it is possible to drag and drop OSX installer and USB you have to use. Another great utility by macOS86.it1 point -
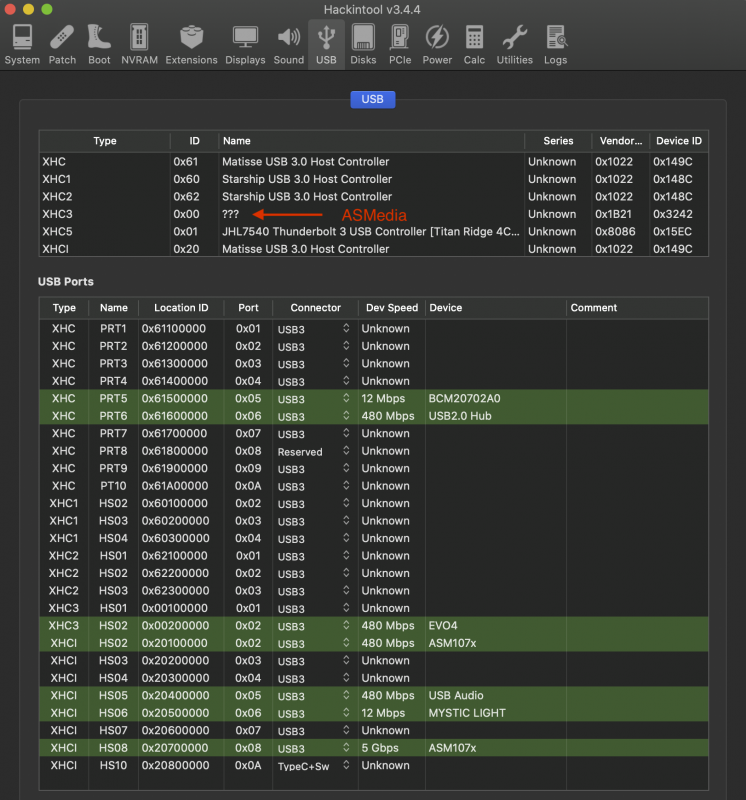
I don't think that will matter. I have now tested and computer shuts down, clicks off... but then immediately clicks back on again. So better, but not perfect. (This might be a USB connected device problem that I'll need to sort out; so hopefully just my problem.) Attached is the SSDT-TRX40-FixShutdown-USB file. It must be paired with two other files and used in the ACPI section in the order shown below. The order is important because FixShutdown attaches to site XHC that is created by the other two files. All of the TRX40 mobo's IORE files, which I've seen, have these USB devices so I think everyone can use them. However, for you @meina222, you'll need to edit the BYD8 file to remove, as I recall, PRT5 in order to cancel your BT/WiFi device. Back-to-the-future: we now know that proper Shutdown requires a good MmioWhitelist for your mobo. See this post to create that list.1 point
-
Yes, this is the next SSDT I was going to work on. It must be paired with a patch. The problem was attaching it to a USB device. Through yesterday, I was still sorting out USB devices with custom SSDT files. I'll work on it shortly. All ports are now accounted for and re-named. (I can provide custom SSDTs if anyone wants. I just need more recent IORE file to study). *** As far as USB go, I seem to recall one of your posts indicating that you'd created a USB-Ports kext to limit USB ports. In my exposure to AMD platforms, I've not yet seen a USB device that has more than 10 USB connections. The 15 USB macOS limit is per device not per machine. So I've seen no need to create any USB limits for AMD to date. (Intel is different, they have sometime 20 USB connections on one device.)1 point
-
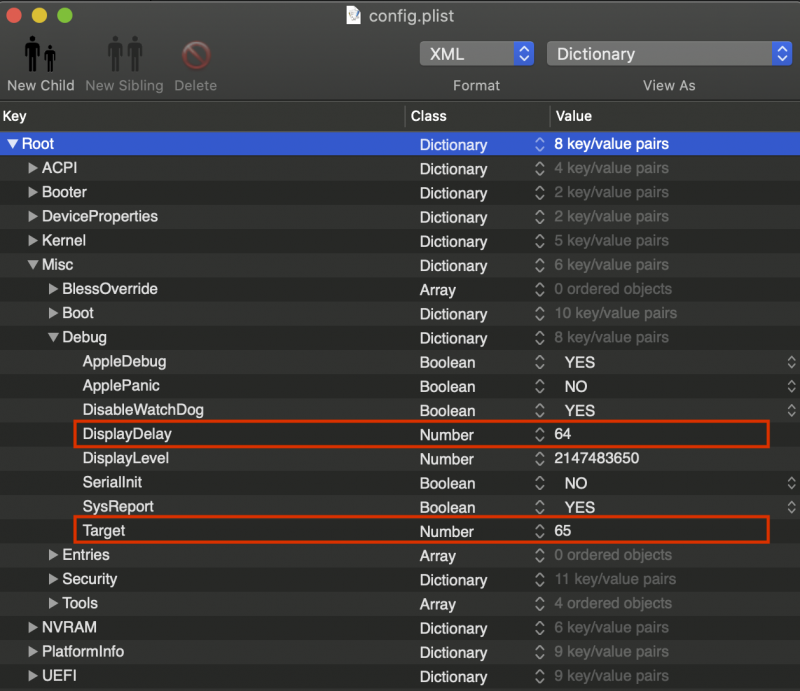
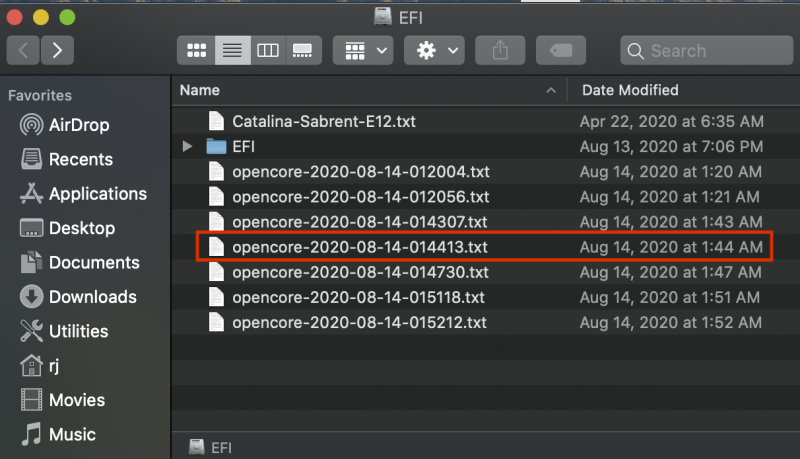
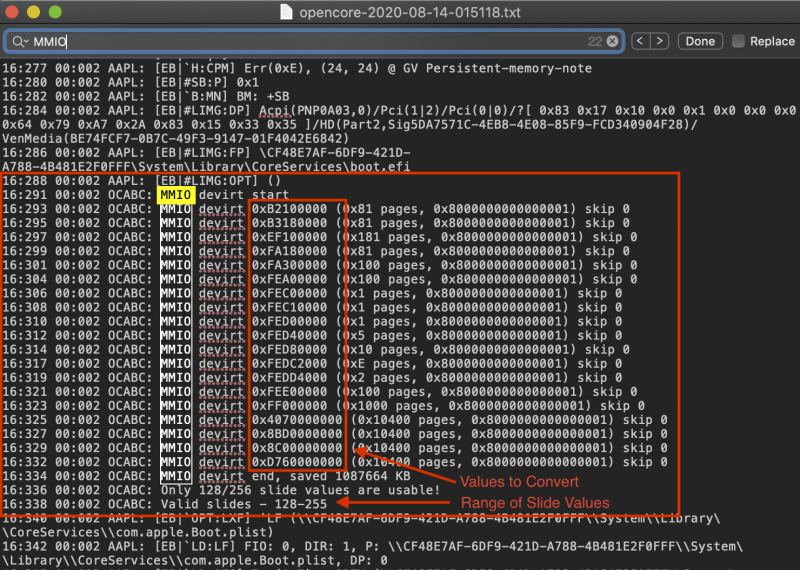
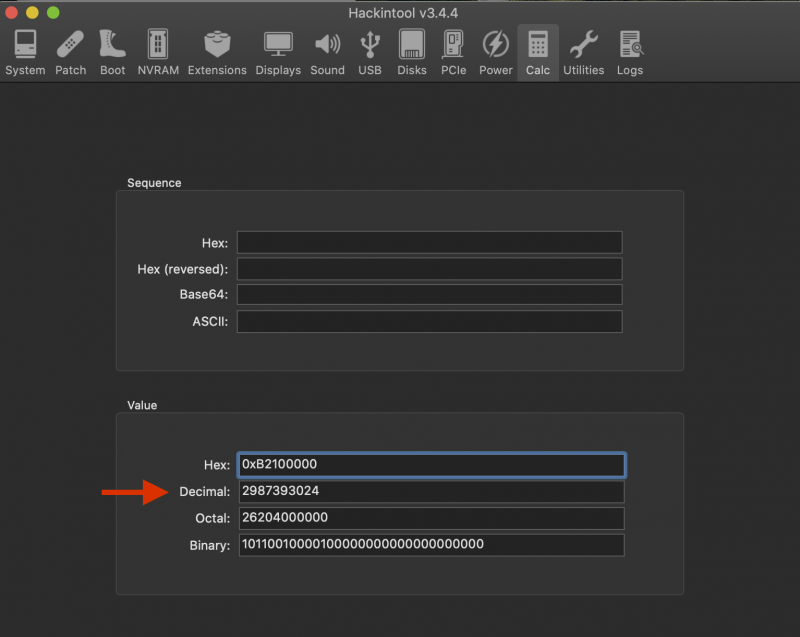
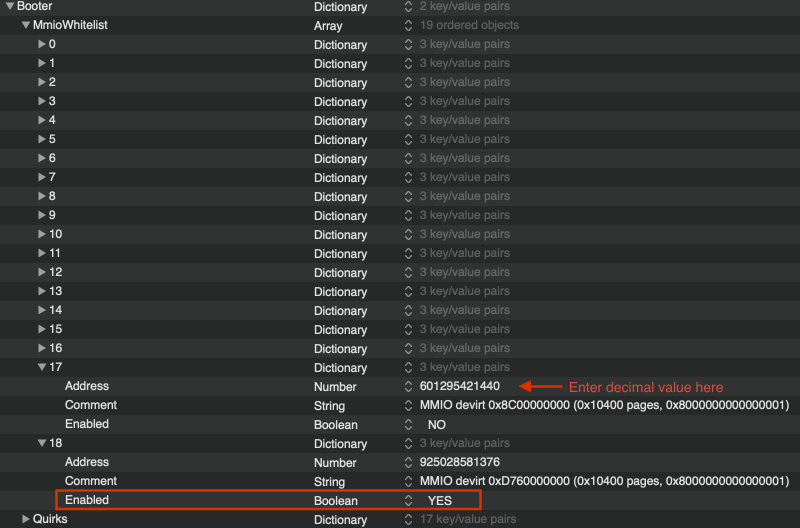
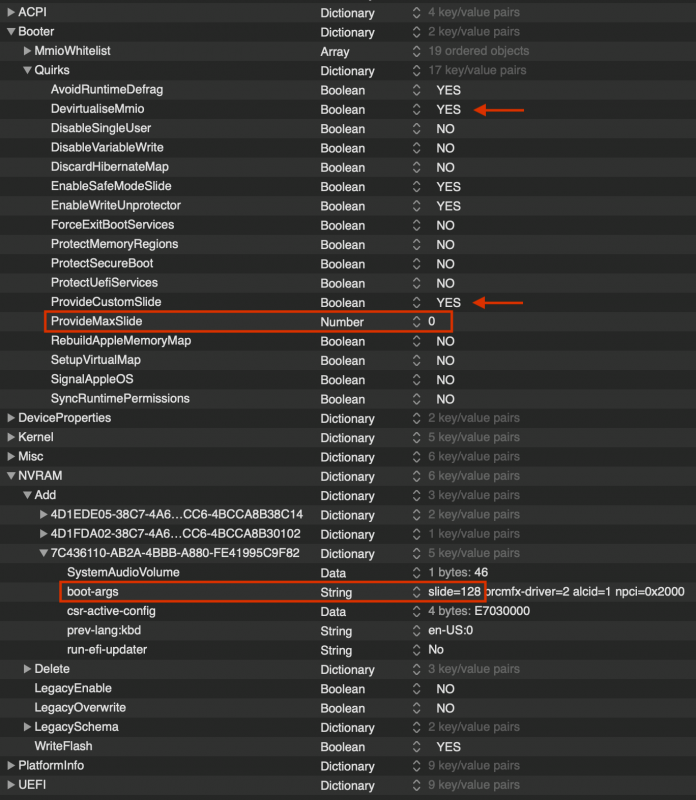
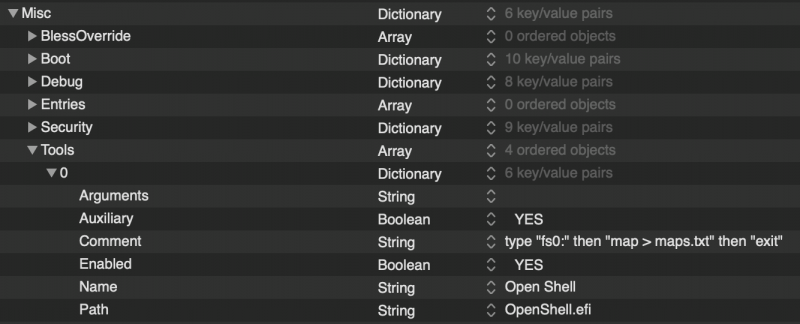
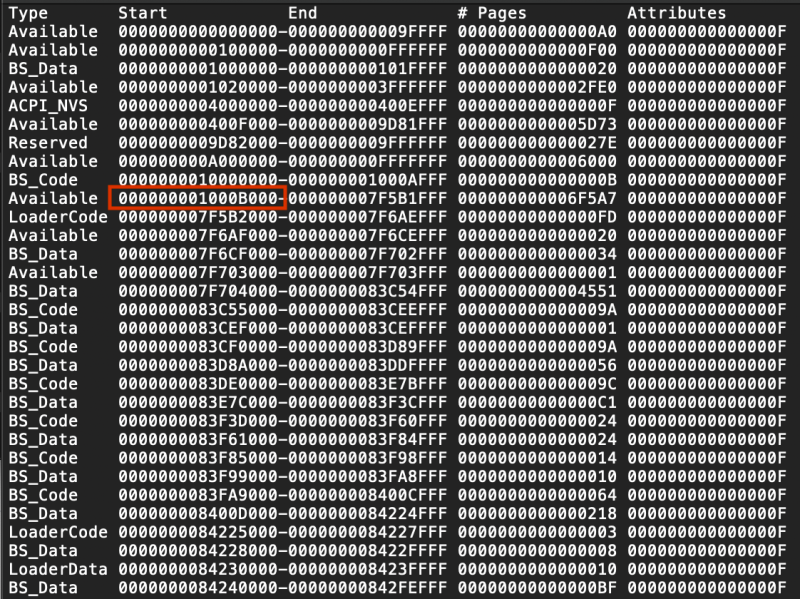
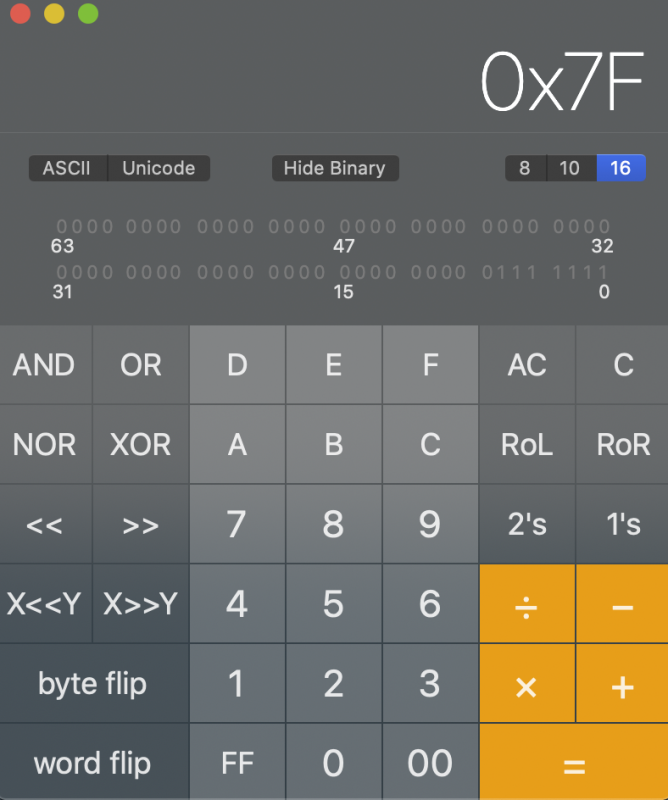
I'll lay out the steps I went through to derive the MmioWhitelist. But first I want to say that aside from the slide value of 128, I'd tried various OC combinations to obtain native NVRAM including using the new SSDT-NVRAM. None worked. Only when combining the Quirks reported above and MmioWhitelist and using the SSDT-TRX40-NVRAM did native NVRAM work on bare metal. Steps for deriving MmioWhitelist (make certain that you have an alternative bootable EFI, as you'll see below): A. MmioWhitelist Determination EDIT: Updated from future link at step 4. Initial steps for creating the debug file are still accurate. 1. Run OC debug version (≥ v059; even if you can't fully boot into macOS, you'll have sufficient data written out on the next boot with a non-debug, working version). a. debug OC settings (spoiler): b. after running OC-debug, you'll see following on the EFI boot partition; choose one to open (spoiler): 2. Edit debug text. Once the above text file is open and search for MMIO (spoiler; press press <Cmd><f>, enter "MMIO", then repeatedly press <Cmd><g> until you see list below). a. note the MMIO value range and the permissible Slide value range: b. the 0xYYYYYYYYYY values are copied one-by-one into a calculator (I use the calculator in Hackintool): 3.After converting each of the MMIO hex values into decimals, enter those values (and any optional comments) into Booter/MmioWhilelist (spoiler). Initially, leave all entries disabled (no): 4. Back-to-the-future: we now know a simpler way to create an MmioWhitelist for your mobo. See this to create that list. A proper MmioWhitelist is needed for proper Shutdown functionality as well as native NVRAM. B. Slide Calculation (left as an FYI reference, but not seemingly needed, so don't waste your time with it) 1. memmap calculations a. to run memmap, you need to have OpenShell enabled in OpenCore: b. boot into OC menu system and select "Open Shell" (or however you named it above). you'll then see "shell> ", type "fs0:" then type "ls" and see if you see the EFI folder. Is so, then type: "meemap > meemap.txt" fs0:\> meemap > meemap.txt fs0:\> exit c. after typing exit above, you'll return to the main OC menu and boot normally into macOS d. open the EFI partition (if you have more than one, it may not be on the boot EFI, so look around at other drives) e. locate the file mammal.txt and copy to desktop. once this file is open, you'll see something like this (here, only top portion of the large file): f. OC guides say to start at bottom of list (Start column only). if you do, you'll calculate a slide value something like 2047; some such nonsense. instead start near top and find the largest value that is ≤ 255. The optimum is highlighted by red box above. the value immediately below calculates to a slide of 1018, which is also nonsense. The one in the red box will calculate to 127 as shown next, so this is the largest value that is ≤ 255. g. calculations are done in 2 basic steps using the macOS calculator ( type <cmd> <3> to select the Programmer mode): i. the value from above red box is 000000001000B000 which is 0x1000B000 in hex. we'll do all math in hex. next, subtract and divide this value as follows (copy and paste from here; the trailing zeros are important): ( 0x1000B000 - 0x100000 ) / 0x200000 = 0xFF0B000 / 0x200000 = 0x7F ( 0x7F = 127 in decimal ) ii. the 2nd step is verifying above result to see if the decimal value of 1 needs to be added. verification means taking the above answer, 0x7F and reversing the calculation to see if we get the original hex value. If we do, then 0x7F is our final answer (and slide is the decimal value of this, or 127). If it calculates to a different value, then we must add the decimal value of 1 to 127, which means the true slide value is 128. Reversing the equation: ( 0x7F x 0x200000 ) + 0x100000 = 0xFE00000 + 0x100000 = 0xFF since 0xFF ≠ 0x7F, the actual slide value is 127 + 1 = 128 2. Using the Slide calculation result the result of step 1-g-ii above is your slide value to be entered into the boot arg section as shown in the spoiler below. the ProvideMaxSlide value's default is 0, which means that OC will accept a boot arg slide value ranging from 0 to 254. any value other than 0 will be the maximum value of a slide boot argument; best to leave as default 0. (And oddly enough, this is the same value I'd chosen from above MmioWhiltelist section of 128.)1 point
-
1 point
-
Ciao Fasu😄 ti consiglio di partire da zero, usa solo driver essenziali e Acpi di base togli ssdt che hai e metti il basic che è in download kext essenziali lilu, weg e virtual, e man mano aggiungi dopo che sei riuscito ad avviare PS:il tuo hardware quale è1 point
-
grazie mille @iCanaro, svuotato il cestino e cancellata la cartella apple e sono riusito a installare l'aggiornamento di win....✌️1 point
-
Any from v059 will do (I think v060-final is about the best). Most data is written while booting and so even if it doesn't fully boot, you'll get this data. *** Well, shutdown almost works. Before activating NVRAM, computer would effectively do a re-start. Now, the switches click off but then immediately it powers back on and boots (panic reboot). At this point, the panic reboot could be triggered by USB devices connected to the computer. I'll need to test some more tomorrow.1 point
-
I based on what I reported above. The value range came from OC's debug report associated with MmioWhitelist. I simply tried the first one, 128 and it worked. EDIT: a Slide is not needed.1 point
-
Yeehaw! I got NVRAM working (again, I do not know if the values below are CPU or mobo dependent; but worth a try). Test in Terminal: a) enter: sudo nvram myvar=test b) verify: nvram -p | grep -I myvar c) reboot d) run nvram -p | grep -I myvar (if you only run "nvram -p" you'll see all stored values) e) clear test: sudo nvram -d myvar Use the following settings in OpenCore: 1. Slide =not needed 2. The MmioWhitelist value (its derivative in complicated; better described in future post here). 3. DevirtualiseMmio enabled 4. SSDT-NVRAM EDIT: we now know that proper Shutdown requires a proper MmioWhitelist for you mobo, see above link for MmioWhitelist.1 point
-
I've been mostly working on NVRAM (which does not work) and Shutdown. No success with either, but maybe getting closer as I'll describe below. Meanwhile, I've managed to get better creation of EC and MCHC, as compared to how they function on the Intel side. They should work on all of our TRX40 mobos. I think I also have one for NVRAM, but I was reading on Discord (responses to fabiosun) about how our use of DevirtualiseMmio may have broken NVRAM. So I've spent most of this afternoon chasing down MmioWhitelist. I found the following using OC debug (this may only apply to the 3970X chip: I honestly don't know. The numbers to the right are the calcuated values of the hex humber on the left. They end up being plugged into OC: When I ran tests, turning each one on at a time and re-booting, I found that I could boot into macOS, with DevirtualiseMmio enabled, if the following were enabled: 0, 1, 2, 3, 4, 5, 6, 7, 8, 9, 10, 11, 12, 13, 14, 18 and the following disabled: 15, 16, 17. That's what's reflected in the above table. Now I'm trying to figure out what to do with this information. From the Discord comments, it sounds like we want to now disable DevirtualiseMmio to get NVRAM working. More testing later.1 point
-
ho acquistato un monitor che rientra nelle specifiche di questo thread da ama warehouse con 285 pippi oggi mi hanno consegnato questo https://www.amazon.it/gp/product/B07SL5KB3H/ per il momento sono molto soddisfatto per me non presenta nessun difetto evidente, solo un leggero backlight bleeding nei due angoli di sinistra, non ho notato nessun pixel bruciato o spento... ma prossimamente farò qualche test 😉1 point
-
ma i web driver che ho ora li disinstallo e poi all'avvio li reinstallo?0 points
-
0 points


