iGPU
-
Posts
573 -
Joined
-
Last visited
-
Days Won
17
Content Type
Profiles
Forums
Events
Downloads
Everything posted by iGPU
-
For those who might be interested in creating patches (or at least, making a relatively simple one like for the Aquantia port), I made a post on another thread on this forum on my attempts at learning the basics of patch making.
- 3,995 replies
-
- 1
-

-
- amd vanilla patches
- amd kernel patches
- (and 3 more)
-
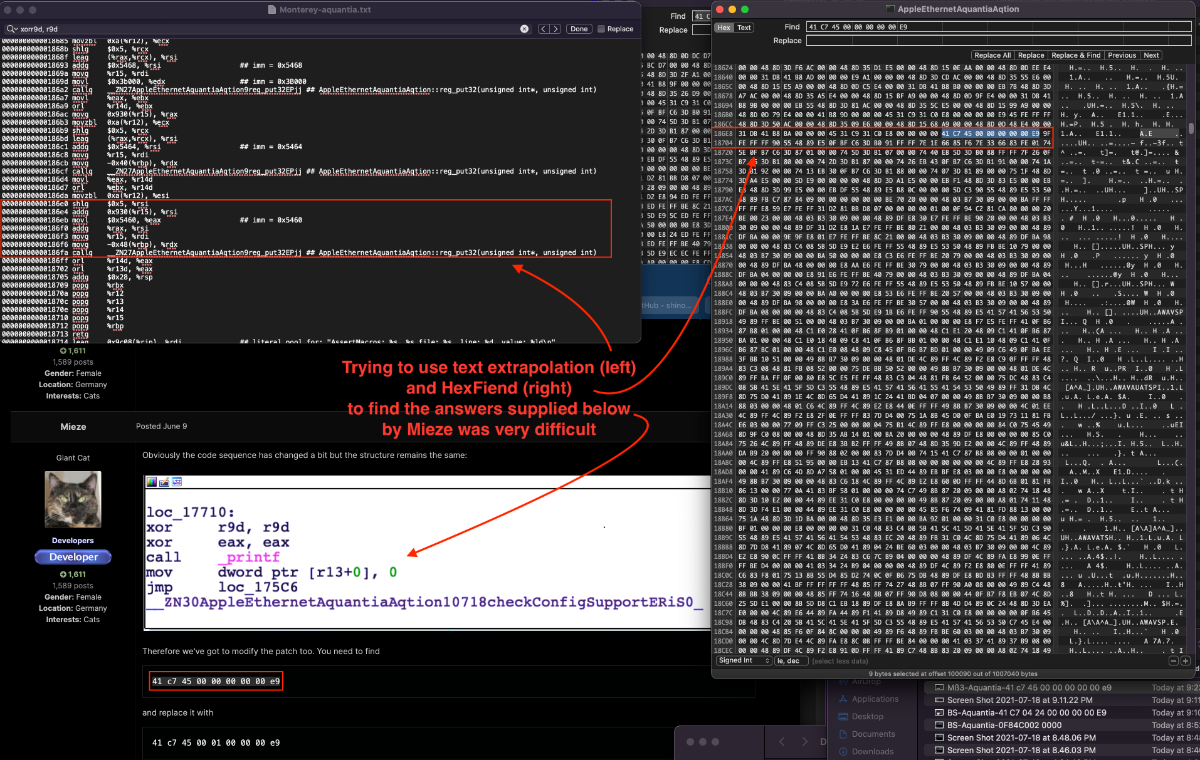
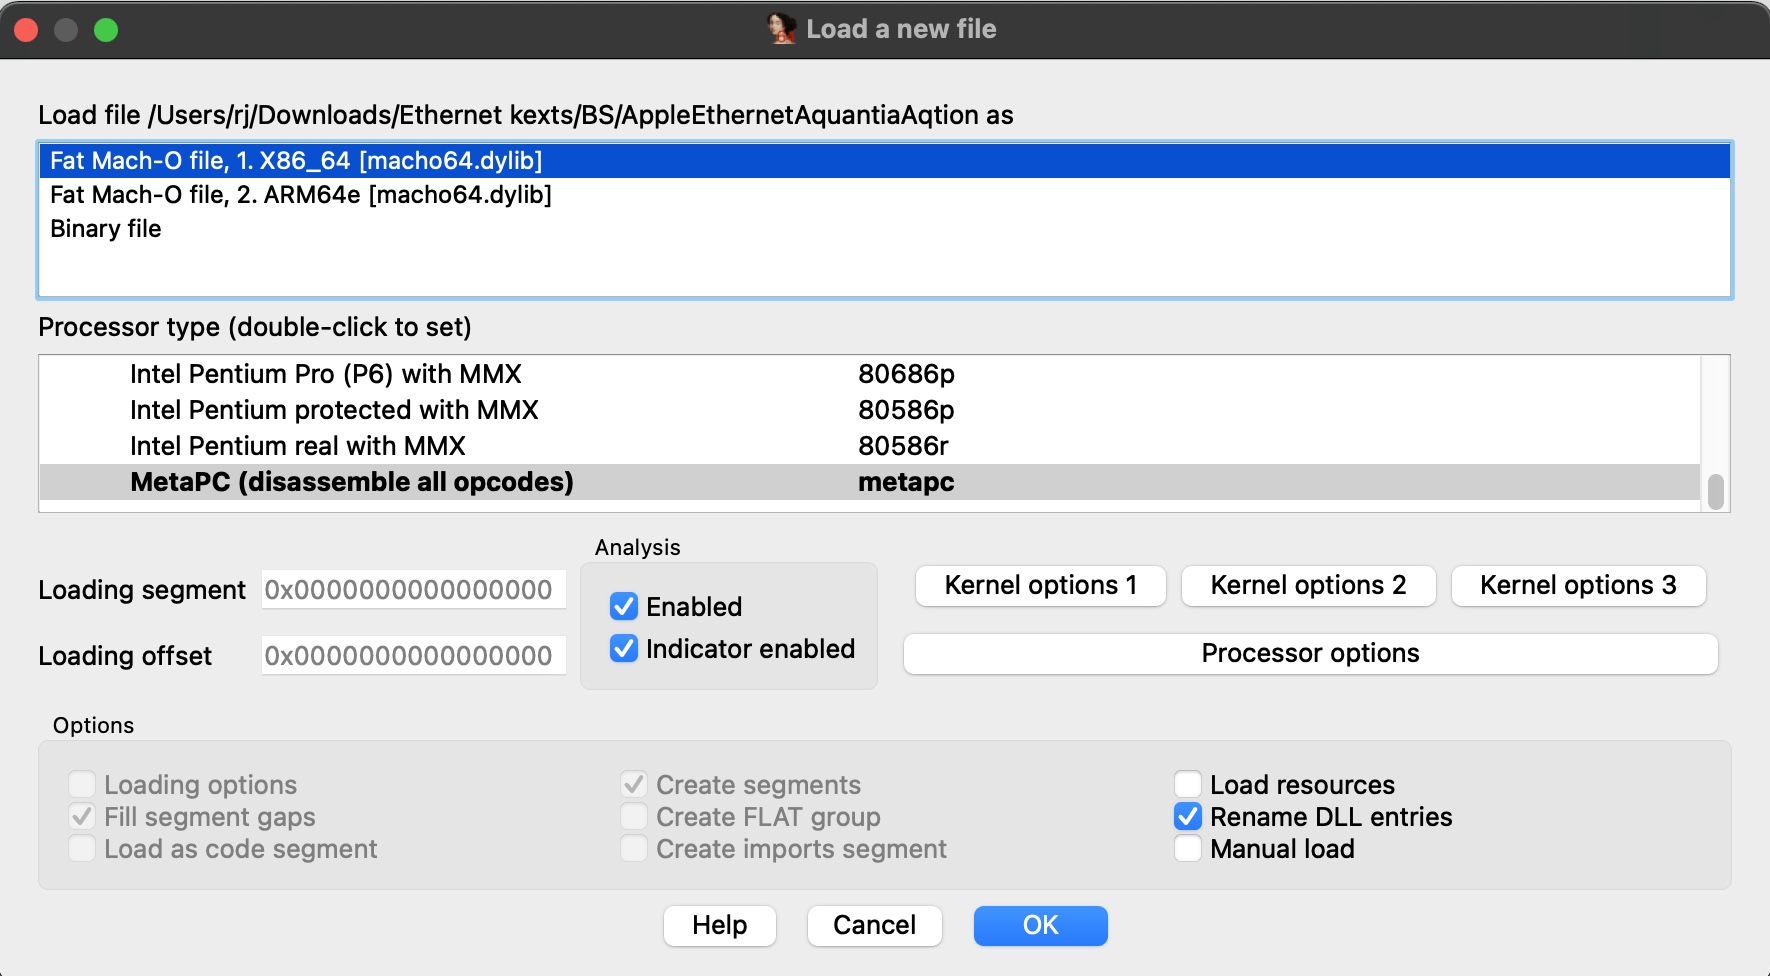
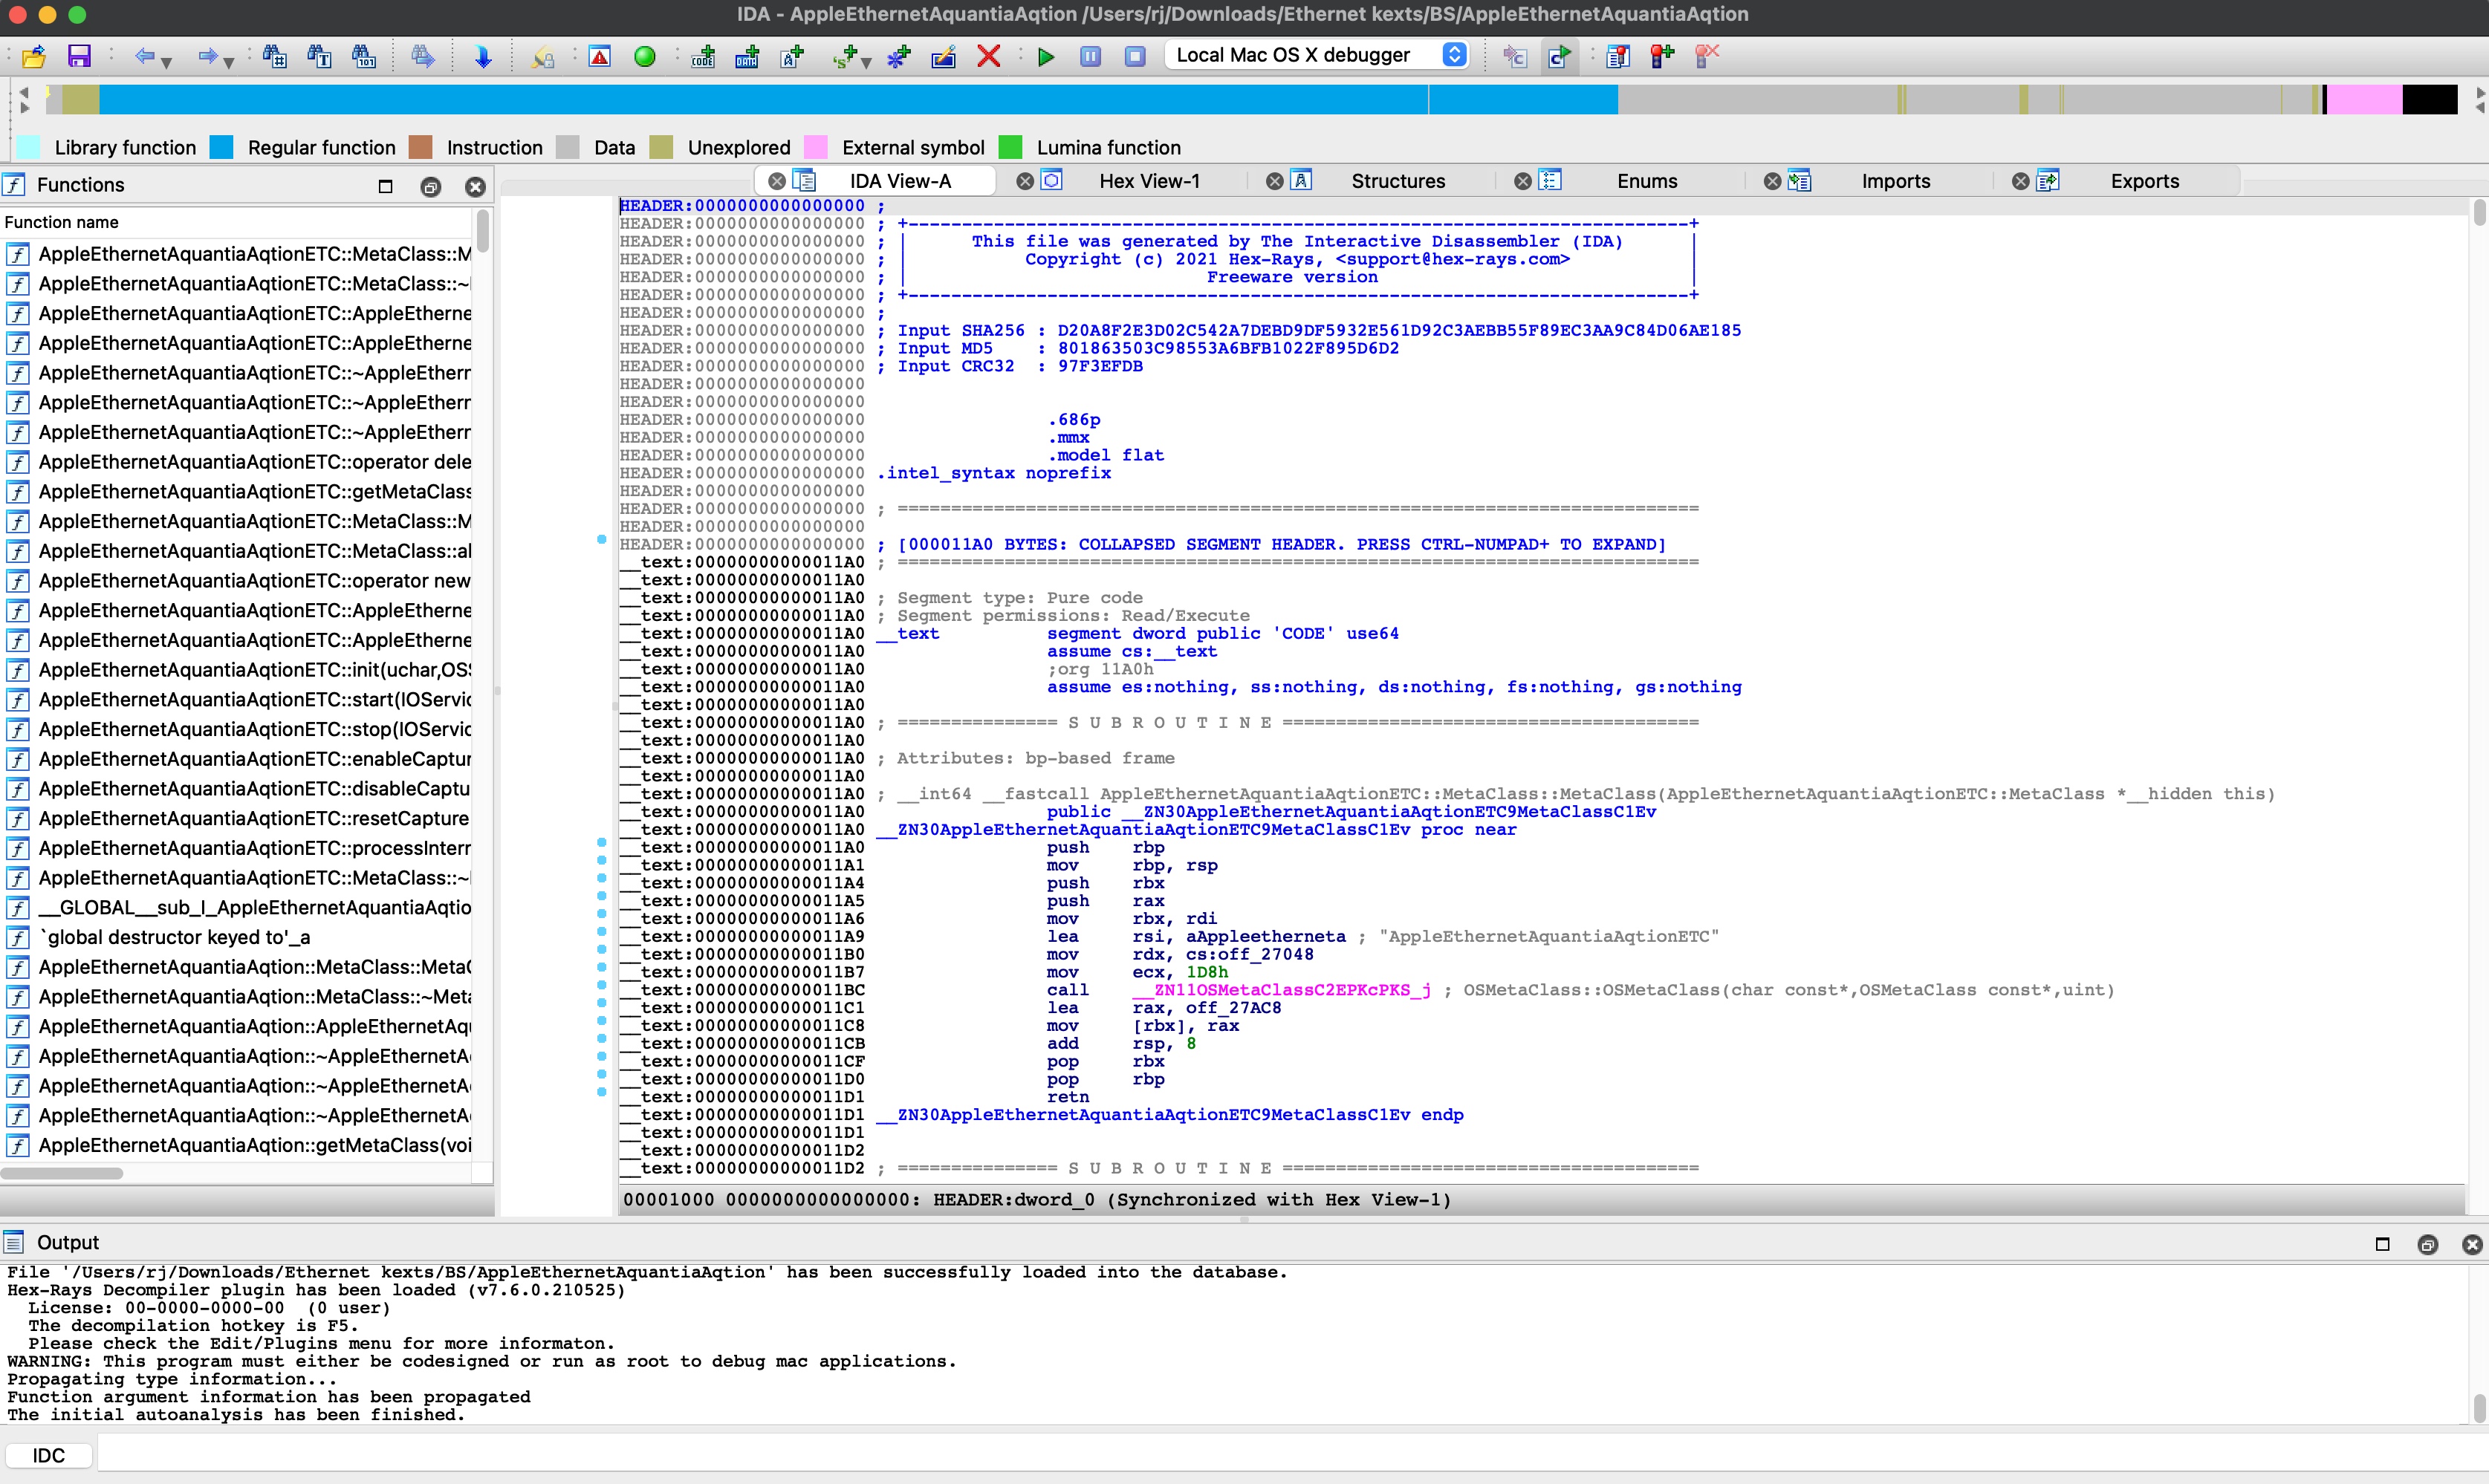
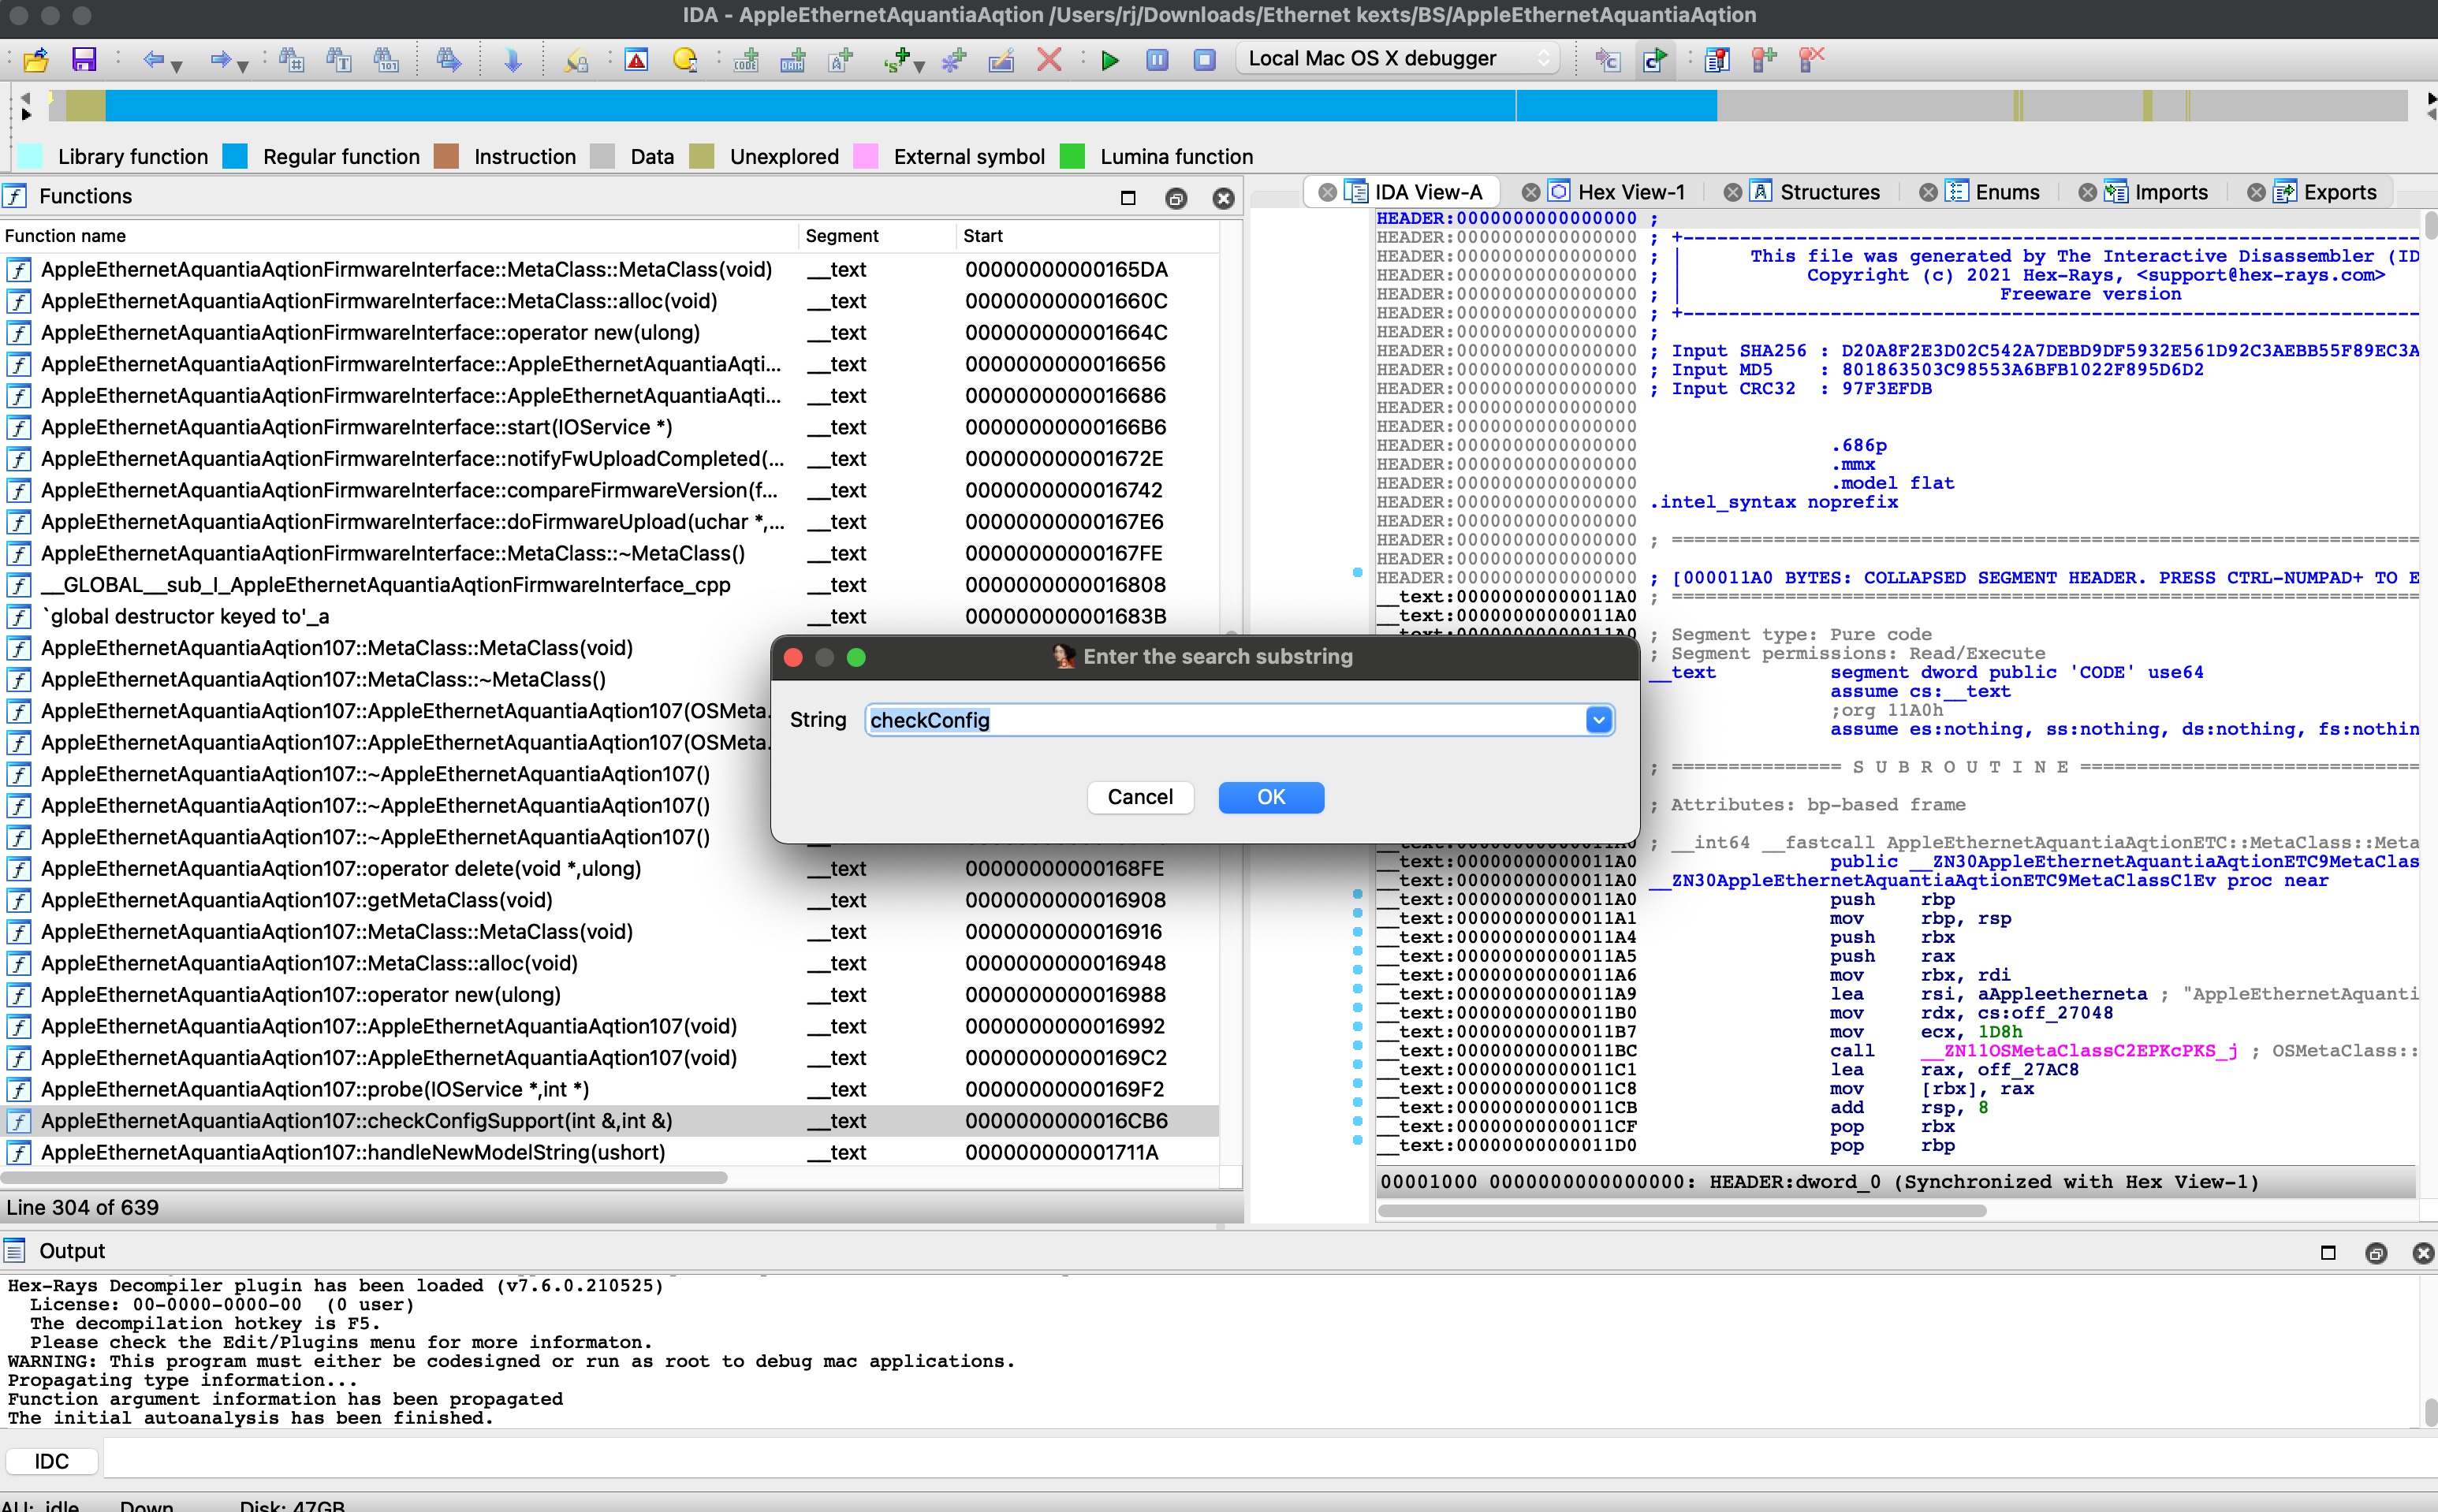
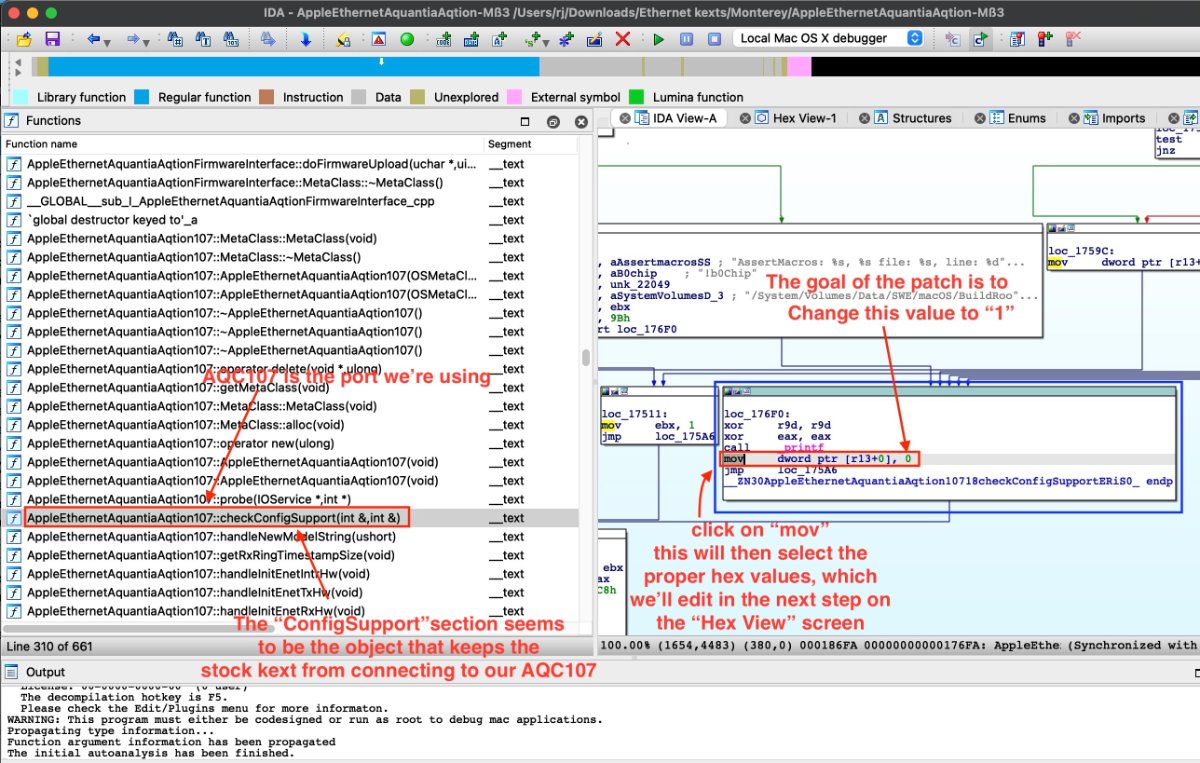
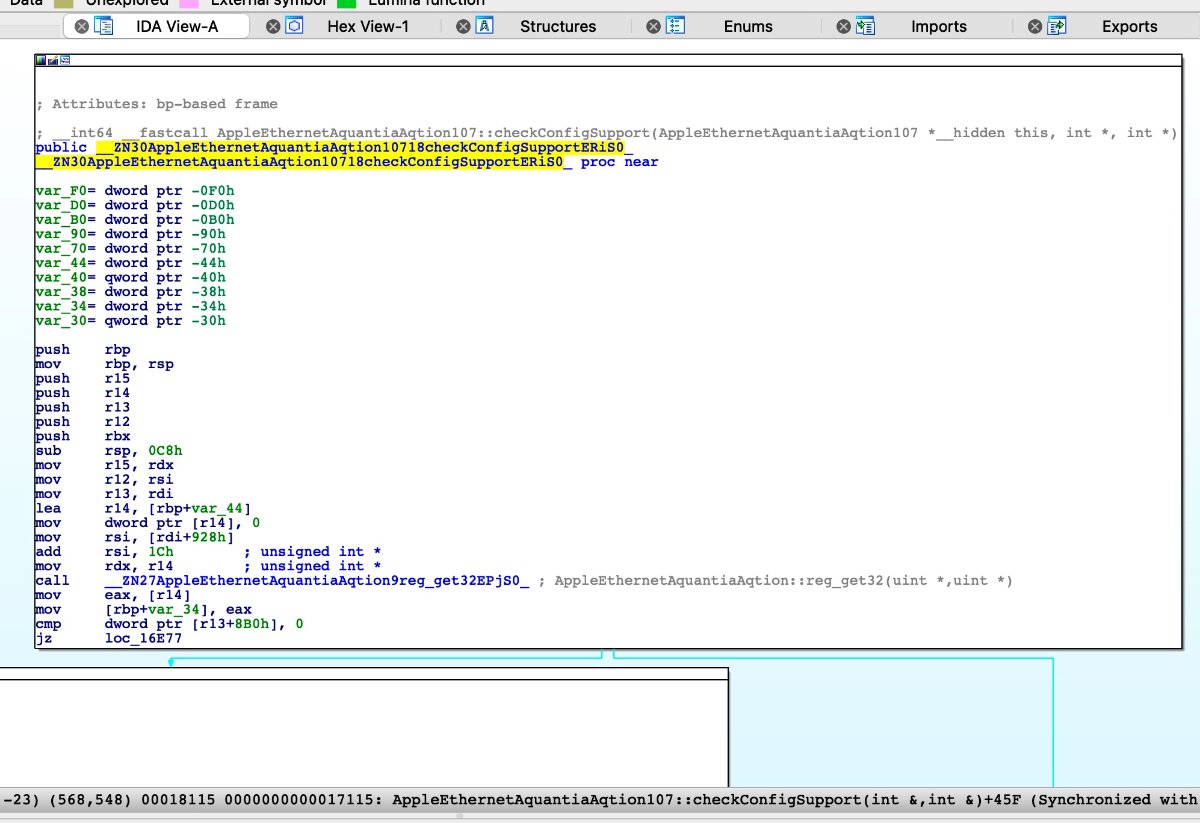
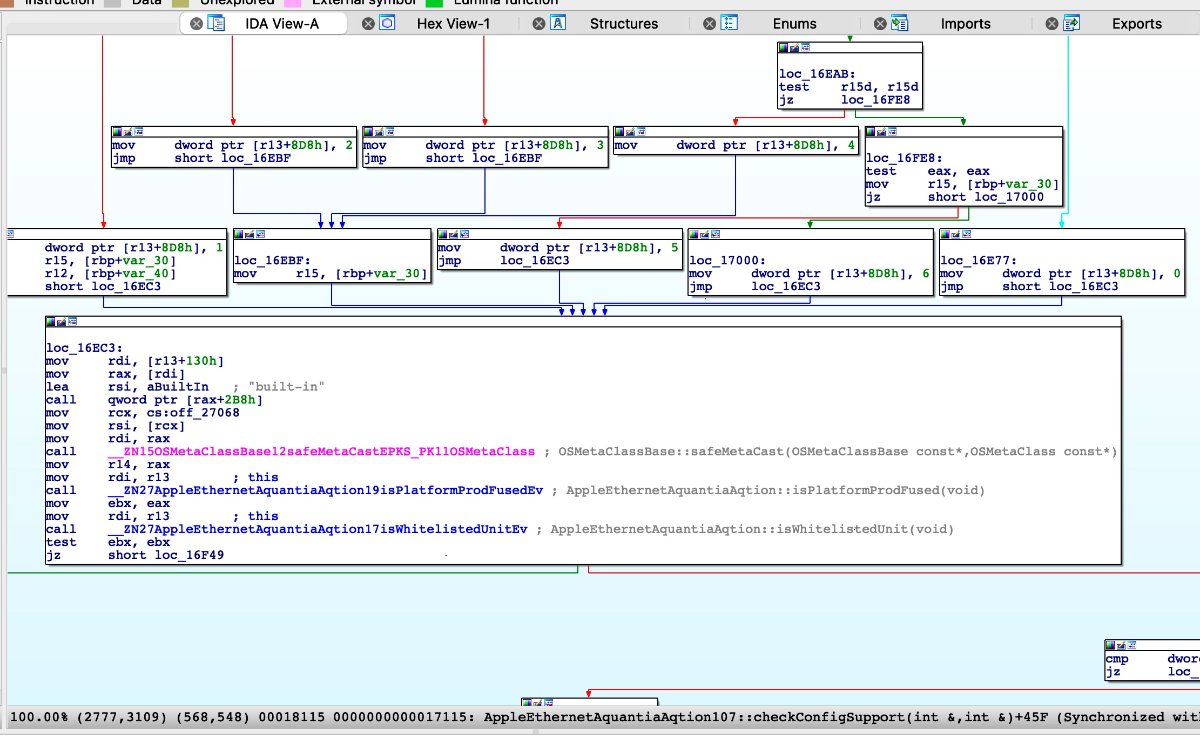
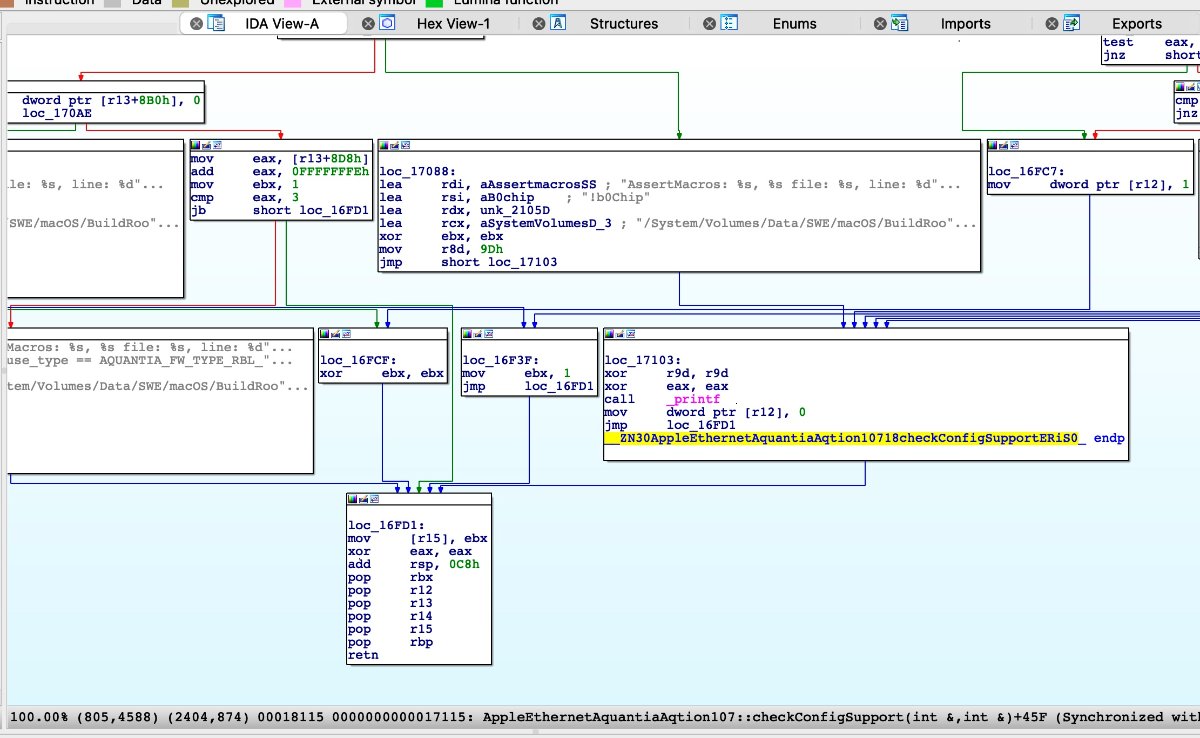
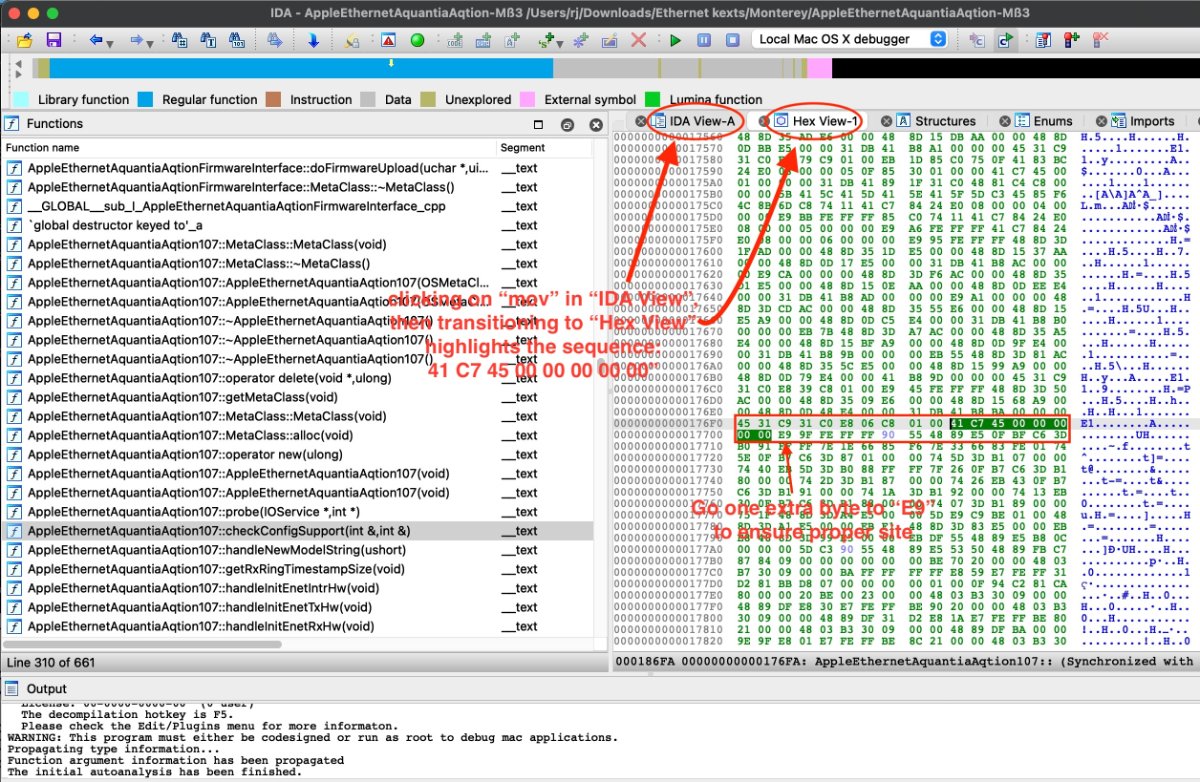
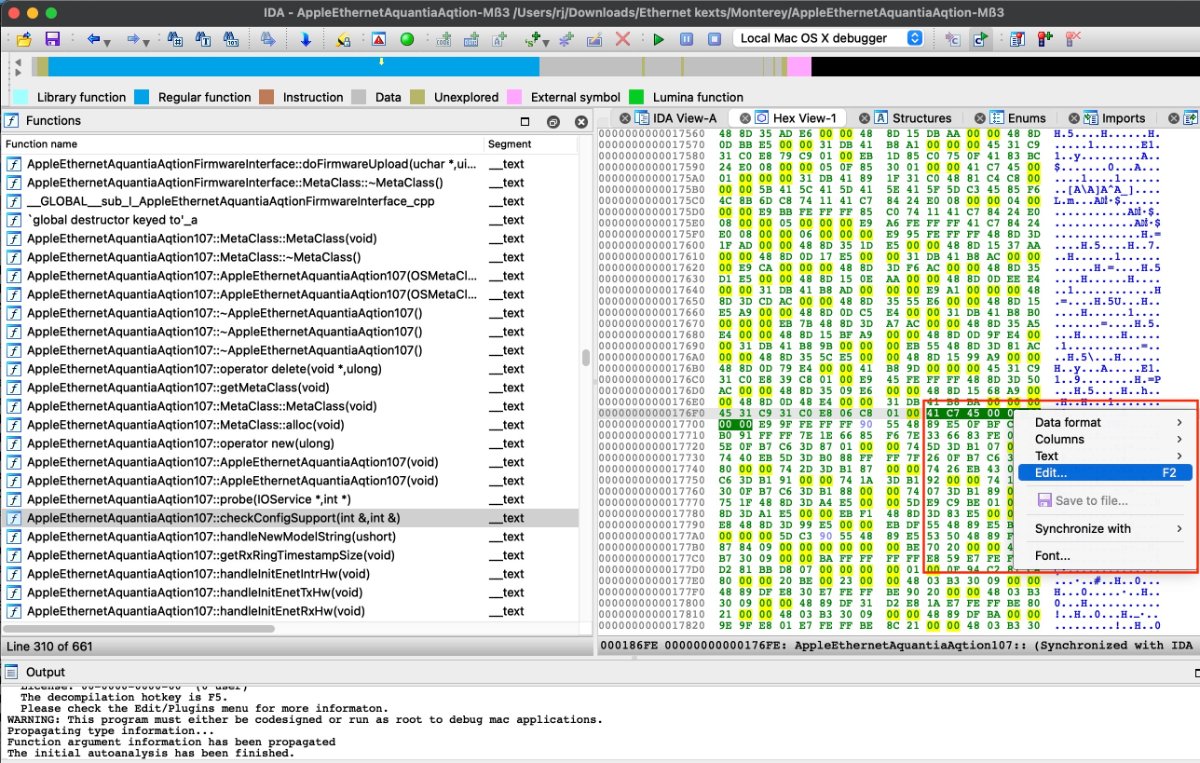
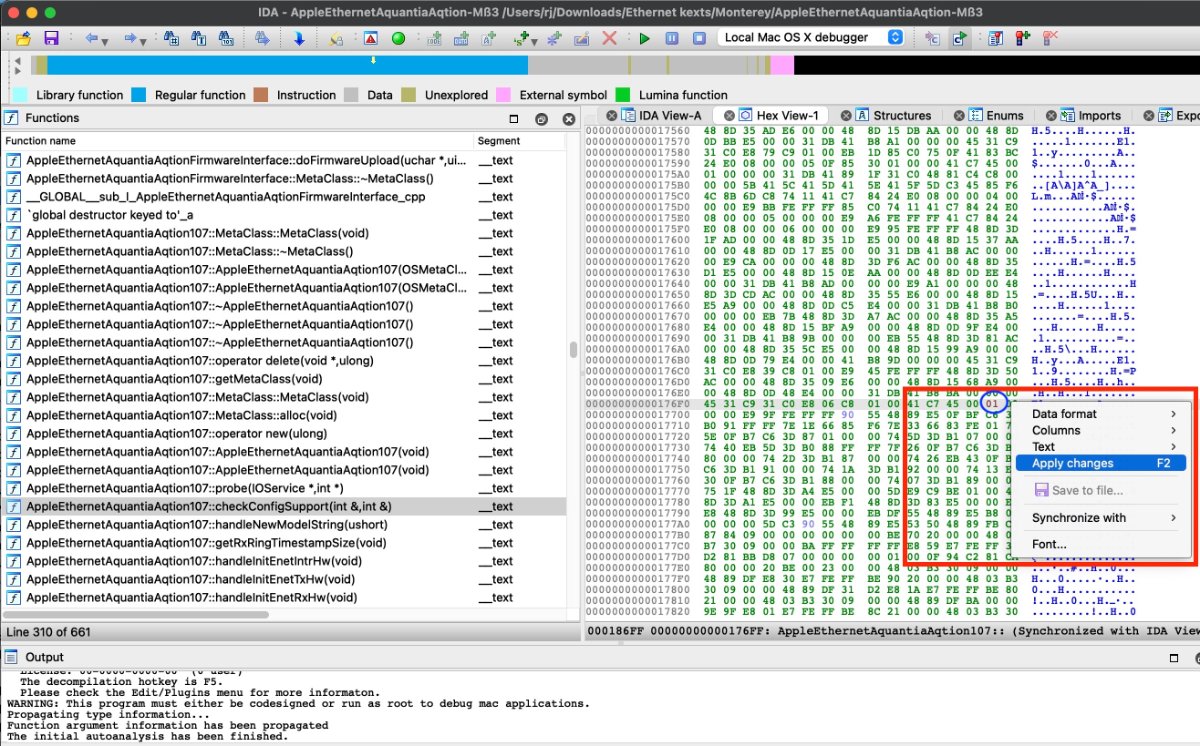
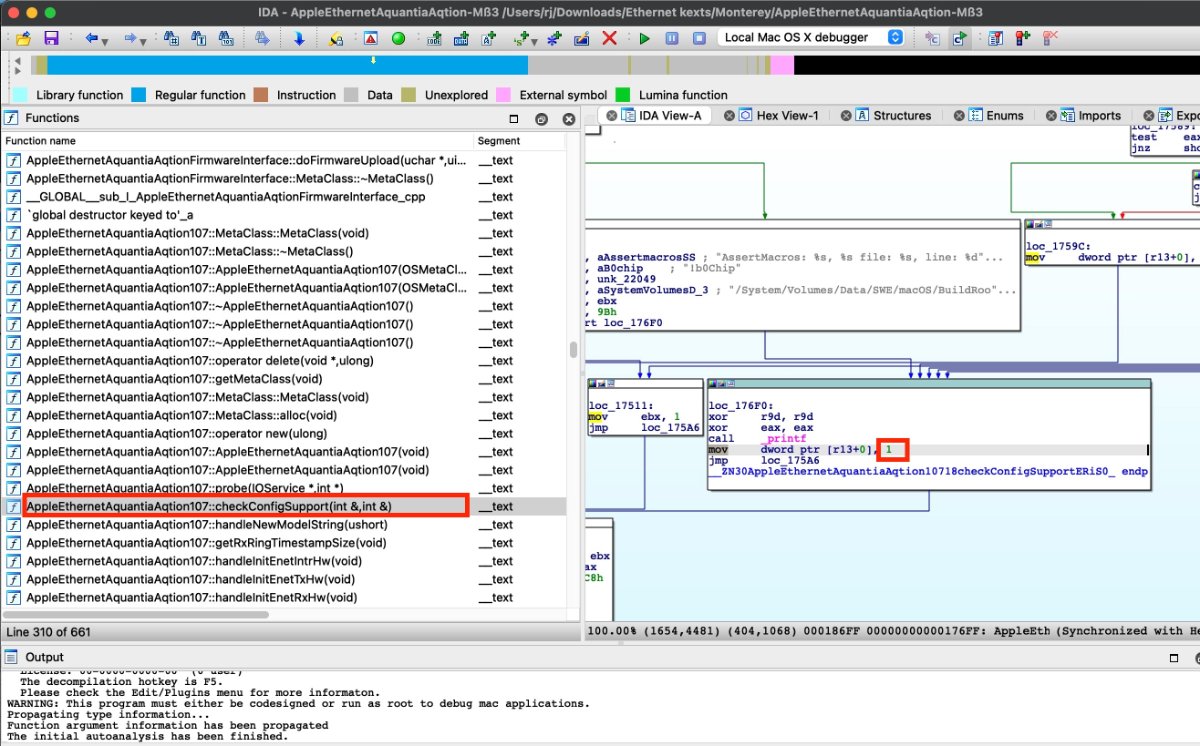
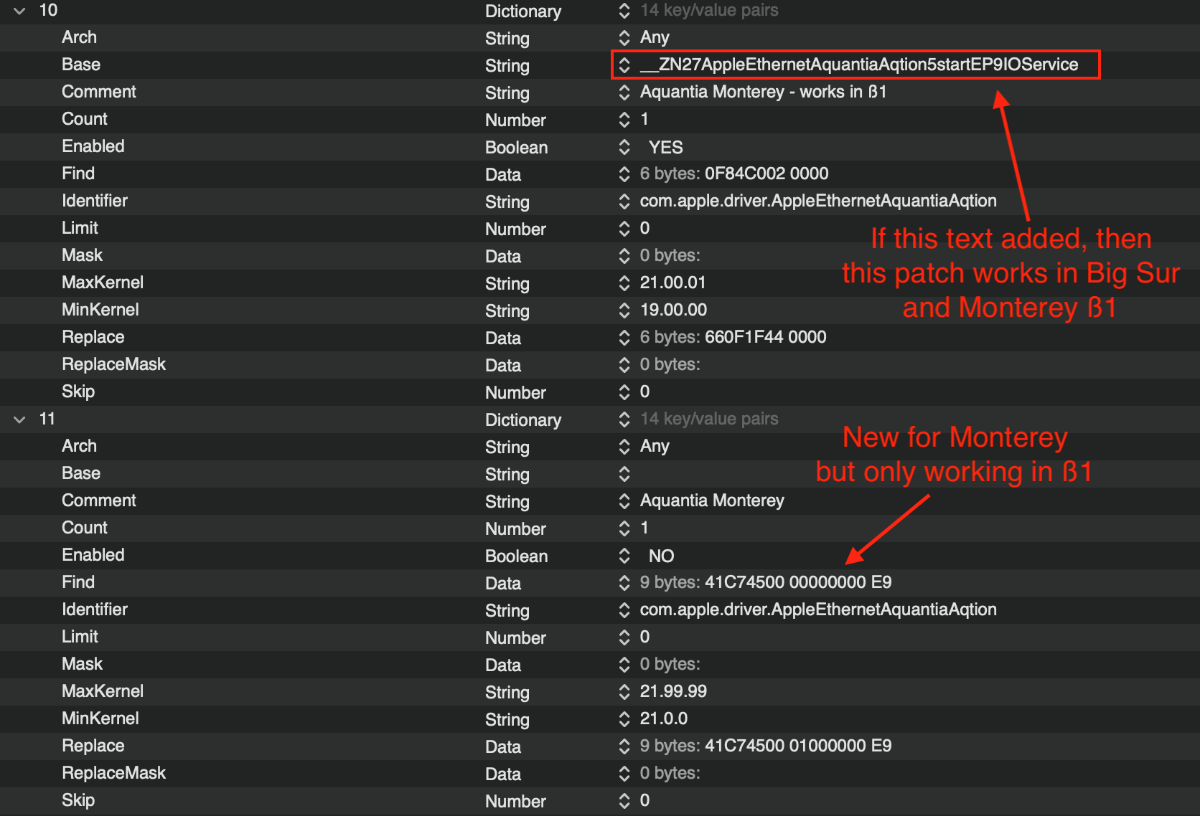
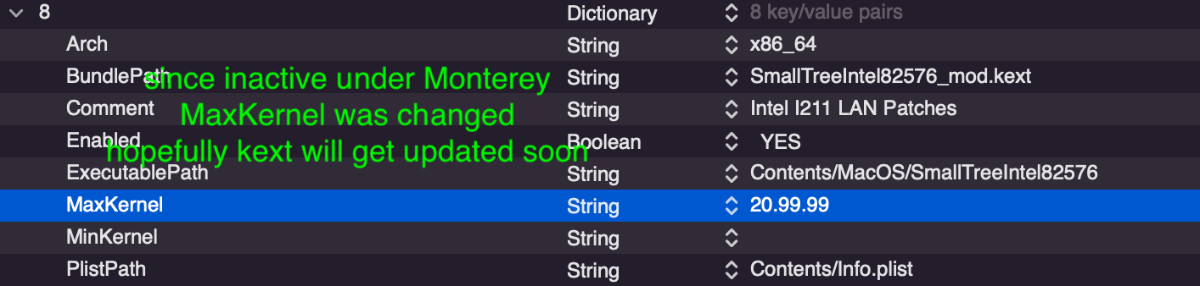
A Reverse-Reverse-Engineering Patch Tutorial For those who already know what I'm posting here and consider this simplistic: sorry. I'm presenting this information for those, who like myself, may be unaware of how patches are created. Virtually every time I've read about a new patch, the patch is presented only by itself or only with the smallest of hints as to how it was created. Recently, I've spent hours trying to get the SmallTree I211 kext to work under Monterey. I've not yet succeeded, but the attempt led me to think a patch might be necessary. SInce I didn't know how to make a patch, I thought a good way to learn might be to "reverse engineer" an existing patch. That thought led me to study patches for the Aquantia ethernet port. There is a long thread over at InsanelyMac (here) where Aquantia patches are discussed for various macOS releases. These patches seemed to have become necessary with the release of Catalina and Big Sur (Mieze and Shikumo seem to have done most of the work). Recently, a new patch for Aquantia was found to be necessary for Monterey; it was discussed in this post by Mieze (from whom I've gleaned the most about kext patches). This means there are several examples to test-out the reverse engineering process. (BTW, what's described below was also tried out on the Big Sur Aquantia patch and this process works with that patch too.) 1. Initial Attempt - OTOOL/HEX FIEND My first attempts to reverse engineer the Aquantia patch began by using the tools discussed in the first post on this thread (from Piker Alpha, using otool (part of macOS): extracting the contents of the Aquantia kext file into a text file), along with using Hex Fiend (a download). The Aquantia kext file is located inside the IONetworkingFamily kext as a plugin (you have to dig a bit to find it!): IONetworkingFamily/Contents/Plugins/AppleEthernetAquantiaAqtion/Contents/MacOS/AppleEthernetAquantiaAqtion. [Note that all editing and work below was carried out on a copy of the kext file that was transferred from "S/L/E/IONetworkingFamily" to the desktop, so nothing destructive was done to the original file.] The text file can be created with otool with the following command (drag and drop your file location in place of the "/~/~/" section): otool -tV /~/~/AppleEthernetAquantiaAqtion > ~/Documents/Aquantia.txt And this same AppleEthernetAquantiaAqtion file can be examined with Hex Fiend. The combination of otool's resulting text file (upper left) and Hex Fiend (upper right) are shown below, where they're also compared with the link from Mieze (bottom left): Unfortunately, I couldn't figure out how to derive the patch from this data. 2. Successful Attempt - IDA64 It wasn't until I did some searching and came across a tool from the Belgium company, Hex-Rays. They offer a free download (here) of the IDA64 macOS app to try out and that is what I'll present next. The idea behind using this app is to de-compile the kext file. But what I'm actually trying to do is "reverse engineer" Mieze's "reverse engineering" of the de-compiled kext file. If successful, then we can learn how to better make patches. We can start this process from some knowledge shared on that thread: we know the area in the kext to examine ("checkConfigSupport", shown in above image) and the given Find string ("41 C7 45 00 00 00 00 00 E9"). Between these two items, we can zero-in on the area that needs to be patched. The first step is in opening the file (again, the nested AppleEthernetAquantiaAqtion file contained within IONetworkingFamily from the latest Monterey ß3) with the IDA64 app. When opening, the default settings in IDA64 are best (shown in Spoiler below). Once opened, the initial screen can have the windows rearranged (initial view shown in Spoiler below). I prefer the Function View be expanded on the left as shown below (also shown is the search window which is accessed from the menu bar). This particular search item was chosen based on discussions in the InsanelyMac thread, where Mieze describes (in Spoiler): When this search is completed, and the Function View item on the left double-clicked, the following can be seen in the right pane. But the result is not obvious as the presentation is a bit complicated: the right pane must be scrolled (shown as separate images in the Spoiler below). After scrolling the right pane, we can begin the process. On the left pane, note that the Aquantia item is "107" which references the AQC107 port name. Next, even after scrolling, there are many windows in the right hand pane. Since we're reverse engineering, we already know that we're looking for something that should say "__ZN30AppleEthernetAquantiaAqtion10718checkConfigSupportERiS0". This is highlighted below on the right. As pointed out in the InsanelyMac thread, we need to change the value of "0" to "1", but first we need to find the corresponding hex code. We do this by clicking on the "mov" command (highlighted below right). Once the "mov" command is selected, the corresponding hex code will also be selected for us, but to see this, we need to change views. To see the hex code, change views by clicking on Hex View near to the top of the window. The new view switches the right pane from the IDA View above to the Hew View below. Again, since we clicked on the "mov" command in the above step, the correct hex code for this command is already highlighed in dark green. We then look for the Find string which is "41 C7 45 00 00 00 00 00 E9", but notice that the "mov" command did not contain the "E9". The next byte seems to be chosen when patching to help ensure only one site is patched. The replacement will simply over write this byte with the same value. But to change the "0" to "1", we need know which byte to change. This can easily be tested in real time by editing the hex code as shown below: right-click on the byte to change. The cursor will be in the middle of the byte to change the right least significant value as shown next. To make this change 'stick', we need to apply it. This is done by again right-clicking. This change can be verified by switching from the Hex View to the IDA View. If incorrect, switch back to the Hex View, re-edit as needed and re-apply and return to the IDA View once more to verify if now correct. If the correct byte was changed, you'll see the following: At this point, we can see that the Find value of "41 C7 45 00 00 00 00 00 E9" and the replacement value of "41 C7 45 00 01 00 00 00 E9" now all make sense and this seems to be how this patch was derived. If anyone has any comments or corrections to the above let me know and I'll edit this post. [BTW, I compared the Monterey ß3 Aquantia file to that of Monterey ß1, using Hex Fiend: there is no difference. However, this is quite a difference in this same file between Monterey and the latest release of Big Sur.] ADDENDUM - Future Approaches

-
Yes, I did that, but the key is that I did not disable SIP. (I must go to work, so later I try.) Thanks!
-
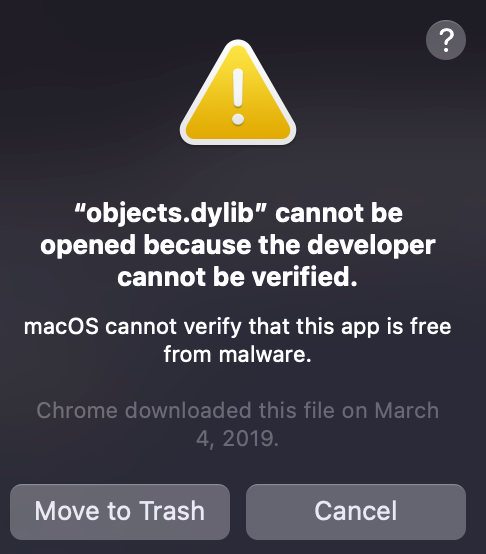
I agree that Monterey is running smoothly with the best sleep/wake cycle that I've yet seen on the TRX40. 😃 What I want to ask you is how you get CB15 to run. I've only gotten errors on Big Sur and Monterey. I've tried all sorts of permission approvals and I only see a series of these (spoiler) for each dylib element.
-
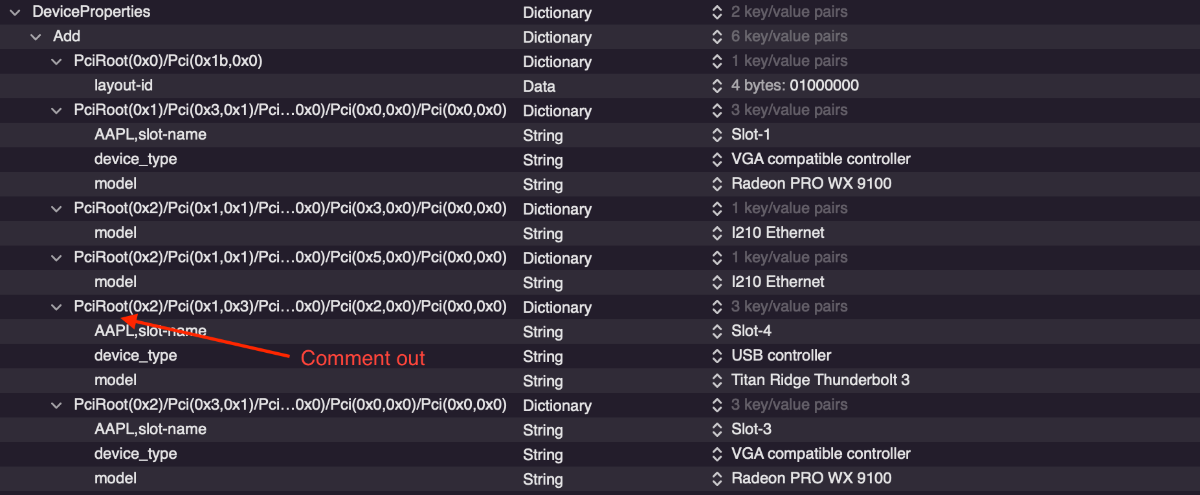
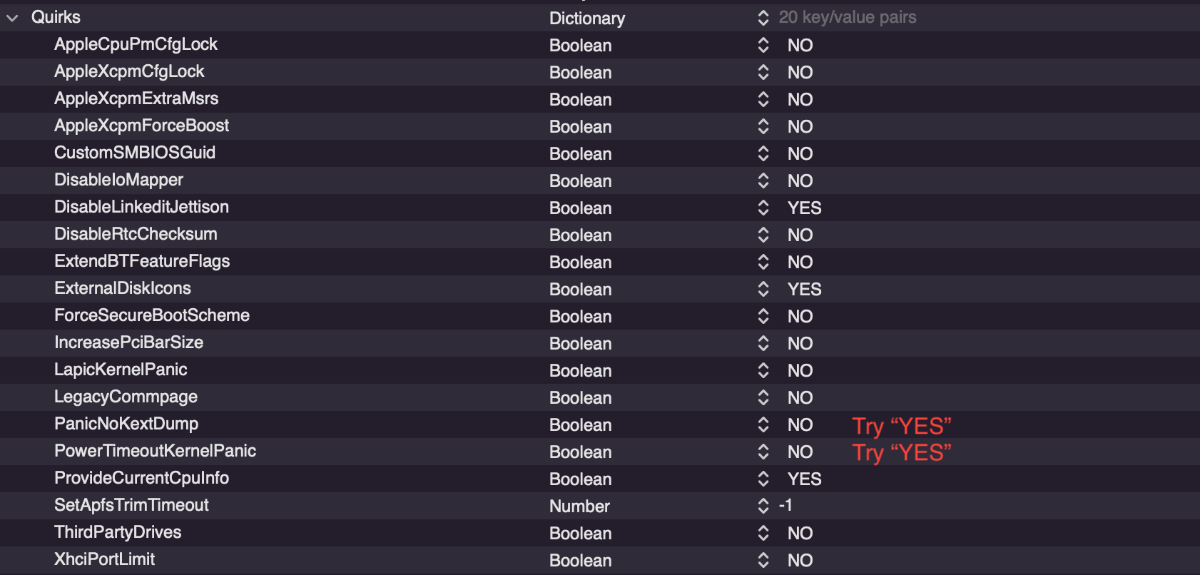
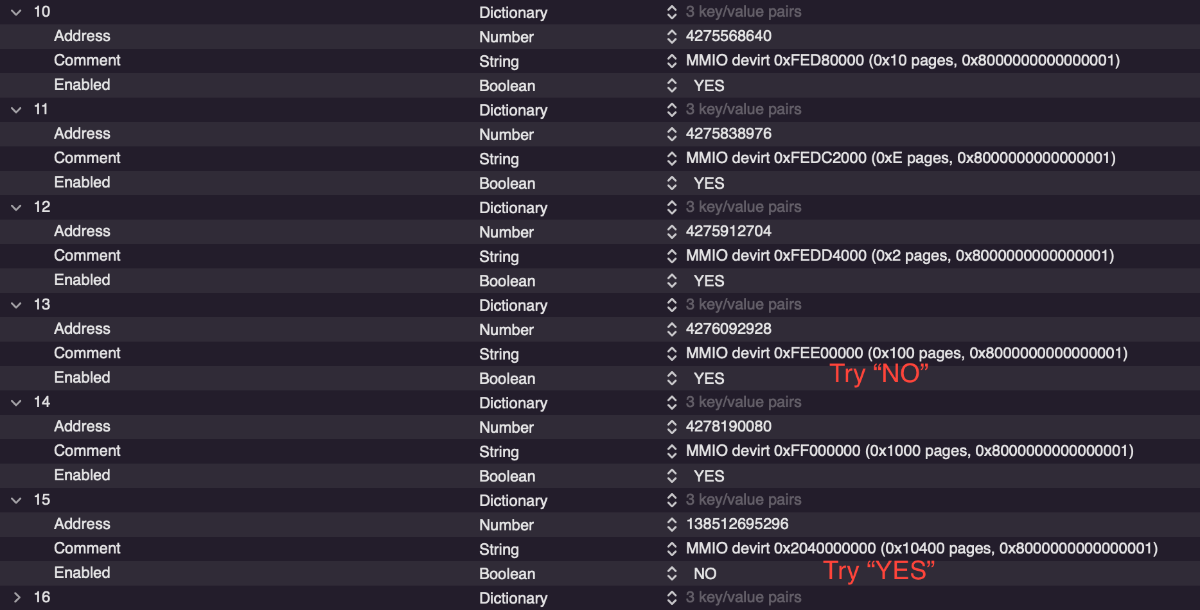
A few comments regarding your config file. But first, are you trying to boot into BS or new Monterey; if latter, then do a fresh install (as I mentioned in a recent post above). When systems behave strangely, remove un-necessary items. In your case, remove the TB AIC (and note Spoiler below) and any USB devices if possible. Kext adjustment (also, if not necessary, since you had so many problems with I225, maybe disable those kexts and unplug your ethernet cables until system booting reliably): I'd use change these Kernel/Quirks (Boot/Quirks look ok): And you might try a MmioWhitelist variation: Your Patches look ok, but the following are not needed for BS onwards and could be removed: Finally, the UEFI section: a few changes to try:
- 3,995 replies
-
- 1
-

-
- amd vanilla patches
- amd kernel patches
- (and 3 more)
-
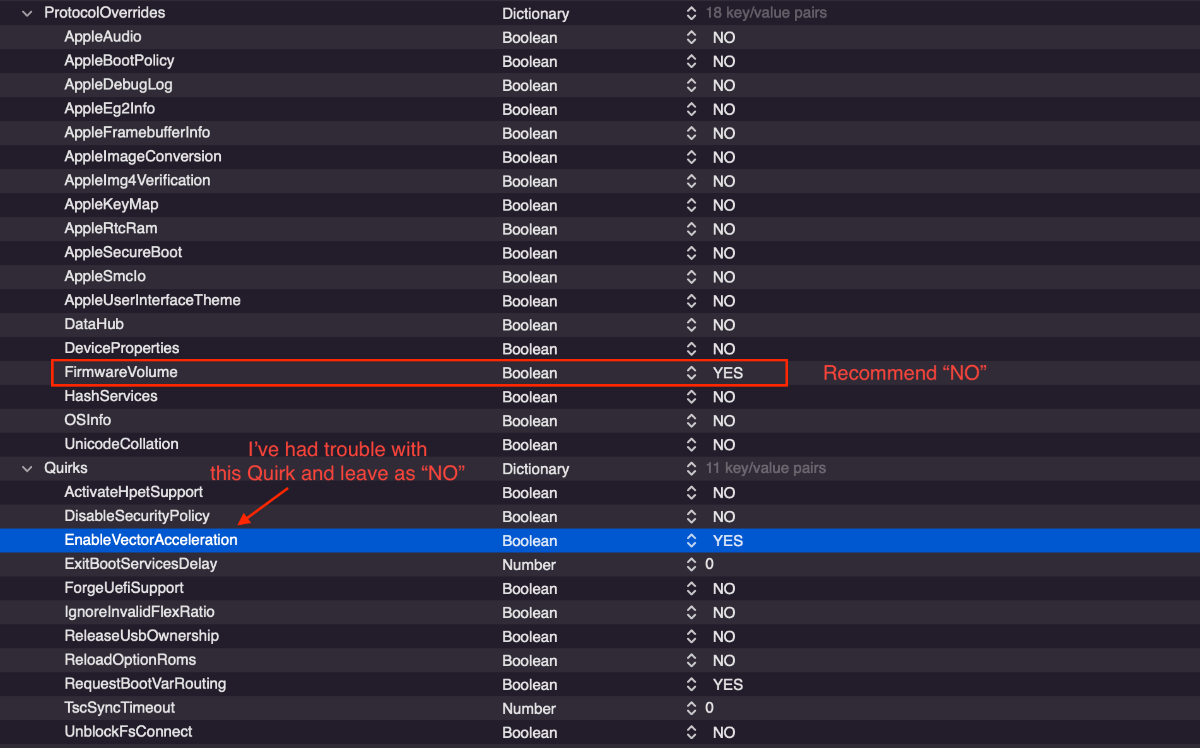
Read this summary along with fabiosun's post preceding that post to understand what is going on with the new Quirk and patches. RestrictEvents has nothing to do with booting; it's more cosmetic. (You might also read this link too to get an idea of the EFI structure.) The basic factors affecting booting are: Booter/MmioWhitelist Booter/Quirks Kernel/kexts (mostly Lilu and VirtualSMC) Kernel/Patches Kernel/Quirks fabiosun in his uploaded OCv072-Shanee EFI has it all laid out. Change very little or you will make things difficult for yourself. Don't be creative at this stage. You only need to adjust your mobo MmioWhitelist as most everything else will work for all of our TRX40 mobos. For some reason, many people keep changing the Quirks around and this is a guaranteed way of getting a boot failure. fabiosun and I have kept the Quirks the same for several days now. *** To avoid trouble when experimenting with your EFI, I would suggest doing the following. To keep testing simple, my BIOS is set to boot from a known, working EFI (call it #1). I have the same, working EFI on another drive (call it #2 that I do not change; this is my backup EFI) that I can access by pressing F11 during boot (may be a different key for your mobo). EFI #2 is my backup guaranteeing that I can gain access to my computer (yes, I also have external USB EFI serving as even more backups). At this stage, what ever EFI works (boots) is okay; don't worry about minimal patch lists, etc. EFI #1 will then become my experimental EFI that I change. In addition to different EFIs, one of these two drives contains a known working macOS (such as Big Sur). The other drive contains the new, to-be-tested macOS (such as Monterey). During the automatic boot, EFI #1 is selected and once the OC menu appears, I then select which OS to enter. Again, I test on the EFI #1, making any changes only to it (not EFI #2). If I break it, such as by using a bad patch, and it won't boot, I re-start computer, hold down the F11 key, select EFI #2. Once booted through EFI #2, I can then make changes on EFI #1 and test it again, repeating this cycle as desired. If you only use one internal EFI and drive, your backup EFI could be an external USB. I tend to use internal drives and their EFIs for testing, since USB drives are slower to boot and prolong the test cycles.
- 3,995 replies
-
- 3
-

-
-
- amd vanilla patches
- amd kernel patches
- (and 3 more)
-
SOLVED When weird things happen, double check the drive and macOS. The drive I used was updated from Big Sur to Monterey ß3. Things must have been corrupted. So I erased the drive and did a fresh install of Monterey ß3. Now, the Aquantia port works just fine on ß3 with usual patch (and the ß1 Aquantia port worked, because is was a fresh install). I'm leaving the problem below as a reminder: do a fresh install, especially with a new macOS if your system is behaving strangely. ******* OK, new problem... which only pertains to those of us with internal Aquantia ports. (Well, maybe only pertains to me, unless I read of others having this problem.) BTW, the SmallTree kext for the I211 is an entirely different problem and does not work in Monterey (and I've found not solution to date), but won't discuss here. A bit of history: the internal Aquantia port worked natively in Mojave, but began requiring a patch starting with Catalina. This same patch worked with Big Sur. However, Monterey ß1 seemed to require a new patch (not quite true; shown below in Spoiler). The new Aquantia patch which works in Mß1, does not work with Mß3. [Aside: I have an external USB-NVMe with Mß1 and an internal NVMe with Mß3 to trouble-shoot and compare.] I've compared the IONetworkingFamily/Contents/Plugins/AppleEthernetAquantiaAqtion kext file from M-ß1 and M-ß3 in the Hex Fiend app and the files are identical. Since there were no changes, it seems rather strange to me that the same patch doesn't work.
-
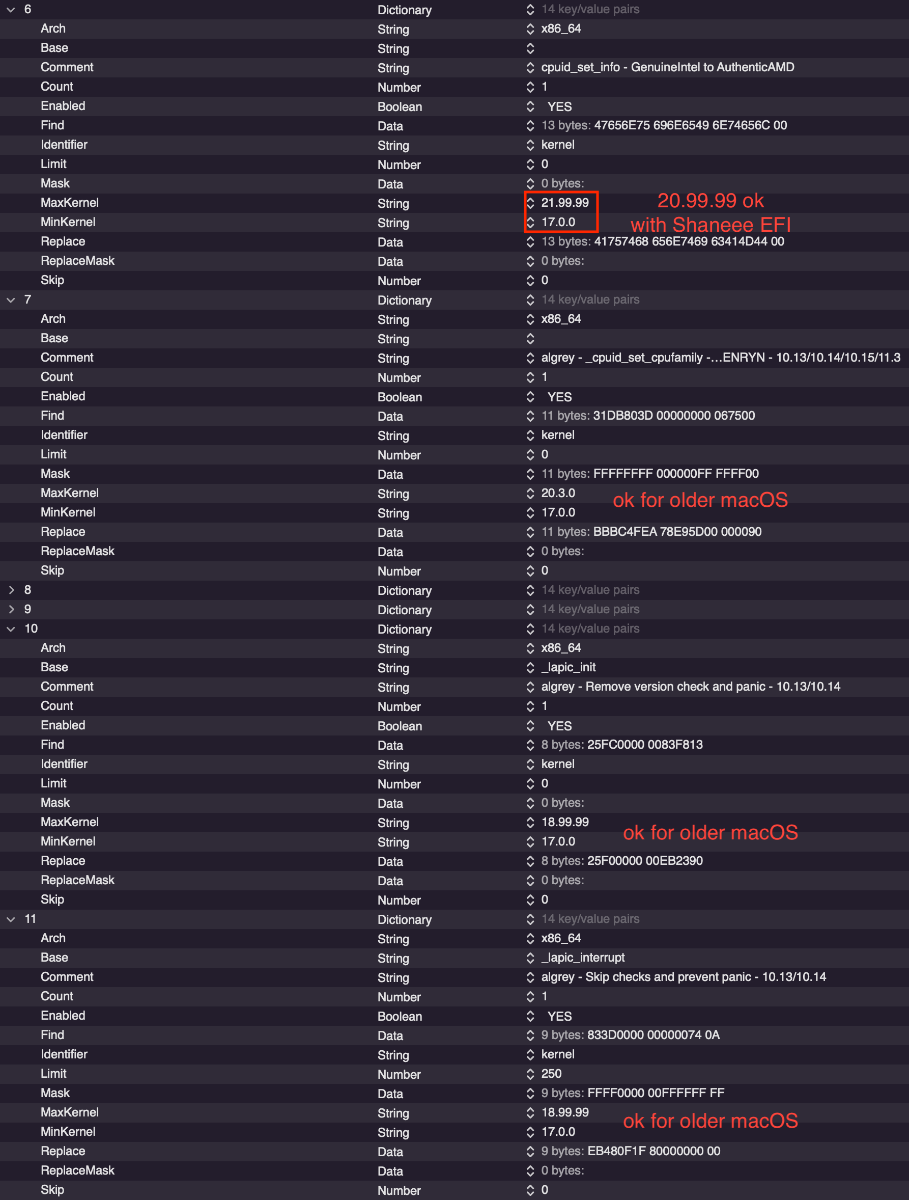
I've installed Mß3. I can confirm that with the new Shaneee EFI that "algrey - _cpuid_set_info - GenuineIntel to AuthenticAMD" is not needed for Monterey ß1 or ß3 (I've skipped ß2 and keep a USB drive with ß1, which I'll discuss below). This patch, even with new PF EFI, is still required for the latest 11.5 Big Sur. *** A comment, unrelated to the above patch. I've randomly observed a refusal of Mß3 to respond to either the "Restart..." or "Shutdown..." menu commands, forcing me to power cycle the computer. I did not see this with Mß1.
- 3,995 replies
-
- 1
-
-
- amd vanilla patches
- amd kernel patches
- (and 3 more)
-
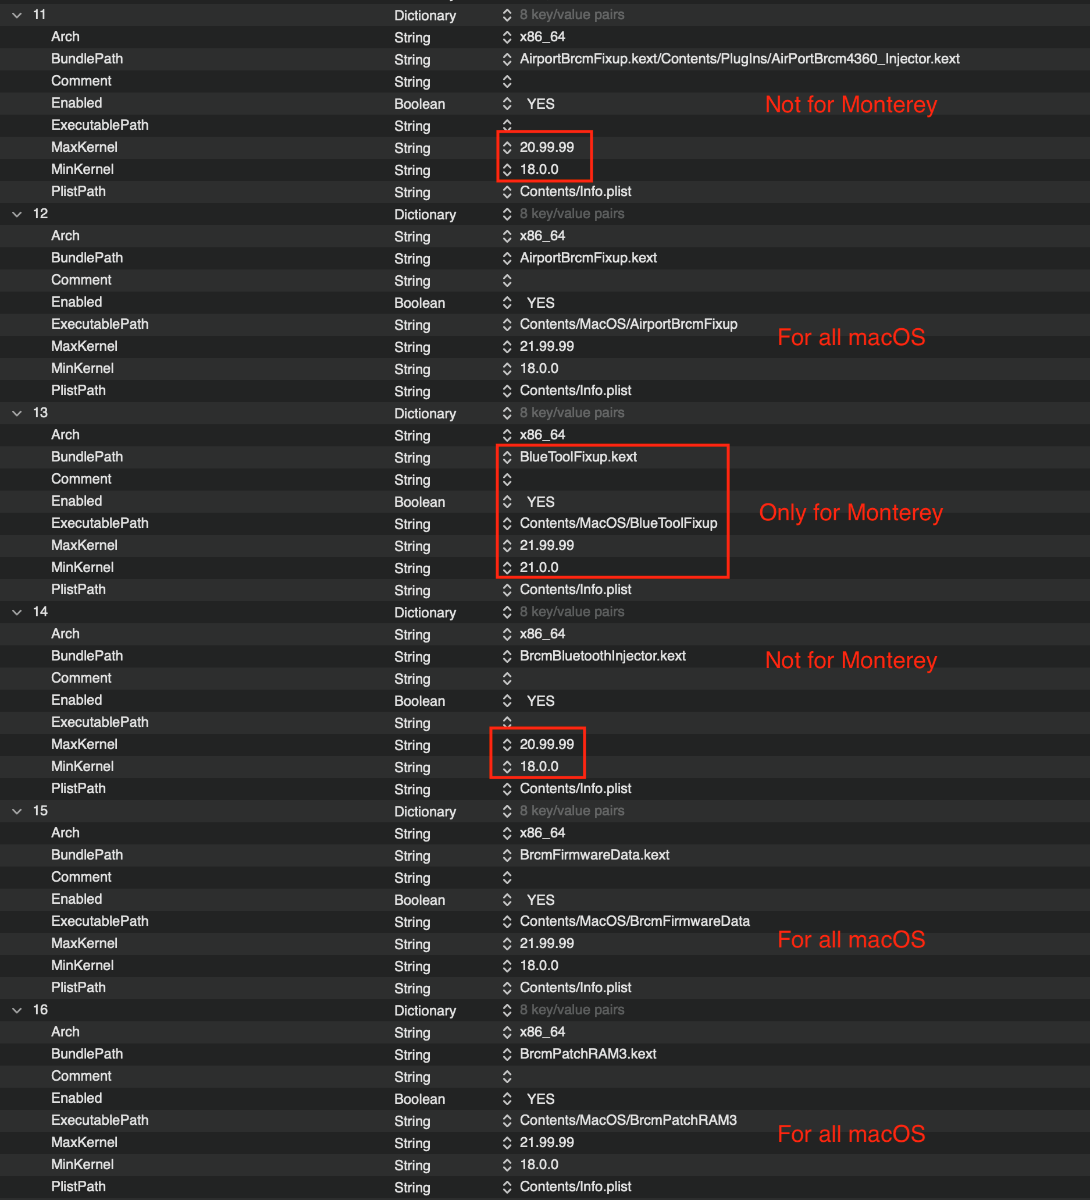
For WiFi/BT in Big Sur and Monterey, look at following image. Note: this is only for Fenzi-type AIC or swapped internal cards, not the stock, internal AX200. WIth a mac-compatible card, these kexts will allow AirDrop to work. See this post of details. To use the kexts shown below, you also must inactivate the internal AX200. I have discussed this many times (see here and here). If you do not inactivate the internal AX200, your BT will not properly work. On the other hand, if you use the stock AX200, entirely different kexts are required (which I won't discuss here), and in that situation, you must not use any of the kexts in the below image. I refer to the special AX200 kexts in the above first referenced post, providing a link to their source. Furthermore, understand that if you use the internal AX200, while you'll have WiFi and BT with those other kext files, AirDrop will not work: trade-offs.
- 3,995 replies
-
- 1
-
-
- amd vanilla patches
- amd kernel patches
- (and 3 more)
-
If I understand what you've presented (and after studying Shaneee's pull request), and to help clarify for others, is the following true? With this custom commit, when ProvideCurrentCpuInfo is enabled, behind the scenes, OC automatically calculates patch 0 since it 'knows' the current CPU core count and the macOS version and thereby determines the proper mask and replacements. In other words, there is no new Quirk, or any other data to enable, except for ProvideCurrentCpuInfo, which is now more powerful. Aside from patch 0, all other patches remain the same.
- 3,995 replies
-
- 2
-
-
-
- amd vanilla patches
- amd kernel patches
- (and 3 more)
-
I forget if your board has an Aquantia port. If not, you can delete or disable the last 2 patches which are for Aquantia.
- 3,995 replies
-
- 1
-
-
- amd vanilla patches
- amd kernel patches
- (and 3 more)
-
I've changed your patches (commenting out your old ones), and re-adjusted all of your Quirks. Try this one as is (except obviously for PlatformInfo/Generic stuff). The first 3 patches are the new algrey ones written out for the 3970X with one each for Monterey, Catalina-BS, and the third for HS-Mojave. config-ploddles-2.plist.zip
- 3,995 replies
-
- 1
-
-
- amd vanilla patches
- amd kernel patches
- (and 3 more)
-
I doubt it's a Samsung benefit, but probably related to pciEx card connection. The obvious way to test, is to exchange the Samsung with one of the Sabrent NVMe. But I wouldn't bother: too much work. I'd just use kext for the internal NVMe drives.
-
I think your Samsung is an SSD drive, the others are NVMe. This kext is only needed for NVMe drives.
-
Downloads are only permitted after making an active post.
-
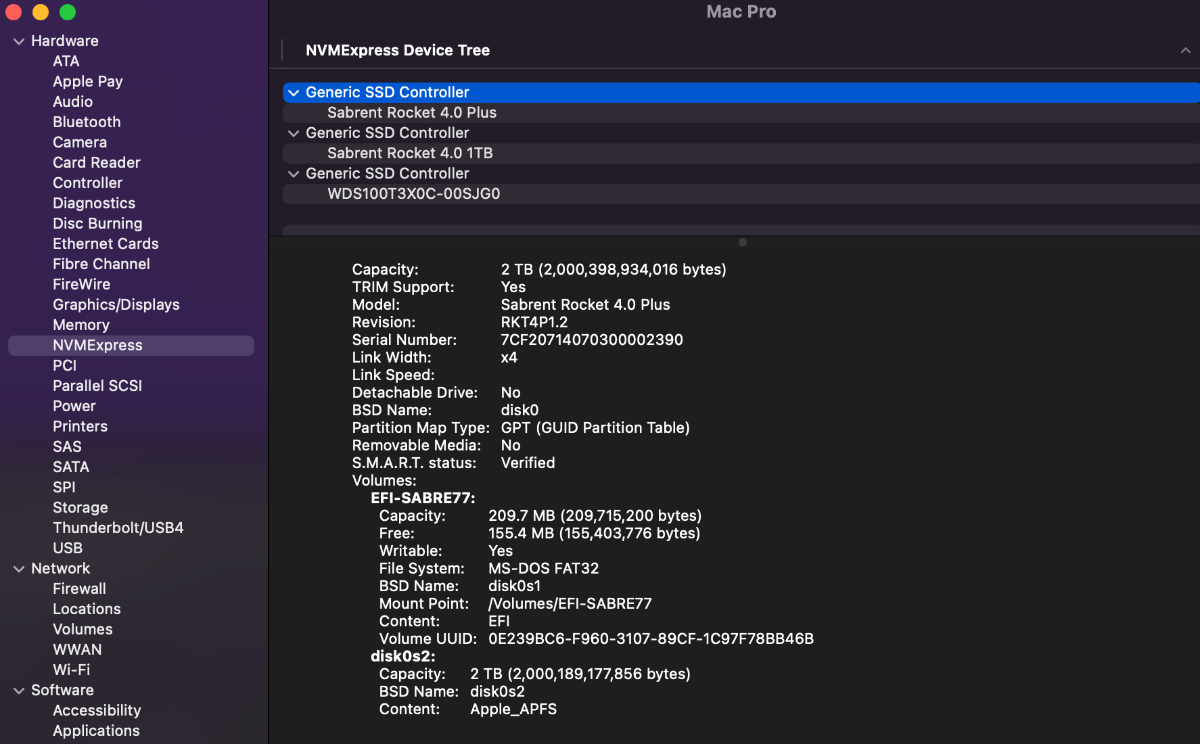
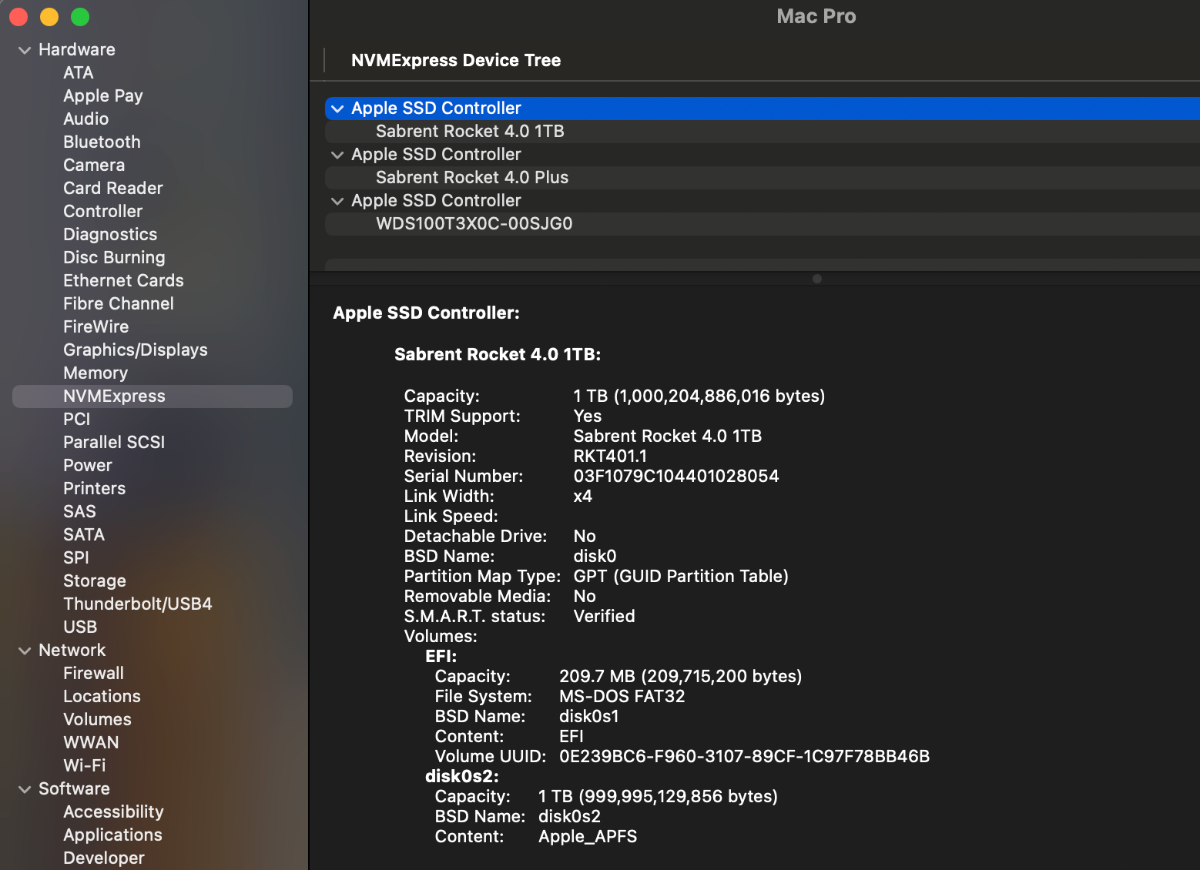
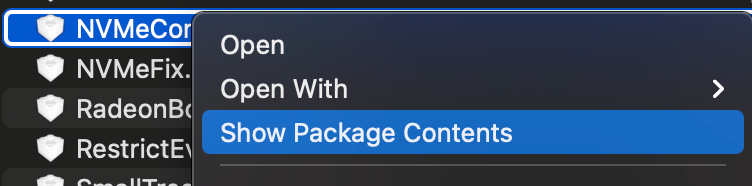
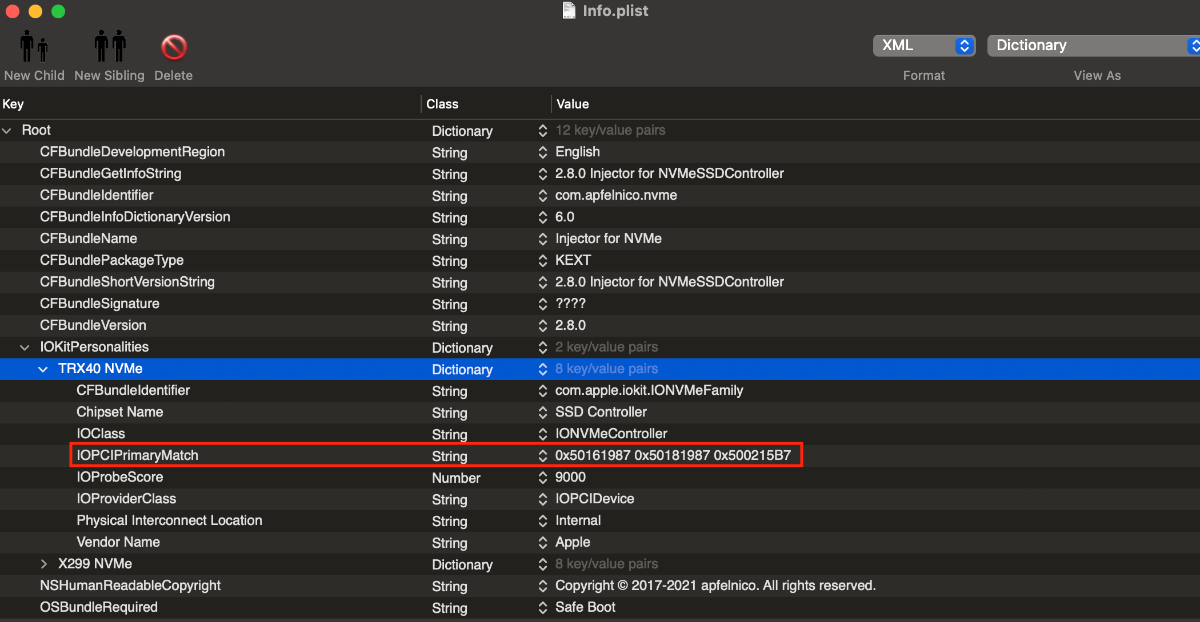
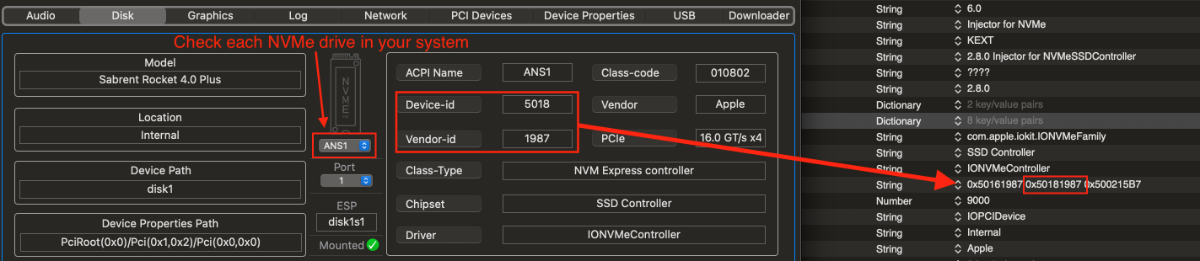
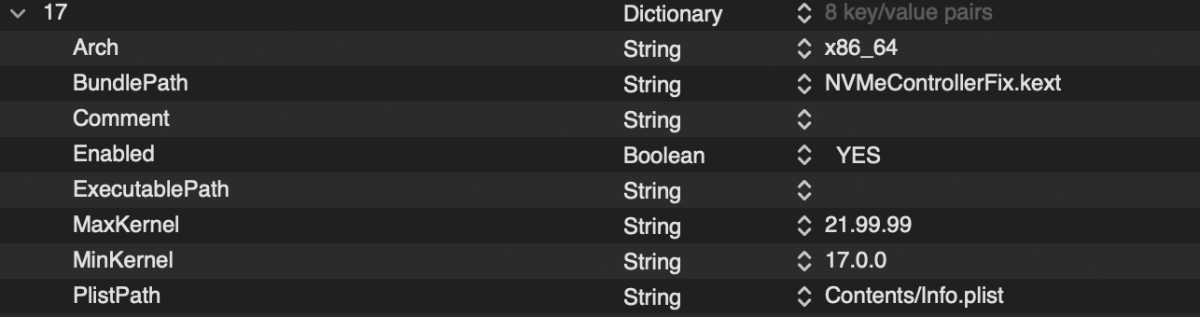
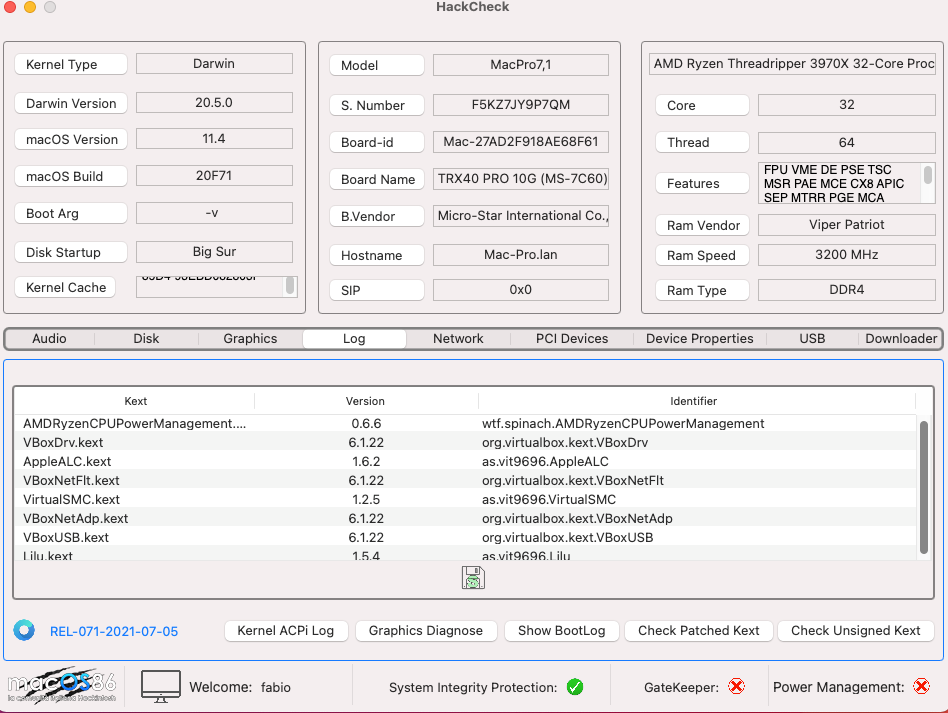
On a different topic (for those of us still stuck with M-ß1 and old patches...), here is a way to adjust the labelling of the NVMeExpress setting in SystemInfo using a kext file (and then no injection is needed within DeviceProperties). This kext file was created by apfelnico who posted it here (after his original post here). I've taken liberty in renaming the file (to better describe its function) and adding another section for TRX40 inside the file. You will have to change the settings for your drives; the uploaded file is for my drives and yours are probably different. [But truly it is not dependent on the mobo, but rather simply on which NVMe drives are in your system as shown below. This means that the "X299" section can be deleted and also means that the "TRX40" section title I made, can be renamed to something else like "NVMeDrives". In fact, this is exactly what I did in the update to the uploaded file: the image of the Info.plist section that says "TRX40" now is "NVMeDrives".] Basically, this kext injects your NVMe drive data so that Apple recognizes it as being an Apple SSD Controller rather than a Generic Controller. This is probably mostly cosmetic, but under the hood, who knows if Apple doesn't treat the controller differently? Before using the kext (note "Generic SSD Controller" in spoiler): After using the kext, now "Generic" is changed to "Apple SSD Controller": How to use NVMeControllerFix 1) To adjust, open the kext and edit the Info.plist file (see Spoiler below): 2) After following steps in above Spoiler, you'll want to edit the IOPCIPrimaryMatch section with data collected using HackCheck. Specifically, using the pop-up shown in the leftmost red box, rotate among your NVMe drives, copying the Device-id and Vendor-id to the IOPCIPrimaryMatch section inside of the Info.plist file. The data is entered as "0x[Device-id][Vendor-id]" (eg, 0x50181987 in the example) with spaces between each NVMe drive in your system. HackCheck: Info.plist: 3) Save the Info.plist file and add this kext file to your Config/Kernel/Add section. NVMeControllerFix.kext.zip
- 3,995 replies
-
- 5
-
-
-
- amd vanilla patches
- amd kernel patches
- (and 3 more)
-
I was planning on not writing anything more about patches, but with Ploddles having problems and your repeating a patch list that I think none of us can presently boot with, I felt compelled to write. While I can speak only for myself, and possibly Ploddles, those of us not having access to "algrey _cpuid_set_info (unreleased)" cannot boot into Big Sur or Monterey ß1 with your patch list unless the following are also added: A. Big Sur algrey - cpuid_set_cpufamily - force CPUFAMILY_INTEL_PENRYN - 10.13, 10.14, 10.15, 11-11.3 DhinakG - cpuid_set_cpufamily - force CPUFAMILY_INTEL_PENRYN - 11.3b1 (11.4-12) B. Monterey ß1 (plus A2 above) Goldfish64 - Bypass GenuineIntel check panic - 12 XLNC - jmp to calculations and set cpuid_cores_per_package - 12 XLNC - cores and threads calculations #1 - 12 XLNC - cores and threads calculations #2 - 12 Perhaps the unreleased patch you reference can replace these extra patches, but presently without this unavailable patch, I cannot boot without the above two sets added to the other patches you've listed (whether or not Above 4G is enabled). Since there is currently so many patch changes and associated confusion, I've removed all of my recent posts about patches (they're now blank, since I could not delete them). Those posts are pointless with the constant changes and secrecy, and will only serve to further misdirect current or future readers.
- 3,995 replies
-
- 2
-
-
- amd vanilla patches
- amd kernel patches
- (and 3 more)
-
Are you using the RestrictEvents kext? And what value are you using for PlatformInfo/Generic/ProcessorType?
-
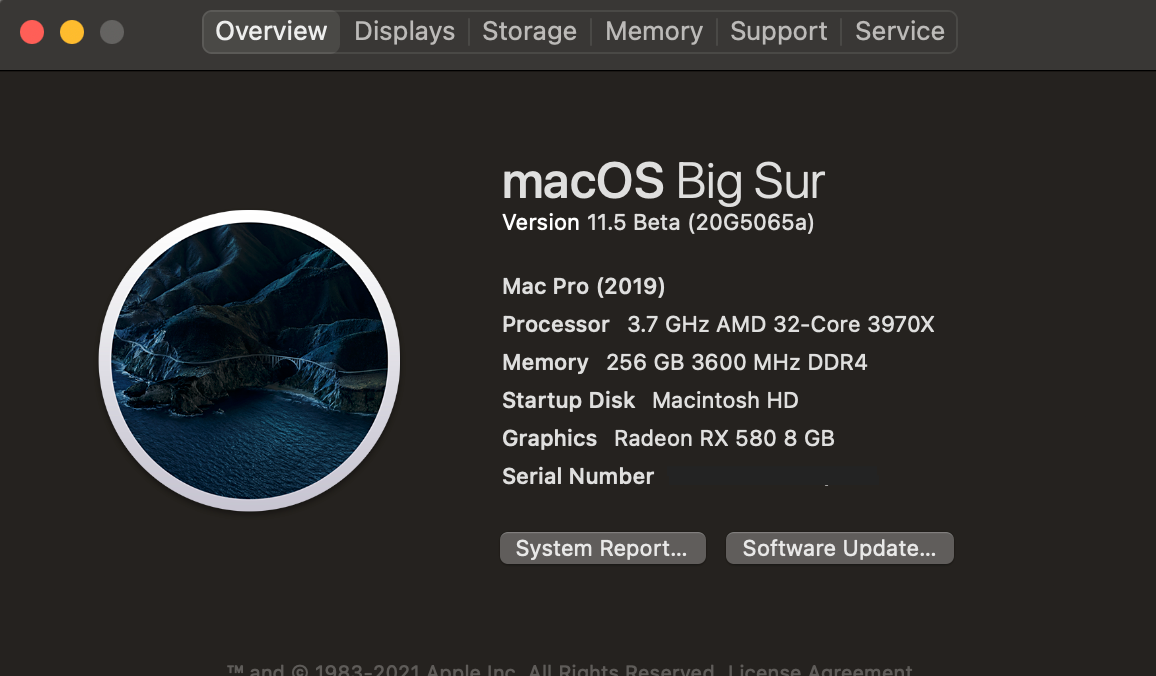
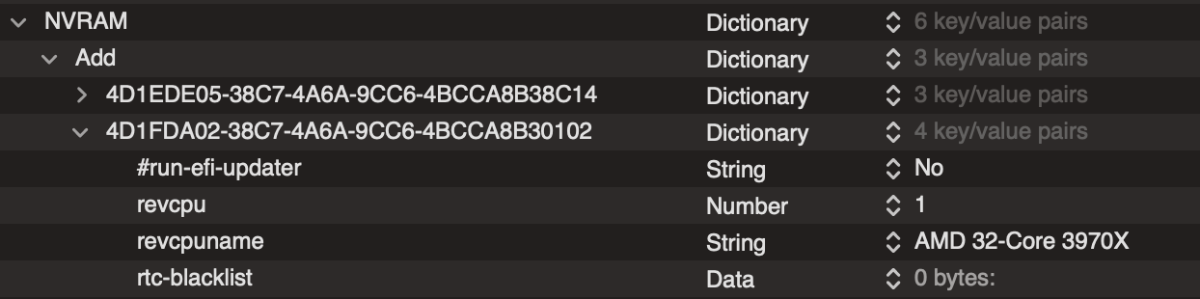
This update went fine with new patches (using the minimal ones I uploaded last night). RestrictEvents injects the Processor info shown below in the "About This Mac" window (with code in Spoiler).
- 3,995 replies
-
- 2
-
-
-
- amd vanilla patches
- amd kernel patches
- (and 3 more)
-
@fabiosun We need to see how this formula will hold up for those using a 3990 CPU which has more cores than macOS software supports. It might not have a searchable result (64-1 --> 3F). This patch might have a limitation on CPUs with too many cores. Use: f:4489EAC1 EA1A r:BA3F0000 0090 and see what error code is created even if it does not boot.
-
I have WiFi/BT AIC working, including Airdrop (as I described here) in Monterey ß1. See the Kernel/Add section in the EFI I uploaded for what needs to be on/off and for which macOS. If you are using an AIC for BT, you must inactivate the internal AX200 or you will have a conflict (I've commented on this several times in the past few posts; follow the links). However, if you're using the internal AX200, a different scheme is needed and Airdrop is not presently supported.
- 3,995 replies
-
- 2
-
-
- amd vanilla patches
- amd kernel patches
- (and 3 more)
-
I'm enjoying HackCheck; it's very nice! Thanks. I don't know if this is useful, but HackCheck crashed. I don't know exactly when it crashed as I had left the computer ~ 2 hours earlier. The screen saver was active. Only after entering the screen saver PW and seeing the desktop did I notice the Apple crash report window. Attached is the content of that window. macOS is Big Sur 11.5 beta 2 (20G5052c and 20G70) on TRX40. One thing I did just before entering the screen saver PW was switch keyboards: a new KB was plugged into a USB port and the old OK unplugged, then I entered the PW with the new KB. So I don't know if the crash occurred because of the USB swapping or had already happened as the computer sat idle. It's happened again. HC crashes if left open when screen saver is running (or, more accurately, it has crashed after stopping screen saver to re-use the computer). Both times, the screen saver has probably been running for at least 1 hour. HackCheck-crashLog.txt.zip
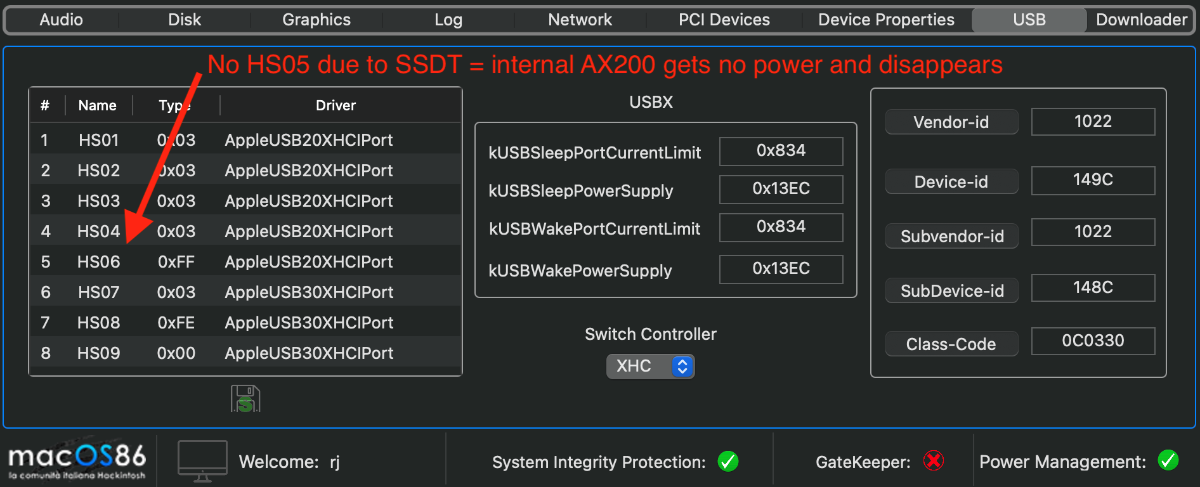
-
I've downloaded and can boot without problem into Big Sur. I did change MmioWhitelist and PlatformInfo/Generic for my mobo. All other settings are the same. I later added SmallTree to get my I211 port active. Only problem is that AMD-SMC kext won't work, so I cannot yet monitor temps. Kext is loading as shown when running "Kextstat | grep -v com.apple" in Terminal. I'll work on shortly. I copied AMDRyzenCPUPowerManagement.kext from one of my backups into the kext folder, over-writing the one in your folder and now it works. Strange. *** BTW, I'm also using HackCheck. It's really nice software. Hats off to gengik84! *** Another finding is that I have no Airdrop with your EFI (no complaints, just describing for others ); this is because there are no Broadcom kexts nor DevProp injections which help on my setup. Also, there is no SSDT to remove XHC/HS05 USB power from the Internal AX200 which then leads to interference with the Broadcom AIC. Once I rebooted with a custom SSDT (7-SSDT-TRX40-USB-Rename-NoIntelBT.aml), provided in the previously posted EFI, Airdrop is working. This can be verified by using HackCheck: on the USB tab, you can see how there is no HS05 (part of the renamed, thru the SSDT, XHC device) because it was simply not declared in the SSDT. Easy. In the same EFI posted above, there is also an alternative SSDT (8-SSDT-TRX40-USB-Rename-WithIntelBT) that does declare HS05 for those wanting to use the internal AX200. (Note that your mobo might require that the USB devices be changed a bit; if an IORE is posted, I can help adjust for you.) Temporary attachment EFI v070 for testing by fabiosun (of no interest to anyone else).
- 3,995 replies
-
- 3
-
-
-
-
- amd vanilla patches
- amd kernel patches
- (and 3 more)
-
Small spike seems of no concern to me. I do not have AIC water cooler for CPU, so maybe worse transients in my case. But even when I tested on other Intel systems in past with AIC water coolers, temps were always jumping up and down based on what's happening. I'm not convinced of overall accuracy and steady states of these values. I take them as relative values looking for significant over-heating problems, mainly during the initial build or for build changes. Aside from that I don't use or run the kexts (more overhead, no?). In BIOS, I have fans set to kick up based on temps. So if the fans are quiet, I know the temps are not bad and I get on with using the computer. If the fans were to stay at full throttle, then temps are elevated and I'd need to investigate. (I've never had this happen to date.) Fans average out the small blips in the temp readings. I do not hear fan surges, accompanying those spikes I posted earlier.
-
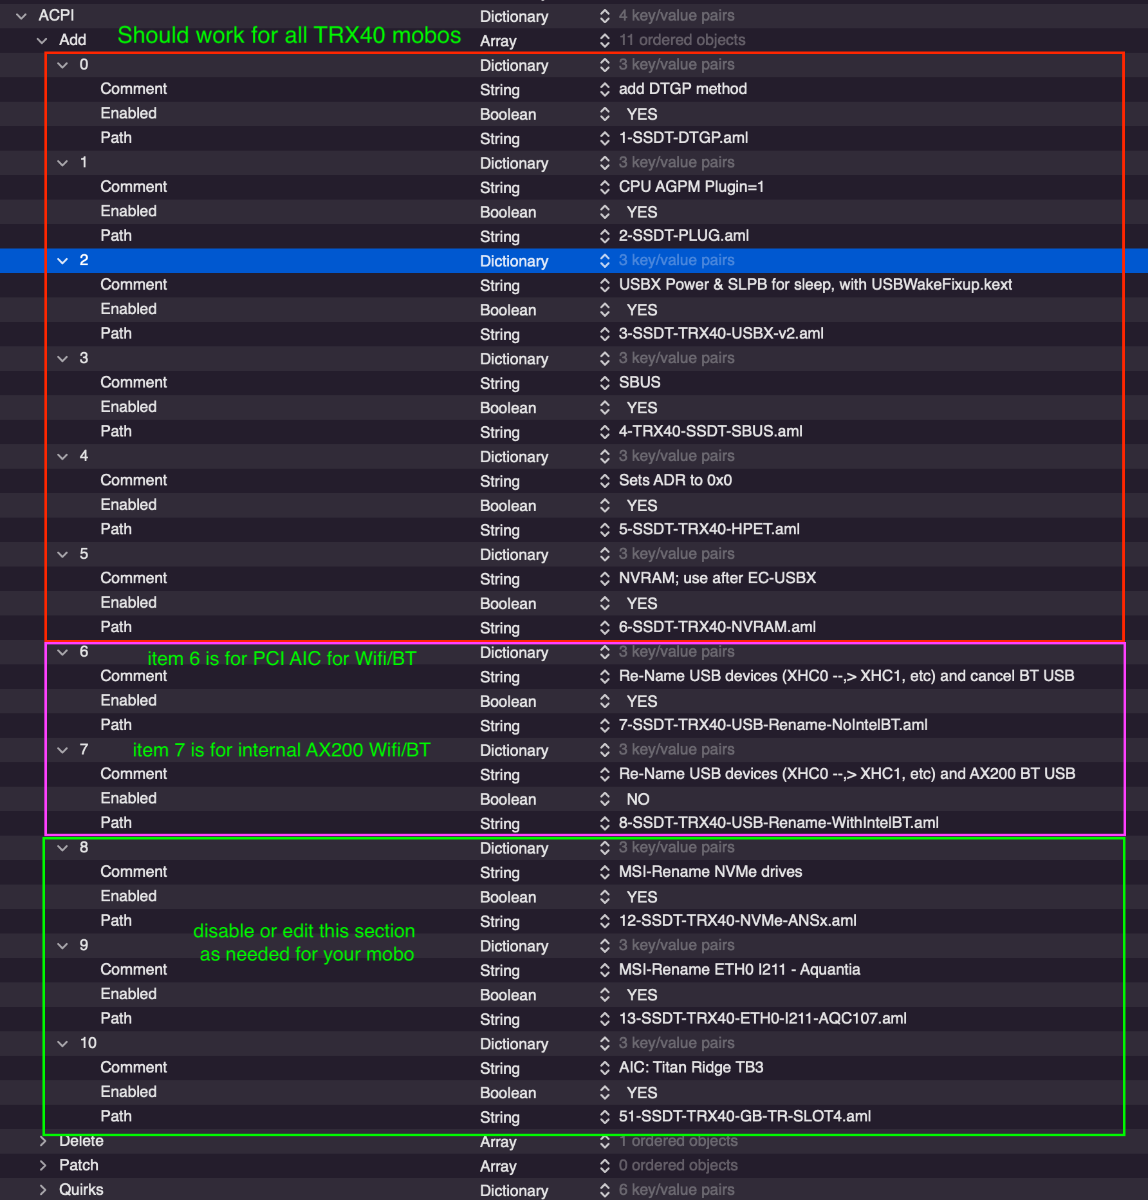
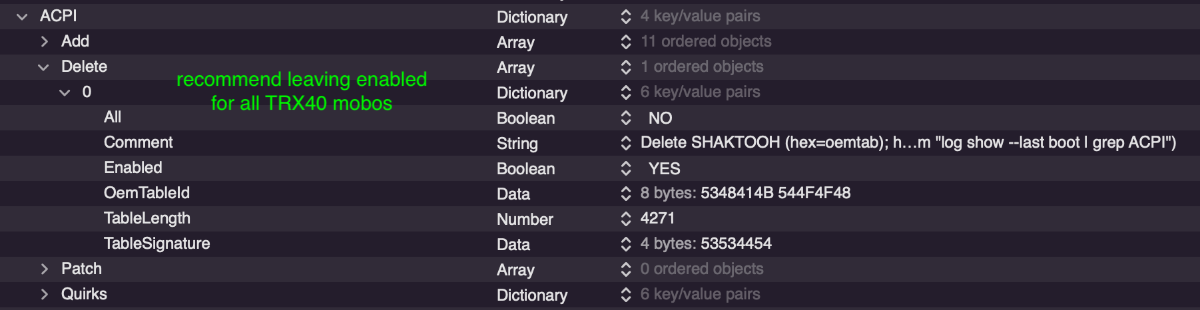
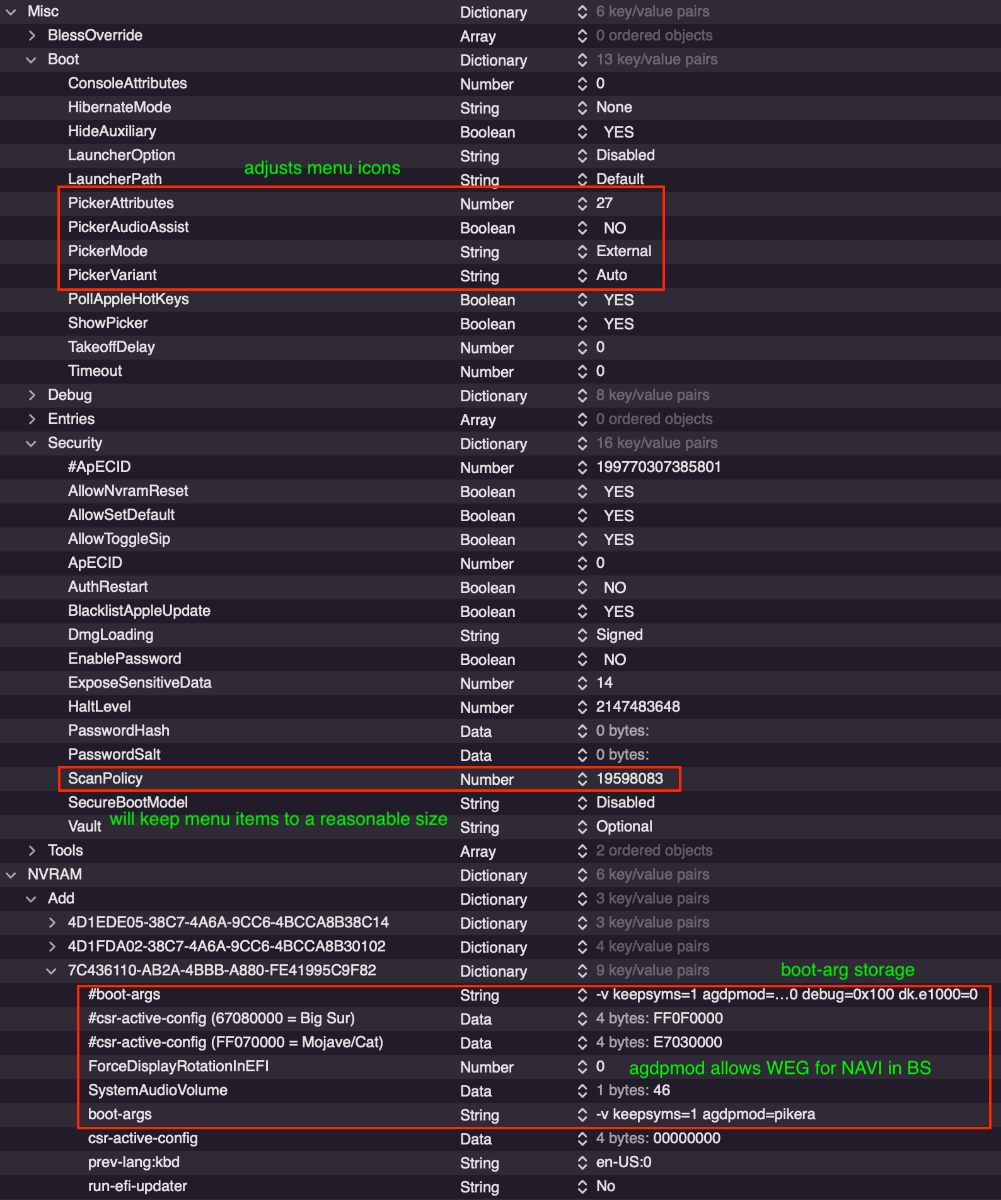
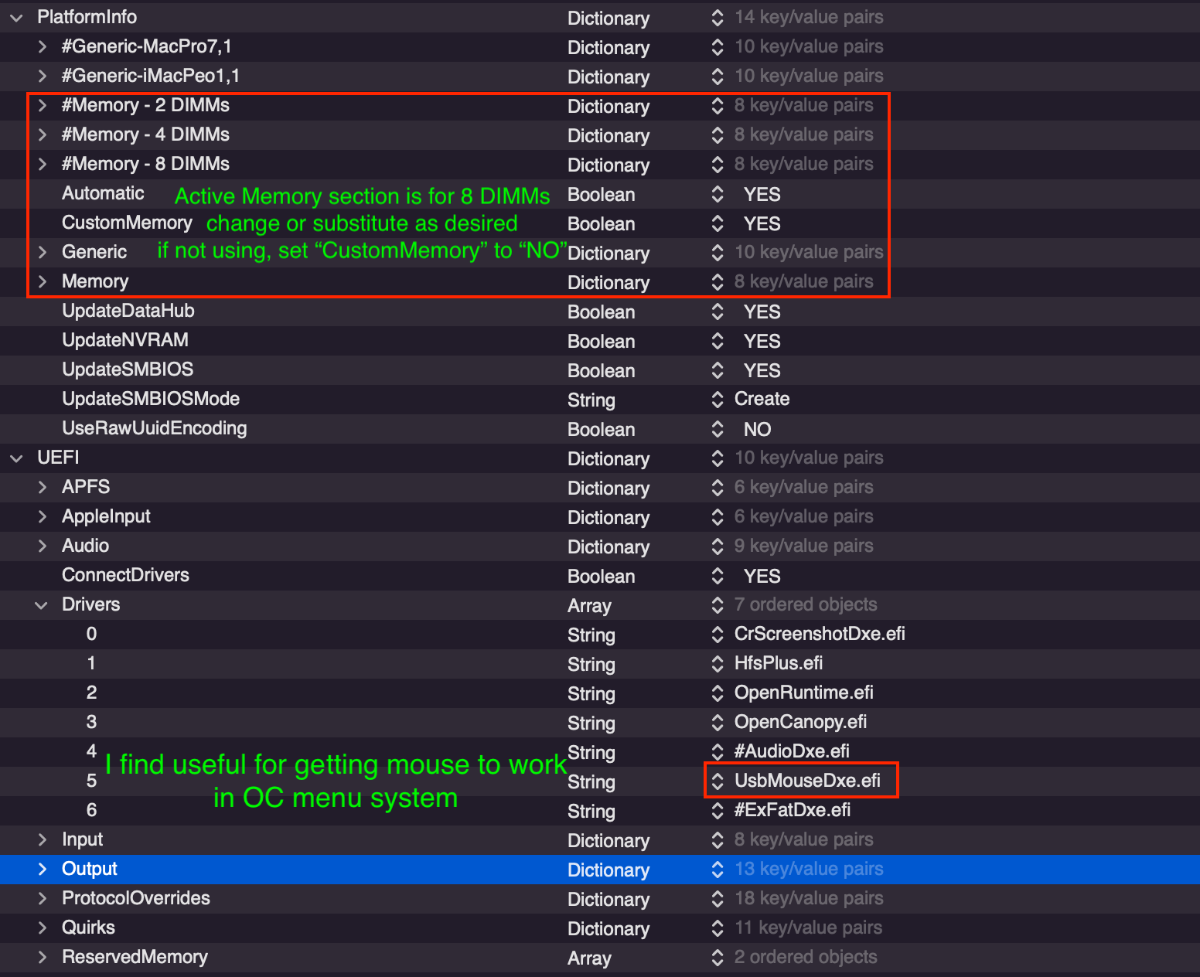
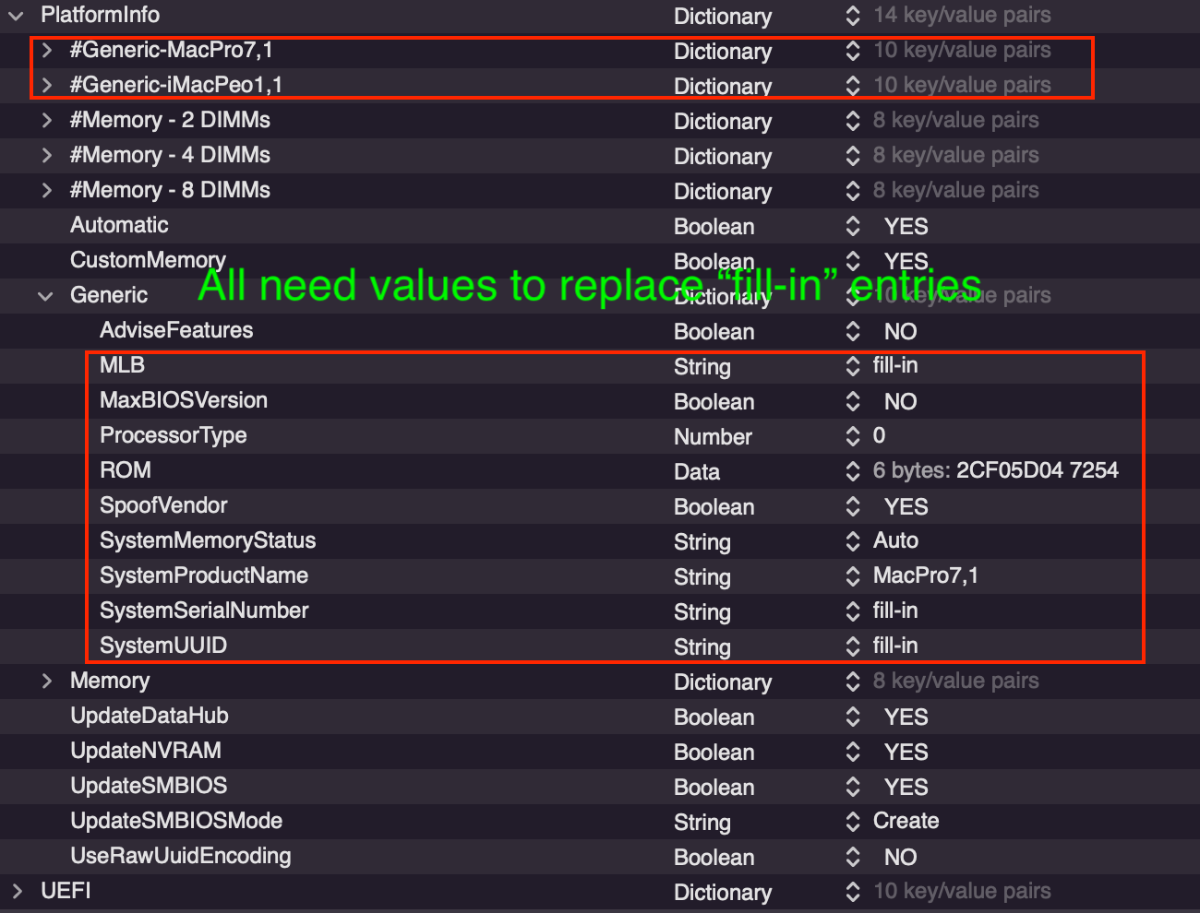
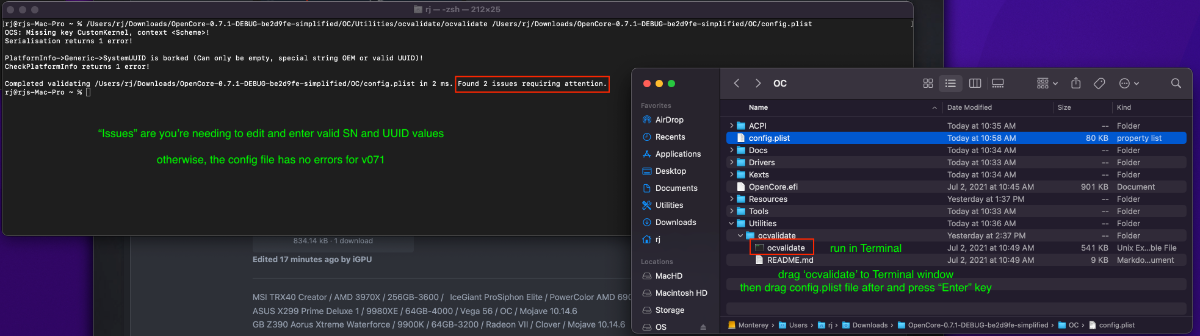
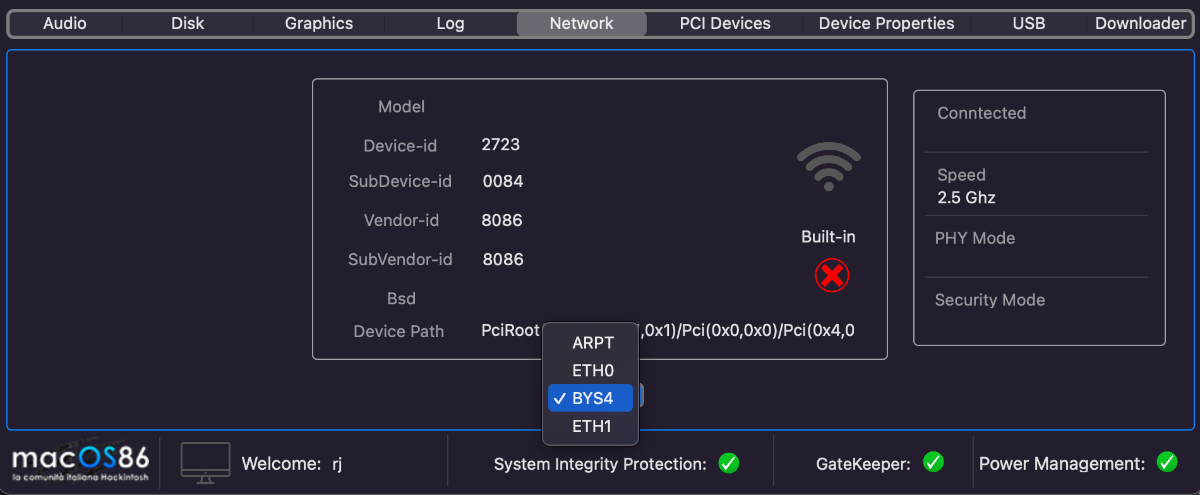
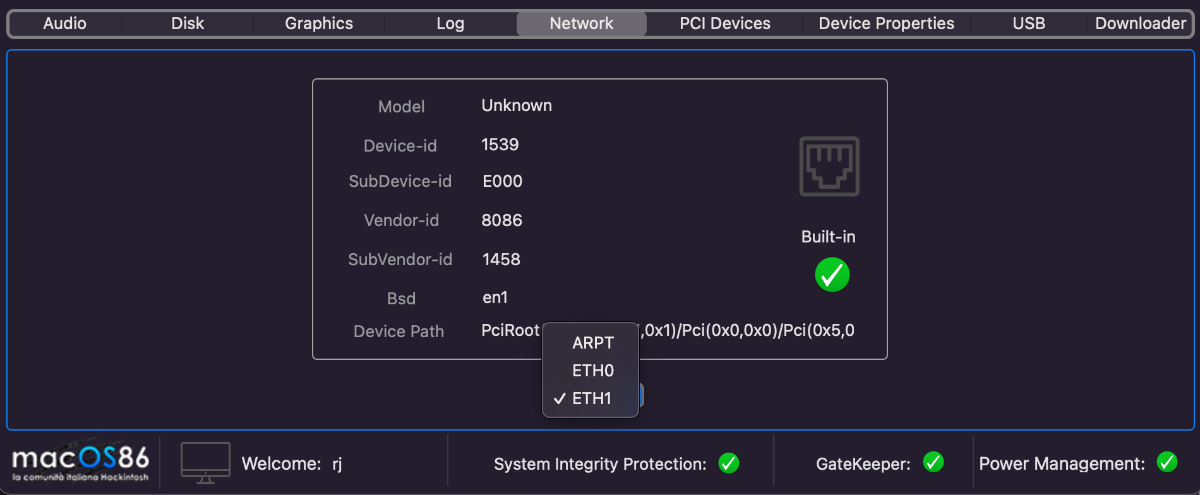
Attached to this post is an EFI that seems to boot into Big Sur and Monterey ß1 on the TRX40 without too much difficulty, using the minimal patch list from recent post. Comments are made on most problematic sections of OC in several Spoilers below. This is the Debug version of OC v071 (be2d9fe) from 5 July. By "too much difficulty", I mean that occasionally, the AMD-SMC kext prevents a boot. As I've mentioned, unless absolutely necessary, I keep it disabled. The developer has not specifically written it for the TRX40 platform, nor updated it recently. 1. ACPI (Internal HS05 power for USB/BT; also see Update at bottom) 2. Booter - DevProperties Sections 3. Kernel 4. MIsc and NVRAM 5. PlatformInfo 6. Validation a config plist file: ***** UPDATE (22 July 2021): This is an expansion on how to cancel the internal AX200 WiFi/BT module discussed above in the ACPI section. For more discussion on the WiFi/BT issue and AirDrop, see this post (p 93). After removing HS05, while the internal AX200 has its BT disabled (after removing its USB power), the WiFi portion at BYS4 is still active (although somewhat broken) as shown below: To completely remove the device, another SSDT is required, 9-SSDT-TRX40-OFF-AX200.aml (the code is shown in Spoiler below and the file added as another attachment). After rebooting with this SSDT enabled, the following is seen. Now there is no device at BYS4 and the power is removed at HS05. Note that this discussion is based on the internal AX200 being located at BYS4. Check IORE to see if your device is at a different location. If it is, you'll need to accordingly modify the SSDT files. EFI.zip 9-SSDT-TRX40-OFF-AX200.aml.zip