Leaderboard
Popular Content
Showing content with the highest reputation on 06/02/2021 in all areas
-
2 points
-
@Arrakis Maybe look at this post here, esp the idea of manually re-setting Ethernet. (In the subsequent post, it's reported that "the vit9696 Kernel patch" that you tried, is broken in 11.4.)2 points
-
Ciao a tutti, al solito non riesco a stare fermo nel cercare di risolvere i problemi di macOS con le cpu AMD in svariate app che usano tali librerie di calcolo (Suite Adobe, Discord, Matlab, e alcune release di DaVinci Resolve) e sono incappato in questo articolo: https://danieldk.eu/Posts/2020-08-31-MKL-Zen.html La soluzione proposta per usare il codice ottimizzato x86_64 Intel pur con cpu AMD è valida e perfettamente funzionante in Linux come si legge, e allora mi sono chiesto: perché non provare ad adattarla a macOS così da cercare di ovviare ai problemi di compatibilità rimasti? Io in programmazione sono a livello pippone ma qualcosa son riuscito a tirar fuori dal cilindro!!! Per prima cosa da terminal ho installato brew, "ponte" tra il mondo linux e macOS /bin/bash -c "$(curl -fsSL https://raw.githubusercontent.com/Homebrew/install/HEAD/install.sh)" In seguito ho installato GCC usando brew secondo questa miniguida: https://discussions.apple.com/thread/8336714 Poi ho compilato come libreria dinamica per macOS questo semplice programmino in C con gcc, citato in tale link: int mkl_serv_intel_cpu_true() { return 1; } il comando che ho usato per la compilazione è, ipotizzando che il programmino in c di cui sopra sia stato salvato in un file testuale fakeintel.c: gcc -dynamiclib /Users/tomnic/Desktop/fakeintel.c -o libfakeintel.dylib ...ed ho ottenuto la dylib che ho chiamato libfakeintel.dylib (che allego per comodità). Leggo che l'equivalente in macOS di quello che nell'articolo è la variabile di ambiente LD_PRELOAD è DYLD_INSERT_LIBRARIES (http://web.archive.org/web/20121108142727/https://blogs.oracle.com/DatabaseEmporium/entry/where_is_ld_preload_under). Possiamo quindi fare in modo che questa libreria venga iniettata in ogni eseguibile unix temporaneamente tramite questo comando: launchctl setenv DYLD_INSERT_LIBRARIES /Users/tomnic/Desktop/libfakeintel.dylib Per comodità io tengo sul desktop la libreria suddetta, modificate la vostra path in accordo a dove la piazzerete, se vorrete aiutarmi ovviamente 😉 Io sto provando Adobe After Effects ultimissima versione, la funzione è quella di camera tracking, funzione per cui i soliti trick noti non funzionano più. I risultati ad ora sono "promettenti": 1. Senza libreria personalizzata il tracking si blocca allo 0% dell'analisi per far poi schiantare il programma in caso di cancellazione del comando; 2. Con la libreria personalizzata il tracking parte e completa l'analisi al 100% tuttavia poi il programma crasha miseramente e nel log leggo il seguente errore: <1641966> <Tracciatore videocamera 3D Profile Data> <5> Analysis Started (Tutorial - Tracking.mov) selector.max_count: 500.000000 selector.spacing: 29.000000 selector.half_winx: 15.000000 selector.half_winy: 15.000000 selector.border: 12.000000 selector.threshold: 0.010000 selector.min_eig: 1.000000 selector.max_eig: 6000.000000 selector.presmoothing: 1.000000 selector.presmooth_factor: 0.100000 selector.eig_ratio_threshold: 15.000000 selector.down_sample_factor: 1.000000 tracker.max_iterations: 25.000000 tracker.tolerance_translation: 0.100000 tracker.tolerance_affine: 0.050000 tracker.pyramidal_levels: 5.000000 tracker.half_win_x: 15.000000 tracker.half_win_y: 15.000000 tracker.color_correction_translation: 0.000000 tracker.color_correction_affine: 2.000000 tracker.affine_verification: 1.000000 tracker.tolerance_color_lambda: 0.050000 tracker.tolerance_color_delta: 1.000000 tracker.tolerance_min_correlation: 0.700000 tracker.tolerance_primary_color_threshold: 5.000000 tracker.kill_tracks_shorter_than: 5.000000 <1641966> <StateBinaryConverter> <5> solveCompleteB = 0 <1642537> <StateBinaryConverter> <5> solveCompleteB = 0 <1641966> <AnalyzerServer> <5> Create Temp Project: /var/folders/qw/wdfjy1tx0z3569g9v0gygxw80000gn/T/tmpAEProject-569fa6b4-c9fb-43f2-a2a4-5ea9f85fde5b.aep <1641966> <AnalyzerServer> <5> Start 7fa4a8b1-fb7a-4570-b4f7-fc33bfce2803 <1641966> <Tracciatore videocamera 3D Profile Data> <5> Analysis Time (seconds) : 5,22 (Tutorial - Tracking.mov) <1641966> <AnalyzerServer> <5> End 7fa4a8b1-fb7a-4570-b4f7-fc33bfce2803 <1641966> <AnalyzerServer> <5> Delete Temp Project: /var/folders/qw/wdfjy1tx0z3569g9v0gygxw80000gn/T/tmpAEProject-569fa6b4-c9fb-43f2-a2a4-5ea9f85fde5b.aep <1642537> <StateBinaryConverter> <5> solveCompleteB = 0 [19817:1642194:20210530,203115.482236:WARNING process_memory_mac.cc:93] mach_vm_read(0x7ffeefbff000, 0x2000): (os/kern) invalid address (1) [19817:1642194:20210530,203115.593841:WARNING mach_o_image_segment_reader.cc:173] section.segname incorrect in segment __TEXT, section ??? ??? ??? ???, ??? ??? ??? ??? 0/11, load command 0x19 0/22, module /Applications/Adobe After Effects 2021/Adobe After Effects 2021.app/Contents/Frameworks/LogSession.framework/Versions/A/Resources/libConfigurer64.dylib, address 0x12f534000 LaunchHeadlightsCrashProcessor result: -11 [19817:1642194:20210530,203119.056962:WARNING crash_report_exception_handler.cc:346] UniversalExceptionRaise: (os/kern) failure (5) [1] + illegal hardware instruction DYLD_INSERT_LIBRARIES=/Users/tomnic/Desktop/libfakeintel.dylib ...mi pare di capire che l'errore può stare nel codice della mia libreria che esegue del codice illegale... forse devo compilarla con g++? Forse devo includere altro codice nel miniprogrammino C di cui sopra? Vi va di aiutarmi perché la direzione non pare totalmente sbagliata? Per ripristinare l'hackintosh al normale funzionamento basta riavviare, non abbiate paura 😉 libfakeintel.dylib.zip1 point
-
1 point
-
1 point
-
1 point
-
1 point
-
Grazie mille Gengik84 🙏, l'ho cancellato con PlistEDPlus ed ho risolto grazie mille!!!1 point
-
1 point
-
Thanks to @Arrakis latest EFI, updated to 0.7.0, I can boot 11.4 just fine on the TRX40 Designare rev. 1.1. I have the same problem with the Intel I210 NICs, unsurprisingly. I've had similar lockups (when the NIC should receive an address) on modern Realtek chips. In the end setting manual speed usually fixed it. I set manual speeds for the NICs, but it won't help just like that. I'm looking at using FakePCIID + I225 kext, and then updating the device-id and PrimaryMatch. UPDATE: Disregard crossed text. Take the I225.kext, update the IOPCIPrimaryMatch to 0x15338086 and you got working LAN and no KP. Thing is, macOS interface became a bit "choppy" first time, but this seems fixed by defaulting the "Manual" configuration on the "Hardware" tab to "Automatically", which I had set before and it seems to be the only difference. Maybe there's merit to updating the device-id as well, but I don't understand how to obtain it and edit it conform the info.plist format. UPDATE 2 / question: How to troubleshoot onboard audio on TRX40, or specifically the Designare? I get Mattise USB2.0 audio devices, regardless of which analogue port I try, but no sound. The IOPCIPrimaryMatch should be 0x15338086, I got that far. I can't figure out how to obtain the right device-id, and translate it to the typical code the kext info.plist understands. The current entry is: 8hUAAA== which should resemble I225, what I'm looking for is obtaining our device-id, translating it to info.plist text, and testing this kext, as I think the controllers are close to identical and could fix our problem (besides reverting to 11.3.1). Maybe someone can chime in on how to achieve this 🙂1 point
-
te lo stà dicendo cosa devi fare per risolvere scarica cloverconfigplistvalidator 5134 https://www.macos86.it/files/file/89-clover-anteprime-beta/ fai analisi del tuo config e con un plisteditor sistema le voci che ti indica che saranno quelle dello screenshot postato se hai difficoltà con un plist editor, ora dovrebbero avere aggiornato anche clover configurator classico injectkexts io ho messo Detect1 point
-
se non cambi l'alimentatore non puoi (secondo me) poi per il "vada bene" e' molto soggettivo per me va bene la scheda che ho in firma 🙂 ma magari a te non serve 🙂 in quella macchina hai problemi di spazio e di alimentazione per schede grafiche di potenza maggiore1 point
-
Patch DVMT Broadwell Name:AppleIntelBDWGraphicsFramebuffer Find:76 40 48 FF 05 A2 2A 06 Repl:EB 40 48 FF 05 A2 2A 06 Comment:Disable minStolenSize check for 10.14 Beta 1 (by FireWoilf/Austere.J) Skylake Name:AppleIntelSKLGraphicsFramebuffer Find:76 40 48 FF 05 11 E5 07 Repl:EB 40 48 FF 05 11 E5 07 Comment:Disable minStolenSize check for 10.14 Beta 1 (by FireWoilf/Austere.J) Kabylake Name:AppleIntelKBLGraphicsFramebuffer Find:76 46 48 FF 05 BA 48 08 Repl:EB 46 48 FF 05 BA 48 08 Comment:Disable minStolenSize check for 10.14 Beta 1 (by FireWoilf/Austere.J) Patch DVMT BETA 2 Broadwell Name:AppleIntelBDWGraphicsFramebuffer Find:76 40 48 FF 05 12 2B 06 Repl:EB 40 48 FF 05 12 2B 06 Comment:Disable minStolenSize check for 10.14 Beta 2 Skylake Name:AppleIntelSKLGraphicsFramebuffer Find:76 40 48 FF 05 61 E9 07 Repl:EB 40 48 FF 05 61 E9 07 Comment:Disable minStolenSize check for 10.14 Beta 2 Kabylake Name:AppleIntelKBLGraphicsFramebuffer Find:76 46 48 FF 05 02 52 08 Repl:EB 46 48 FF 05 02 52 08 Comment:Disable minStolenSize check for 10.14 Beta 3 Patch DVMT BETA 3 Broadwell Name:AppleIntelBDWGraphicsFramebuffer Find:76 40 46 FF 05 42 2B 06 Repl:EB 40 48 FF 05 42 2B 06 Comment:Disable minStolenSize check for 10.14 Beta 3 Skylake Name:AppleIntelSKLGraphicsFramebuffer Find:76 40 48 FF 05 F1 E9 07 Repl:EB 40 48 FF 05 F1 E9 07 Comment:Disable minStolenSize check for 10.14 Beta 3 Kabylake Name:AppleIntelKBLGraphicsFramebuffer Find: 76 46 48 FF 05 22 55 08 Repl:EB 46 48 FF 05 22 55 08 Comment:Disable minStolenSize check for 10.14 Beta 3 -------------------------------------------------------------------------------------- Broadwell Name:AppleIntelBDWGraphicsFramebuffer Find:76 40 48 FF 05 12 2B 06 Repl:EB 40 48 FF 05 12 2B 06 Comment:Disable minStolenSize check for 10.14 Public Beta 1 credit @Sniki Skylake Name:AppleIntelSKLGraphicsFramebuffer Find:76 40 48 FF 05 92 7E 07 Repl:EB 40 48 FF 05 92 7E 07 Comment:Disable minStolenSize check for 10.14 Public Beta 1 credit @Sniki Kabylake Name:AppleIntelKBLGraphicsFramebuffer Find: 76 46 48 FF 05 E2 51 08 Repl:EB 46 46 48 FF 05 E2 51 08 Comment:Disable minStolenSize check for 10.14 Public Beta 1 credit @Sniki -------------------------------------------------------------------------------------- Skylake Patch DVMT 10.14.3 Name:com.Apple.driver.AppleIntelSKLGraphicsFramebuffer Find:4c 89 4d c0 76 40 Repl:4c 89 4d c0 EB 40 -------------------------------------------------------------------------------------- Skylake Patch DVMT 10.14.4 (beta 1) Name:com.Apple.driver.AppleIntelSKLGraphicsFramebuffer Find:4C 89 6D B8 76 42 Repl:4C 89 6D B8 EB 42 1 point
-
il mio set completo https://www.hama.com/d3050446/hama-rf-2300-wireless-keyboard-mouse-set lo davano a 10e al kilo 😅 pero' va alla grande con entrambi i browser0 points
-
qui stavolta ci sono dei problemini 🙂 vediamo se sono io o se e' il driver della GPU0 points
-
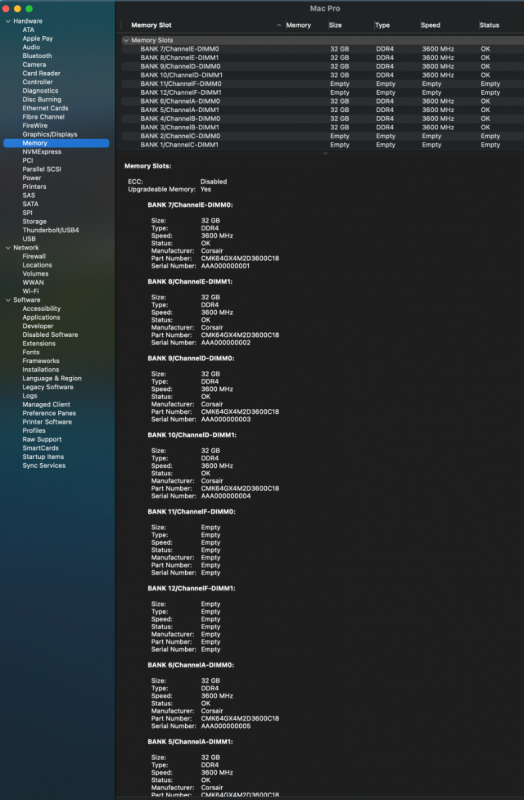
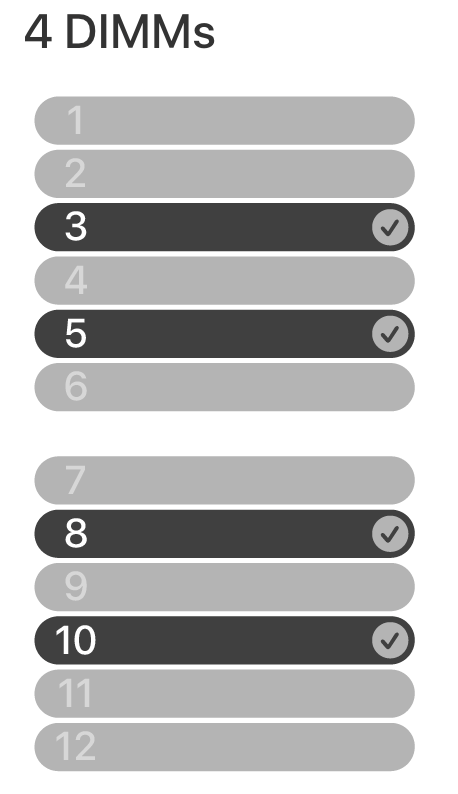
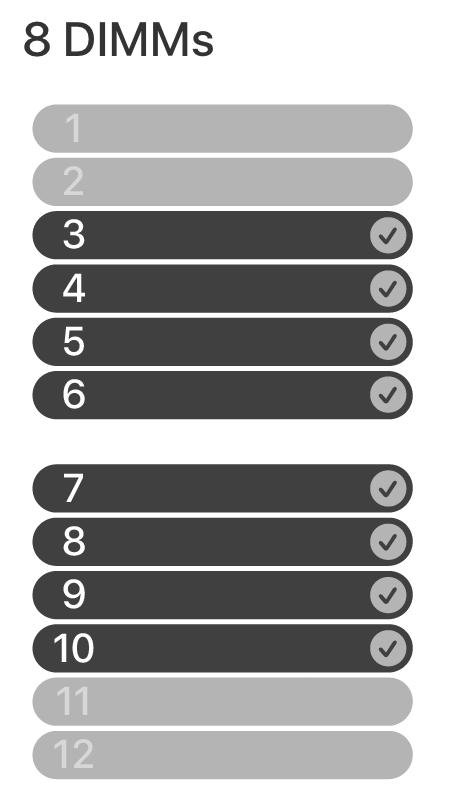
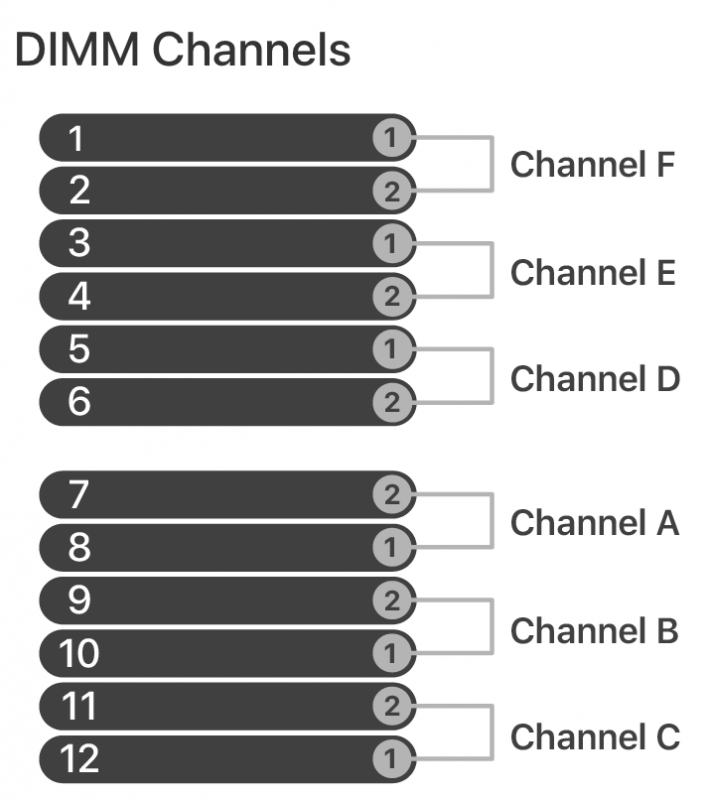
I've finally figured out how to correctly use the Memory section in OC. I decided to work on this since I've now changed to using MacPro7,1 instead of iMacPro1,1 due to the former apparently being a better match for going forward with AMD 6x00XT GPUs. If you follow this guide carefully, you will not need the kext "RestrictEvents.kext" file, and you will no longer see a memory error. I've only tested in Big Sur, but it should work under Catalina as well. Here's the guide (I've paralleled posted on another forum): OC's "BANK" numbers were re-arranged to better match the memory upgrade instructions per Apples's docs. The Bank numbers in their order of appearance are slots: 7, 8, 9, 10, 11, 12, 6, 5, 4, 3, 2, and 1. These correspond to the slot numbers on the memory board. In Apple's docs, the slots are arranged into Channels, A-F. Channel A are Banks/slots 7, 8; Channel B are 9,10; C are 11, 12; D are 5,6; E are 3,4; and F are 1,2 (see spoiler below). If properly arranged, below is what is seen with 8 DIMMs installed on my mobo. An actual MacPro7,1 has 12 slots, so our 8 DIMM slotted mobos will always have at least 4 banks empty. Now, should you only be using 4 memory sticks, then set to empty the following slots: 1, 2, 3, 5, 8, 10, 11, 12. In other words, if you are using 4 DIMMs, only slots 4, 6, 7 and 9 will be populated (thanks djlild7hina!). Note: this does not mean you physically move your DIMMs about on your mobo; this whole process is to map your DIMMs into software locations where the macOS is expecting them to be positioned. Keep your DIMMs physically where the mobo manual recommends. The code within OC is shown in excerpt below (the full code is downloadable as an attachment). Add it enbloc as the "Memory" section within the PlatformInfo section (also make sure to enable "CustomMemory"). The SNs are arbitrary (add your actual ones if you're more OCD than me). The part numbers are mine as used, made by Cosair; change these values as you wish. The AssetTag is also arbitrary but only entered if that memory slot is populated. Finally, change the Size and Speed values to better match your DIMM. If SystemInformation is run, the following is seen: In the attachment, I included the 8 DIMMs as well as one for 4 DIMMs (4 DIMM verified and fixed by djlild7hina on another forum). Inactivate either one with "#" symbol or activate by removing "#" and editing heading label to "Memory": OC-Memory-MacPro7,1.plist.zip0 points
