Leaderboard
Popular Content
Showing content with the highest reputation on 05/07/2021 in all areas
-
Version 1.5.1
1,314 downloads
Tools che crea la struttura della EFI per OpenCore compreso kext e driver. Permette varie tipologie Creazione EFI con OpenCore, kext e driver Release Creazione EFI con OpenCore Beta (viene compilato), kext e driver Release Creazione EFI con OpenCore, kext e driver Beta (viene tutto compilato) Possibilità di compilare OpenCore sia come Release sia come Debug2 points -
io sono tutti i giorni sempre qui siccome i pesci sinora non hanno il covid, non ho bisogno di vaccini 😄 ma comunque a metà mese il doc mi ha detto che potrò prenotarmi gli hack sono sempre aggiornati all'ultima versione di macOS e di Clover 😉2 points
-
Salve ragazzi, è venuto anche per me il momento di aggiornare il mio Hardware (Z77E-ITX) e volendo rimanere fedele ad Asrock, che ho sempre ritenuto la casa più disponibile a recepire le indicazioni degli utenti soprattutto riguardo al BIOS, mi sono indirizzato sulla Z490M-ITX. Sulla MB ho montato un “Intel Core i5-10500”, due moduli Corsair Vengeance LPX DDR4-RAM 3600 MHz 2x 16GB e due Sabrent SSD Interno 512GB Rocket NVMe; il tutto trapiantato sul sistema precedente di cui ho mantenuto il Case (BitFenix Prodigy), alimentatore Corsair da 650W e Dissipatore a a liquido sempre Corsair H60 e i due HDD da 4TB per i dati (Master e Backup) Ho preso inoltre un nuovo Monitor nella fattispecie un “LG 27UN83A Monitor 27" UltraHD 4K LED IPS HDR 400, 3840x2160” semplicemente spettacolare. Dimenticavo il modulo WiFi un BCM94360NG a sostituzione dell’Intel originale. Funziona OOB sia WiFi che Bluetooth (ricordatevi di montare le antennine prima di dire che non funziona) Riguardo il BIOS nessun parametro particolare, un pò le solite cose: Da Disabiltare Fast Boot Secure Boot VT-d (se volete abilitarlo settare “DisableIoMapper” su YES nel config) CSM CFG Lock (MSR 0xE2 write protection) Da Abilitare Load XMP Profile (Altrimenti la memoria non viene vista correttamente) VT-x XHCI Hand-off SATA Mode: AHCI IGPU Multimonitor DVMT Pre-Allocated(iGPU Memory): io ho messo 128 GB avendo un Monitor 4k I kext usati sono questi: AppleALC.kext Lilu.kext Lilu.kext NVMeFix.kext SMCProcessor.kext SMCSuperIO.kext VirtualSMC.kex WhateverGreen.kext Io avevo bisogno di mantenere l’installazione precedente (Catalina 10.15.7) per cui ho prima controllato che si avviasse da USB e successivamente l’ho clonata nel sistema, operazione indolore tutto ha funzionato al primo colpo. L’unico neo di questo sistema è l’audio HDMI, a cui ci tenevo visto che il monitor ha le casse integrate e l’unica entrata audio è quella. Per il momento non sono riuscito a farlo apparire in modo normale, ma solo collegando contemporaneamente l’uscita HDMI e DP della MB alle rispettive porte sulla TV. Il perché di questo comportamento resta un mistero, ma è un bug ben conosciuto che riguarda UHD 630. Se qualcuno ha qualche idea al riguardo non si faccia remore a postarla, anzi ringrazio in anticipo. Oltre ai kext sopra citati è bastato usare SSDT-Basic provvisto dal buon Gengik. Il lavoro più arduo è stata la mappatura delle porte USB; io per arrivare al limite delle 15 previste da Apple ho rinunciato alle 2 porte USB2.0 posteriori (anche disabilitate nel Bios); della coppia di USB 3.2 Gen1 posteriori Type A+C ho lasciato abilitata solo la 2.0 Type A. Avrei voluto allegare i framebuffer che funzionano a livello di video, ma lascio stare momentaneamente finché non si trova una soluzione al problema audio. In generale comunque il risultato è veramente appagante. P.S. Novità riguardo l’audio HDMI: Aggiungere i kext: FakePCIID.kext FakePCIID_Intel_HDMI_Audio.kext e dichiararli nel config. Io li ho messi come ultimi della lista, “FakePCIID.kext” prima di “FakePCIID_Intel_HDMI_Audio.kext”; quest’ultimo è un injector per cui la voce ExecutablePath resta vuota. Nella sezione DeviceProperties / PciRoot(0x0)/Pci(0x1F,0x3) aggiungete device.id 709D0000 come Data Questo il risultato finale: <key>PciRoot(0x0)/Pci(0x1f,0x3)</key> <dict> <key>device-id</key> <data> cJ0AAA== </data> <key>hda-gfx</key> <string>onboard-1</string> <key>layout-id</key> <data>MQAAAA==</data> </dict> A vostra discrezione mettere, come sopra, il valore layout-id come data (in Hex), oppure come integer (number) in decimale come qua sotto <key>layout-id</key> <integer>49</integer> 49 (Hex—>31) è il Layout specifico per questa MB; a detta di Lorys89 ha un bug riguardo il microfono anteriore (fruscio e funziona solo con lo slide a massimo) Lui ha raggiunto un risultato migliore con Layout 51 (Hex—>33) della Asrock Steel Legend, unico effetto secondario l’apparizione di qualche uscita in più non funzionante se selezionata visto che non esistono in realtà. Ringrazio @Lorys89 per aver portato a conoscenza questa soluzione1 point
-
1 point
-
On the TonyMacx86 site there were posts in 2019 that found in Catalina, that 5700s and Radeon VIIs were having issues with WEG. Specifically, there were computer freezes happening within 1 to 5 minutes of booting. Some of the ports (I forget exactly which ones; eg, the middle DP port wouldn't work) were not active if WEG was disabled. These issues did not affect older GPUs like RX580 (a very solid workhorse of a GPU) or Vega 56/64 GPUs. (The Radeon VIIs were actually the last of the Vegas while the 5700 was the first of the Navi architecture; the 6x00XTs are now Navi-2.) In other words, with older GPUs, use WEG, no boot-arg needed. Such WEG issues are why in my early EFI posts on this thread, I used the boot-arg "-wegbeta" to get my Radeon VIIs to properly work once we switched to bare-metal. I don't seem to need this boot-arg any longer. With the latest 11.4 betas, the 6x00XT line of GPUs seem to be supported (and will probably get more robust with later 11.x releases), but if the current generation WEG is used (and it too over time will become more robust with Navi-2 support), there are black screens or other problems. If WEG is disabled, then some users have good functionality with Navi-2. The other option, when using 6x00XT GPUs, is to enable WEG and add the boot-argument "agpdmod=pikera". There is a current thread on this at TonyMacx86 here (I've read the whole thread and you could skip the first half or so until the discussion hits 11.4 stuff). They have found some inconsistent responses with the 6700XT (from the posts, I'd stick with the 6800XT or the 6900XT for now). As an aside, as Pavo pointed out in this post, not all WEG boot-arguments work in Big Sur.1 point
-
1 point
-
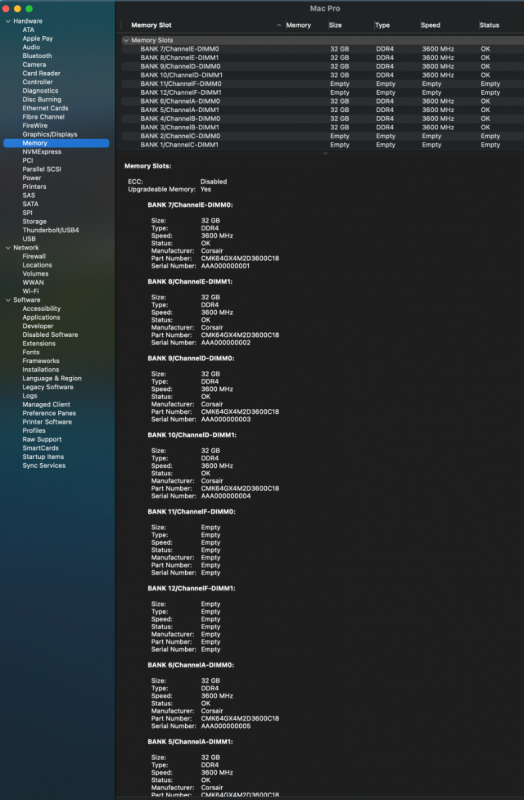
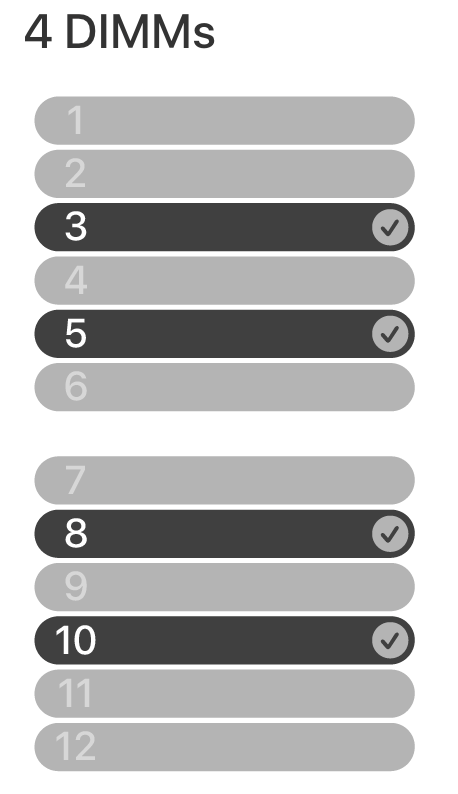
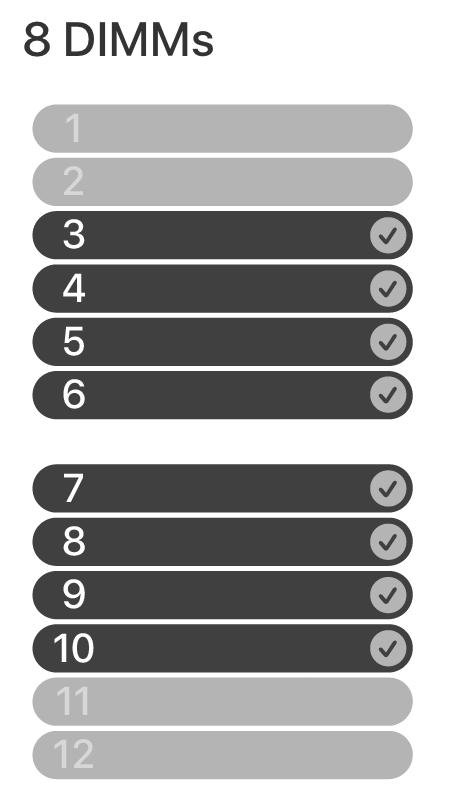
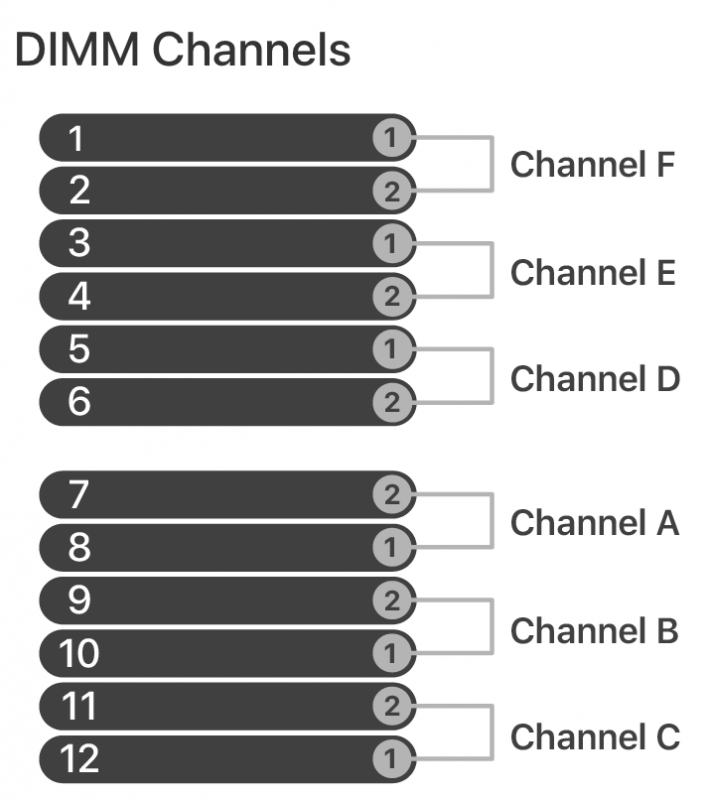
I've finally figured out how to correctly use the Memory section in OC. I decided to work on this since I've now changed to using MacPro7,1 instead of iMacPro1,1 due to the former apparently being a better match for going forward with AMD 6x00XT GPUs. If you follow this guide carefully, you will not need the kext "RestrictEvents.kext" file, and you will no longer see a memory error. I've only tested in Big Sur, but it should work under Catalina as well. Here's the guide (I've paralleled posted on another forum): OC's "BANK" numbers were re-arranged to better match the memory upgrade instructions per Apples's docs. The Bank numbers in their order of appearance are slots: 7, 8, 9, 10, 11, 12, 6, 5, 4, 3, 2, and 1. These correspond to the slot numbers on the memory board. In Apple's docs, the slots are arranged into Channels, A-F. Channel A are Banks/slots 7, 8; Channel B are 9,10; C are 11, 12; D are 5,6; E are 3,4; and F are 1,2 (see spoiler below). If properly arranged, below is what is seen with 8 DIMMs installed on my mobo. An actual MacPro7,1 has 12 slots, so our 8 DIMM slotted mobos will always have at least 4 banks empty. Now, should you only be using 4 memory sticks, then set to empty the following slots: 1, 2, 3, 5, 8, 10, 11, 12. In other words, if you are using 4 DIMMs, only slots 4, 6, 7 and 9 will be populated (thanks djlild7hina!). Note: this does not mean you physically move your DIMMs about on your mobo; this whole process is to map your DIMMs into software locations where the macOS is expecting them to be positioned. Keep your DIMMs physically where the mobo manual recommends. The code within OC is shown in excerpt below (the full code is downloadable as an attachment). Add it enbloc as the "Memory" section within the PlatformInfo section (also make sure to enable "CustomMemory"). The SNs are arbitrary (add your actual ones if you're more OCD than me). The part numbers are mine as used, made by Cosair; change these values as you wish. The AssetTag is also arbitrary but only entered if that memory slot is populated. Finally, change the Size and Speed values to better match your DIMM. If SystemInformation is run, the following is seen: In the attachment, I included the 8 DIMMs as well as one for 4 DIMMs (4 DIMM verified and fixed by djlild7hina on another forum). Inactivate either one with "#" symbol or activate by removing "#" and editing heading label to "Memory": OC-Memory-MacPro7,1.plist.zip1 point
-
quindi più costa e più gradi... sintomo di qualità e poi 110 sono sempre meno di 150 (vedi il lato positivo) sto scherzando ovviamente xP1 point
-
Un altro "mostriciattolo" ASRock 😍 😄 hai fatto bene a dirlo perchè se non erro è proprio capitato 😅1 point
-
Regolamento del Forum E’ severamente vietato: 1) Contestare pubblicamente le decisioni prese da un membro dello staff…nel caso di divergenze usate la funzione PM per contattare chi ritenete opportuno. 2) Pubblicare link o materiale pirata. (P2P, torrent, ecc..) 3) Promuovere siti, prodotti, o servizi (spamming) 4) Fare offerte di denaro di alcun tipo o richiedere denaro per aiutare 5) Postare messaggi senza senso 6) Avere account duplicati 7) Usare nome utente e/o avatar volgari 😎 I tools di Tonymacx e le EFI di Olarila non sono supportati...quindi niente "bestie"....ne "Uni..ne Multi", questo per diversi motivi 8 ) Chiedere aiuto avendo installato usando distribuzioni o con i tools. sopra citati, non avrete il minimo supporto quindi dovrete essere in condizione di usare installer ufficiali ! 10) Hackintosh è basato da anni e anni grazie alla condivisione, lavoro di tanti developers e persone, il tutto in modo gratuito. Per questo non tolleriamo chi lucra su spalle altrui come per esempio chi vende hackintosh. 11) Per scaricare da Download è richiesto un minimo di post quindi magari iniziate presentandovi alla comunità, successivamente quando i contenuti saranno validati, la sezione download verrà sbloccata in automatico. Linee Guida per postare nel forum 1. Ricordate che siete in un forum pubblico quindi educazione e rispetto verso il prossimo, devono essere al primo posto. 2. I topic devono essere aperti nella giusta sezione, dando un titolo che rispecchi il motivo per cui è stato aperto e quindi al suo contenuto 3. I post devono essere inerenti al contenuto del topic stesso 4. Anche se non siamo un forum riguardo la grammatica Italiana, siamo contro i thread o i posts scritti in fretta, male o con un uso eccessivo di abbreviazioni, ci riserviamo la capacita' di poter modificare posts e threads, senza nessun preavviso. 5. Per mantenere il forum fluido anche nei confronti di chi ha connessioni lente, è buona regola usare Spoiler in caso di contenuti molto lunghi 6.Nel caso si postasse kext o altro, è bene specificare la fonte, questo per rispetto del lavoro altrui ed anche per il fatto che sapendo la fonte, un domani un utente sappia dove trovare il Kext più aggiornato 7. Ricordatevi inoltre delle regole della "netiquette". Ad esempio scrivere tutto in maiuscolo, anche una sola parola, o anche solo il titolo, equivale ad urlare ed è considerato maleducazione estrema. Lo staff vi ringrazia per essere parte di questa comunità…e felice di migliorarla insieme a voi… 😉 Buon Hackintosh !!! ----- English ----- Forum Rules It is strictly forbidden: 1) Publicly contest the decisions made by a staff member ... in case of divergences, use the PM function to contact those you deem appropriate. 2) Publish links or pirated material. (P2P, torrent, etc. ..) 3) Promote sites, products or services (spamming) 4) Make money offers of any kind or ask for money to help 5) Posting meaningless messages 6) Duplicate accounts 7) Use vulgar username and / or avatar 😎 Tonymacx tools and Olarila's EFI are not supported ... so no "beasts" .... nor "Uni..ne Multi",this due different reasons 9 ) Ask for help having installed using distributions; you will not have the minimum support so you will need to be able to use official installers! 10) Hackintosh has been based for years and years thanks to the sharing, work of many developers and people, all for free. This is why we do not tolerate those who profit off the backs of others, such as those who sell hackintosh. 11) To download from Download area of this forum a minimum of posts is required so maybe start by introducing yourself to the community, then when the contents are validated, the download section will be automatically unlocked Guidelines for posting in the forum 1. Remember that you are in a public forum so education and respect towards others must be in first place. 2. Topics must be opened in the right section, giving a title that reflects the reason why it was opened, and its content. 3. Posts must be related to the content of the topic itself. 4. Although we are not a forum about Italian grammar, we are against threads or posts written quickly, badly or with excessive use of abbreviations, we reserve the ability to edit posts and threads, without any warning. 5. To keep the forum usable also towards those who have slow connections, it is good practice to use Spoiler in case of very long contents. 6. If you post kext or other, it is good to specify the source, this for respect of the work of others and also for the fact that knowing the source, tomorrow, a user knows where to find the most updated Kext. 7. Remember also the rules of "netiquette." For example, writing everything in capital letters, even a single word, or even just the title, is equivalent to screaming and is considered extreme rudeness. The staff thank you for being part of this community ... and happy to improve it with you ... 😉 Good Hack!!!1 point
-
0 points
-
Aggiornamento: bluetooth e webcam funzionano aggiungendo SSDT-RHUB oppure mappando le porte con UsbToolbox Tool e Kext. Wifi non si disconnette ed è stabile usando itlwm Purtroppo non riesco a far funzionare l'audio via HDMI, @Lorys89 @mbarbierato qualche idea ? (non so se c'entra ma lo schermo HDMI funziona con la risoluzione giusta {1920x1080}, però non è proprio nitido, come se fosse un pochino a bassa qualità). Allego il mio ioreg e la EFI (fatta da voi in cui ho fatto modifiche minime per i kext e le acpi) Grazie EFI.zip richibrics.ioreg.zip0 points
-
dite sempre che quei tool sono bannati perchè non fanno altro che sporcare il codice e ora tu mi consigli di fare la stessa cosa :S?0 points
-
ma lasciare il config.plist standard non equivale a sporcare il codice come fanno i tool di tonymacx86? se li avessi usati dall'inizio avrei risparmiato giorni di madonne che volavano...sono confuso per quanto riguarda l'SMbios sinceramente non so neanche da dove andare a prendere tutti i dati che richiede, faccio confusioni fra quelli reali della scheda madre e quelli fittizzi del mac0 points


.thumb.png.8b9a218ddc314bc771a27a54f13f13f4.png)


