Leaderboard
Popular Content
Showing content with the highest reputation on 05/01/2021 in all areas
-
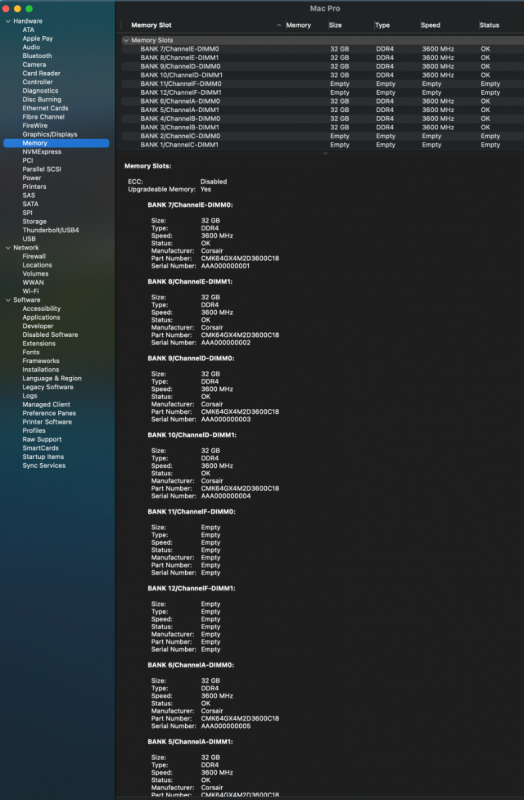
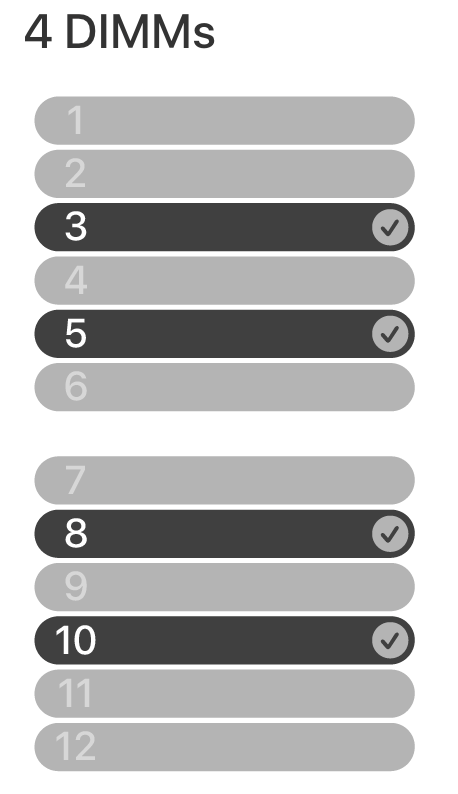
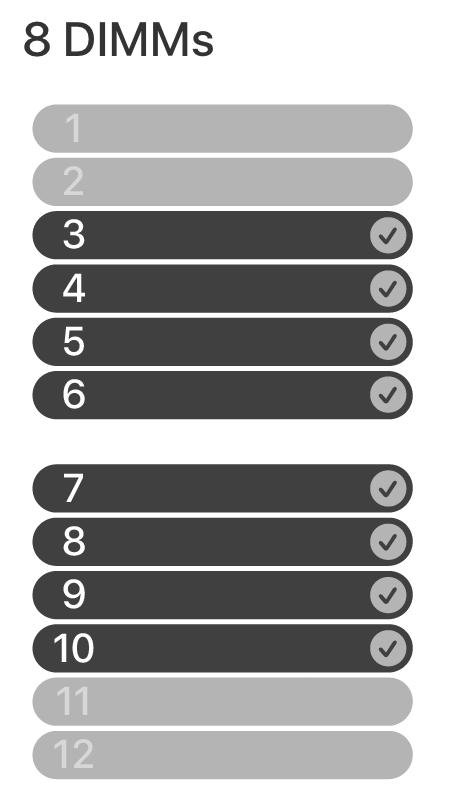
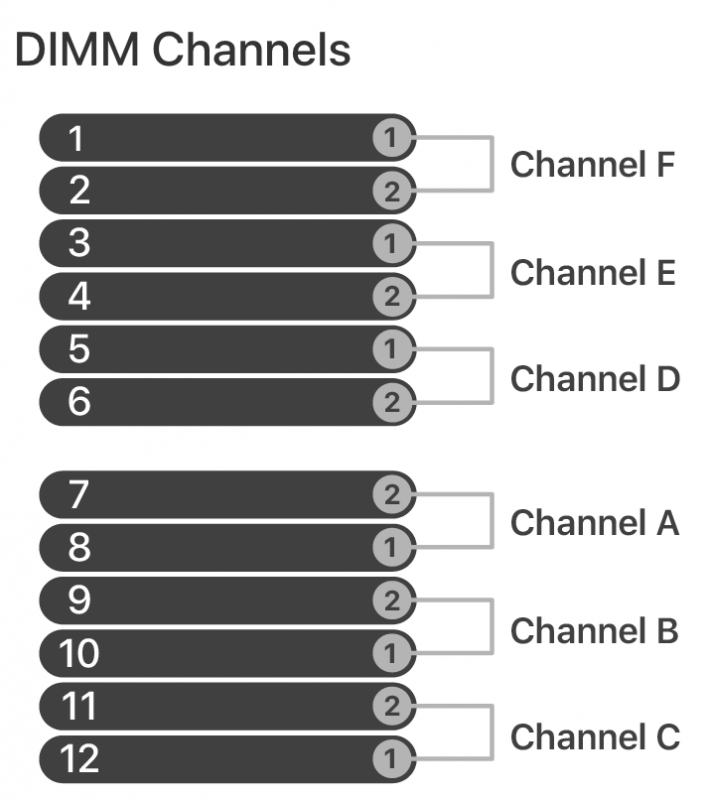
I've finally figured out how to correctly use the Memory section in OC. I decided to work on this since I've now changed to using MacPro7,1 instead of iMacPro1,1 due to the former apparently being a better match for going forward with AMD 6x00XT GPUs. If you follow this guide carefully, you will not need the kext "RestrictEvents.kext" file, and you will no longer see a memory error. I've only tested in Big Sur, but it should work under Catalina as well. Here's the guide (I've paralleled posted on another forum): OC's "BANK" numbers were re-arranged to better match the memory upgrade instructions per Apples's docs. The Bank numbers in their order of appearance are slots: 7, 8, 9, 10, 11, 12, 6, 5, 4, 3, 2, and 1. These correspond to the slot numbers on the memory board. In Apple's docs, the slots are arranged into Channels, A-F. Channel A are Banks/slots 7, 8; Channel B are 9,10; C are 11, 12; D are 5,6; E are 3,4; and F are 1,2 (see spoiler below). If properly arranged, below is what is seen with 8 DIMMs installed on my mobo. An actual MacPro7,1 has 12 slots, so our 8 DIMM slotted mobos will always have at least 4 banks empty. Now, should you only be using 4 memory sticks, then set to empty the following slots: 1, 2, 3, 5, 8, 10, 11, 12. In other words, if you are using 4 DIMMs, only slots 4, 6, 7 and 9 will be populated (thanks djlild7hina!). Note: this does not mean you physically move your DIMMs about on your mobo; this whole process is to map your DIMMs into software locations where the macOS is expecting them to be positioned. Keep your DIMMs physically where the mobo manual recommends. The code within OC is shown in excerpt below (the full code is downloadable as an attachment). Add it enbloc as the "Memory" section within the PlatformInfo section (also make sure to enable "CustomMemory"). The SNs are arbitrary (add your actual ones if you're more OCD than me). The part numbers are mine as used, made by Cosair; change these values as you wish. The AssetTag is also arbitrary but only entered if that memory slot is populated. Finally, change the Size and Speed values to better match your DIMM. If SystemInformation is run, the following is seen: In the attachment, I included the 8 DIMMs as well as one for 4 DIMMs (4 DIMM verified and fixed by djlild7hina on another forum). Inactivate either one with "#" symbol or activate by removing "#" and editing heading label to "Memory": OC-Memory-MacPro7,1.plist.zip4 points
-
1 point
-
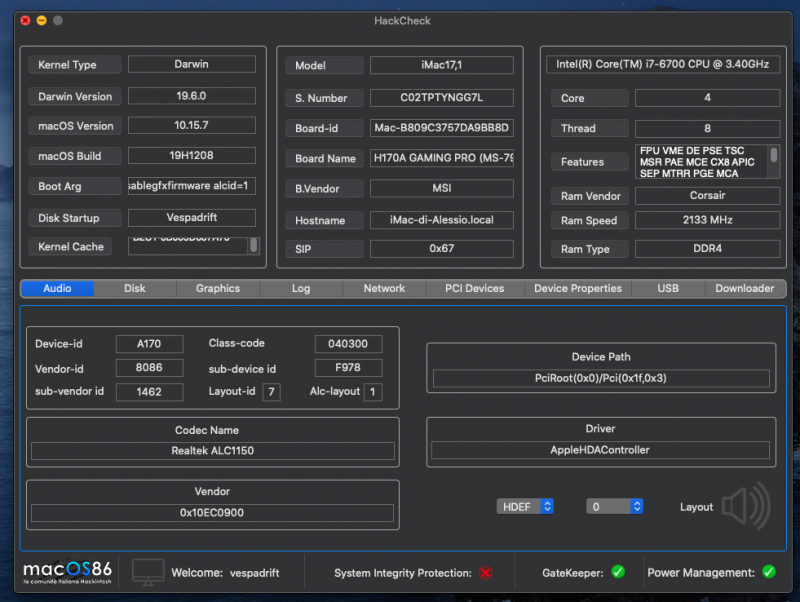
ALC-LAYOUT 1 dovresti essere a posto cosi' se no clicca sull altoparlante e vedi i layout disponibili per il codec ALC1150 e provi a cambiarli , tramite hack check1 point
-
Hai clover giusto , cancellalo da boot-arg prima era impostato cosi' nella efi che hai postato prova , non uso clover sorry a ok. bene infatti ti conviene aggiornare clover e tutti i kext https://github.com/CloverHackyColor/CloverBootloader/releases/tag/5134 configurazione Quirks e Plist https://www.macos86.it/topic/3647-clover-quirks-plist-setting/?tab=comments#comment-89961 adesso e' possibile validare il plist con ocvalidate 😂 ops sorry CloverConfigPlistValidator1 point
-
1 point
-
se rilevava il codec audio (pero' vedo che non lo rileva) cliccando sull altoparlante ti mostrava i layout disponibili1 point
-
prova a mettere ALC come kext e in boot-arg alcid=1 https://github.com/acidanthera/AppleALC/releases/tag/1.5.9 per sapere il codec che usa e il layout , scarica dopo aver riavviato https://www.macos86.it/files/file/95-hack-check/1 point
-
I haven't used it a great deal but it seems very stable atm, in other words it hasn't crashed on me. I updated the BIOS to F4Q and some of the MMIO values changed and these have been incorporated into the EFI. If you therefore use it as is you will need to update to F4Q, or copy the MMIO section from the previous 0.6.7 EFI to stick with F4P. I also haven't got round to changing it to the nice icons yet so it is using the text mode picker. As OC 0.6.9 will be release next week I was leaving it until then to change the picker mode to the icons whilst I am making the other changes that will be necessary. As for the install, you can either register your machine in the beta program and update that way, or my preferred way, you can download the full installer and run that. With the full installer you could either upgrade your current install (just select your 11.3 drive when it asks where you want to install it) or do a full new install to another drive or container.1 point
-
1 point
-
1 point
-
Grazie per il grande supporto. Con questo sono stato in grado di completare con successo il mio primo progetto Hackintosh. Buonissimo, continua a questo modo. Sono contento di ogni aggiornamento. Tanti saluti di Germania.1 point
-
No è corretto per avere una buona usabilità, ti permette di avviare senza avere performance molto basse avviando con OpenHfsPlus che è open source e non "ottimizzato" da Apple1 point
-
1 point
-
Disabilita il CSM sul bios, imposta DVMT a 64mb metti primaria IGPU usa un cavo hdmi per collegarti al monitor sostituisci il config e riprova config.plist.zip1 point
-
Sì, è chiaro che Tony Manero e le sue bestie non sono accettate. Ormai la mia macchina è convertita ad OpenCore e non utilizza più alcuno dei suoi strumenti1 point
-
Come ogni primo lunedì del mese è stato rilasciato OC e i relativi kext. Potete trovare nel primo post la EFI con OC 0.6.8 e i kext aggiornati ad oggi. Buon proseguimento 🙂1 point
-
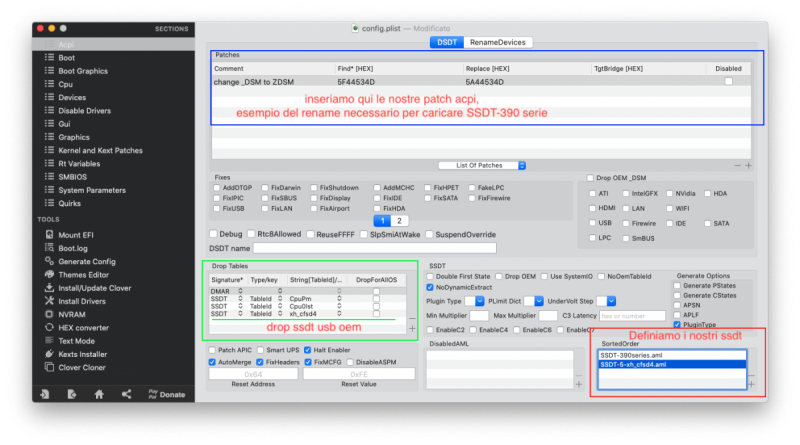
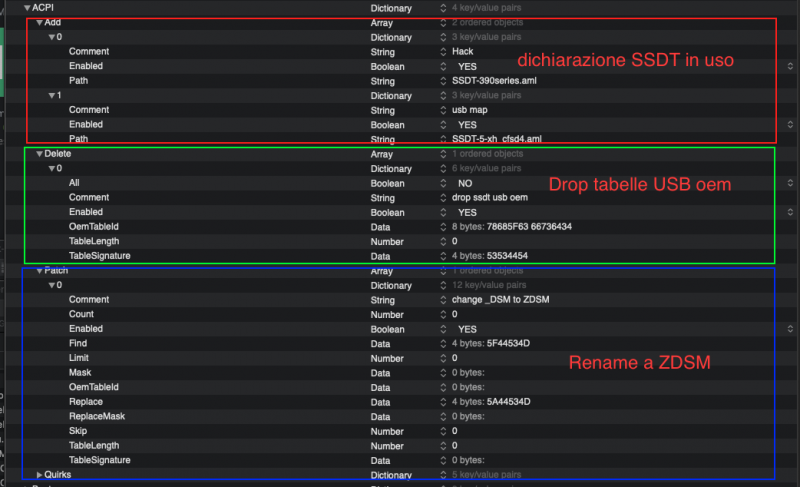
Qualsiasi cosa si faccia, sia per aggiornamento del bootloader stesso, sia per il passaggio a un altro, va sempre mantenuto la propria “base” già configurata, qualora ne avessimo una Cosi si intende con questo? Quali sono le cose “Base”? Kexts: quelli che uso, li userò sia per aggiornamenti, sia per cambio del bootloader. ACPI: usiamo SSDT? DSDT e SSDT? Bene anche qui bisognerà continuare a usare li stessi Grafica, è la stessa cosa ACPI Prendiamo come esempio l’uso su clover di: SSDT-390series.aml SSDT mappatura che nell’esempio casuale sarà questo SSDT-5-xh_cfsd4.aml OpenCore Collochiamo i “nostri” ssdt in EFI/OC/ACPI Passiamo alla configurazione del config.plist: parte ACPI/ADD qui ci deve essere definito i due ssdt citati sopra parte ACPI/Delete qui ci va il droptable come si ha su clover, ossia tableID xh_cfsd4 xh_cfsd4 questo va convertito da string a esadecimale, quindi in OemTableD si dovrà mettere -> 78685F63 66736434 in caso di uso di Lenght al posto di tableID, questo sarà la medesima cosa. Parte ACPI/Patch qui ci dovrai mettere il rename _DSM to ZDSM Clover Collochiamo i nostri SSDT in EFI/Clover/ACPI/Pathed Configurazione del config.plist Parte ACPI/ Drop Table: qui ci va il droptable come si ha su Opencore, ossia 78685F63 66736434 che trasformato da esadecimale a string avremo: xh_cfsd4 in caso di uso di Lenght al posto di tableID, questo sarà la medesima cosa. Parte ACPI/SortedOrder: qui definiamo i due SSDT che abbiamo in uso Parte ACPI/Patch qui ci dovrai mettere il rename _DSM to ZDSM Queste immagini mostrano la medesima cosa fatta con un bootloader oppure con l'altro Parte quirk. Clover, usate le medesime di Opencore che trovate in Kernel/quirk e in altre sezioni del config Ovviamente come detto prima, vale la stessa cosa per la situazione opposta. Parte Boot-arg Clover la troviamo in Boot/boot arguments Opencore: la avremo in Nvram/Add/7C436110-AB2A-4BBB-A880-FE41995C9F82/boot-arg Parte grafica: Clover: Devices/Device properties Opencore: DeviceProperties/Add Nota: in caso non si usasse su clover deviceproperties, allora la parte Graphics del config dovrà essere trasformata in properties (se ne consiglia l'uso in entrambi i bootloader) SMbios: Clover ->SMbios Opencore -> PlatformInfo/Generic (compilare solo questa parte e mettere Automatic YES PowerManagement: Clover: pluginType Opencore: SSDT (SSDT-PM-ALL che trovate in download), dovrà essere definito in ACPI/ADD come da immagine sopra Nota: se ne consiglia l'uso per entrambi i bootloader, in caso di clover omettere il fix sul config e definiamolo in sortedOrder come da immagine sopra.1 point
-
Un saluto a tutti... Vi informo che nel forum è stata integrata una chat accessibile solo per membri.. Questo è un servizio offerto in più per poter parlare velocemente anche di cose che alla fine non riguarderebbero hackintosh, cose che per esempio su uno stesso topic sarebbero OT...etc Non è però un sostituto del forum stesso ;) Lo "stile" della chat si adegua allo stile del forum scelto da ogni singolo utente Il regolamento vale anche li.. Rispettatevi l'uno con l'altro in primis...etc etc... Faccio un ringraziamento a @Ciro82[/mention] Il suo contributo è sempre prezioso emoticon_thanks Vi auguro un buon divertimento e... Buon Hackintosh a tutti !! emoticon_festa1 point
-
0 points
-
Beh dai, credo che i rename basici le conosci già e inoltre molti altri è solo ed esclusivamente estetica Magari per hackintosh bastassero solo i rename... sarebbe una "pacchia" emoticon_sorriso0 points


