Leaderboard


Popular Content
Showing content with the highest reputation on 01/21/2021 in Posts
-
Motherboard: Gigabyte B550 Aorus Pro | rev. 1.0 CPU: Ryzen 7 3700x GPU: Sapphire RX5500 XT RAM: 32 GB 3200 Festplatte: M2 1TB Audio Device: ALC 1220 macOS Version: 11.0.1 (20B29) SMBIOS: iMacPro 1.1 macPro7.1 OpenCore Version: v0.6.0 v0.6.2 v0.6.4 Hello, everyone, I finally got my system (Ryzen3700x, B550AorusPro, RX5500XT) up and running - everything works, including (Sound,Bluetooth,CPU_Temp,etc). For all who are not so patient I provide my debug-EFI. Who still has tips and optimizations, can share them with me, especially regarding USB-mapping. So, now have fun!Update 10.19.20: Everything works except Sleep.The PortMapping works.Best regards Fooose LAN-Fix-Realtek® 2.5GbE LAN : open Terminal: "sudo ifconfig en0 media 1000baseT mediaopt full-duplex"Thanks DSM2!I have taken these settings from this post: #1Bios: Version: F11b 10/19/2020 Major settings to be changed based on the default optimal settings: deactivate I2C and ESPI (essential to solve the random freeze problem) it must be in BIOS (advanced mode) under Settings -> AMD CBS -> FCH Common Options if applicable, set PCIe slot to Gen4 instead of Auto (may contribute to a better stability) enable X.M.P. memory profile disable trusted computing disable wake and boot over LAN enable power loading in Platform Power settings (may contribute to a better stability) setup fan profiles Other relevant default settings: Above 4G Decoding: disabled XHCI Hand-off: enabled HPET: enabled CSM support: enabled EFI_OC_0.6.4_B550AorusPro.zip2 points
-
That’s I’m greatful for all your time and research , the efforts is greatly appreciated, I’m working on fine tuning to get stable system Thanks very much, you’re a big help, now I must learn to mentain and update it as new OS becomes available2 points
-
XFX Speedster MERC319 AMD Radeon RX 6900 XT ULTRA a 1618€ praticamente regalata https://www.amazon.it/dp/B08Q9SCPGD/ scaffale scaffale scaffale... vedi poi come si abbassano i prezzi1 point
-
Agesa security fix and different memory location adjustment no other idea for shutdown problem.. could you detach usb audio card or it is only and USB Headphone?1 point
-
sorry it is a pretty similar config which I use If you can try all things as we said and if it works ok you can stay with that old bios if not you should update to latest one which introduces a new agesa..and probably you have to modify then your MMIO values1 point
-
wait I have done a mistake config.plist 2.zip @eye2eyespy this should be fine1 point
-
may I ask also which bios version do you have form trx40 Pro 10G? also cpu cooler model thanks1 point
-
If you want, following above indication and after a backup of your EFi try to boot from this EFI, replace entirely yours: if it boots try: shutdown and restarts sleep/wake audio thank you EFI_eye2.zip1 point
-
I see by now you have an USB audio device (external?) TX-Hifi Type C audio also this device could be affected from problems I have written above..so disconnect in a cold boot it oer only jack where you have inserted your speaker1 point
-
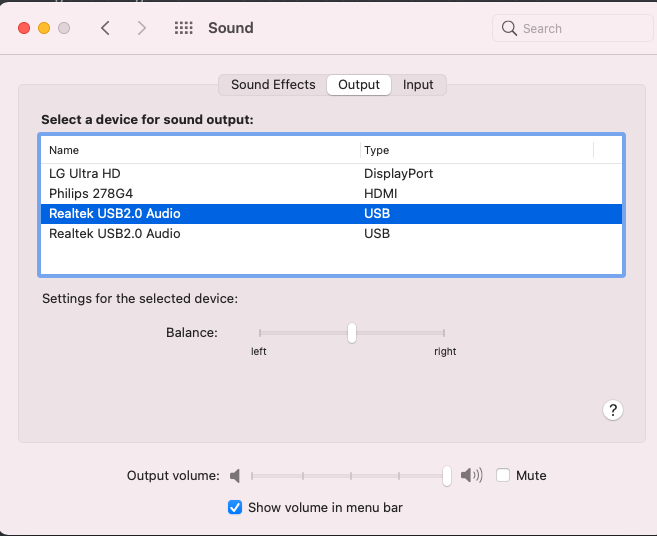
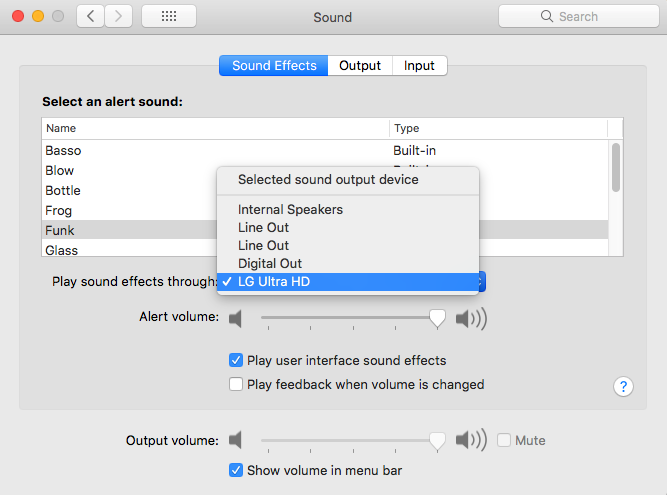
I miss only your CPU cooler if it has some weird USB connection 1) audio what do cpu mean? in ideal condition you must see a condition like this one: LG Ultra HD is my 4k monitor with display port audio working It needs APPLEALC.kext Realtek USB2.0 audio is our internal audio It doesn't need of above kext or alcid parameter to work well (it uses apple USB audio stuff) your speaker should create some problems if connected to rear green port in a cold boot , if you start your system with green jack disconnected and then the system is started you connect it..you should have proper audio To solve this I have connected my speaker to my core X9 case speaker jack, no problem in cold boot with this I have no tested with latest Big Sur but till Catalina problem is there for internal audio and green speaker jack detection about MMIo, any changement in the system could contribuite to change MMIO values, overall first one we free for OSX from virtualised area (skip 1) if this happen shutdown, restart, sleep wake could fail Sleep /wake in Catalina is problematic...same efi and kext produce no sleep in Catalina but it works in BigSur I will try to adapt my same EFi with your MMIO, updating opencore, drivers and kext
 1 point
 -
So is it worst than before? post actual config.plist and also exact configuration and slot position for gpu or all cards you have in pc also nvme disk and cpu cooler thank you1 point
-
@eye2eyespy one step to solve and then we go on our goal is put 4g on on bios delete npci=0x2000 form boot arg if you put 4g on we have (maybe rebuild correct MMIO) you are talking then of BT and wifi..TRX40 pro 10g has not these features so if you want follow for bios settings this link: then post again log1 point
-
You need 1/2 post to have access to download section1 point
-
App updated (1.0.7) to support 10.15.5 download (full and reinstall mode)1 point
-
Useful links: https://pve.proxmox.com/wiki/Main_Page macOS86.it Useful Links https://www.macos86.it/files/file/81-vm-assistant/ https://www.macos86.it/files/file/3-dpcimanager/ https://www.macos86.it/files/file/20-opencore-efi-maker/ https://www.youtube.com/channel/UCN_fzD5ZSF8W3kaVWLUd5Aw https://www.macos86.it/topic/2509-guide-trx40-osx-bare-metal-proxmox-setup61-3/ https://www.macos86.it/topic/2675-proxmox-ve-osx-guide-discussion/1 point
-
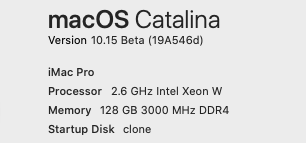
updated to latest Catalina's beta All Is fine
1 point
-
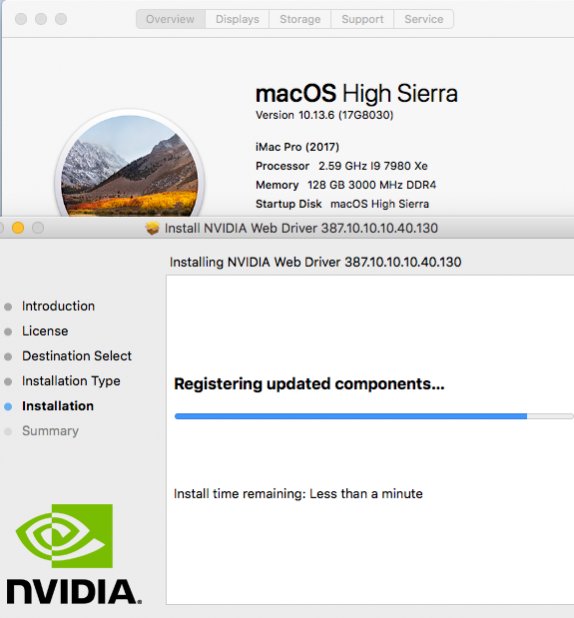
Rig updated to latest High Sierra security patch Also Nvidia wed driver update went fine
1 point
-
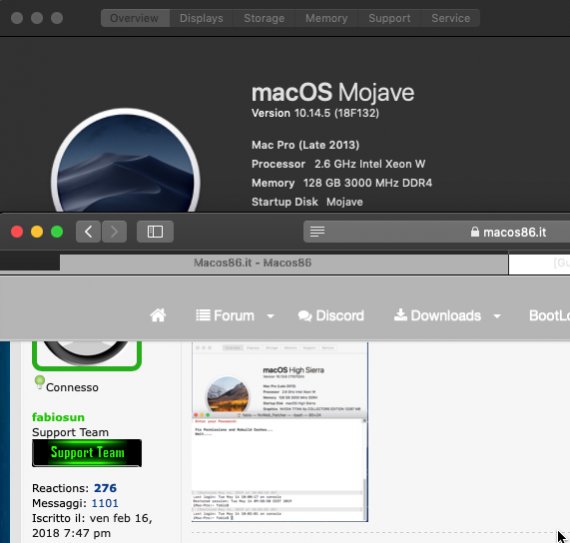
Updated to latest Mojave (10.14.5) using @Gengik84 Mojave HFS+ 1.5 script you can find in download section. Patched Nvidia driver to have full display resolution on both my monitors ( @Gengik84 NvWeb_Patcher script used for this task as usual)
1 point
-
Thanks to @Gengik84 to have found this way to solve a very annoying problem This is a pretty simple way to have a working ethernet Gigabit card using one of the most powerful ASUS x299 motherboard without using any flash or patching other than three attached kext 1) SmallTreeIntel8259x.kext v.3.3.15 2) FakePCIID_Intel_GbX.kext (thanks to rehab man) 3) FakePCIID.kext (thanks to rehab man) kexts in point 2 and 3 go in L/E (then use kextrepair app to repair permissions and rebuild caches) download from download section Kext&repair V2.2 and DPCI manager to see our ethernet device ID see this pictures then you have to modify accordly FakePCIID_Intel_GbX.kext info.plist and SmallTreeIntel8259x.kext info plist as pictures below here are kext used in this guide SageGigabit ehernet.zip1 point
-
added some infos on gpt Windows driver conversion and relative new clover boot menu entry Ha scritto dopo 40 secondi: https://www.windowscentral.com/how-convert-mbr-disk-gpt-move-bios-uefi-windows-10#covert_mbr2gpt_windows10">https://www.windowscentral.com/how-conv ... _windows10">https://www.windowscentral.com/how-convert-mbr-disk-gpt-move-bios-uefi-windows-10#covert_mbr2gpt_windows101 point
-
when you update bios you have to put back the same options you have had with previous one (overall in USB settings and in boot priority settings) and all will be ok as before Also CSM could be a problem for you with your AMD GFX, with GTX you shouldn't have any problem to boot in each bios gigabyte did for our board I am usin f4c bios but also with latest F4i my ssdt is working1 point
-
Hi I do not know if a patch for USB port limit exists in Mojave In my case I do not use any patches because I have remapped my USB as you can find in this guide All USB are working fine (USB 2/3) I have created a SSDT for it and with this no portlimit patches is needed By now I am working on a big project on Windows so I cant share for now any EFI but it is very simple no strangeness on it I will put it as soon I can Ha scritto dopo 3 minuti 35 secondi: for USB problem, if you have High Sierra you can use this tutorial to have all working and used USB also inside Mojave (SSDT is independent) https://www.macos86.it/viewtopic.php?f=68&t=702">viewtopic.php?f=68&t=702">https://www.macos86.it/viewtopic.php?f=68&t=7021 point
-
All is fine with latest security update and latest Nvidia web drivers https://postimg.cc/LhhtLqz0">1 point
-
Ciao KK89 take a look here comment = "_cpuid_set_info_rdmsr"; // PMheart: attempt to add 10.14 compatibility if (os_version >= AsciiOSVersionToUint64("10.12") && os_version - // 10.12 - 10.13 + // 10.12 - 10.14 STATIC UINT8 find[] = { 0xB9, 0xA0, 0x01, 0x00, 0x00, 0x0F, 0x32 }; STATIC UINT8 repl[] = { 0xB9, 0xA0, 0x01, 0x00, 0x00, 0x31, 0xC0 }; applyKernPatch(kern, find, sizeof(find), repl, comment); @@ -1065,9 +1066,10 @@ DBG("KernelIvyBridgeXCPM() return TRUE; } - + DBG("Searching _xcpm_pkg_scope_msr ...\n"); if (os_version >= AsciiOSVersionToUint64("10.12")) { + // 10.12+ patchLocation = 0; // clean out the value just in case for (i = 0; i if (kern[i+0] == 0xBE && kern[i+1] == 0x07 && kern[i+2] == 0x00 && kern[i+3] == 0x00 && @@ -1096,14 +1098,14 @@ STATIC UINT8 find[] = { 0x83, 0xC3, 0xC4, 0x83, 0xFB, 0x22 }; STATIC UINT8 repl[] = { 0x83, 0xC3, 0xC6, 0x83, 0xFB, 0x22 }; applyKernPatch(kern, find, sizeof(find), repl, comment); - } else if (os_version >= AsciiOSVersionToUint64("10.12.6") && os_version - // 10.12.6 - 10.12.x + } else if (os_version + // 10.12.6 STATIC UINT8 find[] = { 0x8D, 0x43, 0xC4, 0x83, 0xF8, 0x22 }; STATIC UINT8 repl[] = { 0x8D, 0x43, 0xC6, 0x83, 0xF8, 0x22 }; applyKernPatch(kern, find, sizeof(find), repl, comment); + // PMheart: attempt to add 10.14 compatibility } else if (os_version - // PMheart: attempt to add 10.14 compatibility - // 10.13.x/10.14.x + // 10.13/10.14 STATIC UINT8 find[] = { 0x89, 0xD8, 0x04, 0xC4, 0x3C, 0x22 }; STATIC UINT8 repl[] = { 0x89, 0xD8, 0x04, 0xC6, 0x3C, 0x22 }; applyKernPatch(kern, find, sizeof(find), repl, comment); and focalize this line : comment = "_cpuid_set_info_rdmsr"; // PMheart: attempt to add 10.14 compatibility if (os_version >= AsciiOSVersionToUint64("10.12") && os_version - // 10.12 - 10.13 + // 10.12 - 10.14 STATIC UINT8 find[] = { 0xB9, 0xA0, 0x01, 0x00, 0x00, 0x0F, 0x32 }; STATIC UINT8 repl[] = { 0xB9, 0xA0, 0x01, 0x00, 0x00, 0x31, 0xC0 }; applyKernPatch(kern, find, sizeof(find), repl, comment); this code is from /rEFIt_UEFI/Platform/kernel_patcher.c inside clover so if you check KERNELXCPM flag it uses all patches it thinks useful for detected cpu Cupid_set_info_rdmsr will be : find B9A00100000F32 Repl B9A001000031C0 I hope this can help to understand ;) Ha scritto dopo 19 minuti 24 secondi: attached c files where you can locate all patches used for Broadwell and other cpu1 point
-
no kingkong I am happily married :) please you have to discover correct patches for you..follow this forum because here there is great people and your EFI need a great help and cleaning :)1 point
-
emoticon-personaggi_89 remember also for now no Nvidia drivers are available1 point
-
Far away from my pc by now I will check later For now take a look here https://pikeralpha.wordpress.com/2016/07/26/xcpm-for-unsupported-processor/">https://pikeralpha.wordpress.com/2016/0 ... processor/">https://pikeralpha.wordpress.com/2016/07/26/xcpm-for-unsupported-processor/ Also you can find xx in your old patches1 point
-
Hi KingKong nice to see you here :) post your actual efi Ha scritto dopo 5 minuti 50 secondi: remember also you have to change some kernel patches if you are using some ;) Ha scritto dopo 7 minuti 34 secondi: @sherloks posted a summary in other forum : here is xcpm patch for 10.14 B9A00100 000F32 B9A00100 0031C0 cpuid_set_info_rdmsr © vit9696 B9E20000 000F30 B9E20000 009090 xcpm_idle_wrmsr © Pike R. Alpha B9980100 000F32 B9980100 0031C0 xcpm_assert_rdmsr © Sherlocks BE0B0000 005DE908 000000 BE0B0000 005DC390 909090 xcpm_SMT_scope_msrs © Pike R. Alpha 04723CD0 04XX3CD0 XX cpuid_set_info © Pike R. Alpha 89D804C4 3C22 89D804XX 3C22 XX xcpm_bootstrap © Pike R. Alpha B9990100 000F30 B9990100 009090 xcpm_assert_wrmsr © Sherlocks BE030000 0031D2E8 91FCFFFF BE030000 0031D290 90909090 xcpm_core_scope_msrs © Pike R. Alpha 554889E5 41574156 41554154 53504189 D64889FB 4189F54C 8D3D6257 C39089E5 41574156 41554154 53504189 D64889FB 4189F54C 8D3D6257 xcpm_program_msrs © Pike R. Alpha BE070000 0031D2E8 AEFCFFFF BE070000 0031D290 90909090 xcpm_pkg_scope_msrs © Pike R. Alpha BE0B0000 0031D2E8 7EFCFFFF BE0B0000 0031D290 90909090 xcpm_SMT_scope_msrs © Pike R. Alpha C1E30848 63D389D0 48C1EA20 B9990100 000F3048 FF05938D 76004883 C4085B5D C30F1F40 00 B800FF00 004863D3 89D048C1 EA20B999 0100000F 3048FF05 938D7600 4883C408 5B5DC390 90 xcpm_assert_perf_max © PMheart 8A0284C0 7442 8A0284C0 EB42 Disable panic kext logging on 10.14 Release kernel © vit96961 point
-
New installation on NVME disk (10.13.6 hfs+) good speed https://postimg.cc/F707rnMw">1 point
-
Thank you Giacomo added to my X299 guide1 point
-
Stimolated from some @Gengik84[/mention] researches in my original dsdt I will try to apply to my rig USB mapping to stay within 15 port OSX limit and to have a more conformed Hackintosh to a real Mac I will not use a complete real mapping method but I will use @PMheart[/mention] port limit kext patch disabler to see all USB ports available and used in my original dsdt, see pictures: In this pictures you can see how my USB situation is only using @PMheart[/mention] kext to patch also you can use it to see USB connected or used by Gigabyte motherboard In my rig HS05,HS07, HS08,HS13,SS05 are taken in some way from my system (mouse, keyboard some gigabyte internal hub) I know also I need to have HS01,HS02,HS03,HS04 and relative SP01,02,03,04 because I tested with usb pen and these ports are related to my External case USB ports I use and this will be final result of ports mapping with a single ssdt: As you can see all port I want are there 🙂 Go on and you will learn "How to" for your system Restart your system Now we will populate our clover Origin folder In clover bootmenu press F4 key to save our original dsdt files Inside origin folder we will find an aml file with inside all our USB ports with their names See file attached: https://s15.postimg.cc/z9z9l5myv/Screen ... .14_AM.png">https://s15.postimg.cc/z9z9l5myv/Screen_Shot_2018-09-02_at_10.26.14_AM.png' alt='LINK_TEXT>'> and to some values we have to edit to disable port we want to disable As you can see X299 Designare Ex SSDT for USB has inside all USB and more available in this motherboard Checking IOREG with @PMheart[/mention] port limit disabler enabled helps to verify which ports are in use or not (also for internal motherboard stuff as hub or similar. Now see above picture we have HSXX ports (XX=from 01 to 14) and SSXX Ports (XX= from 01 to 10) HSXX=USB 2.0 ports SSXX=USB 3.0 Ports USR1 and 2 are USB 3.1 ports[dropshadow=blue] (da controllare)[/dropshadow] You have to use MaciASL app to analyze attached original ssdt above Now we want to disable HS01 port underlined on pictures above (only for understanding method) Check GUPC value on the left is 0x01, It means "port Enabled" put it to Zero (written in this way, in letter with capital Z) and in this way you have disabled it In the same way, to have a proper ssdt.aml files to put inside clover/ACPI/Patched folder we have also to do here a proper rename from PC00 to PCI0 You can do it using find and replace function from Edit MaciASL's menu and you should have something like picture below: after replacing and disabling ports you want you should have an ssdt like this one : and this is file you can put in your clover/ACPI/PATCHED folder Before reboot your system you have to apply some changes in your config.plist file You can do easily with Clover Configurator and following this good guide here from @Gengik84[/mention] https://www.macos86.it/viewtopic.php?p=346#p346 to summarize: extract origin and copy you ssdt- AMI.aml file on your desktop Check value you can see on attached picture (2390 in this case) and open your config .plist and do this two changements: SSDT-11.aml should be the same name of your ssdt in EFI ACPI/Patched folder You should also disable port limits patch: save and reboot If you have done all in a right way for your system you should have a corrected USB mapping without using any port limit or old method to do it If something is not correct you can disable ssdt and config.plist option in clover bootmenu option and re test again To have support here you must have in your signature your system definition, you have also to post your ioreg with all USB port you use (preferably using ports limit patch to see all USB available) Your Origin (F4 press stuff) Have a nice Hack! SSDT-A M I.aml.zip1 point
-
interesting tools to configure properly lanes cpu/GPU/Nvme To achieve optimal performance for pciexpress slot for X299 Gigabyte owners https://www.gigabyte.com/FileUpload/global/MicroSite/473/x299.html1 point
-
10.13.6 final Updated without any problem1 point
-
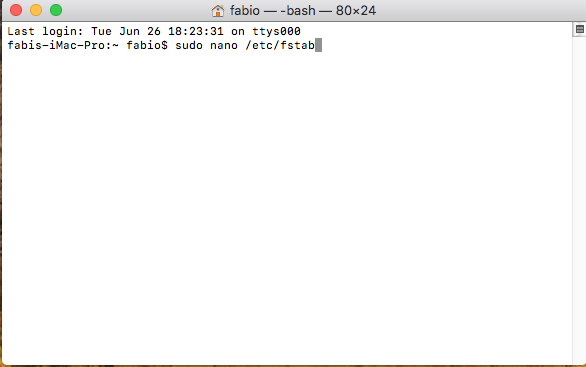
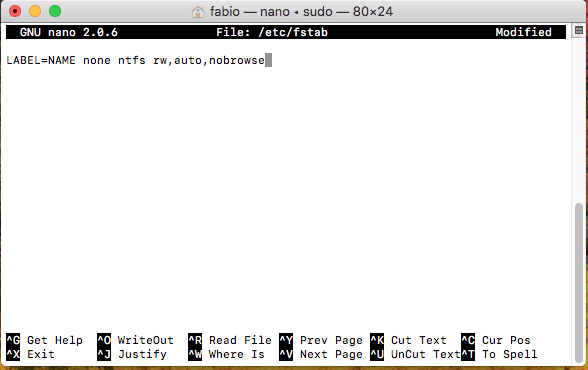
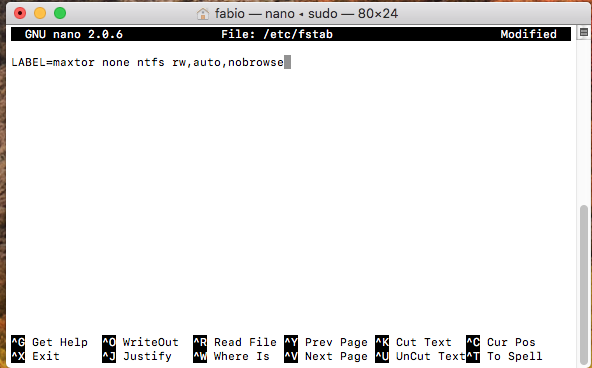
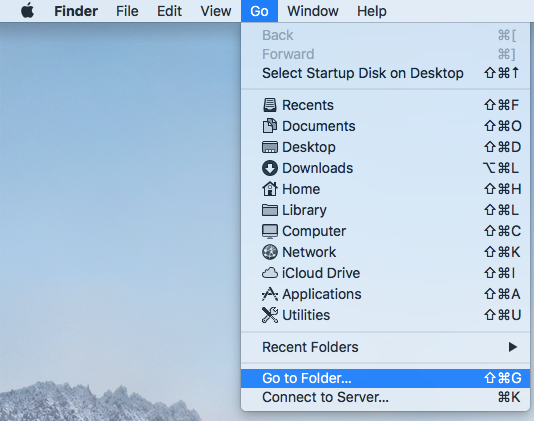
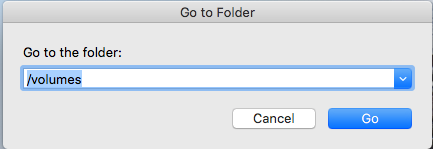
In this mini guide I will help you to have a functional read/write way about writing NTFS drive Many of us use a multi boot with also windows OS and some time it could be useful to write on this NTFS disk from OSX There are different and not free tools, this feature instead is a free one and it is inside your OSX from 10.11 and greater Pro: Vs: Beta support from apple to access NTFS disk you have to navigate with /Volumes (GO/Go to folder /Volumes Open a terminal window and type sudo nano /etc/fstab put your password You will see fstab app interface as picture below where NAME is the name of your NTFS disk in my case maxtor (see pictures below) and press go
1 point
-
Per il problema con HFS+ ho fatto un clone su un disco HFS e tutto funziona bene ora ho Mojave in HFS Con Carbon Copy cloner1 point
-
se non lo hai fatto sostituisci questi file (file boot zip) con quelli che hai nella chiavetta https://www.macos86.it/viewtopic.php?f=72&t=443#p6830">viewtopic.php?f=72&t=443#p6830">https://www.macos86.it/viewtopic.php?f=72&t=443#p6830 Ha scritto dopo 41 secondi: e non smanettare troppo che vengono le occhiaie :P Ha scritto dopo 56 secondi:1 point
-
premi spazio nel boot menu ed attivi debug in basso Ha scritto dopo 18 secondi: se c'e' un KP si germa di solito Ha scritto dopo 1 minuto 29 secondi: al momento per apfs credo l'unica sia installare e poi clonare su un disco hfs+ pero' su Mojave non ho provato1 point
-
apple software render..per la grafica :( https://postimg.cc/image/5byytq507/">1 point
-
Giacomo..ti sei incagliato? :P basta sostituirlo a cloverX64.efi?1 point
-
https://postimg.cc/image/99d1raxiv/">1 point
-
controlla mail Ha scritto dopo 26 secondi: https://postimg.cc/image/jtidwin13/"> adieu Ha scritto dopo 4 minuti 35 secondi: niente al restart mi ha dato un errore crea i file in installmacos ma niente icona da cui partire1 point
-
pero' scrive sui dischi... dimmi come che non va avanti te lo avevo scritto Ha scritto dopo 1 minuto 5 secondi: in che dmg sta intendo1 point
-
giacomo e' silenzioso..sarà già partito? :)1 point
-
https://postimg.cc/image/91kthgpl3/"> Ha scritto dopo 11 secondi: https://postimg.cc/image/lg7lht48n/"> Ha scritto dopo 3 minuti 17 secondi: Re: BETA 10.14 Mojave https://postimg.cc/image/4478w7apj/"> arrivooooo1 point
-
https://postimg.cc/image/xtkfocyyf/">1 point
-
https://postimg.cc/image/9aie734uv/"> grazie a gengik84....1 point
-
updated to 10.13.5 all is fine1 point
-
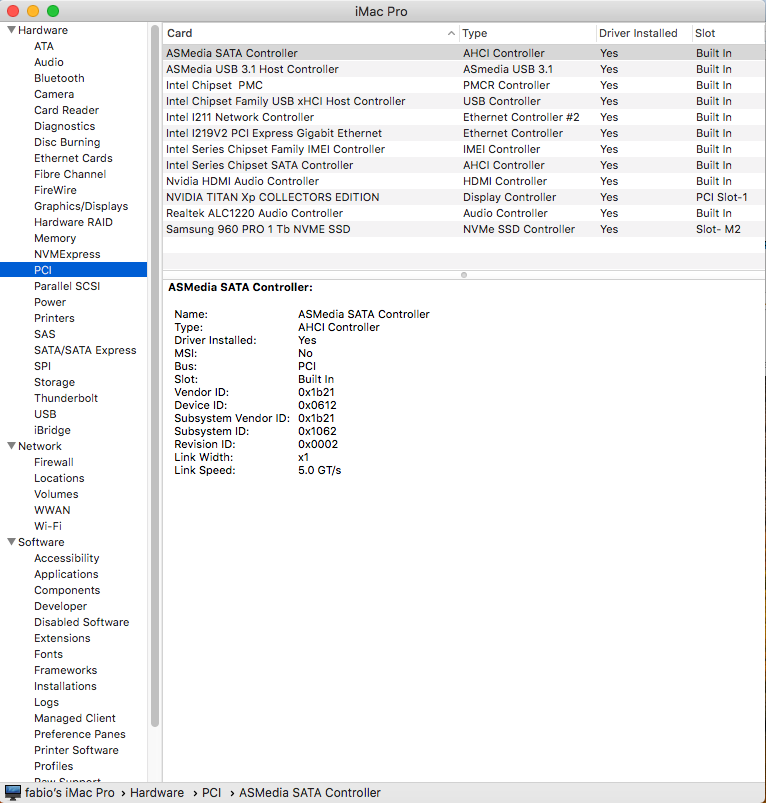
Thank you Without DSDT I see only Nvidia related things in PCI. No others1 point
-
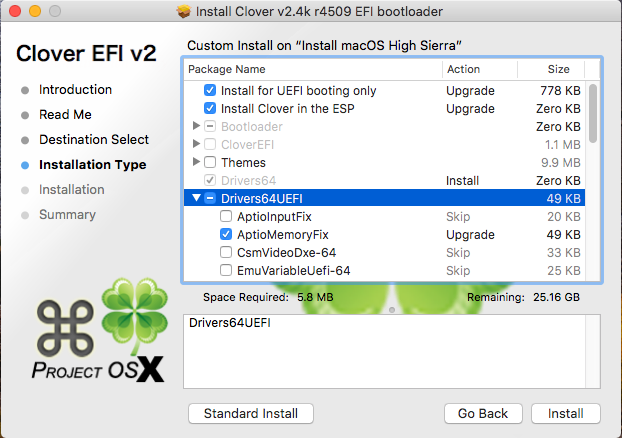
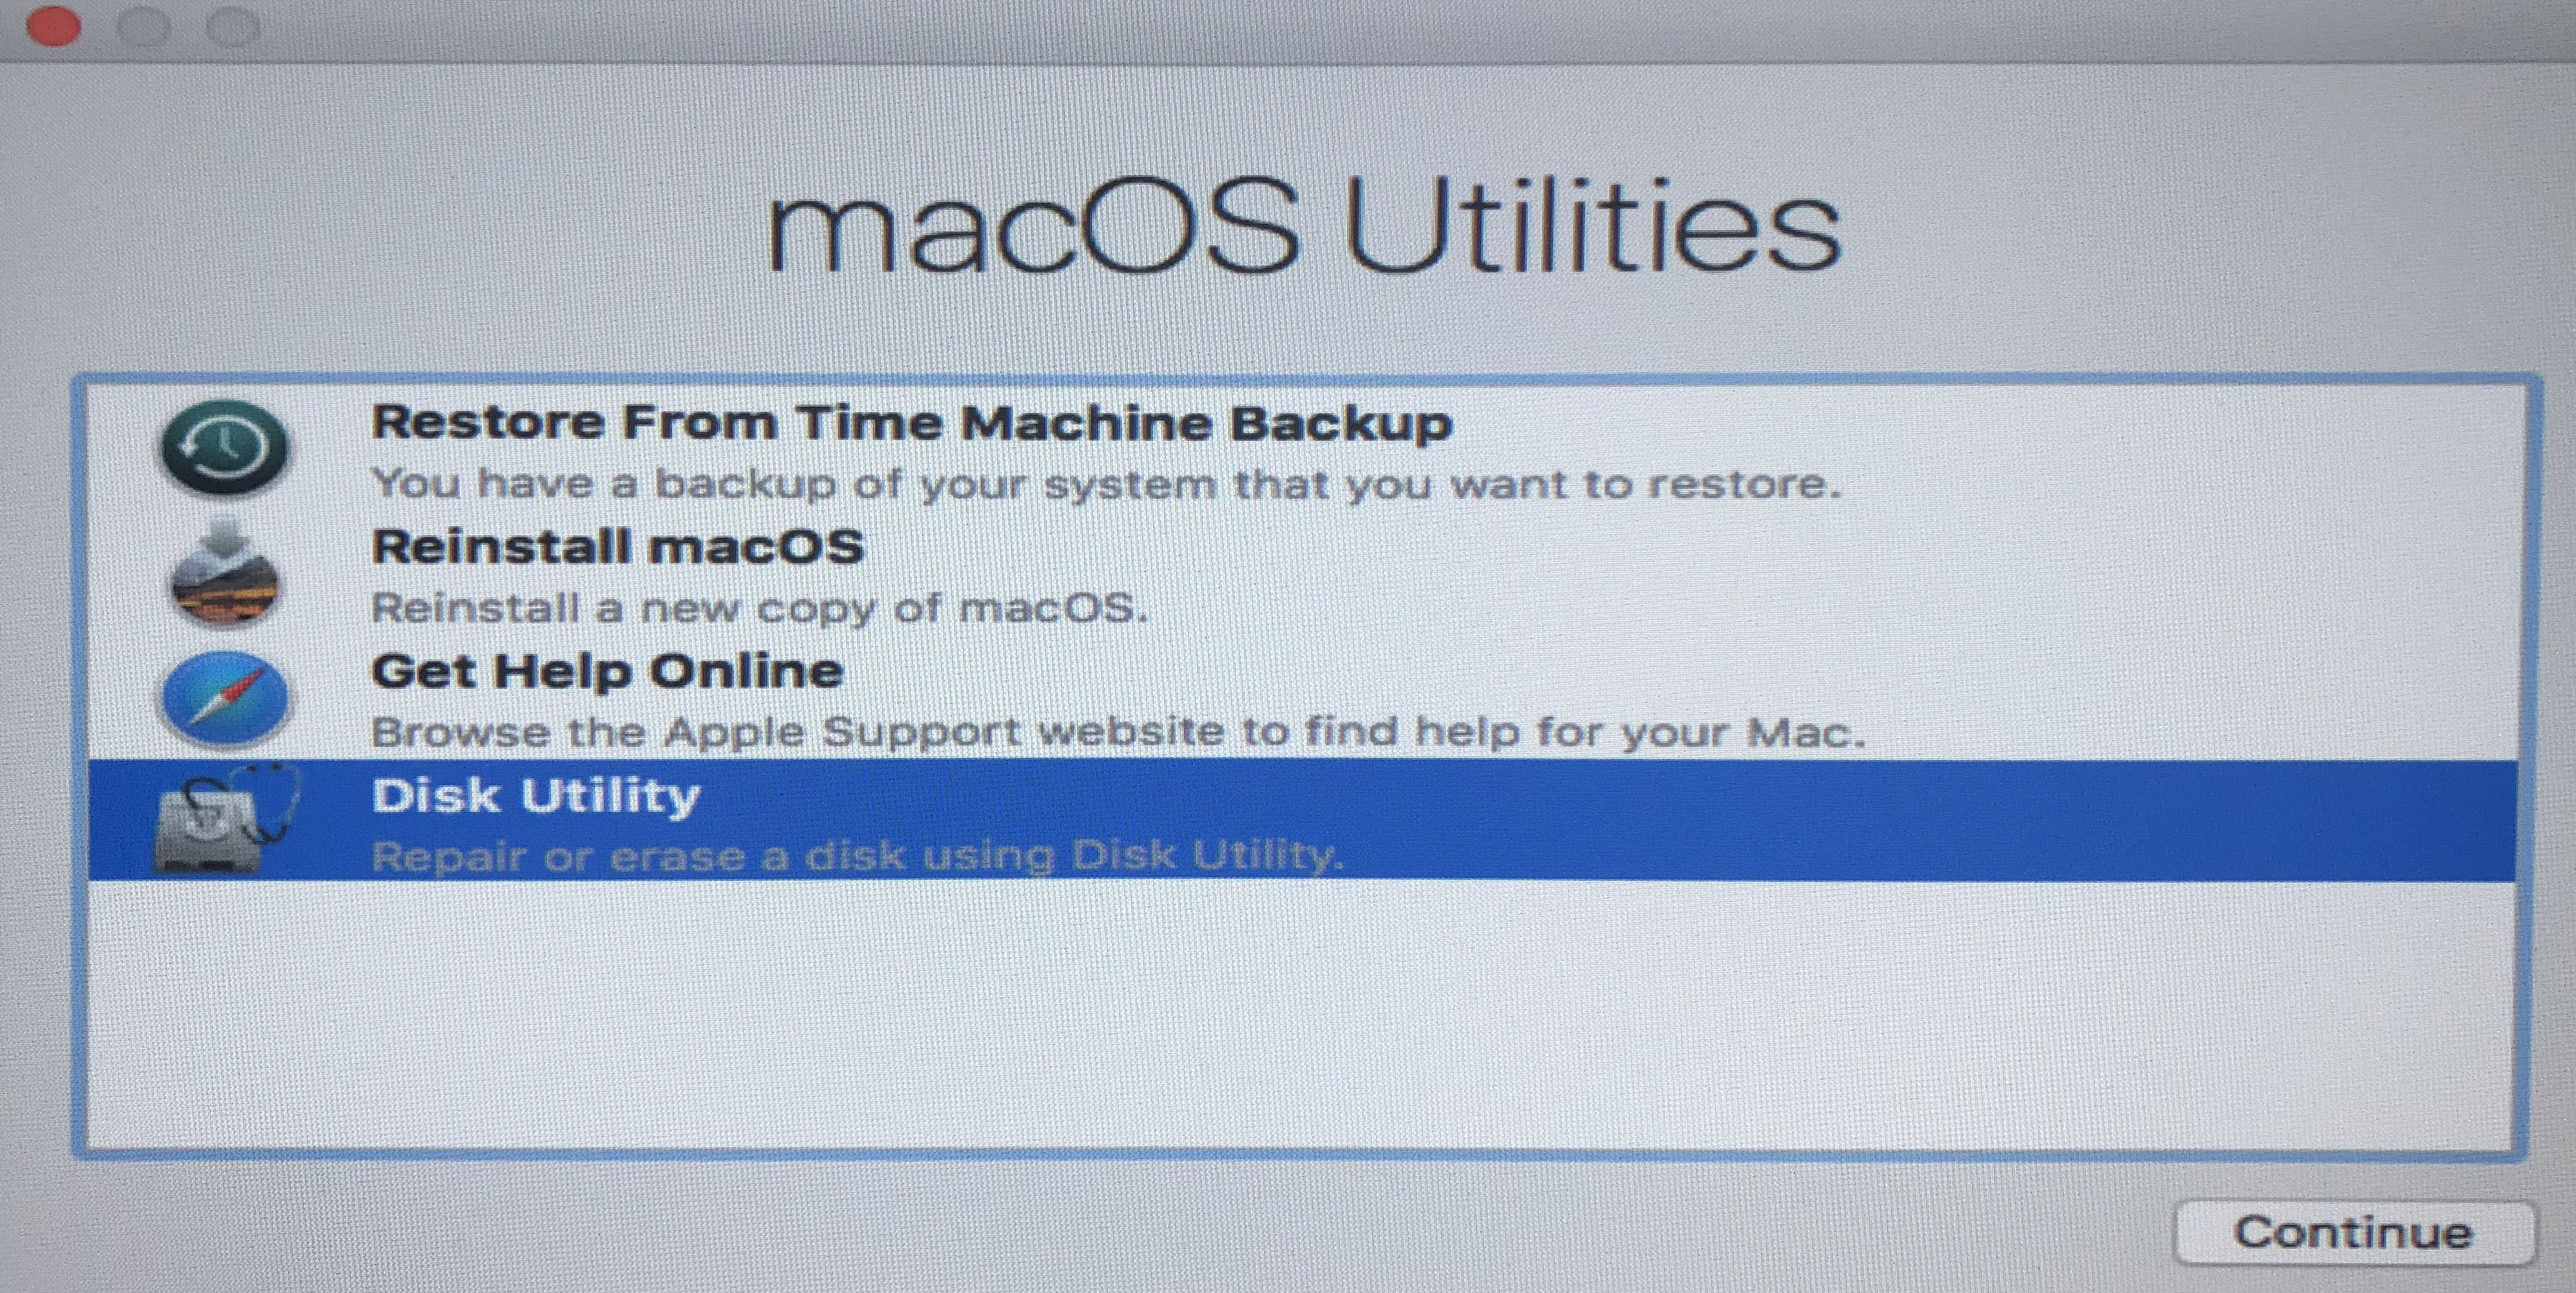
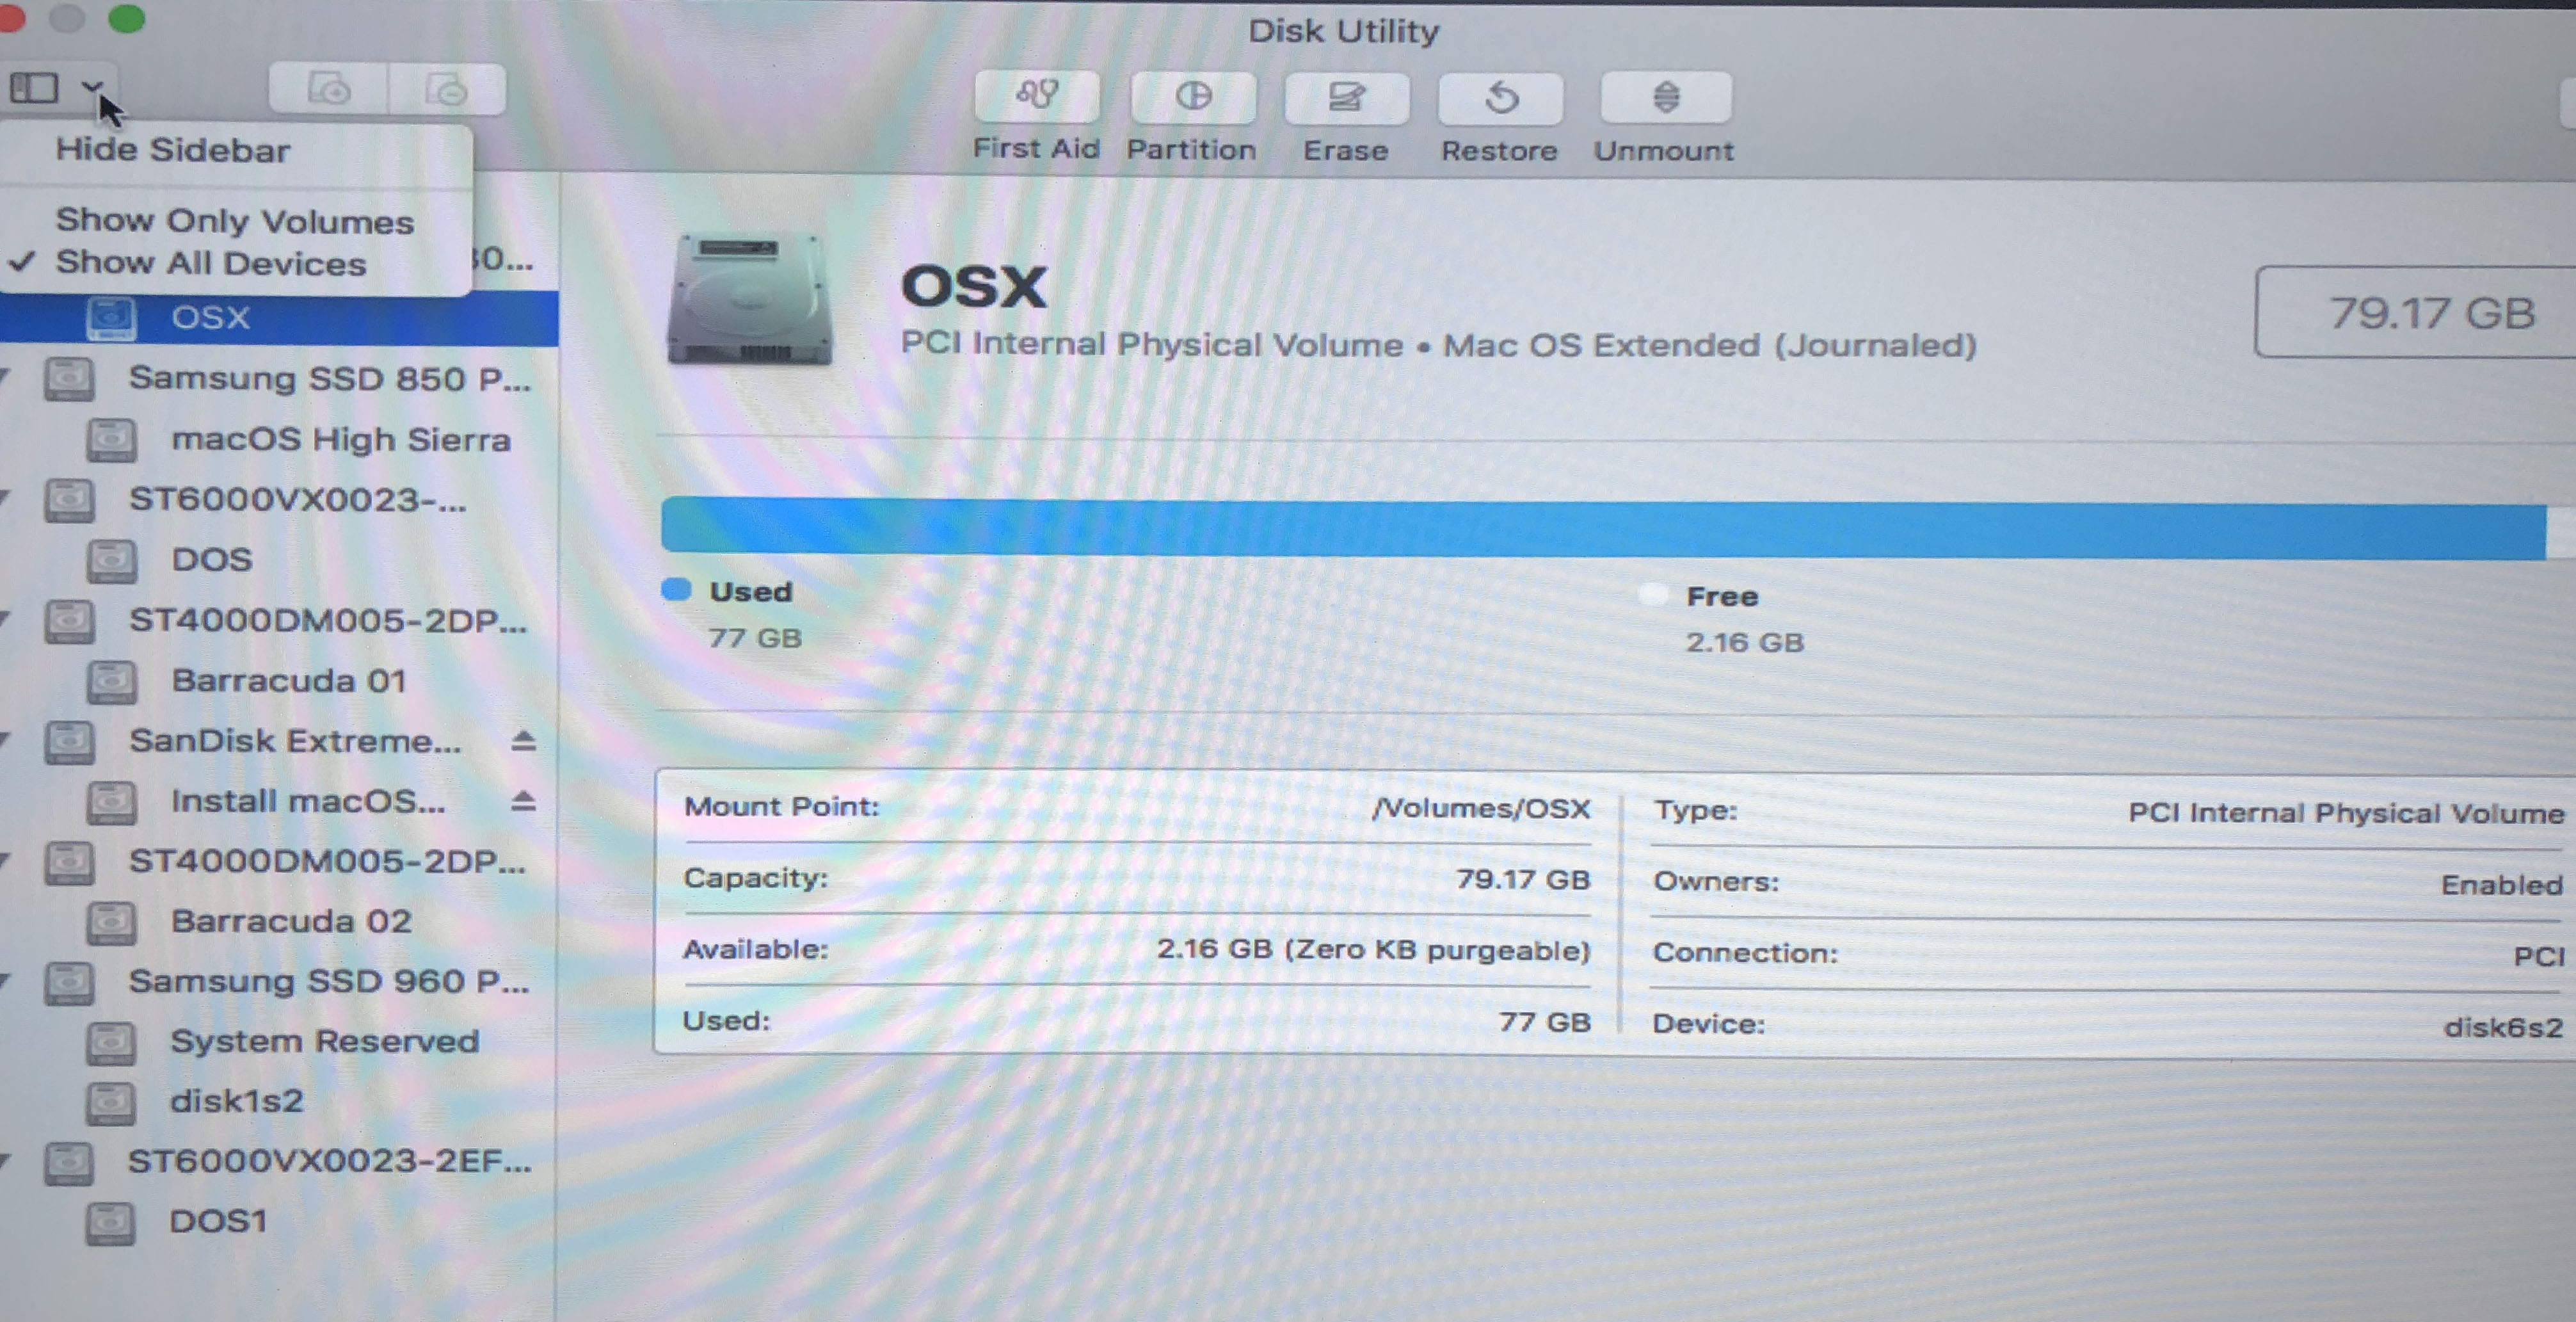
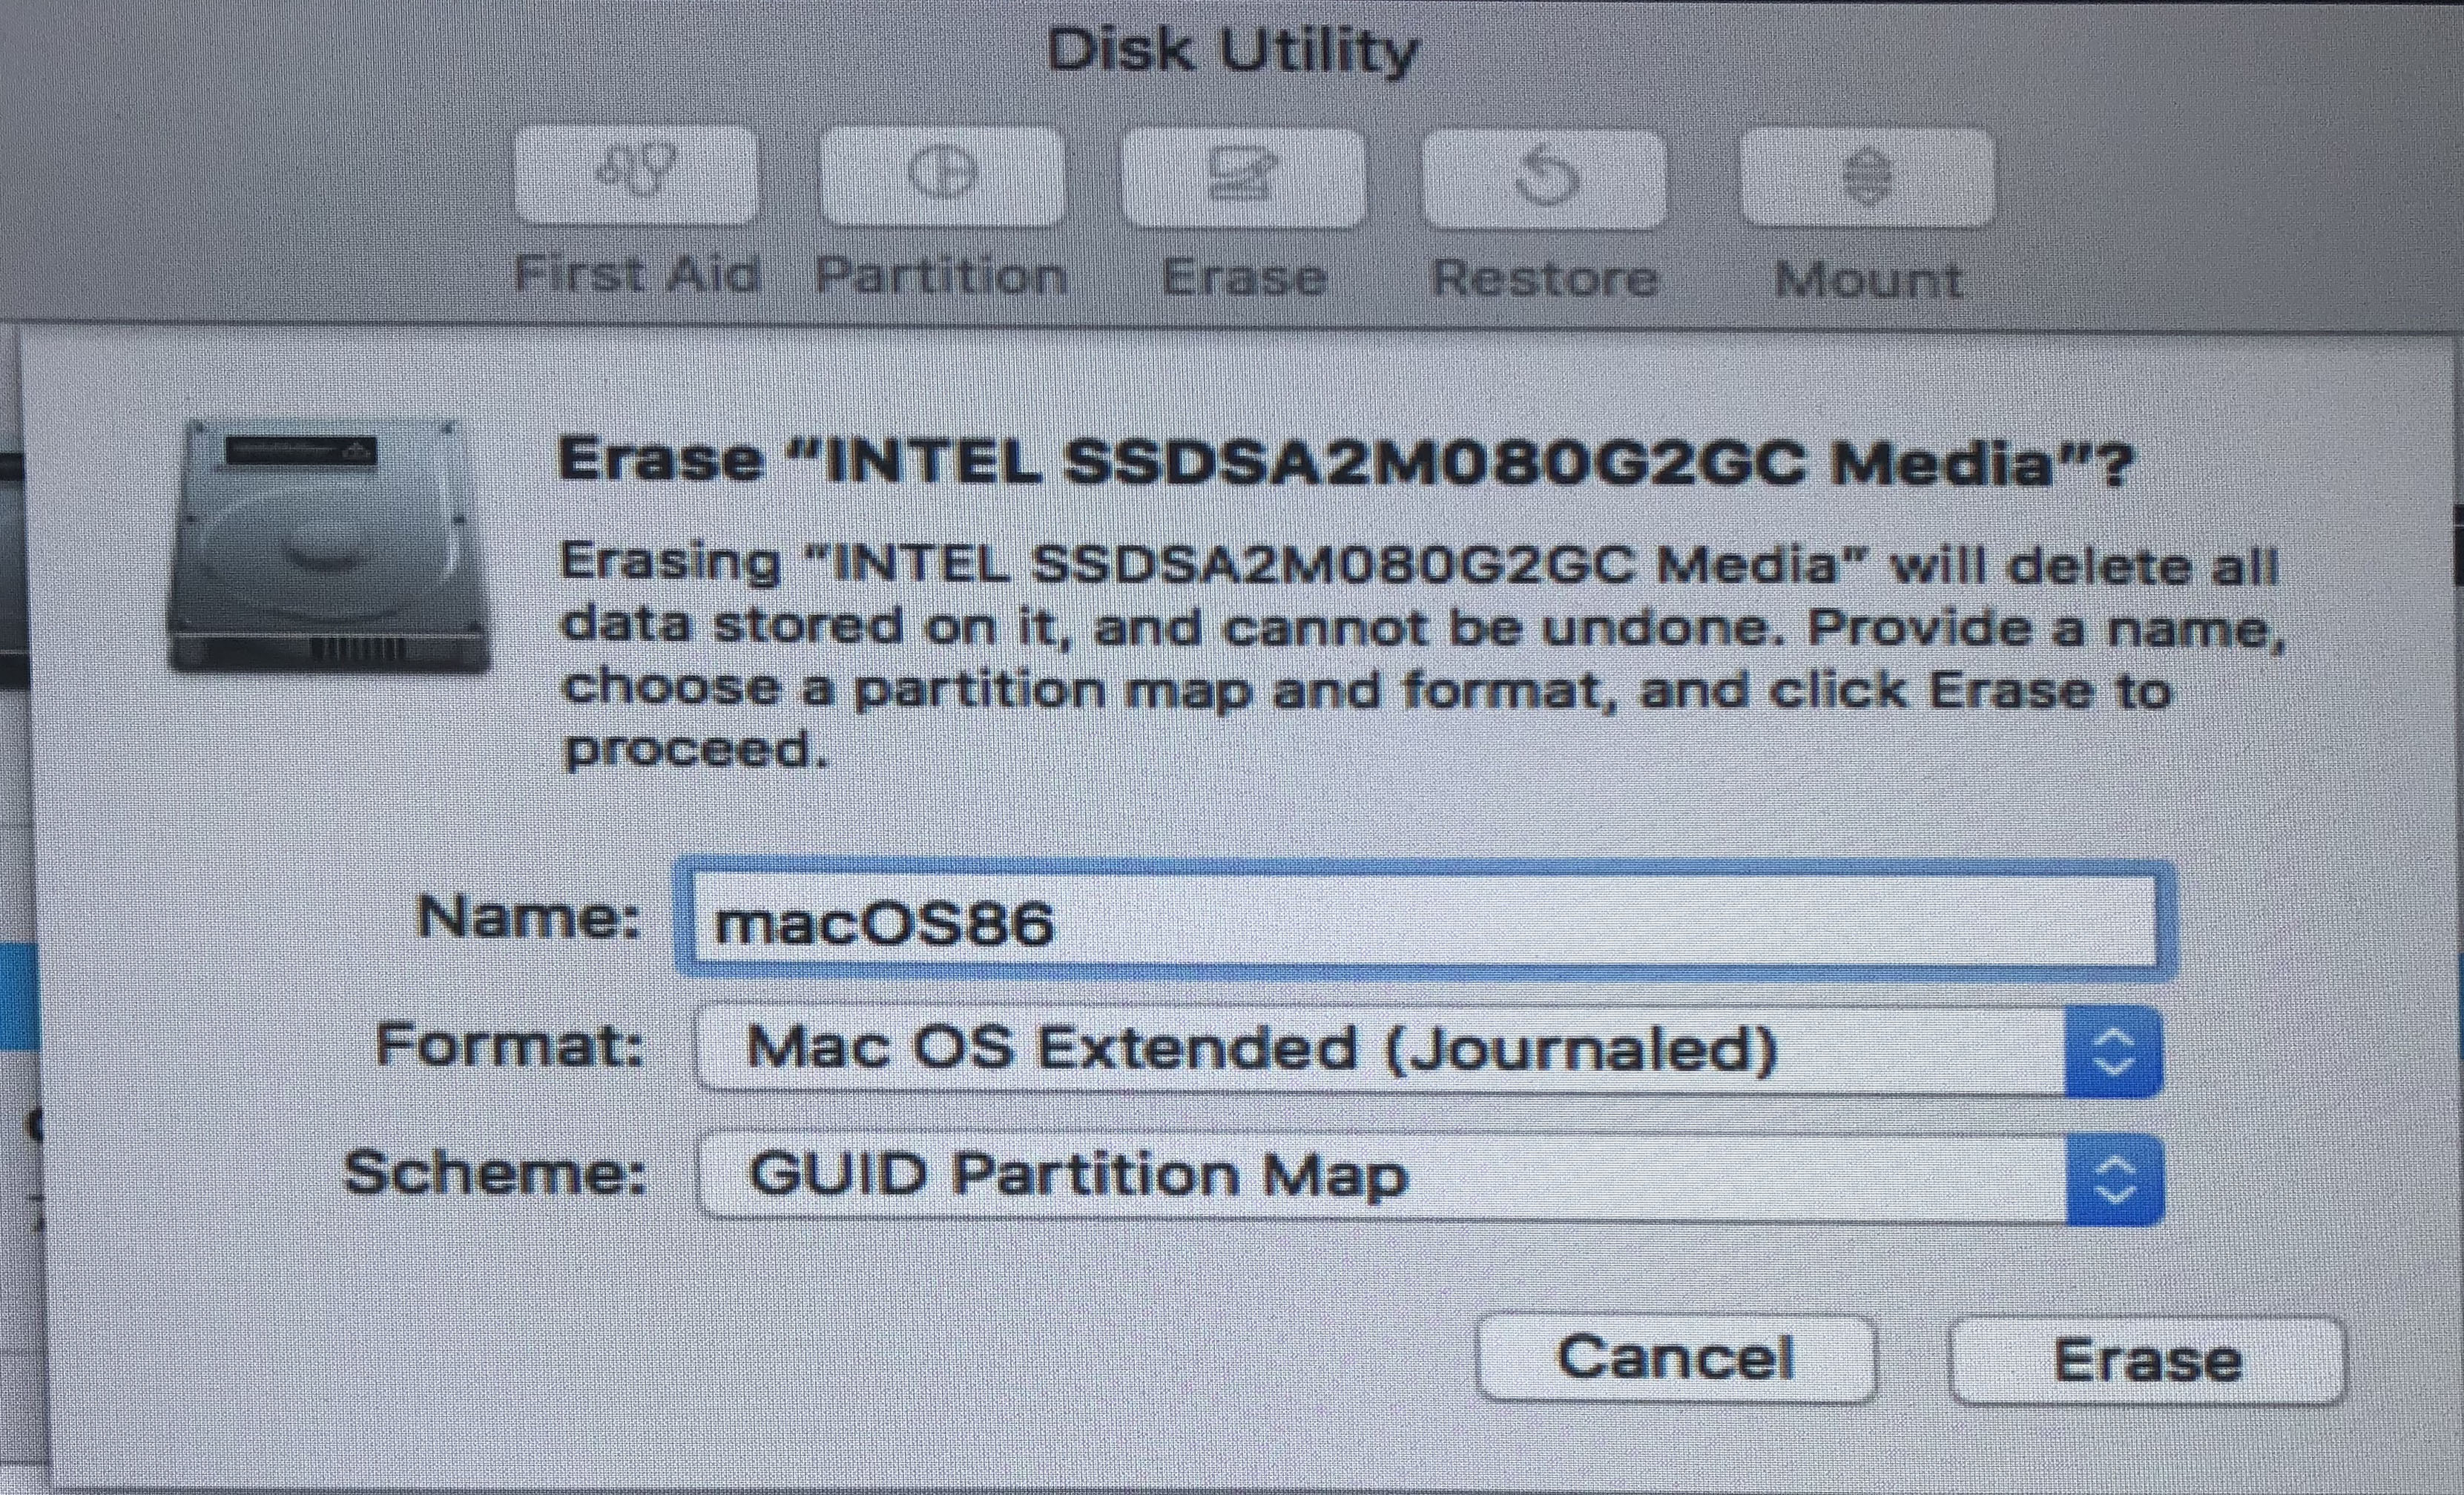
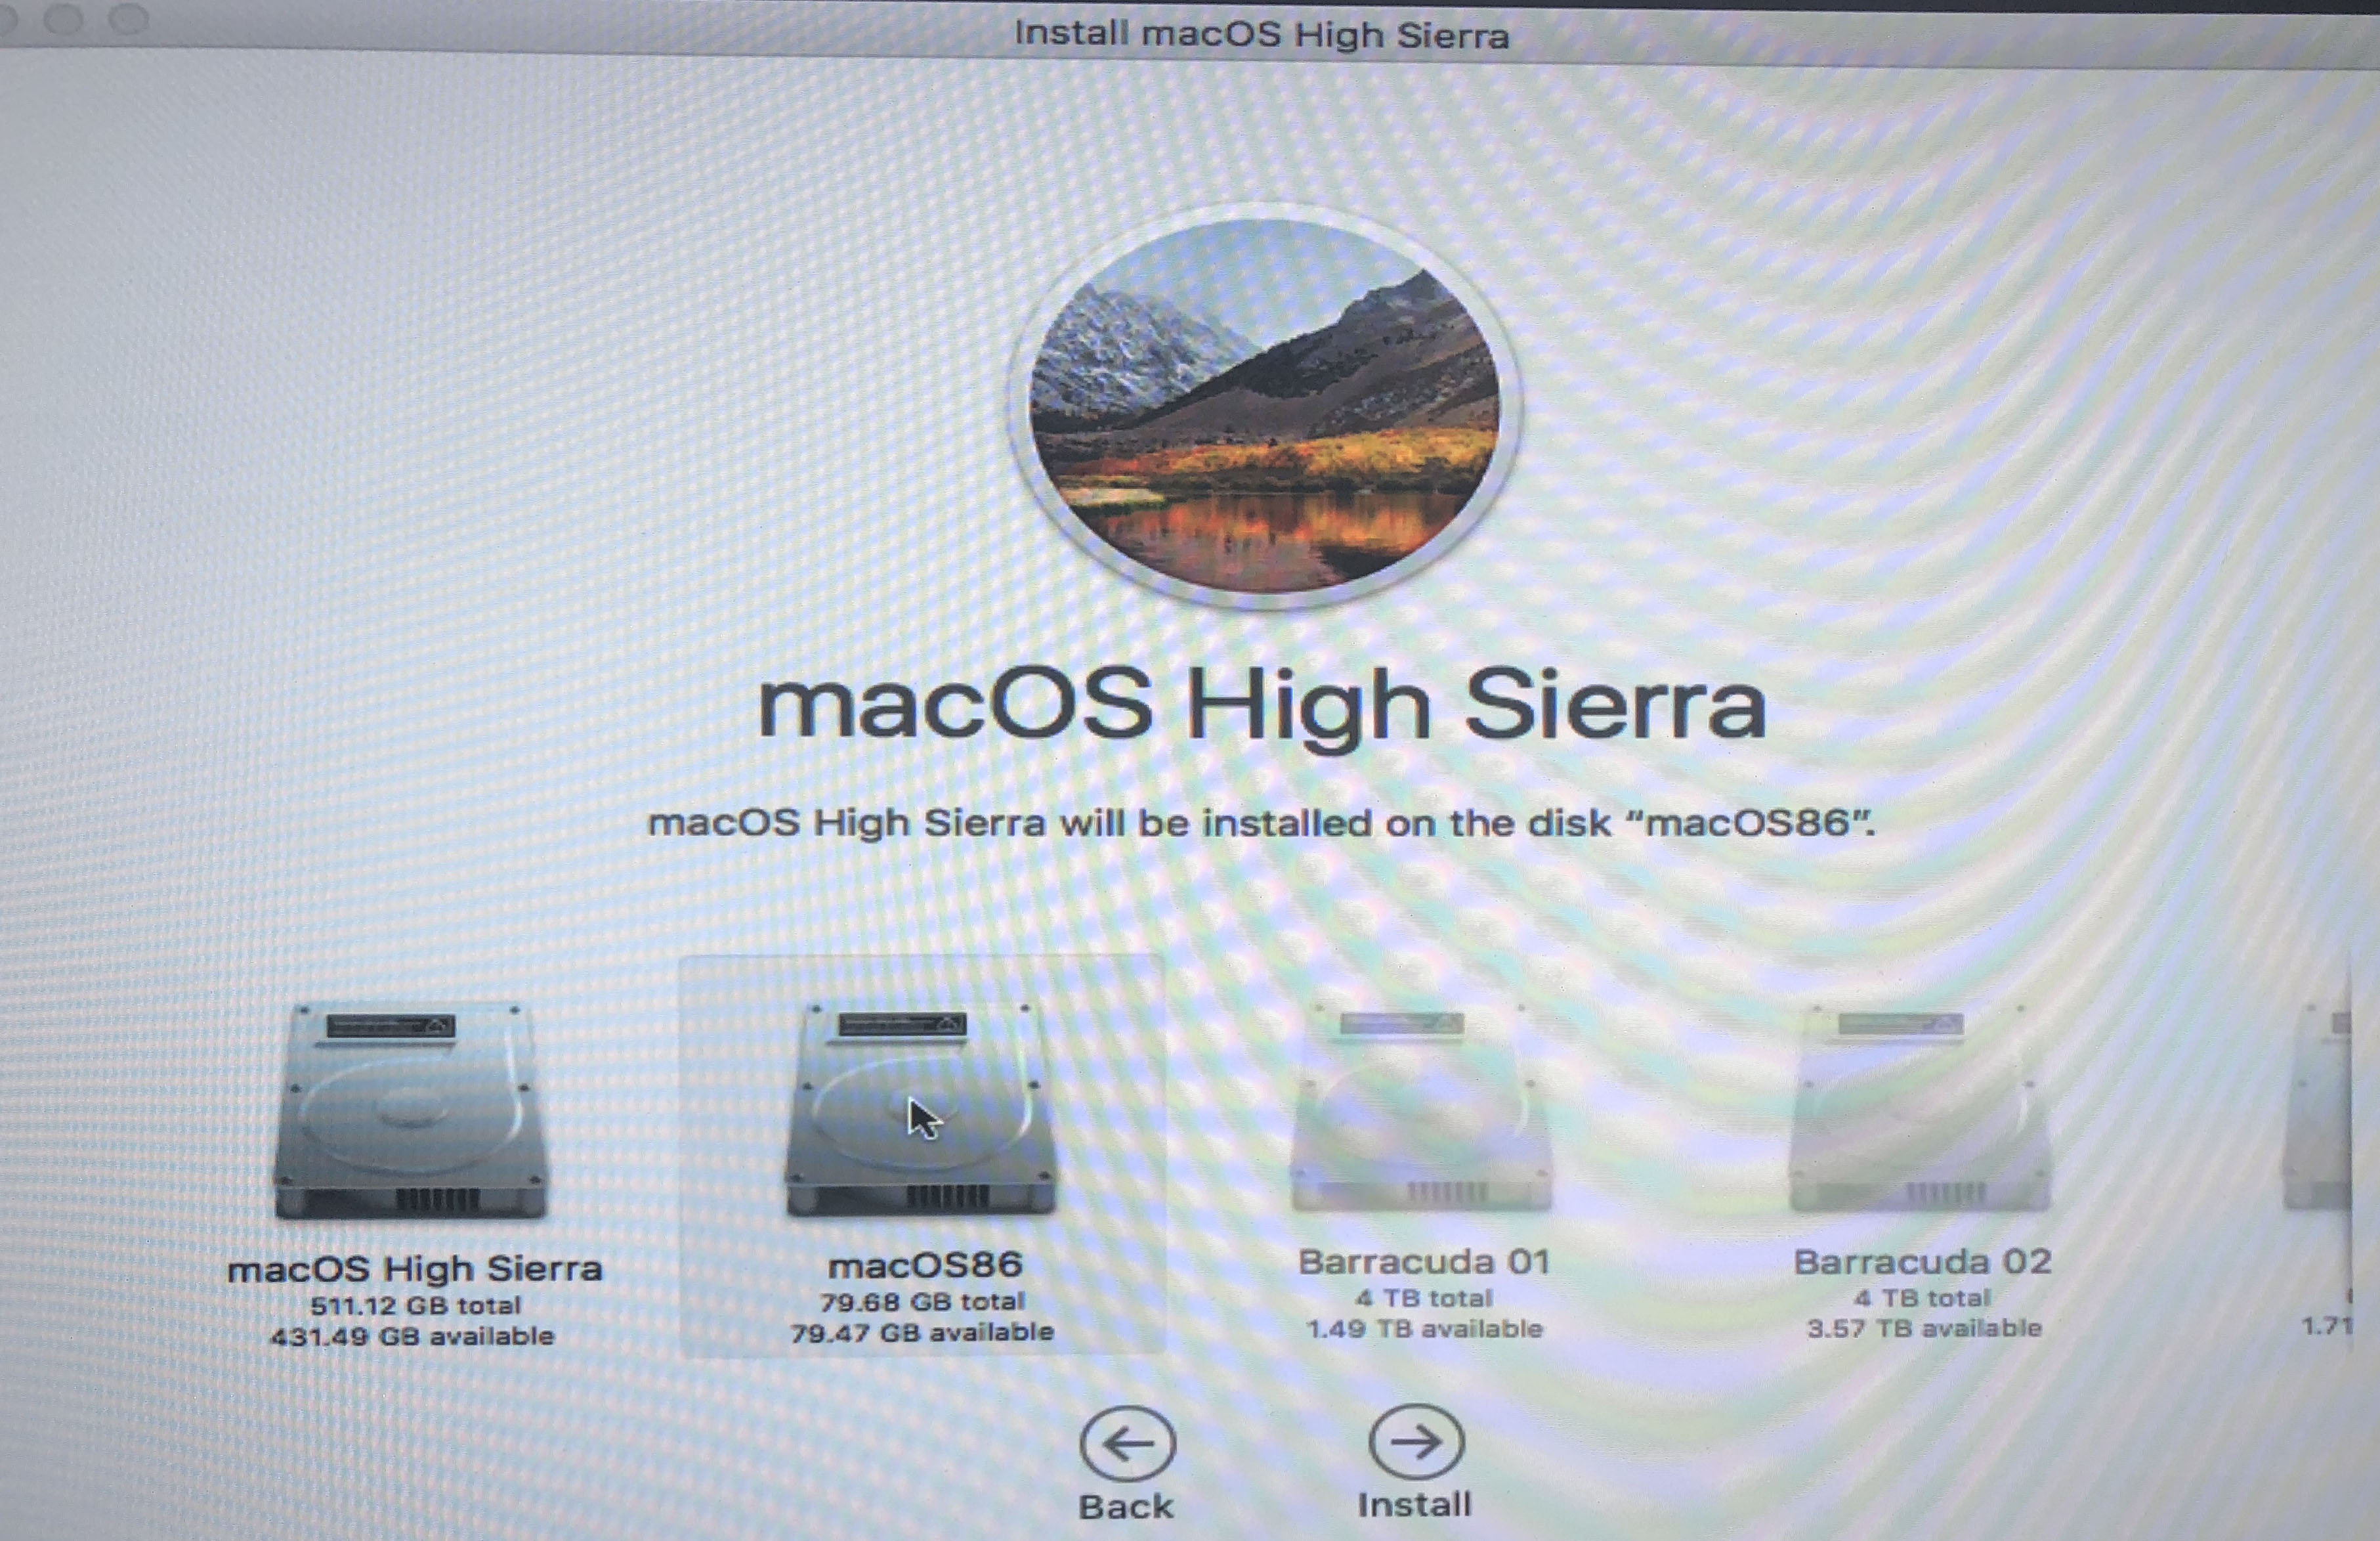
Installation Steps insert an USB pen (size 8Gb or more) run installation utility and follow on screen instructions or follow detailed guide to create an USB pen by @Gengik84[/mention] at this link: https://www.macos86.it/viewtopic.php?f=41&t=2">viewtopic.php?f=41&t=2">https://www.macos86.it/viewtopic.php?f=41&t=2 or in a short way do this steps: Choose installer and then alternate method to install Drag and drop usb pen in installer app when requested Drag and drop instal macOS data app previously downloaded from App Store Wait till process end Install clover on USB clover (any version) as pictures below: using a minimal EFI driver64UEFI installation if you want you can change in Clover/Other this included kexts: config.plist.zip [/b] install clover on Install macOS High Sierra USB pen as picture previously posted You must have selected Install for UEFI booting only and Install Clover in the ESP accordly Now we can reboot. During BIOS scan press F12 to choose boot drive Select Uefi USB pen you have created you will see clover boot loader menu disk utility.jpg Select disk utility and format disk you want use for OSX install 17E202 OSX version[/b] If you have downloaded config.plist posted here you can reboot because Nvidia web drivers is active in it ,otherwis,e you have to flag it as you can see here: DSDT.aml.zip In this way you will achieve this in Pic tab in About my Mac: ALL Kext or utilities used here are available in Downloads Section Sleep is not working by now (WIP)[/color] Have fun :) Other.zip config.plist.zip DSDT.aml.zip
1 point