Leaderboard


Popular Content
Showing content with the highest reputation on 09/20/2020 in all areas
-
AMD hacks are now working with beta 7 using new kernel patches, thanks to Algrey from AMD discord server https://github.com/AMD-OSX/AMD_Vanilla/tree/experimental-opencore3 points
-
I reduced some patches and now have speeds about the same as ß6:
 2 points
 -
In my opinion we shouldn't be putting EFIs or snippets in the thread itself but use a GitHub repo so everyone can collaborate with forks and merges or if there is major differences, have configs to specific systems in the repo. This would eliminate anything in the past to present issue. The config structure is the same for all systems and change on OC updates, which can be maintained on the repo itself.2 points
-
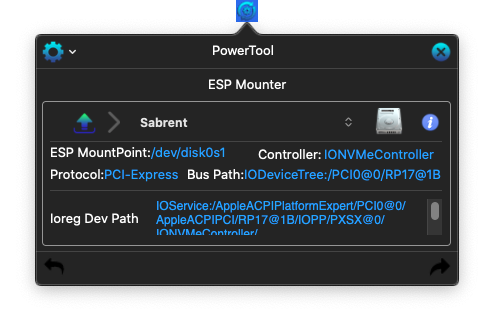
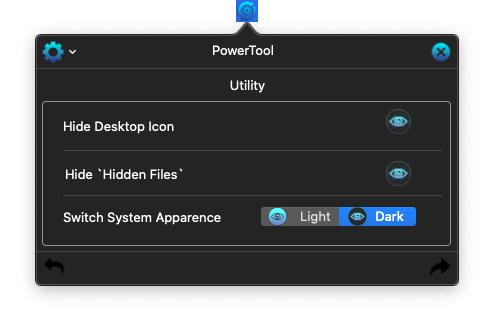
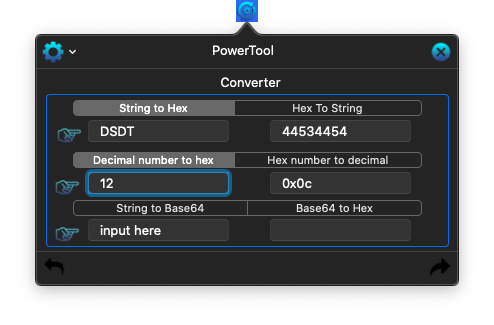
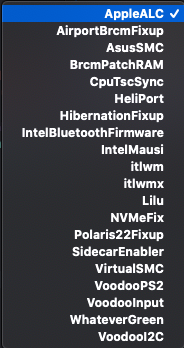
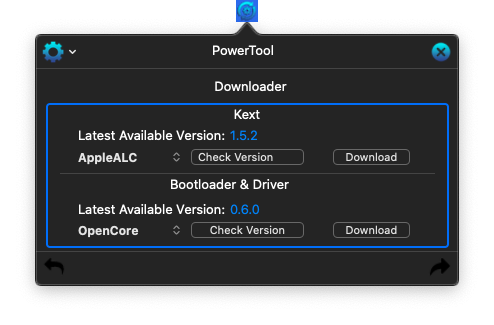
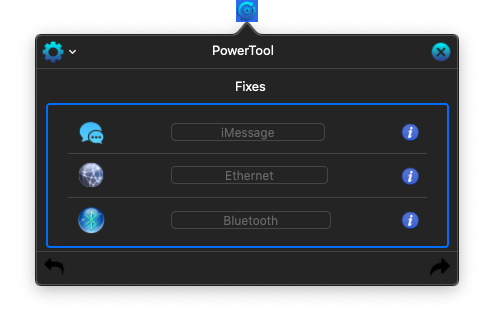
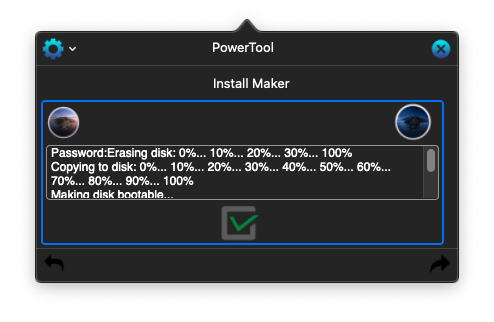
Salve a tutti 😀 Ho fatto una piccola status bar app che ha diverse funzioni, le quali vi elenco: ESP mounter Possibilità di montare le rispettive EFI dei dischi Aggiunge anche info inerenti Preferenze Sistema (utility) Cambiare apparenza di sistema (light, dark) Nascondere icone desktop Mostrare file nascosti Convertitore: hex decimal base64 string Funzione Downloader: possibilità di controllare l'ultima release disponibile per vari kext e possibilità di scaricarli. 2. Possibilità di controllare ultima versione dei bootloader e possibilità di scaricarli. Clover: iso pkg dmg Clover.app OpenCore ovviamente qualsiasi file sarà scaricato e quindi sempre aggiornato... non come alcune app che hanno kext in bundle 😉 Fix: Ethernet qualora non fosse en0 iMessage (ricordate di uscire dai servizi Apple prima di eseguirlo) Bluetooth Installer: Possbilità di creare un installer su usb o disco. NOTA: In caso di consigli, possibile aggiunte etc.. sono ben accette ma da subito vi dico che non ho molto tempo libero nel momento quindi in caso abbiate pazienza e nei momenti liberi cercherò di lavorarci. Questo anche in caso di possibili bug. Scusatemi in anticipo ma attualmente ho un periodo molto indaffarato per varie cose che passano avanti a questa passione... hackintosh!!! 🙂 L'applicazione la trovate in download: Video dimostrativo sotto spoiler: Credits: Apple per macOS @fabiosun per le icone dell'applicazione. Buon divertimento e buon hack !!! **GENG** NOTA-2: anche se può funzionare su BugSur ... di fatto non è supportato dall'app. attendo la release finale come anche per Xcode
1 point
-
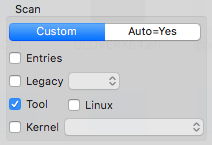
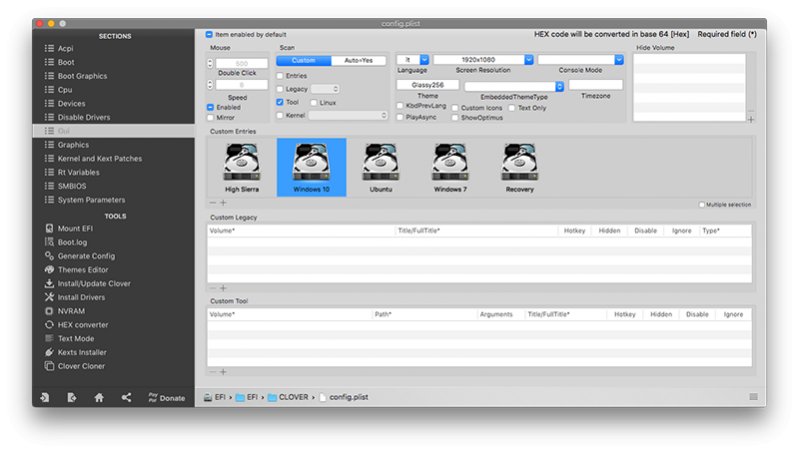
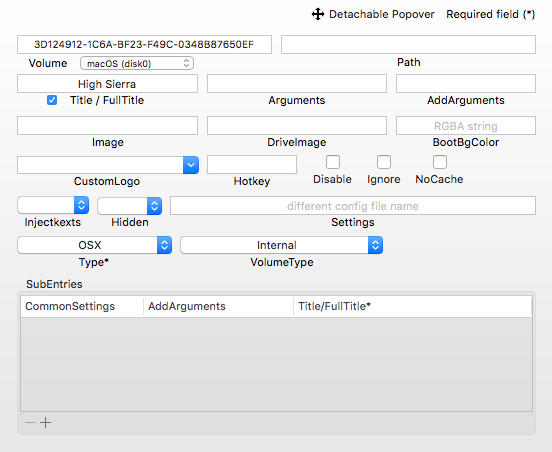
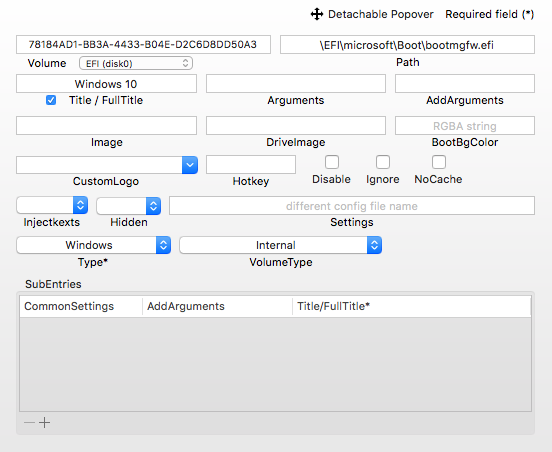
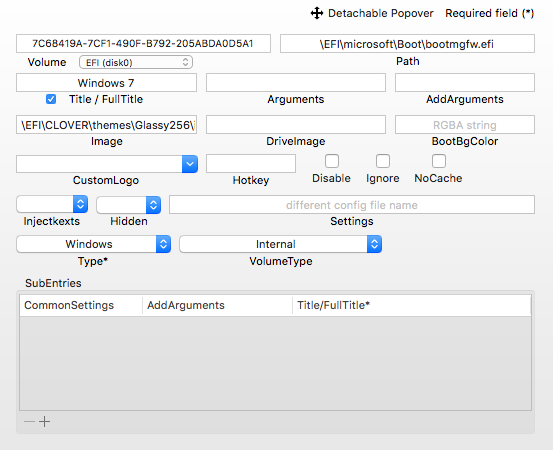
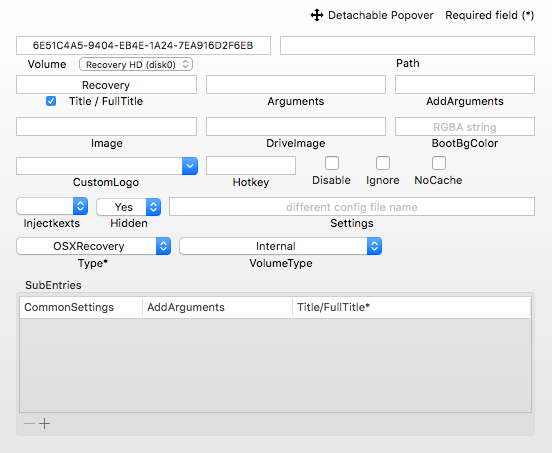
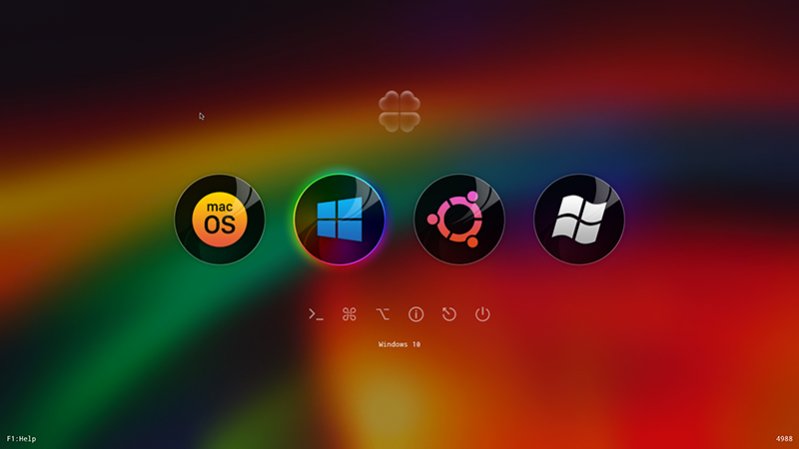
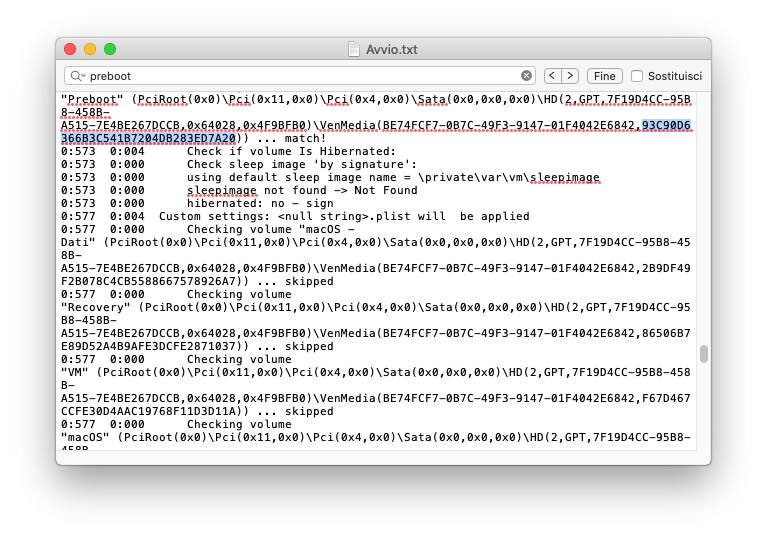
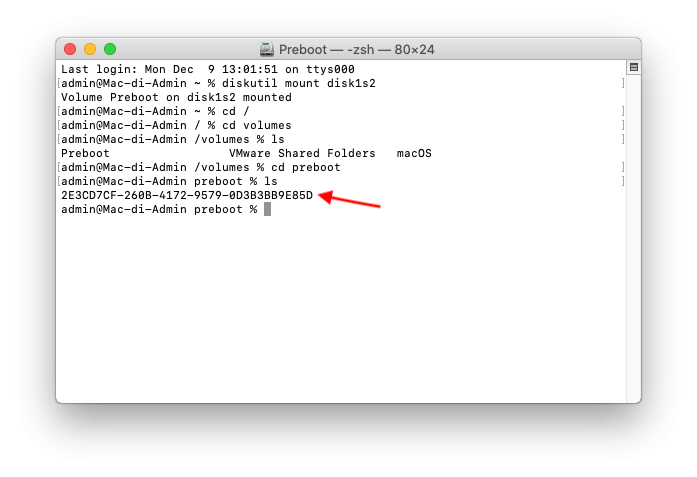
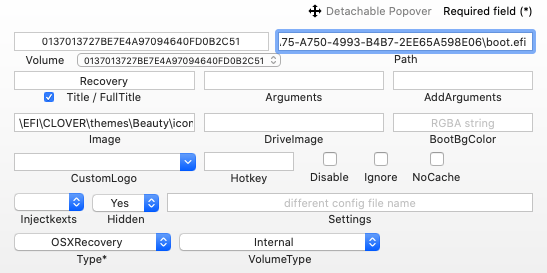
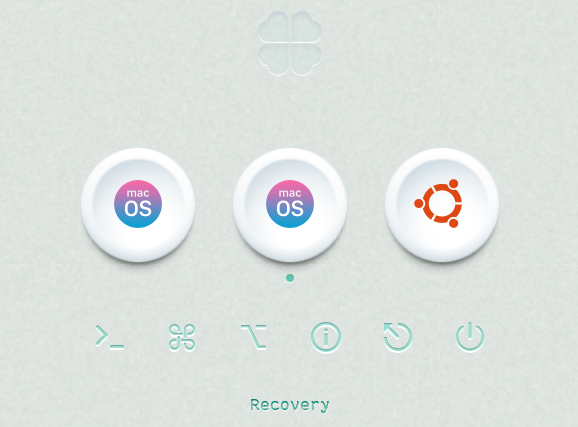
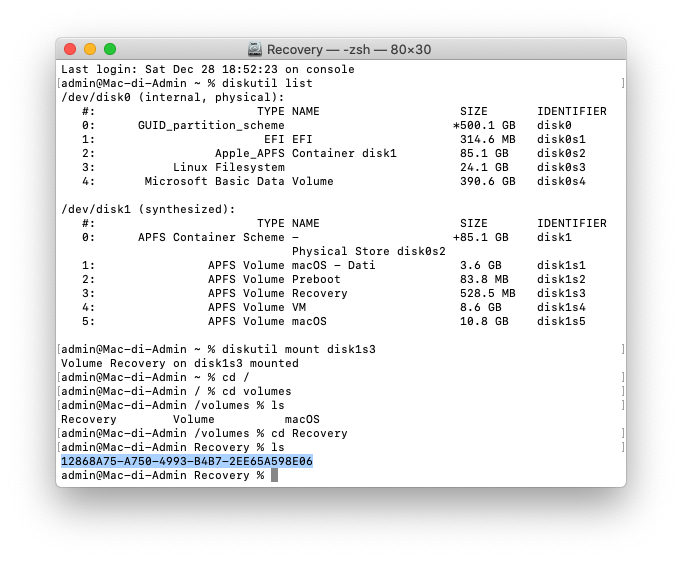
Metodo Diretto per mettere Ordine e non solo nella GUI Disabilitiamo la Scansione: - - Verifichiamola sempre Testualmente nel config.plist: - <key>Scan</key> <dict> <key>Entries</key> <false/> <key>Legacy</key> <false/> <key>Linux</key> <false/> <key>Tool</key> <true/> </dict> - In questo modo nella GUI non verrà Scansionato nulla: - - Per praticità prima di disabilitare la Scansione portiamo a termine almeno una Entries, altrimenti non abbiamo nessun Boot o affidiamo il Boot ad altro. Creiamo le Entries indirizzandole sui File di Boot, mettiamole nell'ordine voluto, cambiamo gli attributi delle Icone se le vogliamo diverse dal Default: - - Clover Configurator: - - Config.plist: - - Riavviamo, la nostra GUI visualizzerà sempre e solo quello impostato nelle Entries: - - Semplice, Pulito, Diretto. - Gli UUID nel caso di Windows, Linux e HFS+, sono validi quelli proposti da Clover Configurator: - - Nel caso APFS, da Terminale: bdmesg > ~/Desktop/Avvio.txt Apriamo il file creato sul Desktop e cerchiamo il Volume che ci interessa, vedi esempio: - - - La Recovery necessita anche del Path, come sopra UUID della Recovery, montiamo la Recovery e identifichiamo UUID di percorso: - diskutil list diskutil mount disk1s3 cd /volumes/recovery ls - - Impostiamo la Entries: - - - F3 alla GUI per Visualizzare la Recovery: - -------------------------------------------------------------------------------------------------------------------------------------------------------------------- Entries per APFS Codificato, o semplice percorso - Identificare UUID del Preboot (bdmesg): - Montare il Preboot e identificare UUID di percorso: - diskutil mount disk1s2 cd /volumes/preboot ls - Impostare la Entries: - <key>Custom</key> <dict> <key>Entries</key> <array> <dict> <key>Disabled</key> <false/> <key>FullTitle</key> <string>Catalina</string> <key>Ignore</key> <false/> <key>InjectKexts</key> <true/> <key>NoCaches</key> <false/> <key>Path</key> <string>\2E3CD7CF-260B-4172-9579-0D3B3BB9E85D\System\Library\CoreServices\boot.efi</string> <key>Type</key> <string>OSX</string> <key>Volume</key> <string>93C90D6366B3C541B7204DB283ED7A20</string> <key>VolumeType</key> <string>Internal</string> </dict> Verifichiamo: -
1 point
-
Attached is a reduced Patch set that still boots Mojave, Catalina and Big Sur ß7 (but not HS) that I used for the speed improvements above. (It is reduced from Pavo's posting.) No Aquantia patches are present. BS-Min-Patches.plist.zip1 point
-
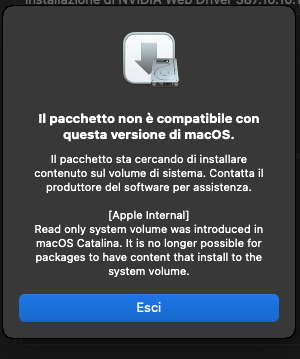
SIP in most of case (for you is not useful) In my case togheter snapshot deleting allows me to instal a patched Nvidia driver and avoid this error:
1 point
-
Lo vedi che grazie a te sto imparando un sacco? Questa cosa del trascinare l'unità sull'elenco del Finder non lo sapevo né mai ci avrei pensato. Ha funzionato subito. Per quanto riguarda la mappatura bisogna attendere ancora(o domani o domenica) perchè chi doveva darmi una mano oggi ha un contrattempo1 point
-
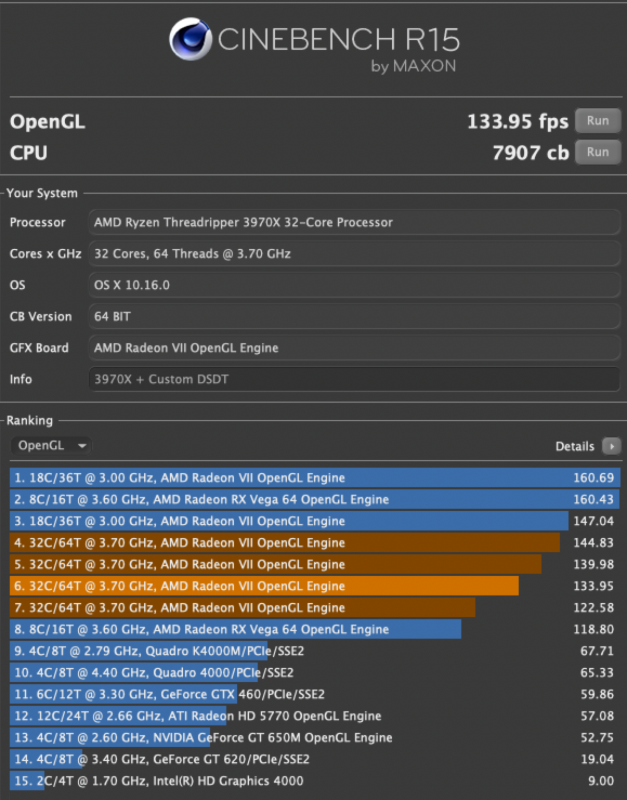
The 4 additional patches worked for me as well. No need to modify DisableLinkeditJettison or add keepsyms to boot args. Getting an average score of 130 fps for Cinebench 15 OpenGL on my RX580, so that is less than previously.1 point
-
Grande boss!1 point
-
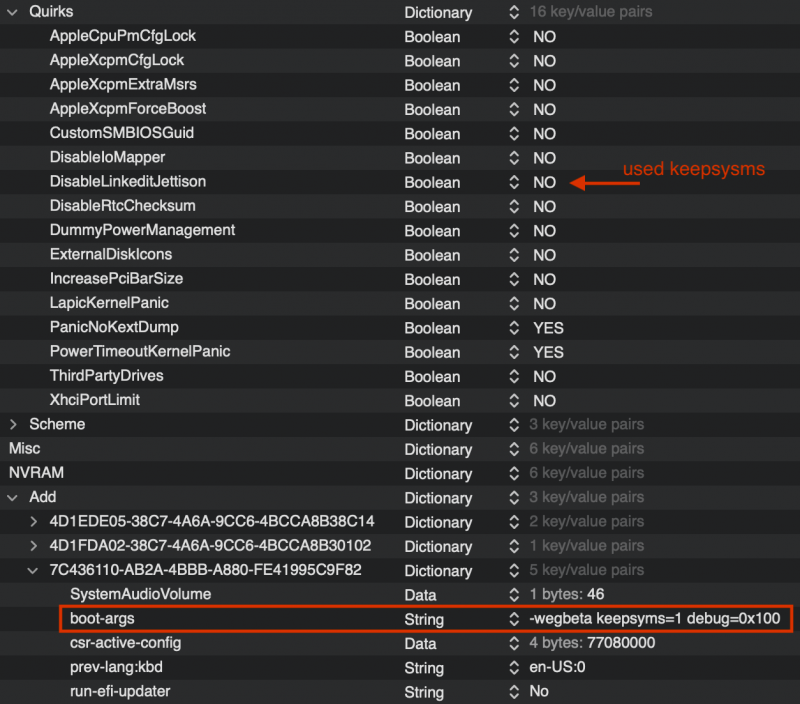
I did change config slightly. When DisableLinkeditJettison was enabled, ß7 would not boot (as it would into ß6), so I disabled and added keepsysms to boot-arg:
1 point
-
Just did the update on the bare metal from beta 6 to beta 7 - several reboots later, it finished just as expected, so thank you from me too. For those who don't know how to back out what changed from the git history, attaching my config plist with working patches (1st 4 patches added based on Pavo's git commit). Note: this covers Big Sur only. config.plist.zip1 point
-
I too tested. It boots Mojave, Catalina and Big Sur. Furthermore, it allowed me to download and update ß6 to ß7 in bare metal (it required 4 re-boots for update). So thanks Pavo (and algrey)!1 point
-
tested works thanks1 point
-
non devi usare virtualSMC insieme a FakeSMC quindi o uno o l'altro inoltre parti con kext minimali, quindi niente sensor etc1 point
-
no non puoi, prova il downloader allegato nel primo post. se quello non la vede, non poso aiutarti in altro modo. in caso puoi scaricare l'ultima ma dovresti usare opneCore e non clover1 point
-
Siamo OT, cmq a me funziona tutto regolare: - <dict> <key>DefaultLoader</key> <string>bootmgfw.efi</string> <key>DefaultVolume</key> <string>A7FCEA9A-1F00-B3BF-8A9D-EDA9A4FC90A7</string> <key>Timeout</key> <integer>5</integer> </dict>1 point
-
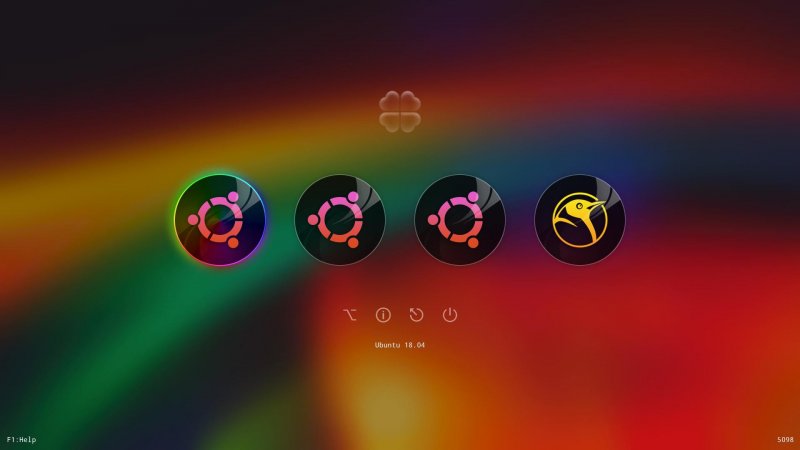
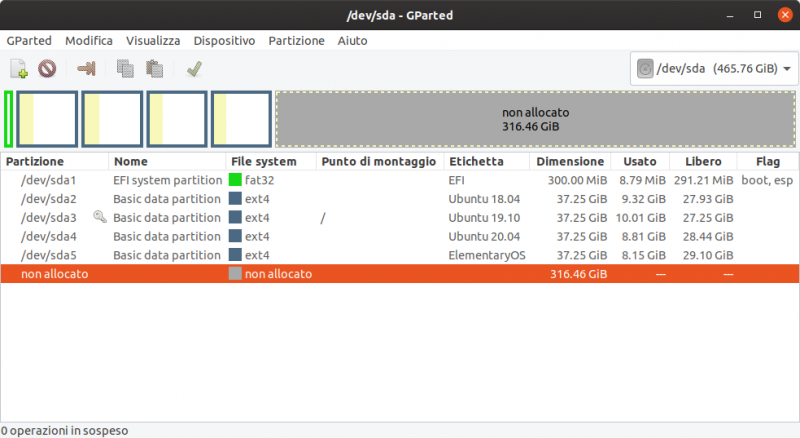
Possiamo usare Clover solo per i nostri Sistemi Linux, indipendentemente da un installazione OS X, come ad Esempio: Ubuntu 18.04, Ubuntu 19.10, Ubuntu 20.04, ElementaryOS 5.1, tutti avviati senza Grub - - - config.plist <?xml version="1.0" encoding="UTF-8"?> <!DOCTYPE plist PUBLIC "-//Apple//DTD PLIST 1.0//EN" "http://www.apple.com/DTDs/PropertyList-1.0.dtd"> <plist version="1.0"> <dict> <key>Boot</key> <dict> <key>DefaultVolume</key> <string>LastBootedVolume</string> </dict> <key>GUI</key> <dict> <key>Custom</key> <dict> <key>Entries</key> <array> <dict> <key>Arguments</key> <string>initrd=initrd.img quiet splash root=PARTUUID=33E7A243-035E-4198-A42F-EB76E521D373 ro</string> <key>Disabled</key> <false/> <key>FullTitle</key> <string>Ubuntu 18.04</string> <key>Ignore</key> <false/> <key>Image</key> <string>\EFI\CLOVER\themes\Glassy256\icons\os_ubuntu.icns</string> <key>Path</key> <string>\vmlinuz</string> <key>Type</key> <string>Linux</string> <key>Volume</key> <string>33E7A243-035E-4198-A42F-EB76E521D373</string> <key>VolumeType</key> <string>Internal</string> </dict> <dict> <key>Arguments</key> <string>initrd=/boot/initrd.img quiet splash root=PARTUUID=F6D4C2B1-3E2B-4572-96F5-BD207D270E98 ro</string> <key>Disabled</key> <false/> <key>FullTitle</key> <string>Ubuntu 19.10</string> <key>Ignore</key> <false/> <key>Image</key> <string>\EFI\CLOVER\themes\Glassy256\icons\os_ubuntu.icns</string> <key>Path</key> <string>\boot\vmlinuz</string> <key>Type</key> <string>Linux</string> <key>Volume</key> <string>F6D4C2B1-3E2B-4572-96F5-BD207D270E98</string> <key>VolumeType</key> <string>Internal</string> </dict> <dict> <key>Arguments</key> <string>initrd=/boot/initrd.img quiet splash root=PARTUUID=05A893DF-B1E5-4809-9899-F3BEDEE27DEC ro</string> <key>Disabled</key> <false/> <key>FullTitle</key> <string>Ubuntu 20.04</string> <key>Ignore</key> <false/> <key>Image</key> <string>\EFI\CLOVER\themes\Glassy256\icons\os_ubuntu.icns</string> <key>Path</key> <string>\boot\vmlinuz</string> <key>Type</key> <string>Linux</string> <key>Volume</key> <string>05A893DF-B1E5-4809-9899-F3BEDEE27DEC</string> <key>VolumeType</key> <string>Internal</string> </dict> <dict> <key>Arguments</key> <string>initrd=initrd.img quiet splash root=PARTUUID=6AFA4E9C-8D62-4169-B50F-CB2D3C8B7C5C ro</string> <key>Disabled</key> <false/> <key>FullTitle</key> <string>ElementaryOS</string> <key>Ignore</key> <false/> <key>Image</key> <string>\EFI\CLOVER\themes\Glassy256\icons\os_linux.icns</string> <key>Path</key> <string>\vmlinuz</string> <key>Type</key> <string>Linux</string> <key>Volume</key> <string>6AFA4E9C-8D62-4169-B50F-CB2D3C8B7C5C</string> <key>VolumeType</key> <string>Internal</string> </dict> </array> </dict> <key>Hide</key> <array> <string>grubx64.efi</string> </array> <key>Language</key> <string>it:0</string> <key>Mouse</key> <dict> <key>Enabled</key> <false/> </dict> <key>Scan</key> <dict> <key>Entries</key> <false/> <key>Legacy</key> <false/> <key>Linux</key> <false/> <key>Tool</key> <false/> </dict> <key>ScreenResolution</key> <string>1920x1080</string> <key>Theme</key> <string>Glassy256</string> </dict> </dict> </plist>
1 point
-
https://www.macos86.it/topic/17-richiesta-di-supporto-aiuto/1 point
-
@iCanaro quell'app porta solamente un link... lui non ha un mac supportato per scaricare 10.141 point
-
vuota? ma ti ha dato qualche errore?1 point
-
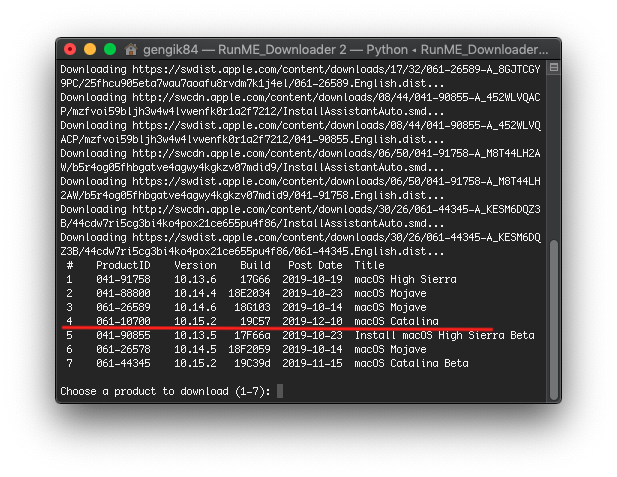
Dopo averlo avviato scrivi il numero corrispondente a quale versione vuoi Esempio catalina ultima release scriverai 4 e poi premi invio a quel punto devi aspettare che finisca
1 point
-
Beh si certo...1 point
-
corretto Grazie per la segnalazione1 point
-
si quello esatto in ultima versione come anche Lilu.kext1 point
-
La puoi usare ma ti sconsiglio di usarla come sistema principale. Attualmente non ha nulla di più di Mojave se non svariati bug.1 point
-
la 550 ti necessita dei web driver nel 90% dei casi e su Mojave non ci sono.1 point
-
devi scrivere 1 e poi premere invio 1 in questo caso perché corrisponde alla tua USB1 point
-
Ciao... lo script va sempre bene... ma se hai letto per 10.14.4 o successivi va usato la Versione 3.5 se si vuole usare il metodo alternativo Ho rimosso il quote dell'intera guida, nel caso puoi menzionarmi usando @ :)1 point
-
Ci sono molte persone che per preferenze o per motivazioni proprie hanno nvdia e ovviamente sono rimasti su 10.13 Detto sinceramente a 10.13 non manca nulla di fatto rispetto a Mojave se non i web driver stessi o il tema "scuro" :D Per l'altro discorso, si è indiscutibilmente vero che ormai da anni Apple usa AMD.. quindi in caso questo "gioca" a nostro favore soprattuto su 10.14 per il discorso detto prima. Il discorso "nativo" è dato appunto dell' ID delle video che sono contenuti sui kext di sistema.1 point
-
@Luciuxx63 Cortesemente come già stato detto apri un tuo topic nella corretta sezione, successivamente parliamo e affrontiamo i tuoi problemi Questo. topic è una guida per la usb e problemi di installazione. Tutto il resto è Off Topic.1 point
-
La EFI è nascosta.. se non la monti non puoi vederla1 point
-
come formatti? selezioni il disco e non la relativa partizione, selezionando poi GUID+mac esteso journaled?1 point
-
io comunque non capisco cosa intendevi qui.. FakeID? quella scheda video ha ID nativi1 point
-
Scusa ma fammi capire.. quale scheda video hai esattamente? Ha scritto dopo 1 minuto 17 secondi: quella boot-arg è obsoleta da anni, ultima volta che è necessaria è su Yosemite...1 point
-
Spiega meglio.. schermata nera dove? dopo il verbose?1 point
-
devi aggiungerla sul config aprilo con clover configurator,sezione kernel and kext patches 32 gb... mm che dire...hai KP un po' strani per l'hardware che hai.. prova la patch ma nel caso ti consiglio di partizione la usb per esempio da 8 o 10 gb e creare li l'installer nuovamente1 point
-
No.. ti chiedevo conferma se l'hardware è quello nella tua firma1 point
-
Sostituisci CLOVER.zip1 point
-
Allega la cartella clover1 point
-
La gui di clover non sul config1 point
-
allega la cartella clover1 point
-
ok...domani mattina ti preparo e ti passo una EFI da provare :) Ha scritto dopo 2 minuti 29 secondi: arghhh scheda video in firma? Mojave supporta video AMD da serie 7xxx in poi1 point
-
usa le stesse cose, nel senso stesso config magari cambia il smbios con uno supportato stessi Kext ma aggiornati DSDT e SSDT se li usavi1 point
-
Ma non avevi un osx precedente già funzionante?1 point
-
Perché? è già fatta la usb... :D hai usato il metodo ufficiale Apple1 point
-
Hai usato il metodo alternativo per creare la usb Però avevo detto che si possono verificare bug con questo ed avrei aspettato la release finale a settembre/ottobre per vedere la versione dell'installer finale come era.. perchè per adesso è solo una beta Quindi ricrea la usb con il mio script però scegli come metodo "create install media" di apple e usa la versione V.3.31 point
-
Hai formattato bene la usb? La efi non la crea clover,viene creata quando il disco viene formattato in Guid1 point
-
Ho solo messo insieme un po' di sperimentazioni :-)...1 point