Leaderboard
Popular Content
Showing content with the highest reputation on 08/05/2020 in all areas
-
2 points
-
@fabiosun that seems about right - this is what I did too. Try following the steps I posted to purge the 5.8 kernel. I am doubtful this is what's causing issues but one never knows - if your High Sierra stops showing odd issues, it might be. There will be plenty of new versions of 5.8 coming in the weeks ahead to fix issues so I will make builds as they come online. After a cold reboot my sleep is finally working. I suspect that some some device went into a power state that prevented from sleeping - USB controller or other. 100% sure it's the motherboard / devices and not Linux itself. FInally I can try the rtcwake hook - with 5.4 I would not wake up from sleep for reasons unknown.1 point
-
1 point
-
mai notato in basso sulla destra sinistra nella GUI al boot di pigiare F1 per avere l'help completo delle funzioni che è possibile fare dalla GUI?1 point
-
Mine shows. How did you apply it to begin with? And did you try to remove it afterwards? Debian GNU/Linux comes with ABSOLUTELY NO WARRANTY, to the extent permitted by applicable law. root@designare:~# pve-efiboot-tool kernel list Manually selected kernels: None. Automatically selected kernels: 5.4.44-1-pve 5.4.44-2-pve 5.8.0-1-zen2 root@designare:~# I'd remove by: 1. Select lower kernel at boot 2. list existing edge kernels dpkg --list| grep 'pve-edge*' 3. apt purge -y [the kernel you want from lust in 2] e.g. in my case pve-edge-kernel-5.8.0-1-zen2 Check that the headers are also removed: Run 2. again. If you see pve-edge-headers-5.8.0-1-zen2 remove it with apt purge1 point
-
strano bug questo, risolto con l'uso di path finder; dopo essere riuscito a browsare la LAN con questo file manager, poi si è attivato anche sul finder comunque una bella merdina questo aggiornamento... per la prima volta si è riavviato il T-RyZo per i fatti suoi mentre stava compilando con OC EFI maker speriamo in un nuovo aggiornamento breve.. quelli della mela vanno come i gamberi, e questo aggiornamento per poter vedere i video di you "porn" in 4K alla faccia dell'innovazione1 point
-
@tsongz - can you check that wireless of broadcom is working in say Windows if you have one? Just to rule out some card issue. Wireless "should just work". The other step would be to check the IOMMU trees as @iGPU suggested. Let me know how it goes - I was hoping it would be more painless when I recommended that card, but it was BT indeed that was a pain for me. Installed 5.8 + Beta 4 last night. All good. I rebuilt the pve-kernel image with proper ZFS patch - will post that on github over the weekend. Means I feel a bit safer to use patched official release of ZFS that only addressed the 5.8 incompatibility. I was hoping 5.8 would fix sleep issues, where my host would fail to sleep with systemctl suspend or rtcwake -m mem. I doubt it's a Linux issue. I think Designare TRX40 has some BIOS issues that prevent proper sleep support. The AE_ALREADY_EXISTS messages at boot also didn't disappear. Gigabyte hasn't updated their BIOS since early March, but they rolled out a rev. 1.1 of their TRX40 boards with new BIOS.1 point
-
Grazie, sono contento che stiamo andando verso il completo funzionamento di quesa macchina. Per quanto riguarda il bud di avvio di windows l'ho notato anche io, infatti per ora quando serve lo avvio direttamente dal windows boot manager cliccando f12 all'avvio del pc. Purtroppo penso sia un bug di OC essendo ancora alle prime versione penso ci stia come cosa. Appena ho novità comunque provvederò ad aggiornare la EFI ed a pubblicarla qui. Se serve qualcosa scrivimi su Telegram @zADiegoAz1 point
-
1 point
-
You have a very valid point, and I think that discussion is more meta and observing how most of us (at least in my own experiences) got here, and what we were told to do when first starting out, before we got here. When it came to PCIe passthrough with VFIO, it was very much - "make sure you blacklist things" as common knowledge (esp with GPUs), and more often than not, it worked. It was the most heavily emphasized 'fact' in regards to this. Most topics won't ever suggest "not unblacklisting" as a solution, and if so it's very rare. So since it's the first things we learned, it's most likely an 'intuitive' thing to do. For example in earlier discussions around getting this specific BT/WiFi card to work, it was mentioned to blacklist the drivers. Then as it works, it tends to accumulate more than it gets removed. Currently, I don't have anything blacklisted.1 point
-
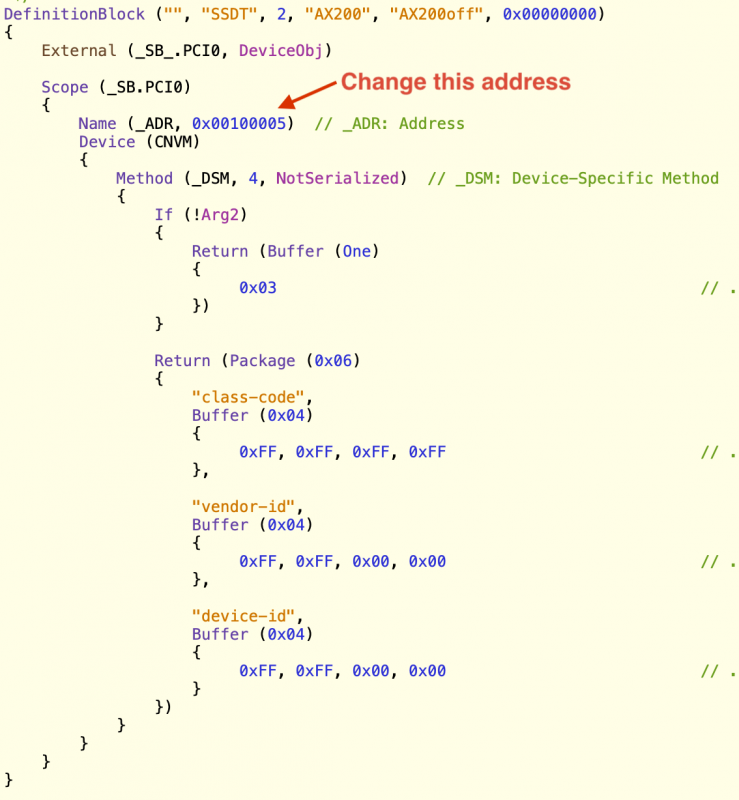
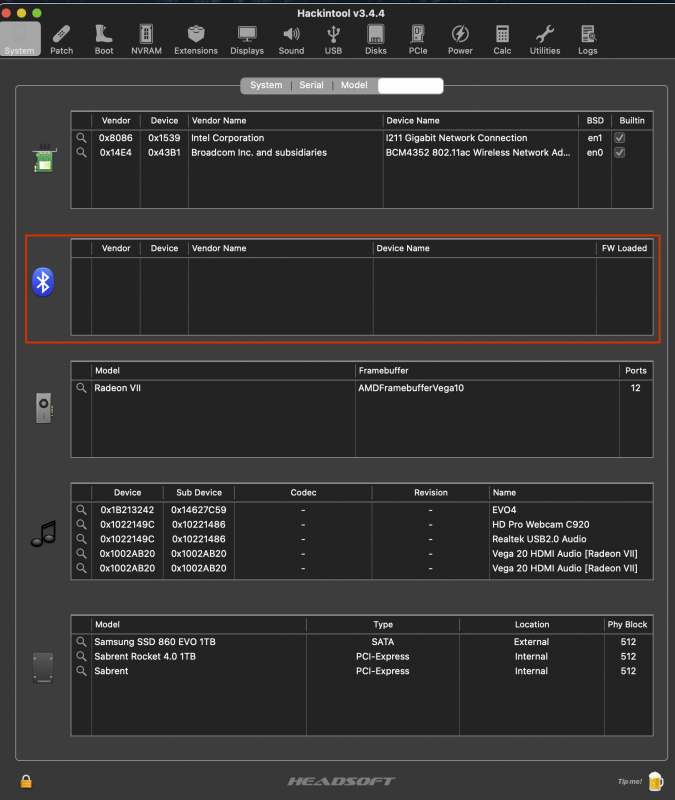
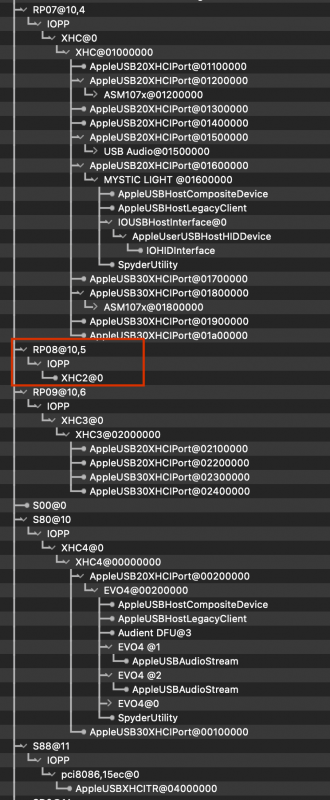
I removed shrouds on TRX40 Designare and MSI mobos, but I did before assembly: not difficult, just a few screws. Once mobo is inside a case, it's a lot more work. If you only want to disable BT, you can cut the power to the AX200. In fact, when I was using special kexts (early in this thread), I had to specifically pass USB power to get the AX200 working (that earlier post references the TRX40 Designare mobo if you look it up). BT from the AX200 worked really well; I think it had greater range than the macOS compatible pcb. But at the time there was no WiFi; I think the hackers have got that working now (but I haven't kept up with their progress). On my current MSI mobo, the USB power is 0489:e07a, which comes from 48.00,3. When I look inside IORegistryExplorer, the swapped BT/Wifi card is appearing under AMD Matisse USB 3 (149c) at address 10,5. (On the Intel side, native BT/Wifi cards are inactivated with SSDT files; this might be another approach.) *** UPDATE I worked on an SSDT that will inactive BT/WiFi. You just have to determine the device address using IORegistryExplorer (IORE) and adjust the address inside the SSDT. Simple. To use, complete the address check described below and adjust the address inside the file SSDT-NoAX200.aml, enable the file in OpenCore and reboot. (To restore function: disable the SSDT in OpenCore and reboot.) First the normal IORE. Locate the address where you find the BT/WiFi card under a USB device. (I've used another SSDT to rename addresses to RP0x.) Next, adjust the SSDT so that its address matches your address in IORE from above step: Now to show how it works... the above device @10,5 gets collapsed. Normal: Inactivated: no BT. Hackintool, normal: Hackintool after inactivation (the actual BT/WiFi card still shows up; but has no power): Hackintool after inactivation (BT entry is gone): SSDT-NoAX200.aml.zip1 point
-
I've had same issue many times with Proxmox and even on their forum, they could not help. Solution is never blacklist GPU, otherwise command line disappears from host monitor and if any thing goes wrong with GUI, the only solution is to re-install Proxmox (which I've had to do so many times, I've lost count...). I've had GUI disappear after simply changing the Proxmox NVMe drive to a different slot. For ethernet, I leave one port (Aquantia) for host and the other I transfer to macOS. I don't VM any other ethernet ports. To manually adjust the ethernet, I ran "nano /etc/network/interfaces" and entered the following code (and after changing, ran the command: /etc/init.d/networking restart): As for BT/Wifi, I never got a PCIe card to work. I eventually swapped out the built-in card for macOS compatible card.1 point
-
Yesterday, I read one of the more significant updates to our understanding of TB. It's related to how the DROM section, which is critical for proper functioning of the SSDT, is constructed. A new tool was uploaded and discussed in detail here by CaseySJ (who is a true guru for TB; all firmware flashing I did was based on his work). There is also an interesting post he made on same page as the link, but 2 posts up. I updated some of my SSDT TB DROM using this tool; all needed improvement. (Morganaut copies off the internet the work of others and charges for her collation. We should share without charge; accordingly, I have no use for her posts.)1 point
-
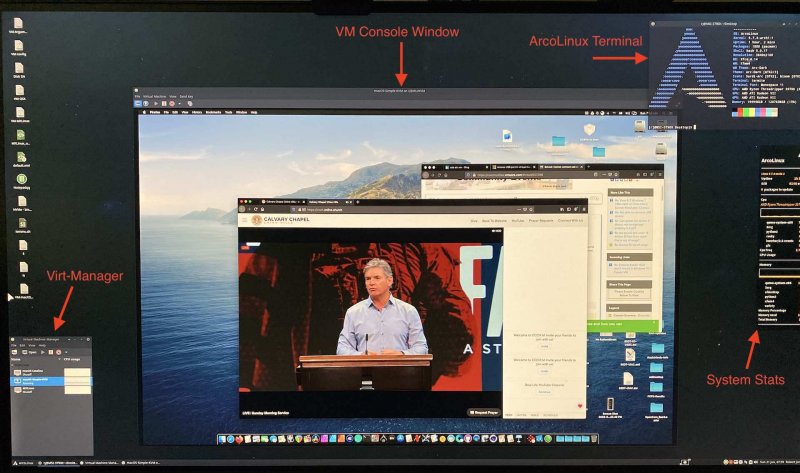
For the past couple of weeks, I've been playing with getting a VM working on ArcoLinux while, in parallel, working on problems in Proxmox. I did this to check on 2 issues: getting Thunderbolt to work and getting rid of the USB dropout problem. The potential advantage of ArcoLinux, unlike Proxmox or UnRAID, is that it gets the latest kernels; maybe a year or two faster than Proxmox or UnRaid. I've finally got a Catalina VM working (see image below). However, I've not yet passed the GPUs and I'm presently only passing 8 cores to the macOS VM. While the installation of ArcoLinux is simple and not much different than Proxmox, setting up a VM is more involved. In ArcoLinux, there is more support for VirtualBox (which doesn't seem to want to play nicely with macOS), but Virt-Manager seems to be a more flexible choice. However, it takes a few more steps to get it working. (I did not document what is involved, nor do I plan on presenting a tutorial; this post is more of an FYI.) Once Virt-Manager is installed and the usual vfio files are created (same as with Proxmox), running the VM is straightforward. There are a few differences, such as the devices seen with IORegistryExplorer having different addresses, which appear more ordered. (I'll later update an image or two to this post.) As with Proxmox, I was not able to get Thunderbolt working for the same reasons: no ability as of yet to pass the bridge portions. Although, I thought I'd read that in the near future, the Linux kernel will allow passing whole devices. (And since ArcoLinux kernels seem, a VM running under ArcoLinux might be expected to pass TB before other distros.) With regards to the USB audio dropout problem, it is about the same as with Proxmox. However, I was able to noticeably reduce, if not eliminate, the dropout by turning off BT and WiFi. (I tried this once before in Proxmox and did not notice an improvement; but I'll revisit it again.) Catalina VM under AcroLinux:1 point
-
Version 1.1.0
1,122 downloads
Semplice e piccola app per creare la usb per installare macOS Il tutto è basato sul metodo ufficiale Apple --> createinstallmedia L'app nella prima parte fornisce il comando da usare, quindi chiunque voglia può prenderlo e copiarlo direttamente sul terminale. Vi è anche la possibilità di creare la usb direttamente. Credits: Apple per macOS Thx @fabiosun per l'icona 🙂 ---- This simple and tiny app is very useful to build an USB installer for OSX It is based on Apple's official installation method (createinstallmedia) It is very simple to use , it is possible to drag and drop OSX installer and USB you have to use. Another great utility by macOS86.it0 points -
che babbo.... hai ragione. visto, grazie. ti sto scrivendo da hack avviato con OC ora, tutto ok. messa efi OC su partizione efi di disco di boot... eseguiti riavvii e non ho riscontrato errori con il POST. Accelerazione hardware funziona e non mi sembra di vedere cose strane.. c'è qualche altro accorgimento che ti viene in mente da fare? grazie0 points
-
Okay salve a tutti, per quanto detto da ICanaro in precendenza volevo avvisare voi altri che l'audio non funziona per ora, su altri forum stanno cercando delle soluzioni, ma ad ora risulta essere buggato con tutti i layout. Per il resto ho grandi novita, ho creato una EFI con OC nella quale funziona tutto e dico tutto, tranne l'audio. funziona anche il wifi con l'uso di heliport, in modo tale da poter rimuovere la wifi adapter usb comprata precedentemente. Questa è la EFI, fatemi sapere come vi trovareEFI OC (NO AUDIO) .zip0 points


