Leaderboard


Popular Content
Showing content with the highest reputation on 06/03/2020 in all areas
-
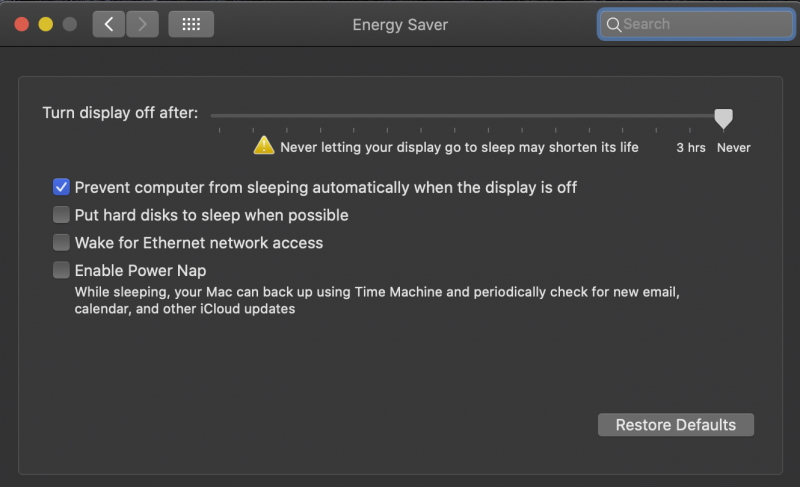
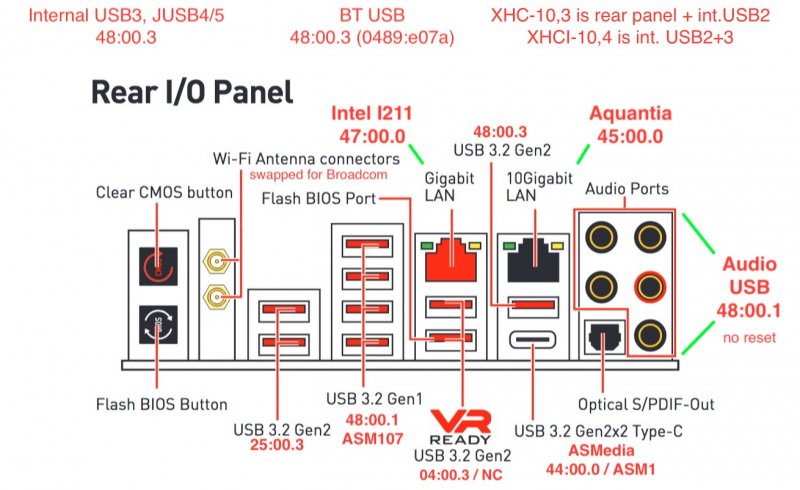
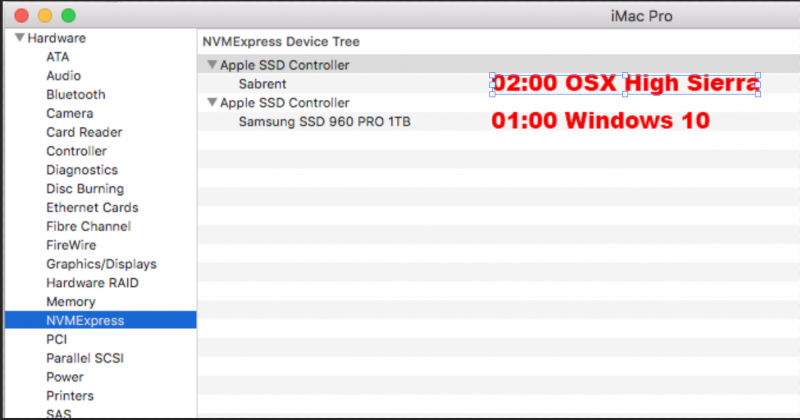
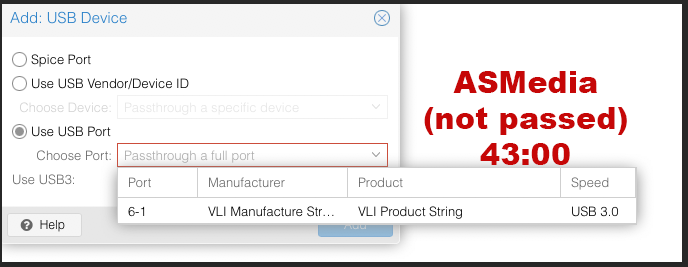
I've finally re-established stability, and it's using the same CPU (which I believe had it's microcode re-written by ArcoLinux <-- thank-you!). Both Radeon VIIs were passed, and today computer has run for 12 hours without any problems. I did inactivate sleep by adjusting Energy Saver (which doesn't work anyway on most Hackintoshes). See Spoiler below. This image was sent to my laptop via AirDrop which works on this build with swapped BT/WiFi card. However, I needed to pass 48:00.3 which powers BT. Without specifically passing 48:00.3, BT did not work. Below is the rear panel for MSI Creator. MSI TRX40 Creator mobo (previously posted here😞 Basically, passing 48:00.3 covers most of the internal ports and rear panel. 48:00.3 must be passed if using a swapped BT/WiFi card, or else there is no USB to power the BT component. 48:00.1 covers the 4-stack and has interwoven, according to IORegistryExplorer, the ASM107 device. So while ASMedia specifically controls the USB-C port, it also is somehow involved with 48:00.1 in the 4-stack ports. The references to XHC and XHCI are from my custom SSDT file. The 10,3 and 10,4 are device locations as reported by IORegistryExplorer. Proxmox is located at 43:00.0 on an NVMe drive, which, of course, is not passed. The MSI Creator mobo has 3 NVMe slots. What are passed in the VM are the following (no SATAs to date, but they're coming, described here😞 VM:
 2 points
 -
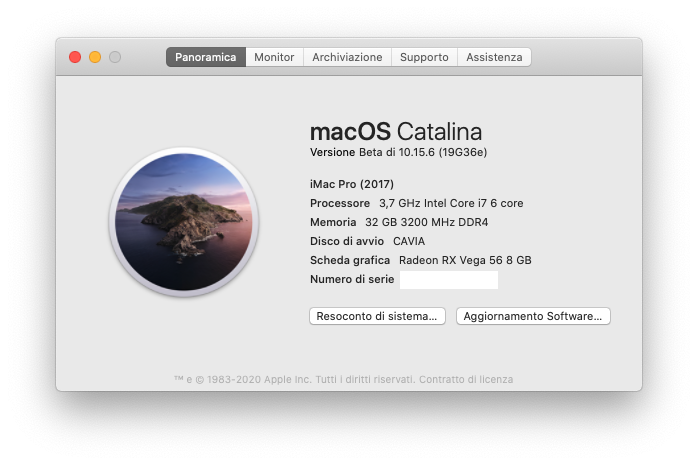
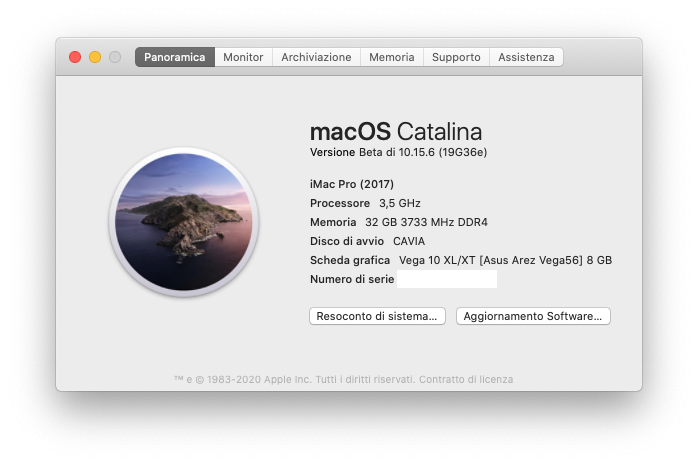
Sbloccata la situazione in cui su catalina del T-RyZo e Z370 non mi proponeva l'aggiornamento alla 10.15.6 beta1: ho eseguito downgrade installando catalina 10.15.4.02 una volta terminato, poi mi è stato proposto l'aggiornamento all'ultima beta (simpatico pacchetto da quasi 5Gb) eseguito e terminato, ecco quanto:
2 points
-
Ragazzi non potete capire (anzi certo che potete capire) che gioia... Ci siamo riusciti. Descrivo qui il problema e soluzione sperando che nessun'altro debba beccarsi questo mal di testa. PROBLEMA: Intel UHD 630 mostra solo 7MB di VRAM, schermo nero in HDMI. HARDWARE: ASUS ROG STRIX H370i Intel i5 9600k / i5 8400 SMBIOS: 18,1 / 19,1 SOLUZIONE: La config postata qui da @br6 funziona. Mi capita di dover staccare e riattaccare il cavo HDMI dopo / durante il logo di boot. Ma a questo punto mi sta più che bene. Ho rimandato indietro la 5500XT. DeviceID: 923E0000 AAPL,ig-platform-id: 0000923E I valori delle patch sono: Conn0: BusID = 5 — Index 1 — Pipe 18 (0x12) Conn1: BusID = 2 — Index 2 — Pipe 18 (0x12) Conn2: BusID = 4 — Index 3 — Pipe 18 (0x12) Conn3: BusID = 0 — Index 0xFFFFFFFF — Pipe 0 (Dummy Conn) Riporto qui l'intera sezione Devices / DeviceProperties: <key>PciRoot(0x0)/Pci(0x2,0x0)</key> <dict> <key>AAPL,ig-platform-id</key> <data>AACSPg==</data> <key>device-id</key> <data>kj4AAA==</data> <key>framebuffer-con0-busid</key> <data>BQAAAA==</data> <key>framebuffer-con0-enable</key> <data>AQAAAA==</data> <key>framebuffer-con0-flags</key> <data>xwMAAA==</data> <key>framebuffer-con0-index</key> <data>AQAAAA==</data> <key>framebuffer-con0-pipe</key> <data>EgAAAA==</data> <key>framebuffer-con0-type</key> <data>AAgAAA==</data> <key>framebuffer-con1-busid</key> <data>AgAAAA==</data> <key>framebuffer-con1-enable</key> <data>AQAAAA==</data> <key>framebuffer-con1-flags</key> <data>xwMAAA==</data> <key>framebuffer-con1-index</key> <data>AgAAAA==</data> <key>framebuffer-con1-pipe</key> <data>EgAAAA==</data> <key>framebuffer-con1-type</key> <data>AAgAAA==</data> <key>framebuffer-con2-busid</key> <data>BAAAAA==</data> <key>framebuffer-con2-enable</key> <data>AQAAAA==</data> <key>framebuffer-con2-flags</key> <data>xwMAAA==</data> <key>framebuffer-con2-index</key> <data>AwAAAA==</data> <key>framebuffer-con2-pipe</key> <data>EgAAAA==</data> <key>framebuffer-con2-type</key> <data>AAgAAA==</data> <key>framebuffer-con3-busid</key> <data>AAAAAA==</data> <key>framebuffer-con3-enable</key> <data>AQAAAA==</data> <key>framebuffer-con3-flags</key> <data>IAAAAA==</data> <key>framebuffer-con3-index</key> <data>/////w==</data> <key>framebuffer-con3-pipe</key> <data>AAAAAA==</data> <key>framebuffer-con3-type</key> <data>AQAAAA==</data> <key>framebuffer-patch-enable</key> <data>AQAAAA==</data> </dict> Grazie del supporto! Tral'altro ieri notte ho fatto anche l'USB Mapping come consigliato da @Gengik84. Oggi posso urlare a gran voce: G R A Z I E I N T E R N E T :rotfl:1 point
-
ho capito per ssdt non vi è niente di particolare da fare, basta inserirlo ed abilitarlo e convertire da clover a OC la patch ZDSM altrimenti usa SSDT-Basic che non necessita patch e ha già il PM incorporato per le USB è meno intuitiva la cosa, ma è spiegata qui https://www.macos86.it/topic/1205-guida-di-base-configurazione-opencore-bootloader/?do=findComment&comment=32215 vedi che combini, poi se non riesci posta le EFI di OC e clover che si controlla1 point
-
That’s a question I’m very glad you asked Fabiosun. I own an RME HDSPe MADI PCIE, that I currently use in my Mac Pro 5.1, previously on High Sierra, now Mojave. Ultimately looking at using that for main audio I/O to RME UFX+ and SPL Madison AD/DA conversion in a 3970x Proxmox Hackintosh setup. A shame I don’t live close by for testing purposes. I imagine it would work fine unlike some of the audio in USB issues, some of you guys seem to be experiencing. But no way of knowing for sure.1 point
-
è ora di aggiornarsi: https://www.macos86.it/topic/1690-hwmonitorsmc2-hardware-monitoring-app/1 point
-
trucco per rendere più veloce la procedura in caso di problemi: Go to /System /Library /CoreServices copy SystemVersion.plist to desktop then change the version 19F101 for 19F96 fonte IM1 point
-
https://images.nvidia.com/mac/pkg/387/WebDriver-387.10.10.10.40.137.pkg guarda con alcuni combattimenti che sento che alcuni con le radeon devono fare..almeno in VM...mi tengo questi che sono risolvibili anche solo dall'utente 🙂1 point
-
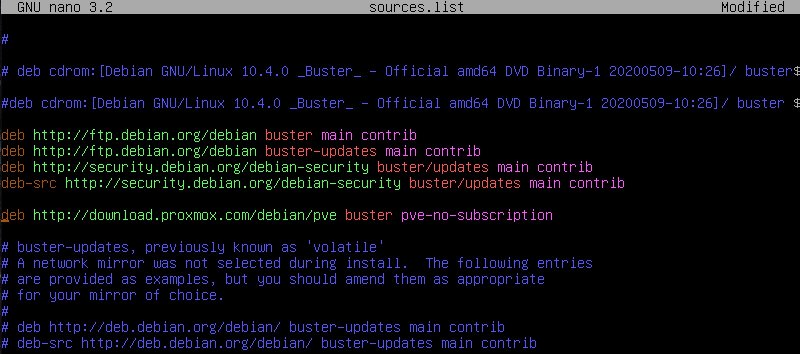
Asus X299 TUF mk1 couldn't install Proxmox right away. So, after installing Debian 10.4 Buster, add proxmox repository and install it to work. 1. Skipped how to installing Debian 10.4 buster and set static ip address 2. add repository like this with root account nano /etc/apt/sources.list deb http://ftp.debian.org/debian buster main contrib deb http://ftp.debian.org/debian buster-updates main contrib deb http://download.proxmox.com/debian/pve buster pve-no-subscription 3. update a repository even if error msg found that proxmox repository 4. install wget and gnupg2 apt install -y wget gnupg2 5. download and add a key.asc cd /etc/apt wget http://download.proxmox.com/debian/key.asc apt-key add key.asc ** this command should be running on the /etc/apt path. 6. download gpg file wget http://download.proxmox.com/debian/proxmox-ve-release-6.x-gpg -O /etc/apt/trusted.gpg.d/proxmox-ve-release-6.x.gpg 7. install a proxmox and other pkgs apt update apt install proxmox-ve postfix open-iscsi then reboot your system will working that proxmox perfectly!
1 point
-
Ok, grazie. Magari correggete quel post ragazzi così qualcun altro potrà evitare di cadere nell'errore... Grazie ancora per la risposta.1 point
-
Yes as @fabiosun says. Install Proxmox from a bootable USB stick to a small old SSD for booting the Proxmox host server, storing your ISOs and vm configs. SSDs are more reliable than using a USB stick to install onto. You will attach this drive to the rear Admedia USB C port. You may have to buy a SATA to USB C adapter. They're easy to find on Amazon. I used my laptop one. Then install Mac (use the 2gb DMG install Mac OS .dmg) onto internal SSD on one of your SATA ports or if you have an M2 drive or two you can use one of them. Then use your spare m2s as data drives for the serious number crunching work like audio and video data!1 point
-
1 point
-
un paio di settimane fa l'ultimo hack di giorgio96 con iMacPro1,1 aveva HEVC attivo con un ivybridge.... tuttodire1 point
-
Ringrazio Gengik84 per l'ottimo tool gli sviluppatori di Clover : apianti, blackosx, blusseau, dmazar, slice20091 point
-
dovrai inserire i seriali che usi con clover0 points
-
a me serve quell'ioreg e le ACPI0 points
-
quello non lo devi usare più, se lo hai rimesso in funzione... vengo li in compagnia per piacere, non postare a caso nel primo thread che trovi, altrimenti poi mi vedo costretto a fare pulizie
0 points