Leaderboard


Popular Content
Showing content with the highest reputation on 05/24/2020 in all areas
-
https://github.com/corpnewt/OCConfigCompare3 points
-
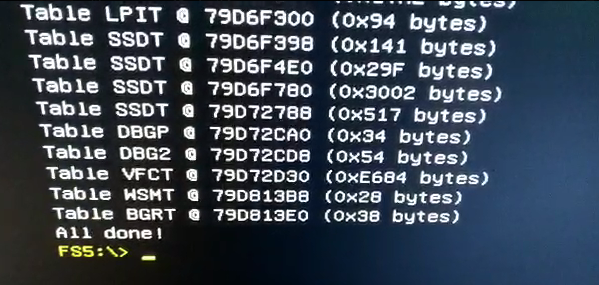
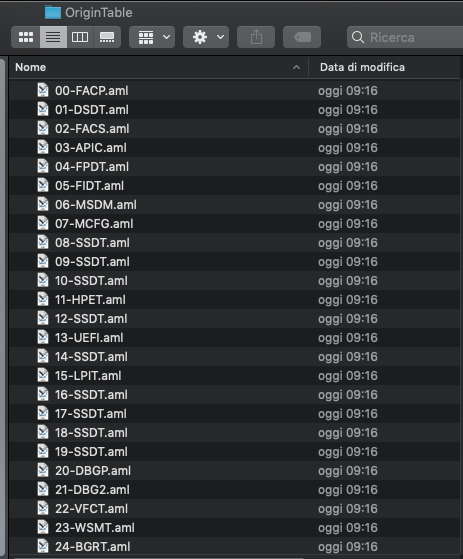
Ho trovato un metodo per estrarre le proprie acpi tramite OpenCore Credits: andreiw per il codice sorgente https://github.com/andreiw/UefiToolsPkg NOTA: questo non è un tools (almeno per ora) ufficiale acidanthera come del resto per esempio audiopkg..etc... Procedimento Scaricate acpidump.efi in allegato e collocatelo in EFI/OC/Tools Abbiamo due opzioni: 1. per facilità di esecuzione è consigliato mettere la efi di OC in una usb ed usarla per il boot 2. alternativa usare il normale disco di avvio ma questo richiede di individuare nella shell ilproprio disco interessato FSx: Per questo vi ho fatto e allegato uno script "ShowEfiUUID" che vi mostrerà l'UUID della partizione EFI. Dovete montare la partizione EFI relativa e poi eseguirlo. Annotavi l'UUID che vi mostrerà il quale sarà salvato nella root della vostra efi. A questo punto servirà usare la shell, quindi riavviate e selezionatela nella gui di OC. Questo esempio è per l'opzione 1 sopra citata eseguite questi comandi: FS0: EFI\OC\Tools\acpidump.efi OriginTables quando avrà finito scrivete exit per uscire dalla shell ed avviate normalmente Troverete le vostre tabelle estratte nella cartella "OriginTables" nella root della partizione EFI Ovviamente ricordate che se usate il disco come boot dovete trovare FS corrispondente... Vi allego alcune immagini dimostrative.. nel mio caso ho scritto FS5: Potete effettuare vari dump delle acpi e cambiare il nome della cartella di destinazione ossia OriginTables con una a vostro piacimento oppure definendola per determinata serie. esempio Origin-Z97 oppure Origin-desktop etc etc... Buon hack! AcpiDump.efi.zip ShowEfiUUID.zip ACPICA-acpidump.efi.zip ACPICA_acpidump_R03_26_20.zip
 1 point
 -
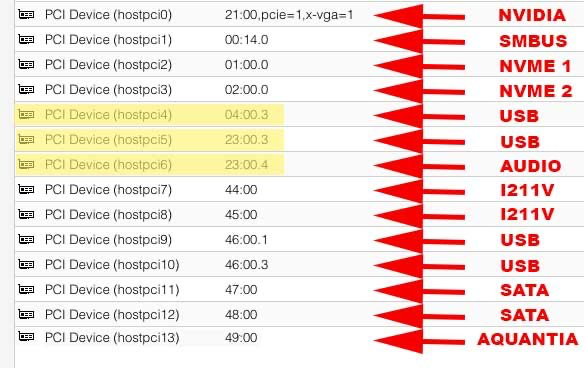
Could you explain a little bit more? Which USB controller did you pass to fix audio? 1) passthrough 46:00 (so all functions) 2) Do not pass through 23:00.4 ? Thanks! I think VFIO.conf is not needed. I put video card in there and none of the other PCIE. All passthrough OK, I will try to remove the video card as well and report back if that still works.
1 point
-
va bene anche così tieni presente che la iGPU (multimonitor) è come si dice, senza testa, per cui se ci colleghi un monitor, schermo nero primary display, se ricordo, la voce è PCIexpress da impostare, che corrisponde alla dedicata, nel tuo caso, la 580 Comunque direi che sei in ordine ora, fai backup EFI e divertiti con l'hack1 point
-
Figurati... ma mi rendo conto che delle volte faccio casini anzi proprio me li cerco...😏 stupid Che mink....a ci voleva se prima di avere questa brillante idea di impostare instant boot andavo a leggere la tua guida!?!? Bene dai.... ormai è andata 🙂 Grazie sempre ragaaaaa ....buona cena.... Sto rifacendo il pennino di Win vediamo che altri casini posso fare stasera......😬1 point
-
Per prima cosa, passa nel thread presentazioni... poi opzione A: opzione B: posta hack_info ed EFI (senza cartella Apple) se non capisci di che parlo, prima di domandare clicca e leggi FAQ che ho in firma L'alimentatore è una cosa seria, degna del resto dell'hardware elencato? marca e modello esatto
1 point
-
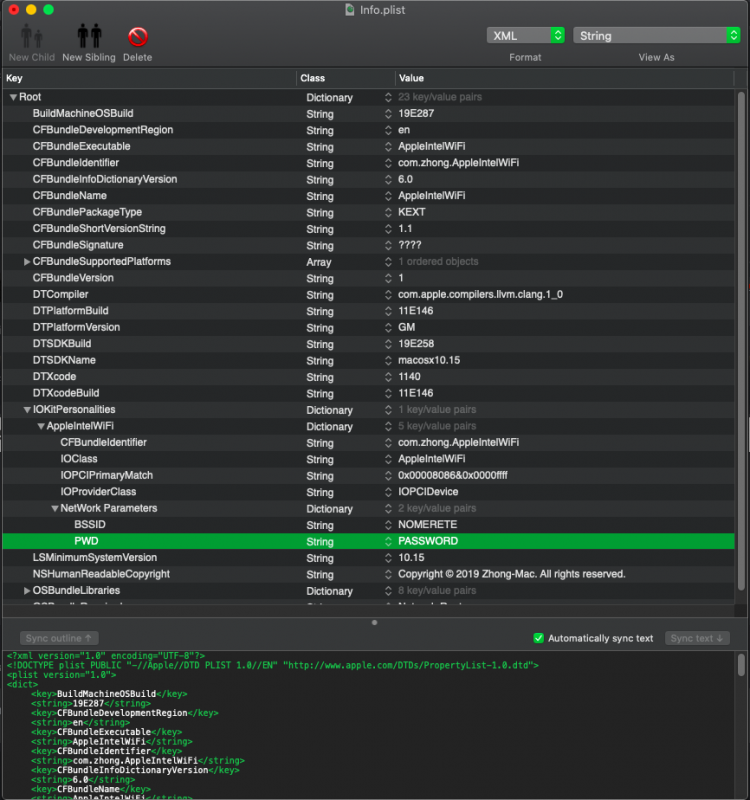
Devi editare il file come nella immagine sottostante per inserire il nome della rete e la password poi suggeriscono di caricarlo tramite riga di commando e non da clover per evitare il kernelpanic da un cattivo funzionamento del kext stesso. Ti passo il kext che funziona sul mio hardware e link del github del progetto sudo mv ./*.kext /tmp sudo chown -R root:wheel /tmp/*.kext sudo kextload /tmp/*.kext AppleIntelWiFi.kext.zip
1 point
-
Buonasera ragazzi, piccolo aggiornamento mi è stato suggerito di utilizzate un kext sperimentale per attivare il wifi della scheda integrata intel, ed effettivamente riesce ad accedere alla rete, mi sembra un pò lenta la connessione e un consumo maggiore della energia, però devo ammettere che non è male. Sto ancora valutendo la sostituzione del pannello lcd interno per risolvere questo dannato effetto banding1 point
-
fast boot puoi rimuoverlo mi sembra da windows con l'utility asrock se non erro comunque leggi anche il manuale, in caso ci sarà anche il clear cmos da ponticellare sulla mobo1 point
-
non usare il dsdt... puoi rimuoverlo adesso..era solo una prova 🙂 fai ioreg i ringraziamenti vanno a @iCanaro... io ho fatto poco o nulla se non erro sei già al limite delle 15 porte totali comunque appena alleghi ioreg ti dico meglio1 point
-
se è quello del log, ha la 5102 meglio aggiornare alla 5118 che pare funzionare bene https://github.com/CloverHackyColor/CloverBootloader/releases/tag/5118 tra l'altro, pensandoci, mi ero scordato di controllare la sezione driver della EFI, ed è un vero disastro come lo era il resto.. azz1 point
-
di sicuro la tastiera PS2 è meglio, infatti è usata in gaming per la minor latenza occhio che le PS2 non si inseriscono/scollegano a PC acceso, si corre il rischio di fulminare qualcosa1 point
-
allora se NEC non ci azzecca niente mappatura e USBinjectall che è da rimuovere, aggiungi questo kext in EFI https://www.macos86.it/files/file/54-usb-3-reneas-nec/1 point
-
posta la EFI che usi con questo notebook ma su windows, funzionano queste porte?1 point
-
Esattamente, manutenzione del config.plist molto più leggera! K.1 point
-
OK da ioreg ssdt-basic è caricato, molto bene nessuna paura, gli abbiamo stravolto la configurazione, al primo giro non l'ha digerita tutta... poi farà anche il ruttino 😉 magari prova a mettere il flag a inject ATI prima voglio che termini la messa a punto dell'hack, poi ci si concentra sulle finiture finali; per cui ora devi dedicarti alla mappatura: Nota 2 - estrarre e postare le ACPI: spesso viene fatta questa richiesta, ecco come fare: riavviare l'hack e fermarsi nella GUI di Clover, premere il tasto F4 e aspettare 30/40 secondi (a monitor non succede assolutamente niente) poi avviare regolarmente, montare la EFI, comprimere e uplodare la cartella origin che si trova nel percorso EFI --> CLOVER --> ACPI Nota 4 - Mappature delle USB: per eseguire tale operazione occorre che il sistema abbia tutte le USB attive con USBIjectall + Port Limit Patch (per i notebook solitamente basta USBInjectall) poi armati di pendrive USB 2 e 3 si avvia ioreg e una alla volta si infila ed espellono entrambe le pendrive in tutte le porte presenti, si prosegue con ioreg -> file -> save as si salva, si comprime e si posta nel proprio thread o in quello dedicato assieme alle ACPI estratte ed eventualmente la EFI senza all'interno la cartella APPLE o Microsoft che appesantiscono il tutto e non servono a niente.1 point
-
a parte macOS che non mi dispiace, tutto l'hardware della mela è agli antipodi per come voglio io un PC... vade retro stà roba comunque, bel lavoro @netgear1 point
-
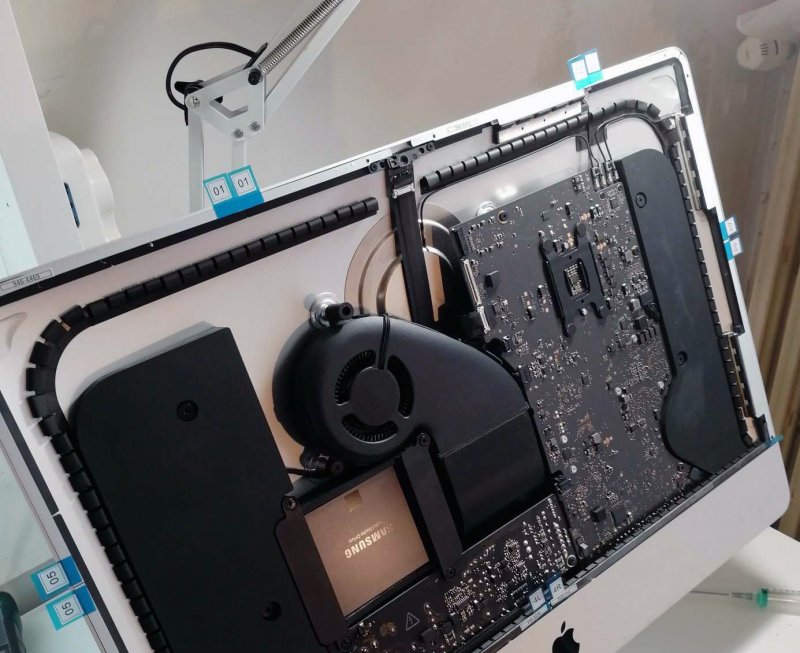
Il KIT del Biadesivo nuovo, numerato per la giusta collocazione: -
1 point
-
ovviamente dovrai confrontare il sample della release che vuoi aggiornare, con il tuo config, e non mescolare delle cose, perché gli aggiornamenti/modifiche sono legati a opencore.efi, con driver e sample di quella build1 point
-
No no va bene così, mi interessava sapere solo se c'erano modiche tali che con le informazioni della 0.5.8 non avviavi sulla 0.59, il resto poi lo vedo al momento di fare il nuovo config, all'inizio le comparavo, ma ora faccio il nuovo config e rizzati...1 point
-
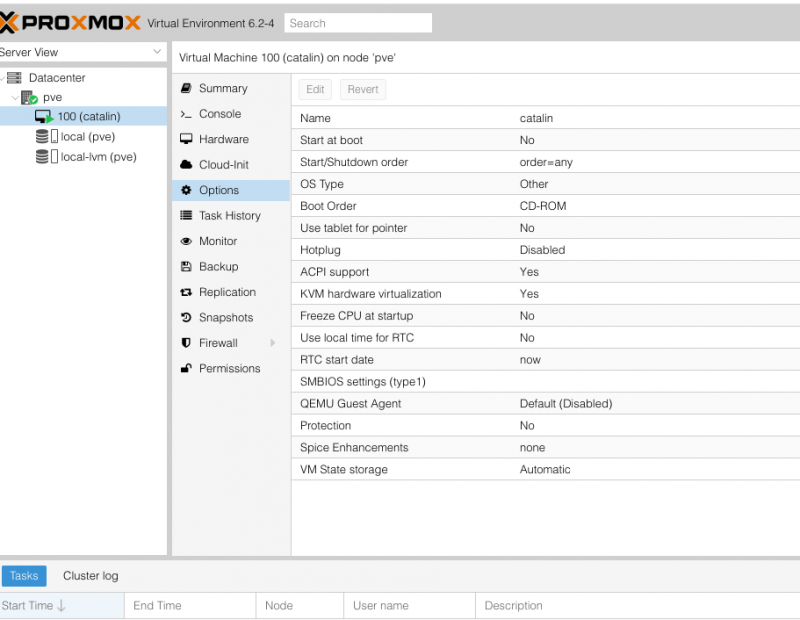
ah si diversi. ma a me la 059 avviava anche con il precedente 058 config 🙂 ps @iCanaro ha anche postato un link dove fare velocemente un compare tra i var iconfig di versioni diverse non me lo ritrovo la volo..ma quando finisce di configurare Proxmox te lo scrive lui 🙂1 point
-
io la uso regolarmente e non ho nessun problema risolve anche il fatto che ora e' possibile decidere il disco di avvio con l'interfaccia ad icone1 point
-
Uscita la Versione R-Drive Image 6.3.6303 :)1 point
-
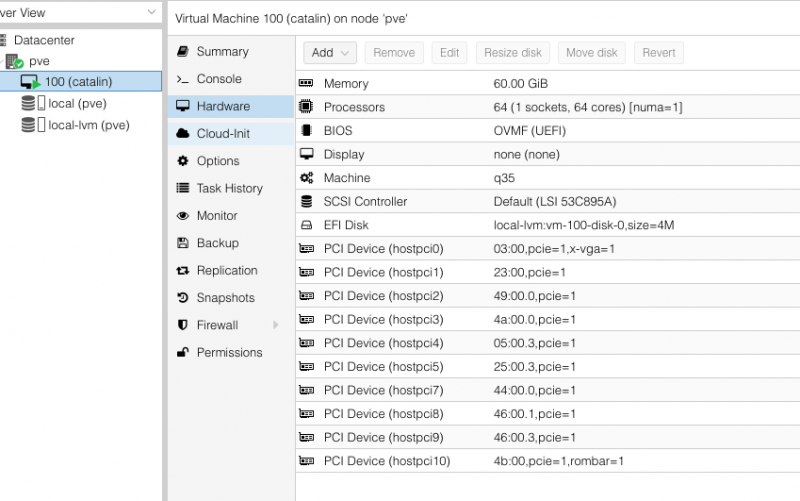
Okay, had a bit of a twiddle with that rogue nic on the ASRock Creator TRX40 board. Pavo took a look at it and totally sorted the problem. Even though I changed it in a post above, it was still going awol. Basically, the problem resides in the Realtek 8125 2.5g (the secondary nic in the mobo) and it goes missing sometimes (that's because it's using Proxmox's 'compatible' 8169 driver). The 'Atlantic' nic or (Aquantia) is always seen but you need to keep that unused for your passthrough OS as the Mac supports this nic. During my re-installs of Proxmox I never got the option for an IP home network address for the Realtek 8125g - when it was found it was providing only IPv6 mac addresses and gateway grief. The elegant (yet long-winded approach) method to overcome this problem is to grab hold of the Realtek 8125g driver from their site Realtek 8125g drvr - you'll find it under the Linux section. Bind that into your Debian/Proxmox install by ssh and re-edit / ifconfig it to become your default gateway nic. Its a bit tricky but with the massive help of the legendary Pavo he was able to sort it and viola! Everything is looking sweet now. With his top class authority we whipped thru the rest of the build and got everything working tip top. So Dual Radeon VIIs working, two MP600s, USBs, and a Black Magic Decklink 8K Pro all going very well. Messages works etc. Using 7,1 smbios in OpenCore with more tweaks from Pavo. Got a lot to think about but after installing my Firewire card (which should be a breeze as it already works in my HS Hack) we should be good to go. Top speed flyer... so all in all the Creator TRX40 from ASRock is not a bad budget board. Though I do like the look of the MSI with tons of m2 nvme reservations... tempted. PCI10 is the Black Magic Decklink. Notice you have to ROMbar=1 to get it working.
1 point
-
again..on audio problem 🙂 installed Catalina 10.15.5 beta 4 USB audio is perfect ALC internal audio is not present at all if I connect my speakers on green output jack if I do not connect and reboot I see Realtek USB 2.0 audio device inbound, but connecting some speakers has no effects In High Sierra no results at all I would like to specify that I can obtain these passing all stuff I can (all usb, audio and so on) in Catalina Same configg in high Sierra no audio to see audio in high Sierra I have to pass as USB device from web interface but audio is problematic... So Catalina has better usb audio /port drivers than highSierra not tested so much in 10.15.4 release..but there I have had similar HS problem ah, as side note in HS I can't see usb 3 device (if I connect also a simple usb pen (3.0) instead usb 2.0 device are well recognised I attach my Catalina 10.15.4 ioreg where I have mapped all my USB ports testing usb2/3 devices for usb audio and internal audio (when this works 😉 ) no need of any additional kext (no AppleAlc, no voodooHDA) fabio’s iMac Pro ioreg cata.ioreg.zip1 point
-
@AllubzV and @all interested to solve audio problem try to pass all your main USB controller and boot with audio jack disconnected (in my case hostpci: 46:00)..audio instead should be 23:00.4 (and do not pass it) No need to patch FLR1 point
-
After a long evening of trying to sort this motherboard out (ASRock Creator TRX40) and some fantastic tips from all here (plus some eye opening conversations with @iFPU who I am indebted to) Ive finally managed to get network connections and other issues sorted out and am slowly rebuilding the VM that went pear shaped the other day! On my reinstall of Proxmox (which was 6.2 for trhe first trime for me), I was getting a IPv6 Mac address offered as the IP address! on one of the nics, the secondarey nic in the dropdown correctly offered me 192.168.1.134 for my home network and then I could get a working install. Still dont know why I was being offered the mac address - maybe something to do with the realtek nic kindof being 'discovered' under the 5.4 kernel of Proxmox 6.2 - who knows?! Anyway got thru install. Insiode the box and after creating a new VM, If anyone is getting no access to the vnc console in order to restart ISO installation of a OS ensure your args in your .conf are correct. Ensure IOMMU in BIOS is set to Enabled and not just Auto, obviously make sure SMT is enabled for virtualisation (which it was!) and check everything else - you dont neccesarily need to have Above 4G ENabled (you can keep csm and Above 4G Disabled - so long as you are booting from UEFI you're good to go for that matter (if anyone has any advantages let me know), etc. You don't need a bridged net adapter as I learned from iGPU, so the setup vm in conf where you get net0 blah blah blah vmbro bridge can go. Youre going to passthrough along with the correct IP address anyway. The mosty important thing is to re-read items that have been mentioned before here (reminder to self) as even though your board might differ from one of the more experienced guys here, there's still many similarities you need to follow. Anyways, Im back in the game and thank you once again for all support here. This is a great site with a reservoir of info and helpful guys.1 point
-
collegare la periferica prima dell'uso in bagno, prima di mollare, calarsi l'armatura scherzo eh 😉0 points
-
Si @Gengik84 ma su questa mobo non è collocata in modo classico ma da un connettore.... insomma sono riuscito anche oggi ad incartarmi da solo....0 points
-
non riesce a smontarla forse @Smigol81 meglio che provi prima con il solo jumper per il reset vedi manuale o PDF online per individuarlo e resetti0 points
-
vedi tu o L/E o S/L/E visto che sei con high sierra0 points
-
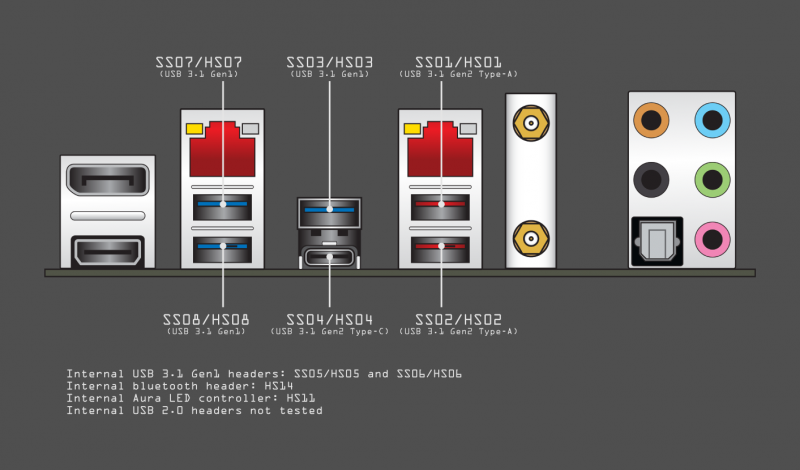
la porta usb-c che non mi funziona dovrebbe essere, stando ad IOReg HS06/SS06
0 points