Leaderboard


Popular Content
Showing content with the highest reputation on 05/21/2020 in all areas
-

Version 1.5.1
1,319 downloads
Tools che crea la struttura della EFI per OpenCore compreso kext e driver. Permette varie tipologie Creazione EFI con OpenCore, kext e driver Release Creazione EFI con OpenCore Beta (viene compilato), kext e driver Release Creazione EFI con OpenCore, kext e driver Beta (viene tutto compilato) Possibilità di compilare OpenCore sia come Release sia come Debug2 points -
tutto ok come sempre niente per il momento da segnalare sempre CLOVER 5100 , squadra che vince non si cambia caso si presentasse qualcosa segnalerò immediatamente Grazie Ragazzi2 points
-
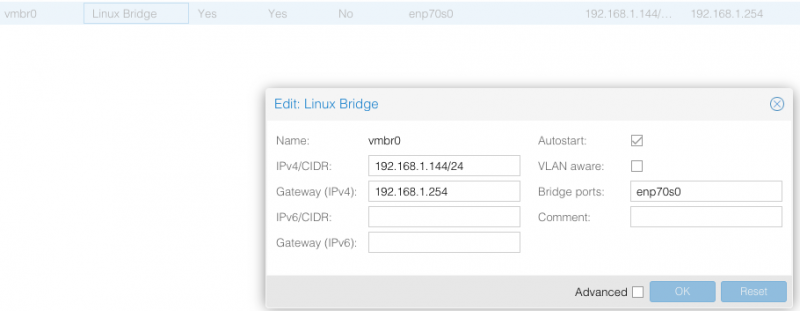
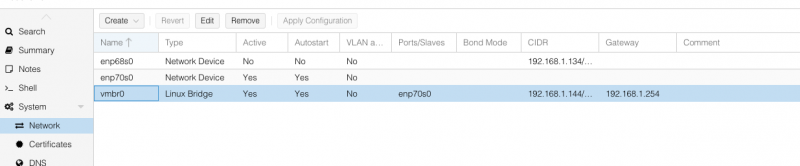
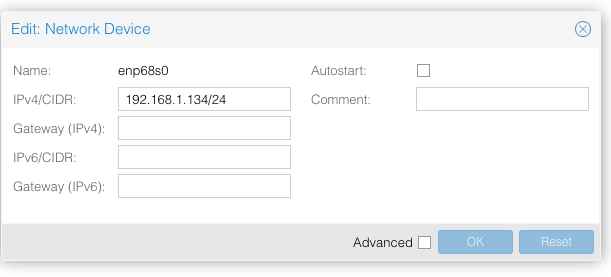
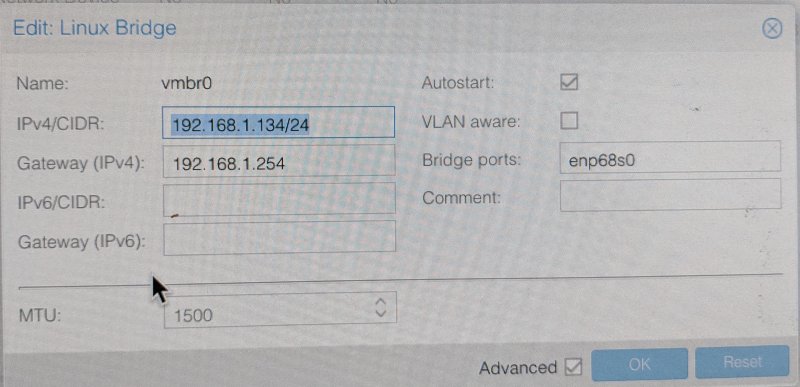
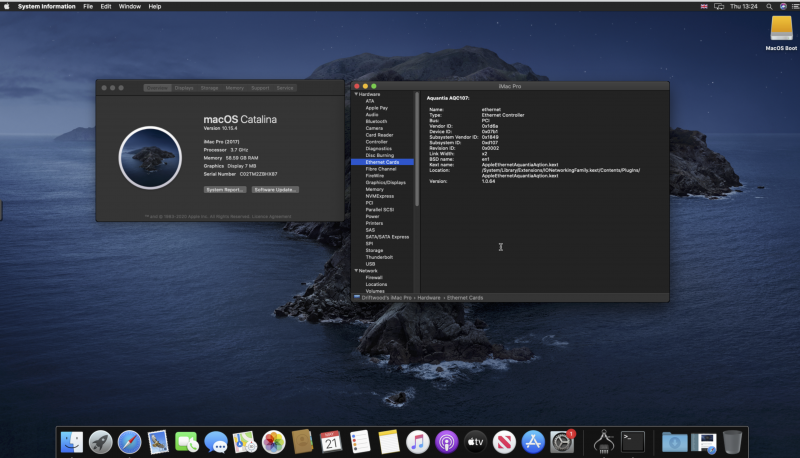
For anyone wanting to swap their nics around for Proxmox. For some reason of mis-selection Proxmox installed its default gateway on my fast Aquantia nic, and I wanted to swap it over to the other Realtek nic in my mobo so I could passthrough the Aquantia to MacOS). Here's how. Use 'lspci' to check which network card is which. In Proxmox use the pve> 'Network' tab and the SHELL cli : Use 'ip a' to get a listing of current Default Gateway and IP being used by Proxmox. Take a look at your current /etc/network/interfaces (use nano but dont change stuff here, CTR X without saving), notice here in this example that interfaces use enp68s0 and is bridge ported to vmbr0. I want to be able to swap/change enp68s0 (A fast 10G Aquantia nic currently 'taken' by the proxmox host) to a 2.5G Realtek on enp70s0. Note enp70s0 is currently not active. The Linux Bridge using old nic selection (BEFORE) ----------------------BEFORE --------------------------- auto lo iface lo inet loopback iface enp68s0 inet manual auto vmbr0 iface vmbr0 inet static address 192.168.1.134 netmask 255.255.255.0 gateway 192.168.1.254 bridge_ports enp68s0 bridge_stp off bridge_fd 0 iface enp70s0 inet manual -------------------------------------------- Lets issue a ip link show command and see whats going on BEFORE the change we're about to swapover nics. root@pve:~# ip link show 1: lo: <LOOPBACK,UP,LOWER_UP> mtu 65536 qdisc noqueue state UNKNOWN mode DEFAULT group default qlen 1000 link/loopback 00:00:00:00:00:00 brd 00:00:00:00:00:00 2: enp70s0: <BROADCAST,MULTICAST> mtu 1500 qdisc noop state DOWN mode DEFAULT group default qlen 1000 link/ether a8:a1:59:16:33:85 brd ff:ff:ff:ff:ff:ff 3: enp68s0: <BROADCAST,MULTICAST,UP,LOWER_UP> mtu 1500 qdisc mq master vmbr0 state UP mode DEFAULT group default qlen 1000 link/ether a8:a1:59:16:33:87 brd ff:ff:ff:ff:ff:ff 4: wlp69s0: <BROADCAST,MULTICAST> mtu 1500 qdisc noop state DOWN mode DEFAULT group default qlen 1000 link/ether 50:eb:71:77:e7:fa brd ff:ff:ff:ff:ff:ff 5: vmbr0: <BROADCAST,MULTICAST,UP,LOWER_UP> mtu 1500 qdisc noqueue state UP mode DEFAULT group default qlen 1000 link/ether a8:a1:59:16:33:87 brd ff:ff:ff:ff:ff:ff Now Ill show you how to to edit in Network tab, or CLI to discover how I got to the results of AFTER the swapover below;- Edit each network device to make sure they each have their own IP (the enp68s0 will keep its current details so you can leave it alone, but remove its gateway because the other nic is going to be default gateway). The nic you are swapping to will now have a Default Gateway to your home network's gateway once youve entered an address (e.g. 198.162.1.254) so enter that in this net device. Note: the enp70s0 wont need IP info if using a Linux bridge as the bridge will hold the details. You will have noticed I have a Linux Bridge in use on vmbr0 so we're going to reassign it to enp70s0: So take a note of the vmbr0 Linux Bridge details, remove & re-add/or just edit existing details to read enp70s0 in place of enp68s0 and bridge ports to = new nic to be used - ie the enp70s0. The enp70s0 will now become vmbr0, input that nic card's address in ipv4 (eg in my case 192.168.1.144/24), set Gateway ipv4 to your home network gateway (e.g. in my case 192.168.1.254) and finally Set to autostart by checking its box) So you have basically swapped the information around from one nic to another and on reboot you've activated the new nic assignment and this will become the default used by proxmox host. You can see by me BEFORE (see top) and AFTER (see below) details as to how it all now looks. (Note: to do above you can alternatively use CLI with nano /etc/network/interfaces if you prefer to edit directly) -----------AFTER--------------- auto lo iface lo inet loopback auto enp70s0 iface enp70s0 inet manual iface enp68s0 inet static address 192.168.1.134/24 auto vmbr0 iface vmbr0 inet static address 192.168.1.144/24 gateway 192.168.1.254 bridge-ports enp70s0 bridge-stp off bridge-fd 0 ----------------- ip a AFTER --------------------------- root@dwd:~# ip a 1: lo: <LOOPBACK,UP,LOWER_UP> mtu 65536 qdisc noqueue state UNKNOWN group default qlen 1000 link/loopback 00:00:00:00:00:00 brd 00:00:00:00:00:00 inet 127.0.0.1/8 scope host lo valid_lft forever preferred_lft forever inet6 ::1/128 scope host valid_lft forever preferred_lft forever 2: enp70s0: <BROADCAST,MULTICAST,UP,LOWER_UP> mtu 1500 qdisc pfifo_fast master vmbr0 state UP group default qlen 1000 link/ether a8:a1:59:16:33:85 brd ff:ff:ff:ff:ff:ff 3: enp68s0: <BROADCAST,MULTICAST> mtu 1500 qdisc noop state DOWN group default qlen 1000 link/ether a8:a1:59:16:33:87 brd ff:ff:ff:ff:ff:ff 4: wlp69s0: <BROADCAST,MULTICAST> mtu 1500 qdisc noop state DOWN group default qlen 1000 link/ether 50:eb:71:77:e7:fa brd ff:ff:ff:ff:ff:ff 5: vmbr0: <BROADCAST,MULTICAST,UP,LOWER_UP> mtu 1500 qdisc noqueue state UP group default qlen 1000 link/ether a8:a1:59:16:33:85 brd ff:ff:ff:ff:ff:ff inet 192.168.1.144/24 brd 192.168.1.255 scope global vmbr0 valid_lft forever preferred_lft forever inet6 2a00:23c6:ab84:8b01:aaa1:59ff:fe16:3385/64 scope global dynamic mngtmpaddr valid_lft 314957848sec preferred_lft 314957848sec inet6 fd65:76f8:30e8:1:aaa1:59ff:fe16:3385/64 scope global dynamic mngtmpaddr valid_lft forever preferred_lft forever inet6 fe80::aaa1:59ff:fe16:3385/64 scope link valid_lft forever preferred_lft forever --------- DONE ------------- Hope this helps anyone who was confused and reluctant to change nics for fear of losing guest web access to the host like I was! AFTER images And when we passthrough the Aquantia 00:44: nic :- vm101.conf contains this addition: hostpci1: 44:00.0,pcie=1 & nano /etc/modprobe.d/vfio.conf contains this addition: #ethernet - Aquantia 1d6a:07b1 (DeviceName:DeviceID) options vfio-pci ids=1d6a:07b1 Boot to MacOS and viola! you get this in System Report>Network The Aquantia ethernet is automatically recognised by Mac OS Catalina! Finally, you can remove or comment out any install leftovers relating to ethernet in your vm conf file, such as:- # net0: vmxnet3=3E:34:8E:BA:0A:50,bridge=vmbr0,firewall=1
2 points
-
puoi diciamo divertirti con PCI, ti ho solo dato informazioni anche perchè oggi purtroppo ci si basa troppo spesso con questo discorso che è solo estetico collegandolo a "qualità hack" ma di fatto non è così2 points
-
Ciao a tutti E' un semplice applicativo che scarica l'ultima versione release di OpenCore Bootloader, le ultime versioni dei kext e driver base acidanthera. Successivamente crea la struttura della EFI. Possibilità di scelta se si usasse FV2 oppure no, quindi adeguerà i driver di conseguenza Modifica i plist in base ai Drivers scelti. THX to @fabiosun per l'icona Lo trovate in Downloads
1 point
-
CMMChris ha pubblicato un kext con il quale si dovrebbero migliorare le prestazioni sulle GPU AMD: ❇️https://www.hackintosh-forum.de/forum/thread/47791-radeonboost-kext-benchmark-scores-wie-am-echten-mac-unter-windows/ ✳️ https://egpu.io/forums/mac-setup/radeonboost-something-for-you-guys-to-try/ ✴️ https://www.insanelymac.com/forum/topic/343461-kext-tired-of-low-geekbench-scores-use-radeonboost/ List of supported GPUs: RX480, RX580, RX590, Vega 56, Vega 64, Vega Frontier, Radeon VII, RX 5500, RX 5500 XT, RX 5600, RX 5700, RX 5700 XT Warning: In 10.15.5 Beta this kext causes a kernel panic with Navi GPUs. It's not possible for me to fix that and might be some kind of bug in the graphics driver. If the issue does not go away with the final release of 10.15.5 I will remove Navi support. grazie @fabiosun per la segnalazione e @tomnic per il link radeonBoost 1.6 Download e log delle modifiche 28 Maggio 2020: V1.6 - Disabled SMU Firmware Loading for Navi10/14 due to broken SMU firmware starting from macOS 10.15.5, improved Polaris compatibility 13 Maggio 2020: V1.5 - Added back some parameters based on users feedback, fixes for Polaris cards 24 aprile 2020: V1.4 - Aggiunti SMBIOS target per iniettore AGPM per impedire l'override della configurazione stock AGPM su SMBIOS che non necessita di un iniettore AGPM (ad es. IMac19,1 ecc.) 20 aprile 2020: V1.3 Sostituito "ATY, EFIVersion" con "ForceLoadFalconSmuFirmware" (grazie agli sviluppatori di Whatgreen per la scoperta di questo parametro), modificato le proprietà Polaris (gli utenti RX480, 580, 590 si prega di ripetere il test), rimosso le proprietà del framebuffer di Apple ( la differenza di prestazione è minore) 19 aprile 2020: V1.2 Supporto rimosso per Vega 56, Vega 64 e Vega Frontier ( REASON ) 19 aprile 2020: V1.1 Rimosse le proprietà del dispositivo non necessarie, aggiunto l'iniettore AGPM incorporato per SMBIOS dove ha senso (iMacPro1,1; MacPro7,1; MacPro5,1; MacPro4,1) 17 aprile 2020: versione pubblica iniziale V1.0 List of supported GPUs: RX480, RX580, RX590 (!!! USE ALONG WHATEVERGREEN !!!) Radeon VII, RX 5500, RX 5500 XT, RX 5600, RX 5700, RX 5700 XT (WHATEVERGREEN NOT NECESSARY) RadeonBoost.kext 1.0.zip RadeonBoost.kext 1.2.zip RadeonBoost.kext 1.3.zip RadeonBoost.kext 1.4.zip RadeonBoost.kext v1.5.zip RadeonBoost.kext-v1.6.zip1 point
-
Version 1.0.0
55 downloads
SSDT per disabilitare le porte non in uso VERSIONE 1 :Testato su MSI Unify di @iCanaro VERSIONE 2: Testato su Asus Tuf X470 Versione 3: Msi B450 Gaming Plus Max NOTA: Da usare in caso di malfunzionamenti di alcune usb, non è obbligo mappare le usb su hardware AMD, quindi non usare a prescindere. Non usare alcun rename per le usb quando viene eseguita la mappatura e nemmeno usbinjectall.kext1 point -
My present drive scheme: The Proxmox boot drive is a 500GB SATA SSD drive at SATA port 1. At SATA port 2, I installed Windows 10 onto a SATA SSD 1TB drive. I'll boot Windows directly; it makes no sense to me to hassle with VM for Windows on this build; just hold down F12 key during BIOS boot. On the mobo, in the M.2 slot closest to the CPU, is the 1TB Sabrent Rocket 4.0 (E16), which is the "Macintosh HD" drive. In the next M.2 slot over from that drive, is the "Catalina" drive, which is a slightly slower Sabrent 1TB NVMe (E12). There are 2 other M.2 slots on this mobo, both facing each other adjacent to the 4th PCIe slot, farthest from the CPU. These are presently empty.1 point
-
I've solved the prolonged boot problem... it took me several days because I forgot a maxim with Hackintoshes. If you get strange boots ,without having made major changes, consider 2 sources: BIOS and OS. That is, our Hackintoshes during our initial builds have frequent crashes/freezes/forced shutdowns. These episodes can lead to corrupted BIOS and macOS. The fix is to re-flash BIOS. This is fast and pretty easy. I'd done that, but it didn't help. The second, and more annoying fix, if you don't have a bootable backup (which I did not on this machine), is do a fresh install of macOS. My Mojave drive was corrupted and this is what led to prolonged boots (2 to 3 minutes, instead of 10 or 15 seconds. So I made a fresh install; this time using Catalina. I started in Mojave and erased (formatted) the new drive. I then copied the EFI partition contents from the Mojave drive to the new drive's EFI partition in preparation for the next step. (Remember to copy the EFI folder to the EFI partition; don't be too fast and copy the contents of the EFI folder to the other EFI partition: it won't boot). I had already downloaded the Catalina installer onto the Mojave drive and next proceeded to begin the installation on the new drive (named "Catalina"). At the end of the installation, when prompted if I wanted to transfer data, I indicated yes and did a migration between the Mojave and Catalina drives. This allowed me to have almost all settings and apps ready to go. Once I knew it was functioning well (and booting very fast), I created a backup. The backup was the old Mojave drive: I erase/formatted it (naming it "Macintoth HD"), using Carbon Copy Cloner (CCC) to duplicate the new Catalina drive. Now there are 2 drives with Catalina. The one labelled "Macintosh HD" will be the main drive and the "Catalina" drive will now become the backup. There was (is?) some documentation for OpenCore indicating that a drive traditionally named "Macintosh HD" will behave better. (I can't swear by this; but I've kept this naming scheme for the main booting macOS drive.) Periodically, while things are stable, I'll run CCC to keep bootable backup current. If I get another corrupted macOS drive, then it's a simple matter to clone the backup back to the "Macintosh HD" drive, saving much time.1 point
-
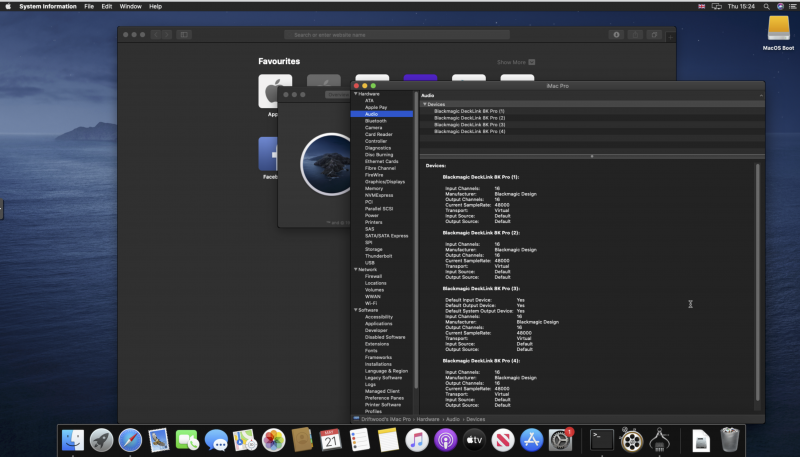
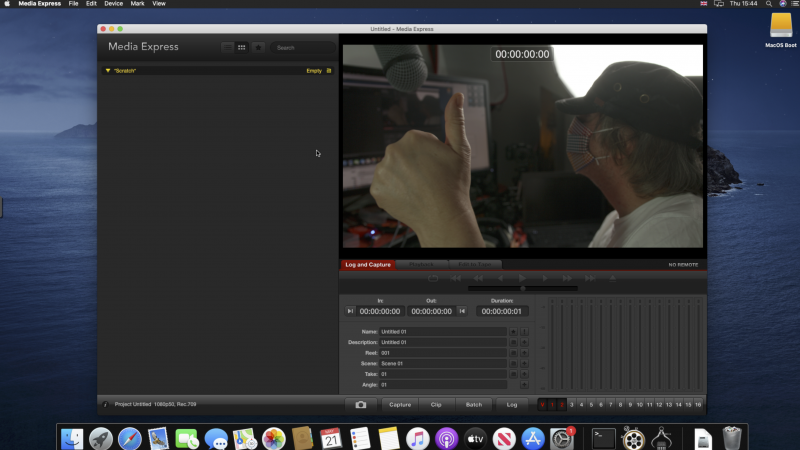
Black Magic Decklink Cards working very well in KVM virtualisation Machines without a problem. Here, a Decklink 8K Pro PCIe card on the 4th lane working no problems inside MacOS Catalina VM. Tested one of the SDI ports 'In 1' on the Decklink , loaded BMD's drivers, quick reboot, ran Decklink Xpress, plugged in a camera, click Record panel, and viola! We have images & Audio. 🙂 VM.conf hostpci2: 4c:00.0,pcie=1 root@:~# nano /etc/modprobe.d/vfio.conf: # Decklink 8K Pro Black Magic Design options vfio-pci ids=bdbd:a14b Live Video Audio
1 point
-
yess e' ok!!!! grazie per la pazienza e la disponibilita', tra l'altro ho "sporcato" il tuo 3d speriamo serva anche a qualcun'altro. non mi resta che guardare l'ssdt con maciasl e vedere le modifiche fatte...1 point
-
avvio in legacy vuole dire semplicemente che l'installer ha piazzato un file di avvio nella zona mbr del disco GPT UEFI, quindi al boot legge zona mbr che una volta caricata passa la palla al resto UEFI, quindi non fa avvio diretto in UEFI come fare se impostassi il BIOS in UEFI. Questo hai fini del funzionamento dell'hack è relativamente importante, anzi a volte serve avvio legacy perché appunto automaticamente si abilita il CSM e poi la grafica funziona correttamente. non si deve avere assolutamente nessuna EFI nella root del macOS, se presente, eliminare eventualmente prosegui nel thread del notebook1 point
-
@iCanaro devo dire che sono molto soddisfatto del lavoro fatto!! (Ovviamente il 99% del merito è tuo! Soprattutto nella scelta dell’hardware😍😘😘😘 sicuramente si dovrà un attimo testare, ma non penso ci siano problemi💪🏼) Piccolo OT: in questi giorni mi sono imbattuto nella sistemazione del clover sul notebook perché ho più icone e sto cercando di sistemarlo con le entries dirette....ma il punto non è questo, quanto alle mie capacità...ovvero la maggior parte dei casini che ho fatto sono sorte perché avendo clover in legacy spesso sbagliavo il config da aggiornare 🤣🤦🏻♂️😱 (Mi riferisco a quello salvato in /Volumer/EFI e a quello che risiede sul disco insieme al OS X) il che mi faceva impazzire, aggiungiamoci pure che sono abbastanza niubbb e il gioco è fatto 😭 trasferendo quella già pochissima esperienza che avevo al mostriciattolo Targato ASrock mi portava a sbagliare anche li.... 🤪 Detto questo adesso visto che in parte ho imparato (IN PARTE perché la parte difficile l’hai fatta tu) ....vorrei provare a Far funzionare le usb sul notebook magari se dici posto ioreg e acpi sul thread di la....Thanksss 🙏🏻1 point
-
@eros74 sostituisci config aggiungi ssdt in patched rimuovi USBinjectall riavvia, posta ioreg e testa le USB config.plist-USBMap.zip SSDT-3-xh_rvp08.aml.zip1 point
-
Ho aggiunto il kext senza togliere WEG e ho fatto i test: in effetti c'è molta differenza. Senza RadeonBoost Con RadeonBost1 point
-
certo, che ogni configurazione deve trovare la propria via, sperimentando1 point
-
su tutte le uscite video?1 point
-
config --> devices flagga useIntelHDMI1 point
-
no no perchè hai disattivato WEG? sono kext che possono coesistere questo kext è solo un semplice injector1 point
-
in che senso il config? se usi OpenCore oltre che aggiungerlo nella efi, lo devi anche definire/abilitare sul config.1 point
-
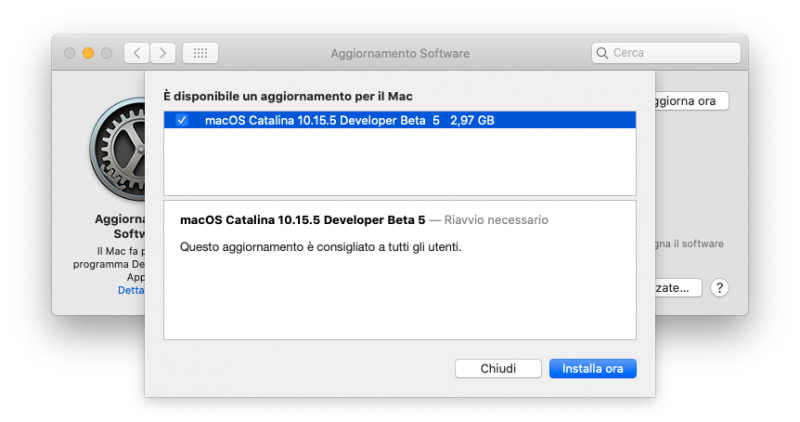
certo che l'ho provato, ma ancora niente 😞 unica miglioria, con il precedente aggiornamento era regredito che lo schermo rimaneva nero e si doveva resettare, ora almeno il desktop si riprende1 point
-
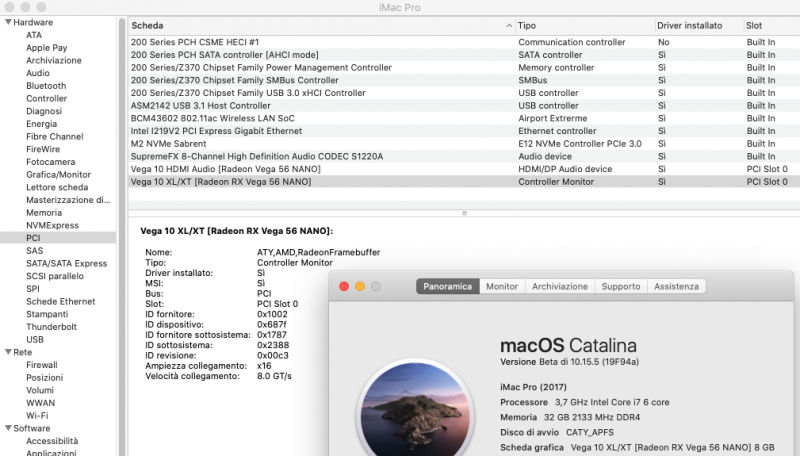
Appema aggiornato. Sembra tutto ok! Clover 5117!
1 point
-
T-RyZo OpenCore 058
1 point
-
Z370 Clover 5117
1 point
-
1 point
-
Ioreg va bene Spiegare il tutto è direi impossibile e non si avrebbe mai fine, stessa cosa per un discorso acpi che un semplice manuale porta ben oltre 1000 pagine. tutto questo poi va comunque portato in hack, conoscenza dei kext di sistema, veri mac etc... Comunque per esempio riguardo a vedere il pm se è configurato, in generale basta un semplice comando sul terminale kextstat | grep -i X86 Qualora tu non avessi alcun risultato significherebbe che non è configurato a modo1 point
-
Se usi la mia soluzione ad EFI separate, gestire tutto su un Disco è un divertimento.1 point
-
Usato da tempo sul mio ryzentosh, fa il suo dovere.1 point
-
Thanks to @Gengik84 to have found this way to solve a very annoying problem This is a pretty simple way to have a working ethernet Gigabit card using one of the most powerful ASUS x299 motherboard without using any flash or patching other than three attached kext 1) SmallTreeIntel8259x.kext v.3.3.15 2) FakePCIID_Intel_GbX.kext (thanks to rehab man) 3) FakePCIID.kext (thanks to rehab man) kexts in point 2 and 3 go in L/E (then use kextrepair app to repair permissions and rebuild caches) download from download section Kext&repair V2.2 and DPCI manager to see our ethernet device ID see this pictures then you have to modify accordly FakePCIID_Intel_GbX.kext info.plist and SmallTreeIntel8259x.kext info plist as pictures below here are kext used in this guide SageGigabit ehernet.zip1 point
-
Mi pia piaci perché sei sintetico0 points
-
Ho voluto fare la prova pure io, ma sempre stessa cosa: si spegne il pc, ma dopo avviandolo nuovamente schermo nero e pc che tipo ha il "fiatone"....😂0 points
-
Ho guardato su internet e tutti i processori intel con la lettera f sono senza igpu si prenderò un altro processore0 points
-
immaginavo 😂 , ti ho postato la mappatura che feci ai tempi comunque procedo con usb in mano0 points
-
risolto dal bios 🙂0 points
-
Perfetto! Adesso ho la voce SAMSUNG sul menù e ovviamente anche l'audio! 😍0 points
-
Sperati i 40 siamo tutti fanciulli 😉... a te quello che hai chiesto... la mappatura la feci tempo fa, e ne era saltata fuori la stringa che avevo in boot e che poi tolsi, comunque quando hai tempo a te i file "RAGAZZO" EFI.zip hack_info.zip iMac di eros.zip HackInfo_Report.zip0 points