Leaderboard
Popular Content
Showing content with the highest reputation on 04/19/2020 in all areas
-
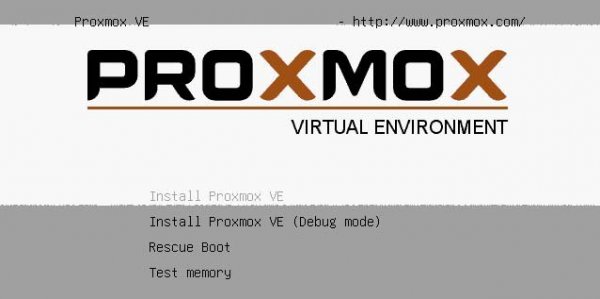
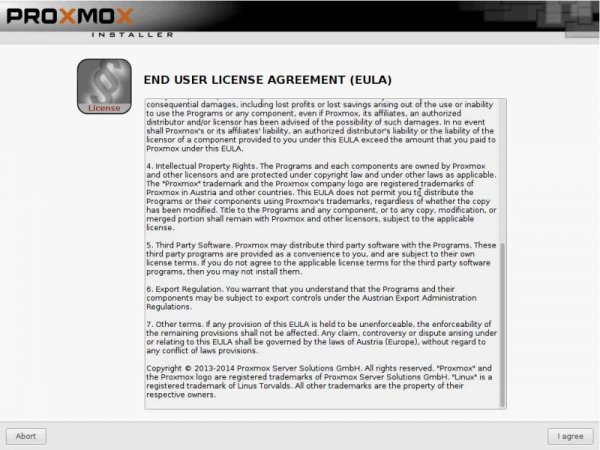
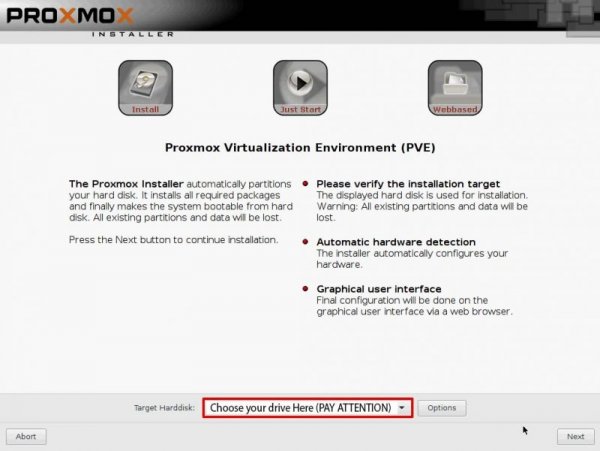
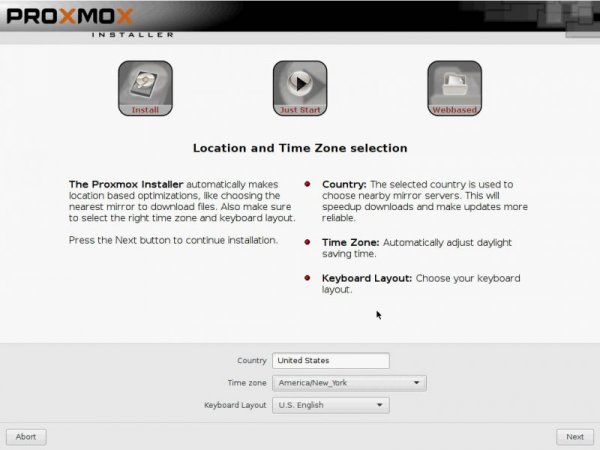
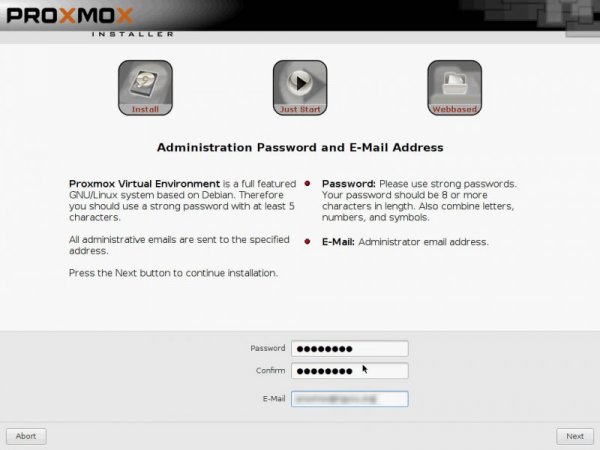
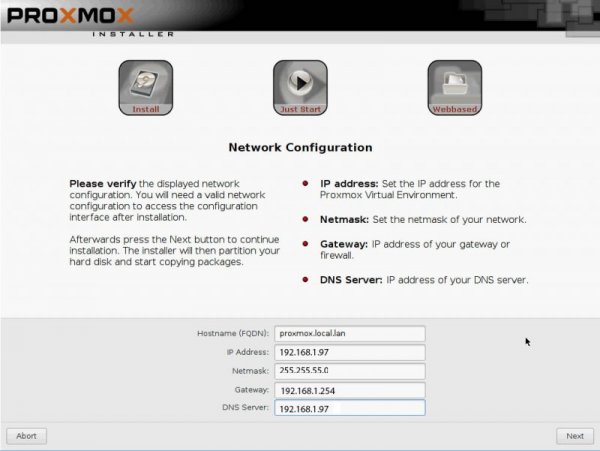
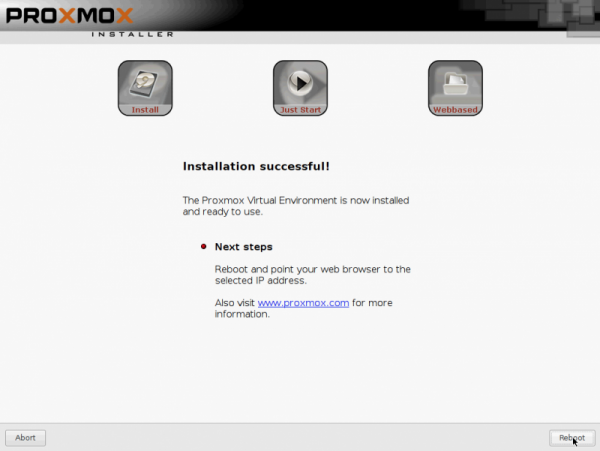
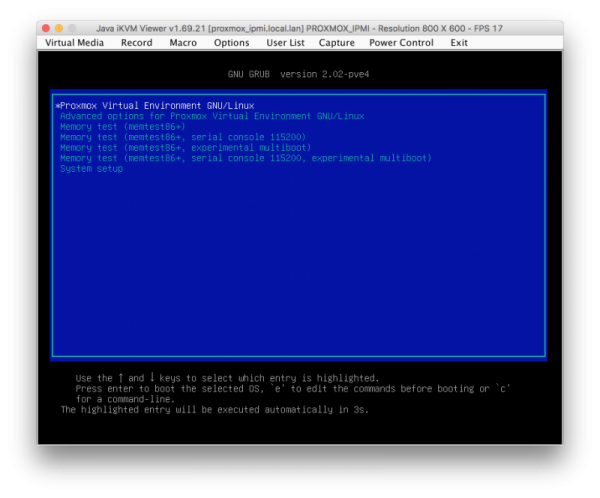
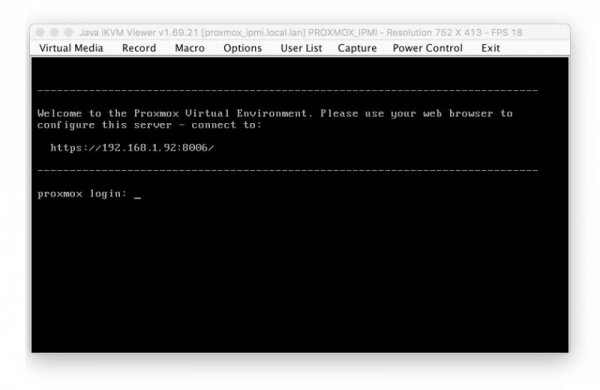
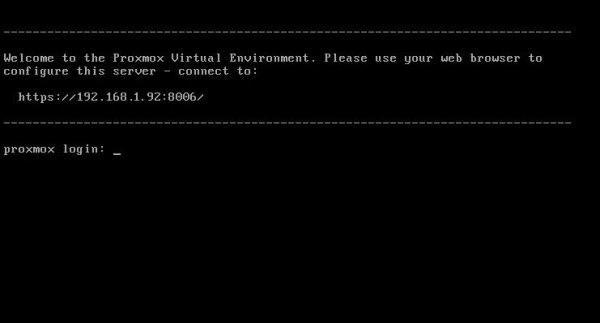
Preface: Inspired by the lack of patches for this new ThreadRipper CPU series , I have started to find a way to have "the fast Amd hack ever". Hard task was to setup a pretty bare machine inside an OSX linux vm. Many solutions were evaluated to reach this important goal. Ubuntu, CentOS, UnRaid and so on Tested many VM and found many interesting stuff on the net. Kholia's or foxlet's GitHub guide for example or nicksherlock's guide more Proxmox like. With these guide is possible to start our job and to have a working OSX..but I need more! 😉 I want to use my single Nvidia Gpu on it and for it I need a different approach. Single GPU usually is a pain because when we passthrough* it to the guest PC..we will loose it. So, we have to use another PC to connect in it or a simple Android or iOS tablet (now I am use my iPhone for this task 🙂 ) So, after some days of brainstorming with @tomnic we choose to start with Proxmox VE. It seemed the most flexible linux distro to reach my goal. macOS High Sierra and Nvidia web driver installed with no compromise. Proxmox Ve allows to build a bare metal system with Gpu passthrough, and, most important thing it has a web interface to control guest PC * Passthrough is a technique to "pass" hardware to a virtual machine loosing only a minimal part of hardware performance More difficult and critical task is passthrough our hardware to VM in a way which will allow me to have a pretty similar performance as a real hack and overall to have GPU at its best in this system. Prequisites: A minimal linux experience (I have had no idea before about linux and this was the main difficulty for me) To know what to search usefull for my need! A OSX, linux or windows system to collect some files (I have used used linux and OSX, with latest one preferred. System configured is in my signature, summarized here: MSI Trx40 10G Pro AMD 3970x Threadripper 32 cores / 64 threads (this guide is also useful for 3960x and maybe for 3990x (capping cores not supported by OSX kernel) 1Tb Nvme Sabrent and so on... Let's start! Mandatory Elements: 0) Proxmox VE (Proxmox Ve's wiki link) 1) a working OSX. Linux, Windows ( in this guide we use OSX High Sierra 10.13.6 2) download Vm_assistant's script, an exclusive script by macOS86.it and @Gengik84 VM assistant From this link a simple guide: Promox VE installation procedure: In this guide I will not do a detailed guide to install this linux release, you can find useful information on: link to Proxmox link to iso installer Use your favorite Iso installer to produce a bootable USB pen drive (8gb or more is fine) In this guide I have used Balena Etcher: link Balena Etcher Warning for initial installation part! * Due a problem with new TRX40 motherboard , ProxMox 6.1 and lower will hang on early booting stage. To avoid this you have to modify grub.cfg file in this way: find this line: linux /boot/vmlinuz-5.3.10-1-pve root=/dev/mapper/pve-root ro quiet with this linux /boot/vmlinuz-5.3.10-1-pve root=/dev/mapper/pve-root ro quiet mce=off adding mce=off allows us to start this exciting journey.... Alternatively you can modify this line directly on boot menu selection before selecting your choice (press E and add mce=off as shown before) thanks @KTC for pointing me in the right direction * this problem could be resolved with a future Proxmox update SOLVED in Proxmox 6.1-3 and greater step 1: boot from your ProxMox Ve USB pen drive, you will have: select Install Proxmox VE and then follow indication you can see below. Note Fill your network data with your (setup should do it for you except for Domain and your email) Installation is done! 😛 Reboot and choose your usb pen drive and boot from it. In a few second you will see: Now pay attention..if you have not modified grub.cfg...you MUST do it now pressing E on keyboard and adding manually mce=off as previously shown. You have also to remember to do it permanently when we start in Proxmox VE first time. At login user is root password (your previous choice during Proxmox installation) now it is possible to be a bit worried..if you are (as I was) not confident with linux command)..but I will try to stay more simple I can. Start to find googling how to read or to modify some files in linux (text configuration file I mean). I have used nano command..you can also use vim or similar command. Now, take note of link you can see in this picture: https://192.16.1.92:8006 (yours could be different) and the magic starts : )1 point
-
@bradipo666 poi con calma, testa anche questa EFI, se avvia, poi posta ioreg EFI 2.zip1 point
-
@bradipo666 prova ad avviare con questo config e testalo un po stai anche pronto, stasera o domani, ti preparo EFI da testare, con alcuni cambiamenti importanti config-1.plist.zip1 point
-
1 point
-
Hack AMD in firma con CPU (Ryzen 9 3950X) e GPU (AMD Radeon VII) aggiornati (in attesa di MainBoard adeguata), OpenCore aggiornato a 0.5.7, Catalina aggiornato a 10.15.4... boost discreti in geekbench, nulli in Cinebench 15 OpenGL e in gaming (non posto il video ma il framerate è sempre troppo altalenante verso lo slideshow nel gioco che uso sempre come test, Xonotic). Senza radeonboost Con radeonboost: Il boost è notevole nei geekbench pure in Catalina per me 😉1 point
-
strano....dovrebbe essere quello...prova questo AppleIntelE1000e.kext.zip1 point
-
prova questo https://github.com/chris1111/AppleIntelE1000e/releases1 point
-
esattamente che modello di Z97 gigio hai? in base a quello si definisce meglio quale kext usare https://www.macos86.it/files/category/8-ethernet/1 point
-
te l'ho già detto 2 volte, questa è la terza apri tuo thread e non continuare a scrivere qui problematiche non attinenti (nel senso che devi mettere a punto tuo hack prima) se vedi la mia firma, quelli colorati sono tutti link, tra le quali mappatura e FAQ, che consiglio lettura, prima domandare 😉 FAQ per prima1 point
-
ciao IGPU when osx boots..you have the same problem you have in a regular hackintosh However not tested Intel BT/wifi stuff I have had x299 gigabyte designare mb before this one and I have had many problems with its integrated thunderbolt on my previous rig With sage 10G ant titan ridge all was working fine (hot plug and so on) In this one I have not tested any TB adapter for now. My MSI has not a thunderbolt header and I would have to test with titan Ridge and the cable trick1 point
-
Ciao ho avuto lo stesso problema dopo aver clonato high sierra su ssd formattato in apfs ho risolto utilizzando solo il terminale seguendo la guida qui: https://hackintosher.com/forums/thread/how-to-update-and-patch-apfs-efi-on-a-hackintosh.126/1 point
-
per adesso non mettere i kext dei sensori...sono rifiniture che si fanno all'ultimo...aggiungi lilu e whateregreen in efi....sostituisci anche osxaptiofix3drv.efi con AptioMemoryFix.efi....hai provato il consiglio di canaro?....non ho guardato per ora il config1 point
-
non le hai su ssdt ma su dsdt inoltre non è detto che ti serva mapparle hai provato senza alcuna patch e senza usbinjectall? se funzionano tutte sei ok così1 point
-
@Alexei-17 se vuoi provare le EFI che ho passato qua https://www.macos86.it/topic/2638-huawei-matebook-d-14/?do=findComment&comment=67699 è riuscito ad installare con la EFI31 point
-
1 point
-
ciao prima di iniziare una lettura alla guida di gengik1 point
-
Ciao perchè High Sierra? per la UHD sarebbe meglio Mojave o anche Catalina1 point
-
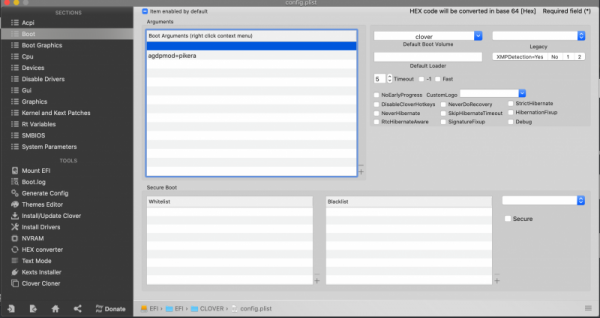
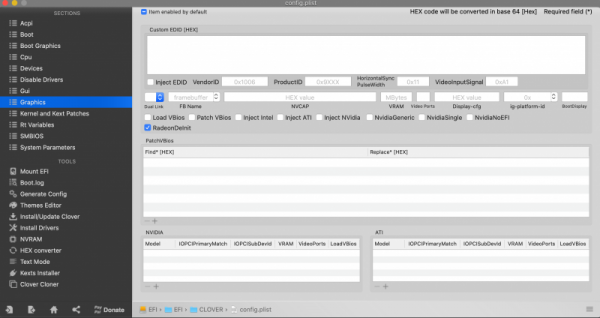
Thanks Fabio for this excellent guide! I got my hackintosh working! I'm using 3970x, 5700XT GPU passthrough, and MP600 NMVE passthrough. Performance is great. I'll share some tips to get the 5700XT GPU passthrough working. This can be helpful for other people using AMD GPUS. I had to do some extra things: The default GPU BIOS doesn't have UEFI enabled. Instead of updating the firmware, which is risky (or non existent tools) , you can download a ROM with UEFI support and let proxmox load/expose it when starting the VM. In my case I downloaded this rom (https://www.techpowerup.com/vgabios/212439/gigabyte-rx5700xt-8192-190616). You have to copy it to /usr/share/kvm/5700xtcustom.rom and specify the ROM file in the GPU pcie passthrough line vm conf: hostpci1: 03:00,pcie=1,x-vga=1,romfile=5700xtref.rom Additionally, I had to enable some extra flags in clover or it didn't boot correctly. Make sure that you pass the agpmod=pikera boot argument. In graphics settings enable RadeonDeinit. Make sure that InjectATI is correctly disabled. If you are using clover configurator press the checkbox twice, otherwise it's enabled by default.1 point
-
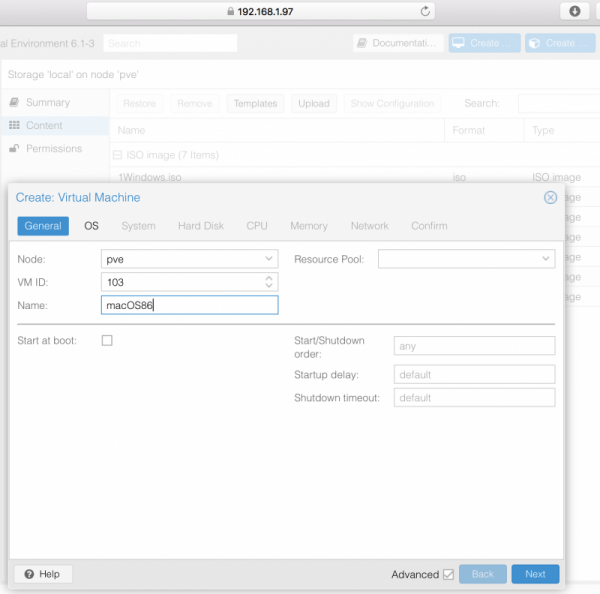
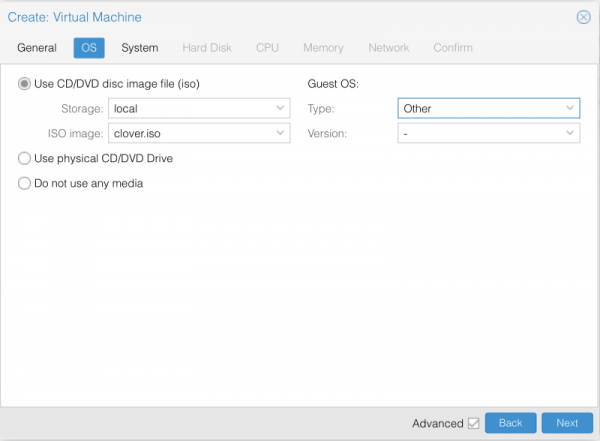
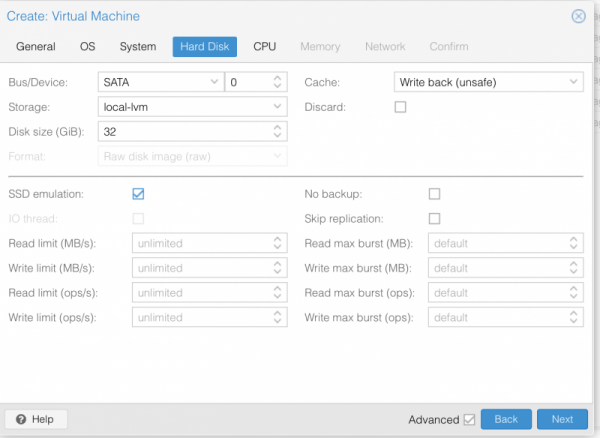
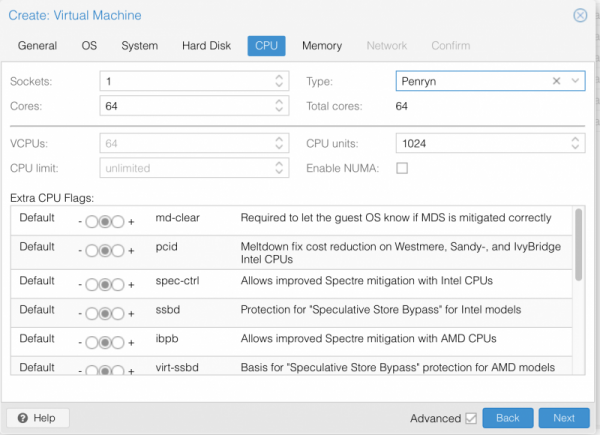
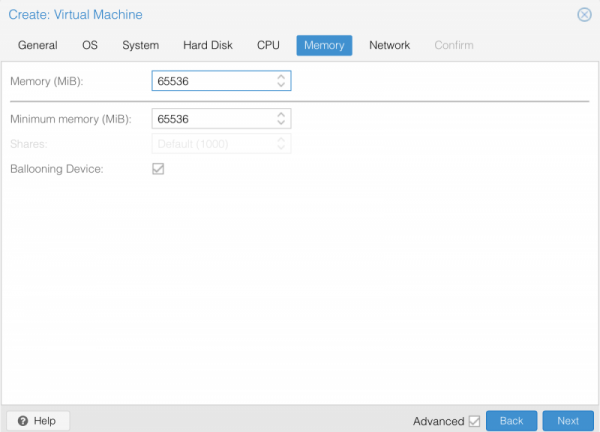
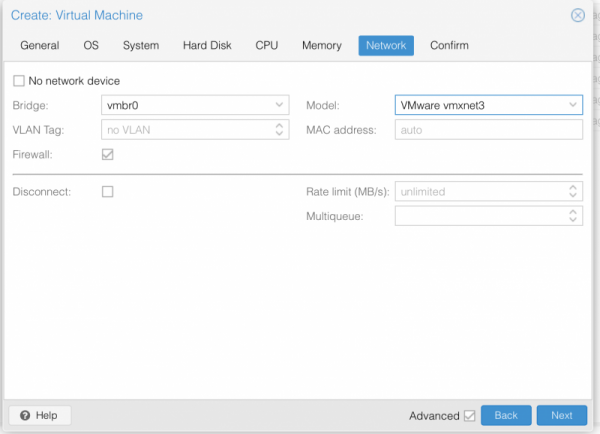
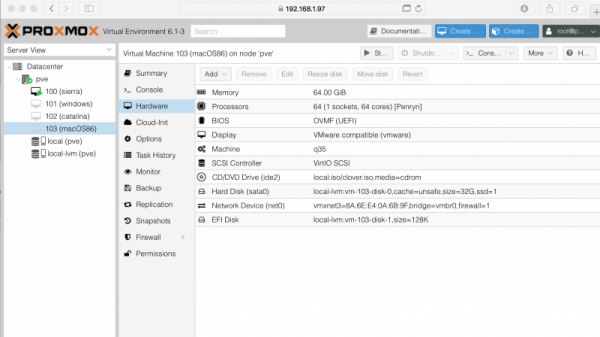
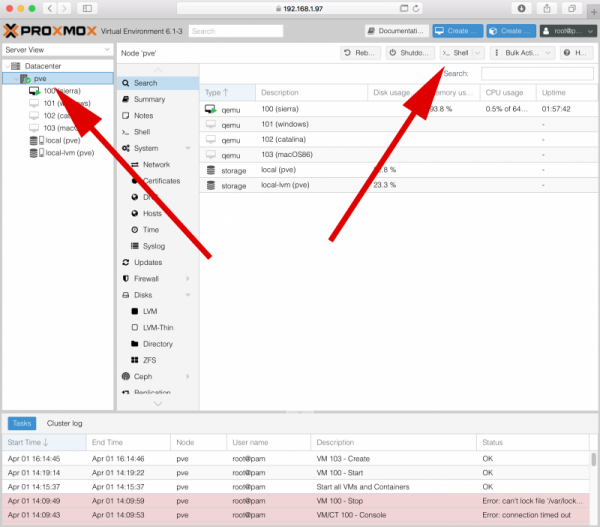
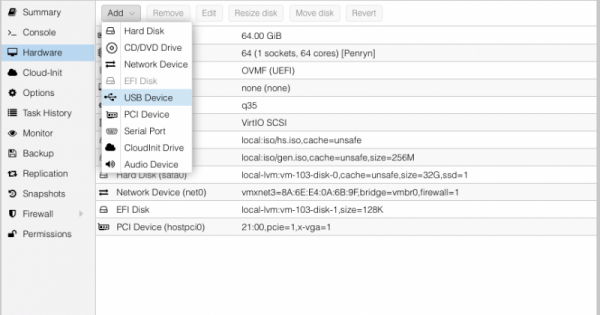
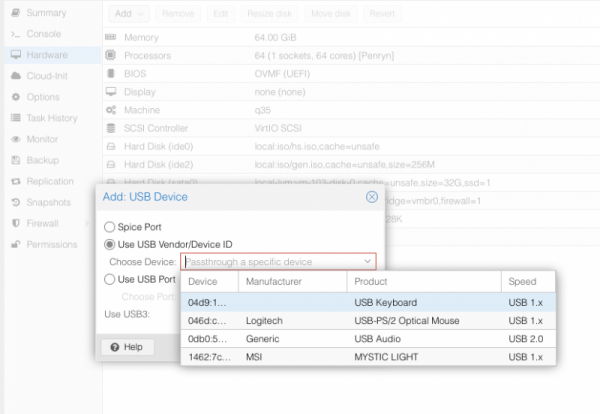
and now....Virtual machine creation. Create button, start to fill all data in the same way I did. Put a flag on Advanced, name your VM in my case macOS86 and go on choose local in Storage tab, clover.iso in ISO image and Other in Guest OS type, next. Now important page (system) . We come back here to the last part of this guide to configure GPU passthrough , for now in Graphic card us VMware compatible, in BIOS OVMF (UEFI) in Machine Q35 in storage local-lvm, then next Hard disk section. Here I have configured in a simple way, pretty similar to other guide, but it is possible to apply many solutions based on your skill to configure this beast... Bus/device SATA cache write back Unsafe, Storage local-lvm, size 32 (as you want), flag on SSD emulation. press next to go to CPU part. In a VM cores and thread are the same (not sure but..hey..I am not an expert 😛 ) so fill as following image, Sockets 1, Cores 64, Type Penryn, flag on enable NUMA, leave default all other parts. You can also try others CPU type but no different results. In a windows VM you can use Host as Processor type. In OSX no! (not really true..we discover it later) next to the memory part. Here you define memory passed to th VM. It is not possible to pass all memory to VM, in my case I can pass about 125 Gb*, in this VM I will use 64 GB (65536 Mb) *less is better, now I am using 118 Gb Next network part. This is very important because it will be mandatory to complete Osx installation (if you use BaseSystem.dmg ReinstallOS method) I use for now VMware vmxnet3 and leave the rest as is. next step review all your selections in confirm tab and If all is ok finish it. Now we have to modify some stuff in a terminal shell so click on node and to shell as shown in this following pictures: now we have to passthrough our keyboard and mouse (I have it connected via USB port) In hardware tab select add and see following pictures: do the same for usb mouse. Important note: disable USB 3 flag otherwise usb are not working for this now..the linux part of VM creation.1 point
-
@iCanaro Polaris non le trovo, intendevi saphire?0 points
-
0 points
-
0 points
-
0 points
-
scusa che domanda è? già dal nome si capisce no! config.plist è il predefinito (quello da usare normalmente) config-WEG-OFF per avviare senza weg con inject ati (per test) config-emergenza serve il manuale istruzioni? (quando te la sei fatta nelle mutande)0 points


