Hi all, thanks to everyone in this community for publishing all your findings and being immensely helpful in sharing your knowledge. I've been through all 38 pages of this thread - many times over to refer to tidbits of information.
I wanted to share my own experiences, what worked for me and what didn't, in a concise post so that someone who may stumble on this in the future might benefit from it. I'm not entirely done yet, but I'm further ahead than I previously was in a different system build.
EDIT: added more notes
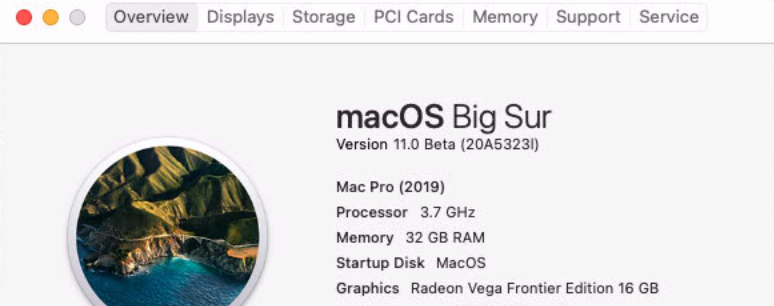
As of this post, my system configuration is:
MacOS Big Sur Beta 3
OpenCore 0.5.9
AsRock TRX40 Creator
AMD Threadripper 3970X [Be Quiet Dark Rock Pro TR4]
64GB DDR4 3200MHz Team T-Force Vulcan Z (2 x 32GB - maxing out later)
Radeon Vega Frontier Edition 16GB @ PCIe Slot 2
- 1080p HDMI Monitor
- 4K Displayport Monitor
Intel 660p 1TB NVME* (don't buy this, note on this later)
Samsung 500GB SSD
- LED Fans* (note on this later)
To be added on:
Gigabyte Alpine Ridge (for use with current Thunderbolt Display)
Scripts used will be posted at the bottom of the post.
The purpose of my build is as a primary workstation for Machine Learning (NLP), which is my primary job day-to-day. I currently use cloud VMs with GPUs in order to do this, as my existing Macs aren't up for the job. However, this is a tough requirement in itself, because anyone in ML will know, Nvidia is the de-facto GPU due to it's CUDA cores, and well, Apple =/= Nvidia. My existing system is:
- 5k iMac Late 2014 (Mojave 10.14.6)
- 3.5GHz 4-core i5
- 24GB DDR3
- 2GB R9 M290X
- 2010 Mac Pro (10.14.4 - Last Supported Version)
- 3.46 GHz 6-core Xeon
- 64GB DDR3 ECC
- 8GB RX 580
- 1GB NVME
The reason I chose the Frontier Edition is specifically due to it's 16GB of HBM, which is very rare in consumer grade GPUs, as the GPUs I access daily all have 16GB, making the work with ML more accessible. For all other intents and purposes, the Radeon VII seems to have more support, and if you were to pick one and didn't need the 16GB of GPU RAM, I would lean towards the Radeon VII or others.
I had previously started with Nick Sherlock's Proxintosh guide, along with many different vanilla guides with the last build, which was with a 2x E5-2680v2 Xeon and a Huanan X79 motherboard. I would not suggest venturing into motherboards that are not widely supported or have community support around them. This led to 2 weeks of my time down the drain.
This time I started with Pavo's Proxintosh guide on Github, while also using Nick Sherlock's guide in parallel. Pavo's guide is a great starting point - but skips over a big step (under the assumption you know what you're doing) of preparing the bootloader and installer.
Assuming you have successfully installed Proxmox, and at least have gotten into the web UI, I will start from there. At this stage, I had identical configs from Pavo's repo:
- /etc/modprobe.d/blacklist.conf
- /etc/modprobe.d/kvm.conf
Minor edits to:
- /etc/modprobe.d/vfio.conf (only GPU Passthrough)
Additionally, I use Remote SSH with VSCode in order to better work with editing the configs/files, without having the terminal close on me. You will need to add your ssh key to Proxmox through the web console first, and then add the Proxmox instance to your VSCode config for easy connection. At this step I would start a spreadsheet to write down your pci configurations as you will refer to this many times over.
The Installer
For Big Sur, you will need to sign up and request developer access. Since my Apple account was already a developer account, this wasn't difficult. I don't know what it would be like for non-developer accounts. It will download a dmg which is an installer application to verify your hardware compatibility before downloading Big Sur.
I tried this with my 2010 Mac Pro first, but hardware verification didn't allow me to, so I ended up having to download the installer again to my iMac, which was allowed to.
The process took a couple of hours, and then I copied over my 'Install macOS Big Sur Beta.app' to my Mac Pro since I offload intensive work over to it.
I used Nick's script with minor modifications:
- In the script 'hdiutil create -o "$dmg_path" -size 16g -layout GPTSPUD -fs HFS+J' was modified (from -size 12g to -size 16g) as the beta 3 in my own device (or at the time of writing) was not big enough.
- It looks to be modified now, but previously where 'in_path=/Applications/Install\ macOS\ Beta.app' was modified to reflect the correct path -> 'in_path=/Applications/Install\ macOS\ Big\ Sur\ Beta.app'
Once I had the dmg, I renamed to iso, and uploaded it into proxmox through the web UI.
- Datacenter -> Storage -> local -> Content -> Upload -> ISO Image
Additionally, I pulled the latest OpenCore installer and moved it there as well. (I didn't have access to Downloads in this forum at the time of writing)
Then following the steps of the remainder of Nick's guide, got Big Sur installed (will take 4-5 reboots for B3) through Proxmox's VNC Viewer.
Notes:
- At this time, no PCIe passthrough
- Only using Pendryn Emulated CPU
- Passed through only 16 Cores / 16 GB
- Installed on a qemu raw disk of 64 GB
- macOS installed as iMacPro1,1
Within the VM, I installed OpenCore configurator, and copied the EFI folder from the OpenCore bootloader into the VM Storage.
After this step, I wanted to get my GPU passthrough to work.
Important Vega Specific Note:
- In my experience, you absolutely must have a gpu reset script in order to get GPU passthrough to work successfully for Vega (specifically for my Frontier Edition).
- I used the reset-gpu.pl script from someone who shared theirs on here, and have made minor modifications to it since. In this script, the part where "rtcwake -m mem -s 4" is important, as it is the function that restarts your system in order for the GPU to be passed through. Additionally, I added the "post-stop" for rebooting proxmox, which can be removed, but whenever I was shutting down the VM - the machine itself would start having fans turboing up like crazy. I haven't isolated the component but safer to do a full reboot. [1]
- Another consideration was that after a few times of this, the RGB LED controller stopped working. I have two sets of these controllers, ones that came with the fans, and another that came with the case. I didn't have enough fan headers so I used both. The case fan controller still worked, but the secondary fan controller did not. (Only the RGB was affected, the fans still worked). They were both independently plugged into the motherboard in their respective RGB header pins. I fixed this by taking the non-working secondary RGB controller pin header and plugging it into the case RGB controller slot, and now it works as normal.
- I have seen notes regarding the latest kernel header but many have pointed out that this does not solve the problem, so I have not upgraded the linux kernel.
- I also downloaded vega rom bios and added it to /usr/share/kvm/vegafrontier.rom
Now I'm able to add the two lines to my 101.conf
- hookscript: local:snippets/reset-gpu.pl
- hostpci0: 4d:00,pcie=1,x-vga=1,romfile=vegafrontier.rom
NVMe Passthrough (failed)
After GPU Passthrough, I wanted to pass through my entire NVMe (Intel 660P - brand new, out the box) to macOS. After several different attempts, including adding "rombar=0", adding additional boot args, and getting an error
- "failed to add PCI capability 0x11[0x50]@0xb0: table & pba overlap, or they don't fit in BARs, or don't align"
- https://patchwork.kernel.org/patch/10707761/
- Apparently several NVME drives, and in my case, specifically the Intel 660P lack a certain module allowing for ease of use with VM passthrough. Stick to NVME drives that have been seen within members' sigs that have proven to work.
I decided to just mount the drive and use it as a qemu. This works with no problems.
If you've gotten to this point, I would recommend using Proxmox's Backup feature (backup tab in VM View) to completely back up the VM in the event something goes wrong.
- You may have to increase the limits of backups.
- Unless you've already partitioned your primary Proxmox drive, would recommend putting it somewhere there's more available storage.
- If you add a large secondary drive to MacOS that does not contain the OS, remember to remove it first from 101.conf prior to this, otherwise the backup will take a very long time as it will save the entire volume. A 64GB VM-mounted drive should take 5-7 mins, and be around 1/3 of the size (22-23GB in my case)
PCIe Passthrough
I had first tried to go all in and pass through all the PCIe ports all at once, but this led to macOS not booting up (with -v args in config.plist). Don't try to pass everything all at once. I would recommend going through one by one in order to isolate and identify which works and which don't. At this point, you should have additional items in your vfio.conf and done:
- update-initramfs -u -k all && update-grub && pve-efiboot-tool refresh
In my case, specifically for the ASRock Creator motherboard, one of the USB Controller headers could not be passed through successfully. (22:00.3, 22:00,4 - Asrock's USB 3.0 and HD Audio)
Currently I have passed through successfully.
hostpci1: 43:00.0,pcie=1 [USB 3.2 Controller]
hostpci2: 47:00.1,pcie=1 [USB 3.0 Controller]
hostpci3: 47:00.3,pcie=1 [USB 3.0 Controller]
hostpci4: 45:00.0,pcie=1,rombar=0 [Intel Network - thanks to rombar tip from iGPU]
hostpci5: 44:00.0,pcie=1 [Aquantia Ethernet]
usb0: host=0461:4dd7 [USB Keyboard passed through]
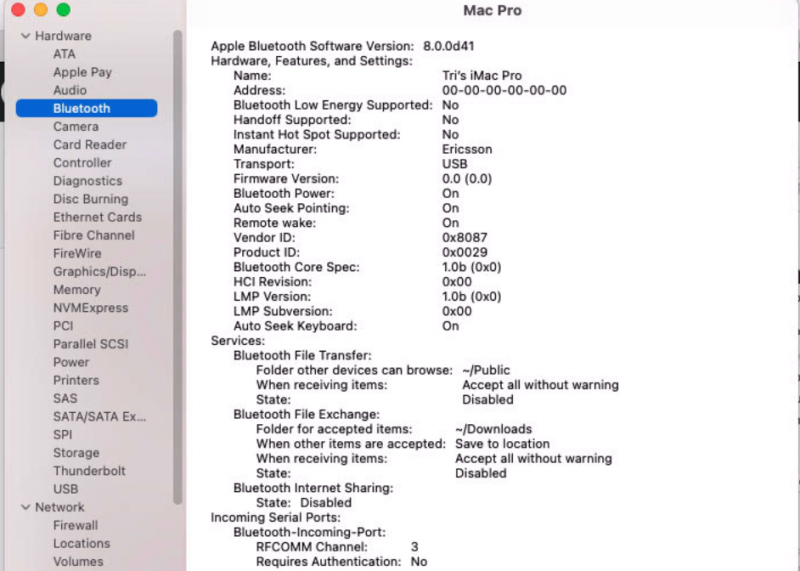
Network & Bluetooth (not working)
I am still using VMXnetwork from Proxmox qemu to access the internet, but have been able to start getting Bluetooth and Wifi viewable within macOS in System Report. I am still using Intel AX200 (which is what comes with the motherboard) and trying to use itlwm kexts to get it working. (as well as previous posts by iGPU)
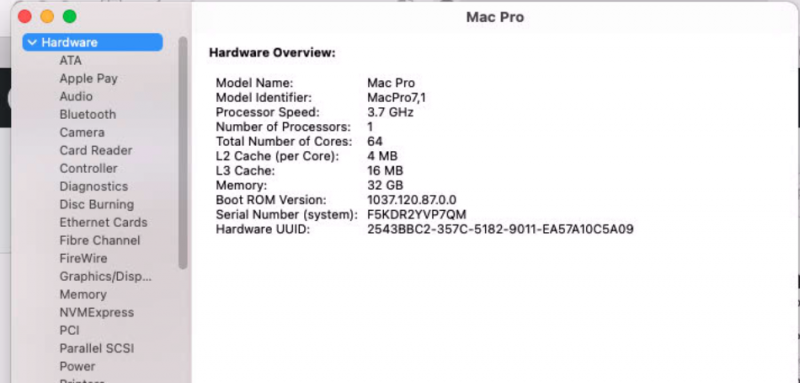
Current MacOS System
GeekBench 5 CPU: 1156 Single-Core, 16350 Multi-Core
GeekBench 5 GFX (Metal): 61914
Passed Through HW:
- 64 Cores (Penryn)
- 32 GB RAM
- Vega Frontier
PCIe Tab does not display anything - guessing due to not passing it through yet.
Bluetooth looks to be enabled, but doesn't actually pick up any devices
OpenCore Configurator
I use OpenCore Configurator to mount and modify the config.plist and add/edit new settings. I modified the system from iMacPro1,1 to MacPro7,1 and got a lift of 1000 points in geekbench in multithreaded. I am currently working on setting up the full host CPU passthrough without Pendryn, as iGPU has referenced in the previous posts with using the kernel patches for Pendryn, cpumask, and not leaf7. Planning on upgrading to 6.0 after xcode finishes downloading on MacOS BS.
Still WIP (I/O):
- Full networking (Wifi/Bluetooth) passthrough as mentioned above, if not, then going the route of getting the BCM card
- Full NVME passthrough (new drive)
- Upgrading to OC 6.0 with Pavo's OCBuilder.
Questions/WIP (Performance Enhancement):
For full CPU Passthrough of the TR3970X, in the CPU Mask in OpenCore configurator, I've seen a few different lines used. In my existing config.plist (vanilla from Nick's OC), in:
Kernel -> Add -> Cpuid1Mask
- Current: FFFFFF00 00000000 00000000 00000000
- Enabled: DummyPowerManagement
- Pavo's: FFFFFFFF 00000000 00000000 00000000
- Enabled: PanicNoKextDump, PowerTimeoutKernelPanic
As far as I've read, would I need to have the system-specific ACPI compiled prior to using full Host CPU? Or would the change to the patches (enabling) take care of that?
There's been several discussions related to GPU Performance with specific SSDTs (which I've tried to understand, but I get lost every time) https://forums.macrumors.com/threads/tired-of-low-geekbench-scores-use-radeonboost.2231366/
I'm not 100% confident in compiling the system SSDT, as you would generally do a compilation on the host system, not the virtualized system, and it seems like PCI mapping is a bit off.
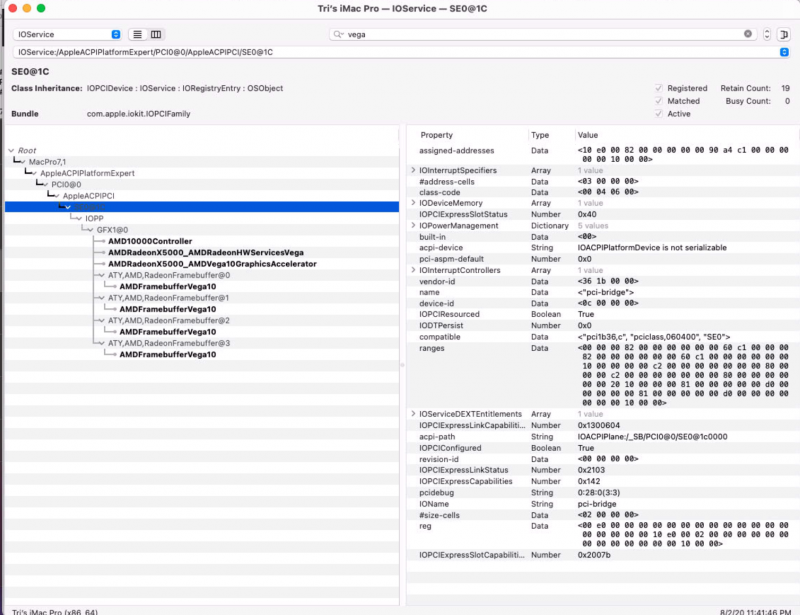
My Vega FE shows as PCI0@0/SE0@1C in IORegistry.
I'm wondering whether there's value in compiling the SSDT, because in my use-case, there will be times when the GPU will be pushed to 100% for hours at a time, and so optimizing the performance in both temp control and speeds will be important as to not fry the system.
I had started with KGP's X299 System SSDTs and his guide using achive.org to try to better understand the process, but because the PCIe slots aren't lining up, it's confusing me a bit.
BIOS Setting Modifications (AsRock TRX40 Creator, thanks to Rox67er):
- Advanced > Onboard Devices Configuration > SR-IOV Support > Enabled
- Advanced > AMD CBS > NBIO Common Options > IOMMU > Enabled
- Advanced > AMD CBS > NBIO Common Option > Enable AER Cap > Enable
- Advanced > AMD CBS > NBIO Common Option > ACS Enable > Enable
- I had tried to disable Bluetooth in BIOS but led to Bluetooth not being detected in MacOS.
Current Kexts (Kext Order is VERY important, although not sure mine is correct, or if I'm missing some. V indicates vanilla from the default installer):
- Lilu (Enabled - V)
- VirtualSMC (Disabled - V)
- Whatevergreen (Enabled - V)
- AGPMInjector (Enabled - V)
- AGPMInjectorVega (Disabled - for Vega Specifically from Pavo's AGPMInjector tool)
- USBPorts (Enabled - V)
- MCEReporterDisabler (Enabled - V)
- AppleALC (Enabled - V)
- itlwm (Enabled - for intel networking)
- IntelBluetoothInjector (Enabled)
- IntelBluetoothFirmware (Enabled)
- LucyRTL8125Ethernet (Enabled)
- itlwmx (Disabled, for newer intel networking, not sure which one AX200 falls in yet)
Helpful One-liners
# Mount EFI Folder within MacOS - Make sure disk1s1 is where your efi is located.
sudo mkdir /Volumes/EFI && sudo mount -t msdos /dev/disk1s1 /Volumes/EFI
# Update Grub and all after vfio.conf edits
update-initramfs -u -k all && update-grub && pve-efiboot-tool refresh
Helpful Tools (within MacOS VM)
- VSCode (preferred Editor, but any others would work)
- OpenCore Configurator - not linking this one bc there seems to be a lot of debate around the source.
- OCBuilder (used for compiling to 6.0)
- Kexts Folder (library of Kexts for a majority of not-as-easy to find Kexts)
- Hackintool
- AGPMInjector
- Apple's Developer Downloads (used to download ioregistryexplorer under Additional Tools for Xcode 12 Beta 3 - does not require Xcode to run, but will need Xcode to compile other stuff, so might as well grab it as well)
- Screen Sharing (controlling VM Mac from iMac, native Mac OS Application)
- MaciASL (for working with SSDTs and stuff)
Things I wish I knew before wasting a lot of time
- If this is your first time, do it exactly as it says first to get things working. Don't be tempted to modify anything that you aren't instructed to first. (bad habit of mine). Then back up often. You will mess up a lot before you get things right.
- Make changes one at a time. Test it. Then continue. This approach will save you a lot more time in the end, because if you're like me and tempted to change a lot of different settings, inevitably, something will cause things to fail, and then you're in a situation where you have no clue what failed - and in the worst of cases, unrecoverable failure, making all the hard work you put in, wasted. Set goals/milestones to reach, and then back up your VM when that is reached. (GPU Passthrough successful, PCIe Passthrough Successful, etc).
- Be prepared to spend at the very least, 3-4 full days getting things to work. It won't be an overnight thing. I'm fairly comfortable with VMs, working with them for at least 4-5 years in cloud environments. However, they were ubuntu kernels and not debian kernels, so there are minor differences. Despite this, my first go at this (prior to this) - I spent a full 1-2 weeks trying to, and failing to, get things working. This time around, it took me 3 days, and still ongoing. This is not an easy project, and don't be fooled by Youtubers who claim it is. To them, it probably is, but for the majority of people who don't do this for a living, or have not dived into this side of things before, there is a significant learning curve. Because we are human, we tend to want to get things done the easiest way possible, and will likely skip a step here or there (or trying something someone said - and it works for them), and could cause you more problems, which will lead you to then try to figure out how to fix that new problem instead of the original problem.
- There are likely zero one-size-fits-all guides/configs/kexts that matches your hardware exactly. Even using 99% of the same hardware, there will likely be differences. For example, in my configuration, I have my GPU in PCIe Slot 2 in order to reach the fan headers easier, and be able to actually pop out the GPU via the PCIe slot. Slot 1 made it nearly impossible to do so. Because of that, my lscpi IDs are different than other members here who have the identical motherboard. Even within the same, identical motherboards, these IDs will be different. Driftwood and Rox67er who both have the ASRock Creator, have different IDs for their PCIe slots than I do.
- Pavo had warned me specifically about ensuring I have the latest BIOS versions early on, so this was one of the first things I did, and because I updated the BIOS (1.7.0) which had AGESA 1.0.0.4 - I did not run into many issues. BIOS is often not discussed in great detail, but plays a crucial role in whether you're going to have lots of problems early on or not.
- Research your GPU support - and then double check it before you buy it. I bought my Vega FE on ebay for a great deal ($350) without doing a ton of Due Diligence. This caused me a lot of problems in the first go at this with the GPU reset bug which I didn't find out about for several days trying to figure out what was going wrong. Don't just look at the specs, google search "[your gpu] proxmox bug" and see what comes up, and anticipate dealing with it.
- Figure out your workflow. You will probably have dozens of runs at this, including reinstalling proxmox from scratch several times because something borked, so make sure you're able to access things easily, especially things like your vfio config, lspci outputs, in the case that you need to wipe your system. When Proxmox reinstalls, it wipes the entire drive, so you will lose everything you did not save (if on the same drive). I have over 40 tabs open related to different bugs/things to read through.
[1] reset-gpu.pl in /var/lib/vz/snippets/reset-gpu.pl
#!/usr/bin/perl
# Hook script for PVE guests to reset AMD GPU before VM start
# chmod +x /var/lib/vz/snippets/reset-gpu.pl
# qm set 101 -hookscript local:snippets/reset-gpu.pl
# https://www.macos86.it/topic/2675-proxmox-ve-osx-guide-discussion/page/10/
use strict;
use warnings;
print "HOOK: " . join(' ', @ARGV). "\n";
# First argument is the vmid
my $vmid = shift;
# Second argument is the phase
my $phase = shift;
if ($phase eq 'pre-start') {
print "HOOK: unbind vtconsole and reset GPU.\n";
system("echo 0 > /sys/class/vtconsole/vtcon0/bind");
system("echo 0 > /sys/class/vtconsole/vtcon1/bind");
system("echo efi-framebuffer.0 > /sys/bus/platform/drivers/efi-framebuffer/unbind");
system("rtcwake -m mem -s 4");
} elsif ($phase eq 'post-stop') {
print "HOOK: $vmid is shutting down. Rebooting System\n";
system("sudo reboot");
} else {
print "HOOK: got unknown phase '$phase'\n";
}
exit(0);
[2] 101.conf in /etc/pve/qemu-server/101.conf
args: -device isa-applesmc,osk="****(c)AppleComputerInc" -smbios type=2 -device usb-kbd,bus=ehci.0,port=2 -cpu Penryn,kvm=on,vendor=GenuineIntel,+kvm_pv_unhalt,+kvm_pv_eoi,+hypervisor,+invtsc,+pcid,+ssse3,+sse4.2,+popcnt,+avx,+avx2,+aes,+fma,+fma4,+bmi1,+bmi2,+xsave,+xsaveopt,check
balloon: 0
bios: ovmf
boot: cdn
bootdisk: virtio0
cores: 64
cpu: Penryn
efidisk0: local-lvm:vm-101-disk-0,size=4M
hookscript: local:snippets/reset-gpu.pl
hostpci0: 4d:00,pcie=1,x-vga=1,romfile=vegafrontier.rom
hostpci1: 43:00.0,pcie=1
hostpci2: 47:00.1,pcie=1
hostpci3: 47:00.3,pcie=1
hostpci4: 45:00.0,pcie=1,rombar=0
hostpci5: 44:00.0,pcie=1
localtime: 1
machine: q35
memory: 32768
name: BigSur
net0: vmxnet3=A6:95:0E:F2:D3:A6,bridge=vmbr0,firewall=1
numa: 1
ostype: other
scsihw: virtio-scsi-pci
smbios1: uuid=****
sockets: 1
usb0: host=0461:4dd7
vga: none
virtio0: local-lvm:vm-101-disk-1,discard=on,size=75G
virtio1: macos-nvme:101/vm-101-disk-0.raw,cache=unsafe,size=750G
vmgenid: ******
[3] vfio.conf in /etc/modprobe.d/vfio.conf
# 4d:00.0 VGA compatible controller [0300]: Advanced Micro Devices, Inc. [AMD/ATI] Vega 10 XTX [Radeon Vega Frontier Edition] [1002:6863]
# 4d:00.1 Audio device [0403]: Advanced Micro Devices, Inc. [AMD/ATI] Vega 10 HDMI Audio [Radeon Vega 56/64] [1002:aaf8]
options vfio-pci ids=1002:6863,1002:aaf8 disable_vga=1
# 47:00.1, 47:00.3 USB controller [0c03]: Advanced Micro Devices, Inc. [AMD] Matisse USB 3.0 Host Controller [1022:149c]
options vfio-pci ids=1022:149c
# 22:00.3 USB controller [0c03]: Advanced Micro Devices, Inc. [AMD] Starship USB 3.0 Host Controller [1022:148c]
options vfio-pci ids=1022:148c
# 43:00.0 USB controller [0c03]: ASMedia Technology Inc. Device [1b21:3242]
options vfio-pci ids=1b21:3242
# 42:08.0 PCI bridge [0604]: Advanced Micro Devices, Inc. [AMD] Device [1022:57a4]
options vfio-pci ids=1022:57a4
# 42:09.0 PCI bridge [0604]: Advanced Micro Devices, Inc. [AMD] Device [1022:57a4]
options vfio-pci ids=1022:57a4
# 4a:00.0 Non-Volatile memory controller [0108]: Intel Corporation Device [8086:f1a8] (rev 03)
options vfio-pci ids=8086:f1a8
### Bluetooth Configuration ###
# 46:00.0 Ethernet controller [0200]: Realtek Semiconductor Co., Ltd. Device [10ec:8125] (rev 01)
# options vfio-pci ids=10ec:8125
# 45:00.0 Network controller [0280]: Intel Corporation Device [8086:2723] (rev 1a)
# Subsystem: Intel Corporation Device [8086:0084]
options vfio-pci ids=8086:2723,8086:0084
# Bus 007 Device 006: ID 8087:0029 Intel Corp.
options vfio-pci ids=8087:0029
# 47:00.0 Non-Essential Instrumentation [1300]: Advanced Micro Devices, Inc. [AMD] Starship/Matisse Reserved SPP [1022:1485]
# options vfio-pci ids=1022:1485
# 44:00.0 Ethernet controller [0200]: Aquantia Corp. AQC107 NBase-T/IEEE 802.3bz Ethernet Controller [AQtion] [1d6a:07b1] (rev 02)
options vfio-pci ids=1d6a:07b1
# 48:00.0 SATA controller [0106]: Advanced Micro Devices, Inc. [AMD] FCH SATA Controller [AHCI mode] [1022:7901] (rev 51)
options vfio-pci ids=1022:7901
[4] blacklist.conf in /etc/modprobe.d/blacklist.conf
blacklist snd_hda_codec_hdmi
blacklist snd_hda_intel
blacklist snd_hda_codec
blacklist snd_hda_core
blacklist radeon
blacklist amdgpu
blacklist btusb
blacklist snd-usb-audio
# blacklist bcma
blacklist xhci_hcd