Renato
-
Posts
44 -
Joined
-
Last visited
Content Type
Profiles
Forums
Events
Downloads
Everything posted by Renato
-
I went to check the config.plist of a hackintosh I have to see what it is you are referring to, however, I do not understand how I would access config.plist of the system in my VM as in order to access it I would need to have access to the OSX system and mount the EFI partition. Is there a way to mount that partition outside of osx, before it boots? or more in general, how do you access that config.plist? or do no need to access the config.plist in the clover.iso (I used the one downloaded by your tool) how can I acheive that?
-
(being tired plays with your mind 🙂 )" just means, It was an error I made for being tired. I have formatted the previously unseen HD, will look for the data to be added in the SMBios. That is a strange one, When I installed a hackintosh system I do not remember performing that action.
-
oops sorry, I wrote SCSI, I meant Sata (being tired plays with your mind 🙂 ). The installation is now done, I am getting a problem while authenticating it, once I put in my apple id and password it falls into an error because it cannot connect to icloud. The error is one I cannot recover in any other way than reboot. I cannot try whether the network works as I do not get to use the OS but I presume it does otherwise I would have never finished the installation as I believe there was plenty of stuff to download.
-
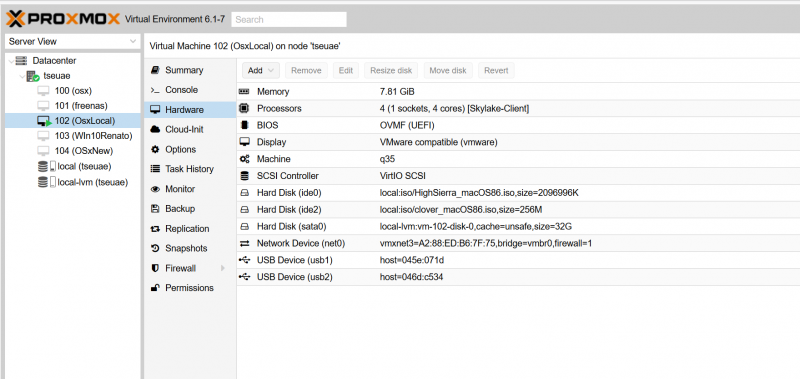
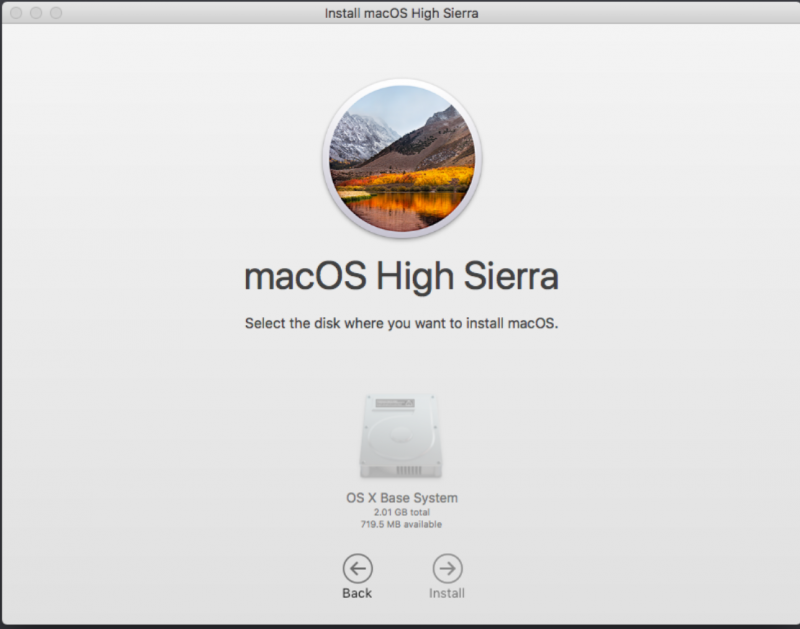
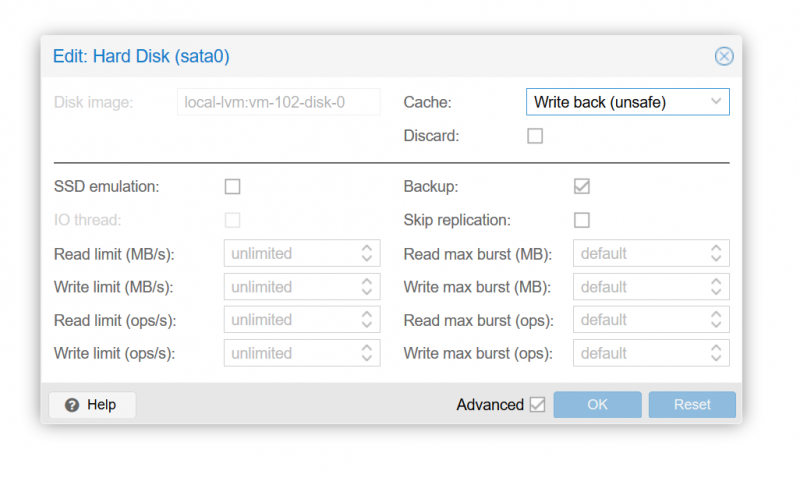
ouch, as murphy said, "solutions generate new problems" I have an OSX vm configured as in the picture below, I have two drives IDE for clover and the OSX CDROM (mounted as an ide HD of 2GB) and the virtual disk of 32GB defined as a SCSI disk. Now (Fig 2) when OSX shows me the choice of HD on which to install itself, it only offers me the choice of a 2GB HD, which I need to speculate, it is the HD in which I mounted the OSX iso, it has no visibility of the 32 GB HD I created and associated to the VM. The HD configuration is listed in fig 3. Any idea?

-
Nunzio vobis gaudio magnum, I finally managed to successfully install osx (High sierra). The error I was making was after setting the OVMF resolution to 1920x1080 (original guide needs to be amended as it still indicates 1024x768) I was not hitting the reset button but I was going straight to booting clover, which means the new resolution never took place. COngratulation to me, it took me one week to figure this out, at least I learned more proxmox than I thought necessary. hitting the reset option is actually indicated in the original guide, maybe it would make sense to highlight better that not doing it would lead to screen corruption and the impossibility to continue.
-
Hi Fabio, is there a way you can email to me (pastebin?) your clover. iso where you are sure of what the resolution should be?
-
ok so it is a catch 22 then, you can make it work with clover. uhmm....
-
Fabio, how did you create DSDT and SSDT for open core ? did you run them against the physical system? The VM? how did you make it to generate them for the VM? At the moment, I cannot use the mouse in a Clover based machine, I can see the pointer but it does not move. In a windows machine I can even use the client mouse and it would work, a dedicate usb mouse is recognized(I can pass it through to the VM) I can see the pointer in the vm but it does nto work. A keyboard instead, with the same setup and passed through, work. Weird.
-
where is the clover config file? btw, will try to pass the usb controller completely as at the moment no usb device works.
-
when I pass the USB controller, just the keyboard works but not the mouse. I will try with an alternative mouse. However the big road-blocker at the moment is the video that corrupts completely. From thereon everything is just fine tuning.
-
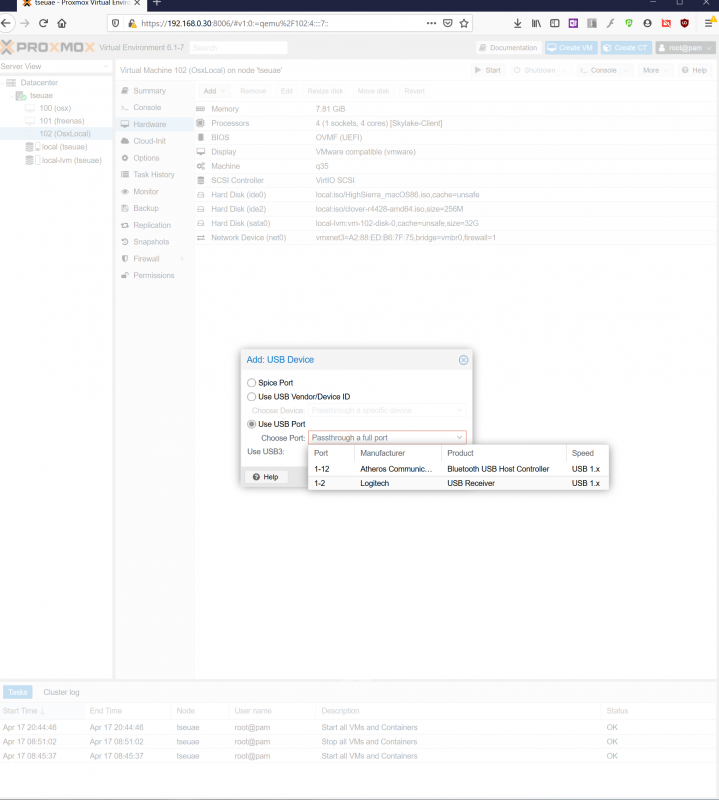
Hi, The usb receiver is the logitech one I do not see a way to add it specifying the port and there seem to be two, see picture below.
-
Hi, not sure what you mean by " pass your mouse as a single USB port", I can chose the USB receiver, but I do not have a choice to add just one port, there is a single option and that includes port 1-2. below you will see the result of the lspci -nn. BTW is there a way for me to upload a picture? 00:00.0 Host bridge [0600]: Intel Corporation Skylake Host Bridge/DRAM Registers [8086:191f] (rev 07) 00:01.0 PCI bridge [0604]: Intel Corporation Skylake PCIe Controller (x16) [8086:1901] (rev 07) 00:14.0 USB controller [0c03]: Intel Corporation Sunrise Point-H USB 3.0 xHCI Controller [8086:a12f] (rev 31) 00:16.0 Communication controller [0780]: Intel Corporation Sunrise Point-H CSME HECI #1 [8086:a13a] (rev 31) 00:17.0 SATA controller [0106]: Intel Corporation Sunrise Point-H SATA controller [AHCI mode] [8086:a102] (rev 31) 00:1b.0 PCI bridge [0604]: Intel Corporation Sunrise Point-H PCI Root Port #17 [8086:a167] (rev f1) 00:1c.0 PCI bridge [0604]: Intel Corporation Sunrise Point-H PCI Express Root Port #1 [8086:a110] (rev f1) 00:1c.2 PCI bridge [0604]: Intel Corporation Sunrise Point-H PCI Express Root Port #3 [8086:a112] (rev f1) 00:1c.3 PCI bridge [0604]: Intel Corporation Sunrise Point-H PCI Express Root Port #4 [8086:a113] (rev f1) 00:1c.4 PCI bridge [0604]: Intel Corporation Sunrise Point-H PCI Express Root Port #5 [8086:a114] (rev f1) 00:1d.0 PCI bridge [0604]: Intel Corporation Sunrise Point-H PCI Express Root Port #9 [8086:a118] (rev f1) 00:1f.0 ISA bridge [0601]: Intel Corporation Sunrise Point-H LPC Controller [8086:a145] (rev 31) 00:1f.2 Memory controller [0580]: Intel Corporation Sunrise Point-H PMC [8086:a121] (rev 31) 00:1f.3 Audio device [0403]: Intel Corporation Sunrise Point-H HD Audio [8086:a170] (rev 31) 00:1f.4 SMBus [0c05]: Intel Corporation Sunrise Point-H SMBus [8086:a123] (rev 31) 01:00.0 VGA compatible controller [0300]: NVIDIA Corporation GM204 [GeForce GTX 970] [10de:13c2] (rev a1) 01:00.1 Audio device [0403]: NVIDIA Corporation GM204 High Definition Audio Controller [10de:0fbb] (rev a1) 04:00.0 PCI bridge [0604]: ASMedia Technology Inc. ASM1083/1085 PCIe to PCI Bridge [1b21:1080] (rev 04) 05:00.0 Multimedia video controller [0400]: Conexant Systems, Inc. CX23880/1/2/3 PCI Video and Audio Decoder [14f1:8800] (rev 05) 05:00.1 Multimedia controller [0480]: Conexant Systems, Inc. CX23880/1/2/3 PCI Video and Audio Decoder [Audio Port] [14f1:8811] (rev 05) 05:00.2 Multimedia controller [0480]: Conexant Systems, Inc. CX23880/1/2/3 PCI Video and Audio Decoder [MPEG Port] [14f1:8802] (rev 05) 05:00.4 Multimedia controller [0480]: Conexant Systems, Inc. CX23880/1/2/3 PCI Video and Audio Decoder [IR Port] [14f1:8804] (rev 05) 06:00.0 Ethernet controller [0200]: Realtek Semiconductor Co., Ltd. RTL8111/8168/8411 PCI Express Gigabit Ethernet Controller [10ec:8168] (rev 15) 07:00.0 Network controller [0280]: Qualcomm Atheros AR9485 Wireless Network Adapter [168c:0037] (rev 01)
-
Almost there. Afetr a painful couple of days, I got to the point to have Clover booting (albeit the screen soon turns into garbage albeit I have modified the botloader resolution) Moreover I cannot make the mouse to work, I pass an USB device (a raido receptor) to what keyboard and mouse connect. The keyboard works, the mouse does not. Go figure.
-
Hi Fabio, I did not ask in order to correct you, my question was meant to be understood as "if you think it could be useful to your guide, I could help by explaining this...." Is there a reason why you added those .iso files by hand ? It is possible to add them already mounted as CDs from the web interface, meaning you can add a CD to your virtual machine and associate it to an iso file so you can add two CDs, one associated to clover.iso and the other one to basesystem.iso. Renato p.s. I am trying to use your guide but my situation is currently slightly different; I already have a hackintosh installed in one HD and I am trying to execute that from inside a VM. I am playing around with this system and will purchase a TRX40 based system once I am sure I can achieve everything I need. I have been burned in the past and now days purchase something just when I have a full (or at least reasonable) certainty, the setup I have in mind is achievable. I was more used playing around with Linux (albeit that is a 10 yo skill) than you are but I am totally new to KVM/Qemu/ProxMox and have not touched a Debian / Ubuntu system in a long while now so I more or less know how to move around but I have quite a few gaps here and there. Hence my questions like the one in this post as I am not sure whether there is a specific reason to add those HD by hand instead of adding them via the web interface as CDs.
-
Hi Fabio, in your instruction set, you indicate to modify the VM config file to add the two lines below. what is not clear to me is where the hs.iso and clover1.iso were created. I believe I read your instruction carefully but I did not find this information. Moreover, are you aware that with the same method you can use an entire SSD for your system? for example you could assign a full M.2 drive to OSX instead of having to rely on the 32GB VM you created. Let me know if you are interested in the full description on how to do it. For the "techie" explanation you could refer to https://pve.proxmox.com/wiki/Physical_disk_to_kvm ide0: local:iso/hs.iso,cache=unsafe ide2: local:iso/clover1.iso,cache=unsafe,size=256M
-
Ok, we'll keep it in english and I will do those tests myself and post the results / experience here, it will be my contribution to the community. The downloadVM assistant link returns an error, has it been taken down? does it require a username / password?
-
I believe we both speak Italian, do you mind if I PVT in Italian if I need some hints? the question on the processors would be easy to address verifying if you can run 2 VM at the same time having 32 (or 64? not sure if as far as proxmox is concerned, one core is one thread) processors allocated. Anyway, this is something I should be able to try by myself once I have proxmox on my "training" system. on IaaS providers one has option to purchase either dedicated or shared CPUs, I would reckon this should be no different. I rather do all my test in advance before spending 4K Euros on a system I can't use the way I envisioned. I love to see that proxmox is debian based which opens lots of other possibilities . Tell me, did pormox recognize all of your TRX40 hardware? (bluetooth, wifi, soundcard, etc?) or you did not care and allocated those resources directly to your OSX?
-
Thank you Fabio for your effort and for a very detailed instruction set. I am currently playing with an old i5 intel system to get comfortable with the whole setup but I am planning to put together, using your setup as a guide, a nice setup/experiment/project as: - having a 3960 TRX40 based system - install on it one VM for Freenas, to be made available to OSX and Windows to store video production - Install on it one VM with Catalina (using OSX as a microsoft supported unix box + video editing) - Install on it a Windows VM for gaming and for a few apps not supported on osx (mainly Microsoft project and microsoft Visio + Games) - Install on it a Windows VM for my wife with a dedicated video card in relation to such project I have a couple of questions you may have gathered some experience on: - Are CPU(s) allocated to a VM, allocated exclusively or is the CPU count for each VM, just setting an upper bound limit on the number of threads a certain VM can execute concurrently at any given time? - Same question for the memory allocated to each VM - Did you find a way to run a VM from a physical disk rather than from a file? ( meaning, I have a windows installation in one disk, and I would like now to run it as a VM) Thank you for your help