iGPU
-
Posts
573 -
Joined
-
Last visited
-
Days Won
17
Content Type
Profiles
Forums
Events
Downloads
Everything posted by iGPU
-
I checked out all of the files inside the SysReport on the Designare mobo where USB works on TB (thanks for sharing meina222), and found nothing useful. Sigh. I think the next step is probably looking at BIOS.
-
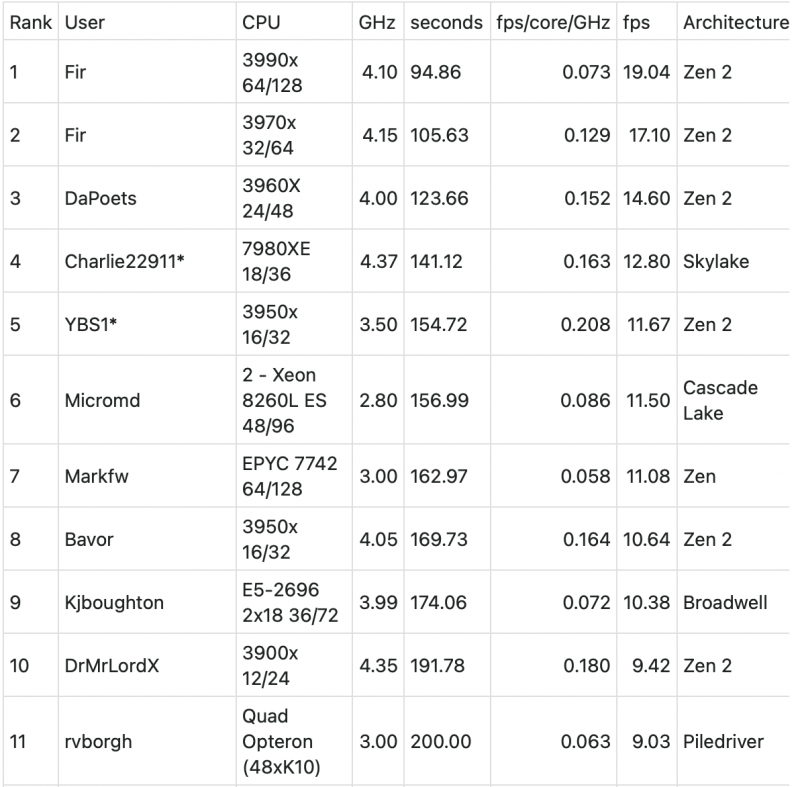
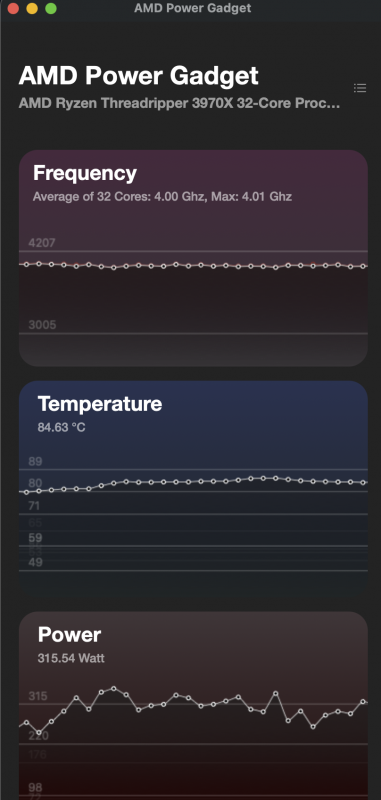
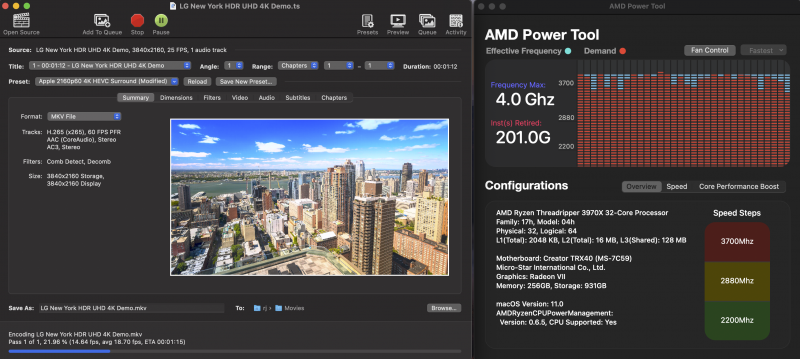
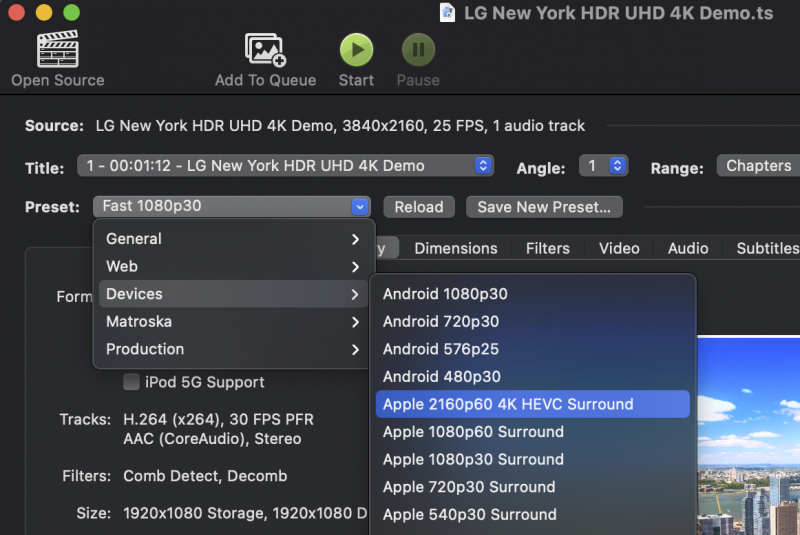
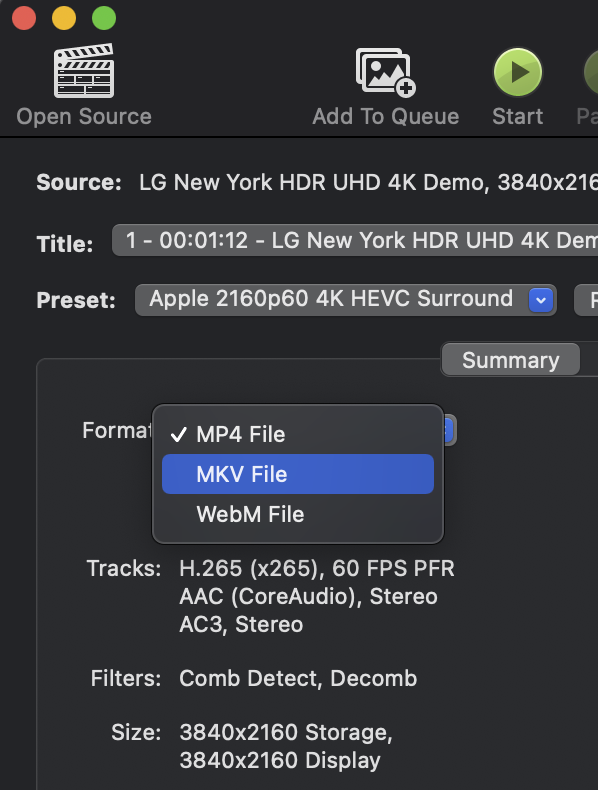
Driftwood mentioned Handbrake. I haven't used that software in years, so decided to give it a try, downloading v1.3.3 here. Next, I downloaded a 4K test file here (it was used to demo LG 4K screens). To set the test up, you want to load the 4K demo file, and on the Preset pop-up, under Devices, select Apple 2160p60 4K HEVC Surround (modified) and below that on Format, select MKV File, then press Start at the top (as shown below in spoiler). A good comparison site is here (p 12 of thread on AnandTech), which shows a table comparing results of various CPUs (mostly Linux) using the same 4K test file, shown in spoiler below: My results are right in there, with an avg of 16.82 fps and a duration of 107 sec (iPhone timer). I did not do any over-clocking nor use XMP. Nevertheless, a 3970X is no slouch when using Big Sur and can keep up with Linux results. From bottom of the HandBrake window at the end of a run: The AMD Power Tool window adjacent to the Handbrake window during a run: During the run, power utilization averaged ~315 W with a temperature of ~80°C and a frequency averaging 4 GHz:

- 3,995 replies
-
- 1
-

-
- amd vanilla patches
- amd kernel patches
- (and 3 more)
-
That was sometimes seen with 5700XT (and occasionally with Radeon VII) and WEG on the Intel side. If you have WEG enabled, try running with it disabled. I did notice this esp with USB, if WiFi was enabled. So after checking WEG status, try turning off WiFi (BT being on is okay).
- 3,995 replies
-
- 1
-

-
- amd vanilla patches
- amd kernel patches
- (and 3 more)
-
Here is my latest config.plist file (sans SNs). Keep in mind that I use many custom SSDTs that are not uploaded, so this config file is not plug-'n-play. Also, I use the unpopular RadeonBoost as well as Radeon VII properties injected via the OC/DevProp section (the latter you can view in the DevProp section). I'll attach below v1.6 of RadeonBoost that I use. Further, I've begun re-using WEG, but with the -wegbeta boot argument; the computer seems to boot more smoothly and the log-in screen is the correct resolution (not a lower resolution as without WEG). However, I do routinely set UIScale to "02" in the OC/NVRAM section. (BTW, the above re-test of the DaVinci 2-Candle test was done with this config file set-up.) RadeonBoost-v1-6.kext.zip config-public.plist.zip
- 3,995 replies
-
- 1
-
-
- amd vanilla patches
- amd kernel patches
- (and 3 more)
-
It is reported that Aquantia ports will stop working under macOS if their drivers are updated under Windows. Did you update the Aquantia drivers while running Windows? (This is based on info I remember from one of KGP's threads on his X299 builds.)
-
I think it's possible that ROM is being fiddled with. (Oh, there's pun about 'fiddling while ROM burned' hiding in there.😉) A similar thing happens with Aquantia ethernet ports. If a mobo with Aquantia is run under Windows and Windows is used to update drivers for Aquantia, those Aquantia ports then won't work under macOS. So OS's do play with the ROM.
-
The 40G/s only seems to appear with a proper SSDT, and only if the following is present under "Device (NHI0)": "linkDetails", Buffer (0x08) { 0x08, 0x00, 0x00, 0x00, 0x03, 0x00, 0x00, 0x00 // ........ }, If you're not certain about how to fix, upload your SSDT and I'll take a look.
-
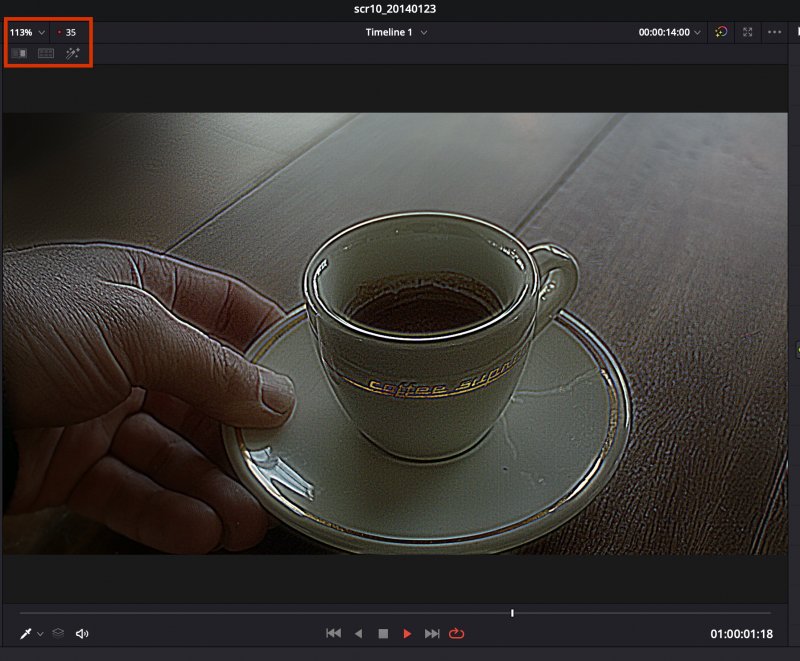
I ran the DaVinci 2 candle tests a week or so ago and forgot to post the results. At the time, they were basically the same as your results: around 34-35 fps in VM with dual Radeon VIIs in Catalina (1 Radeon VII giving 16 fps). Meanwhile, in bare metal (Big Sur ß4) dual Radeon VIIs gave ~24 fps. (BTW, as a reference, 16 fps is a typical result when running when using one 2080 Ti in Win10.) I re-ran the DaVinci 2-Candle test since I've now reduced the AMD kernel patches and added the custom DSDT. The 2-Candle test now returns values the same as VM, fluctuating between 32 and 36, mostly hovering about 34. So for my uses, I'm not seeing any advantage of VM over bare metal. The screen grab was at 35 fps with 66 nodes under Big Sur ß6 bare metal, dual Radeon VIIs. And I've repeated the C15 tests and consistently get the same results (the C15 results are same for 1 or 2 GPUs):
- 3,995 replies
-
- 2
-
-
- amd vanilla patches
- amd kernel patches
- (and 3 more)
-
Many changes occurred at the end of v061, carrying over into v062. These late changes are all in the Kernel section, adding "Force" and "Scheme" sub-sections as well as an "Arch" parameter for each Add, Block, Force, and Patch sub-section entry. At the very end of v061, a new quirk was added, DisableLinkeditJettison. This new quirk is specifically for Big Sur and should be enabled. (To quote the Docs, "This option lets Lilu.kext and possibly some others function in macOS Big Sur with best performance without keepsyms=1 boot argument.")
- 3,995 replies
-
- 1
-

-
- amd vanilla patches
- amd kernel patches
- (and 3 more)
-
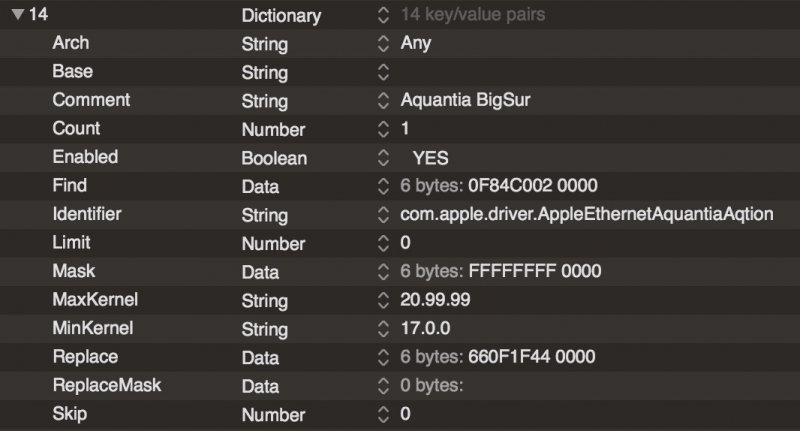
Aquantia is supported natively through Mojave (and I thought ok in Catalina), but Big Sur requires a kernel patch. The inactivation has nothing to do with SSDT or MmioWhitelist. Pavo has provided this on another forum. Here it is below (as written this will work on HS thru BS; if you only want for Catalina-BS, change 17.0.0 to 19.0.0):
-
PikerAlpha used to work for Apple and stopped writing a few years ago after his wife was killed in an auto accident. (Whether he is working again for Apple, I don't know.)
-
The linked instruction is about as lucid as you'll find on such an esoteric build. But this makes me wonder did you actually create the debug file to generate your own hex values? Do you understand that OC comes in RELEASE and DEBUG versions, and you need to use the latter? (The link within the link, here, again, tells you how to make this file in steps A1 a + b.) Look at the pop-up that has green/red numbers (4th spoiler) in first link (here again). Those are hex. The hex values are given in your debug text file. The white numbers in the right column are decimal. You calculate the decimals equivalent, from the hex values, derived from your debug file. (Even the built-in Mac calculator can convert; Google for other on-line calculators if you don't like that one.) The left green/red values should be similar to those in your debug file. Look for a pattern. Your list created in the debug file should match up (as described). Building a Hackintosh, and esp a TRX40, means having to sit and think about things on your own. Problem solving is part of building one, and will be for the life of the computer. Develop those problem solving skills now.
- 3,995 replies
-
- 1
-
-
- amd vanilla patches
- amd kernel patches
- (and 3 more)
-
Create a correct MmioWhitelist following these directions. Once working, Shutdown should work. (There are some hardware/USB issues that could prevent Shutdown from consistently working even with a proper MmioWhitelist.) The list is specific for your setup, so you need to do it yourself (copying other's list will rarely work unless everything is identical).
- 3,995 replies
-
- 1
-
-
- amd vanilla patches
- amd kernel patches
- (and 3 more)
-
It should work on all of our mobos. Code is below to copy/paste (I added to comments to show how it is derived; data are basically ascii to hex conversions). <key>Delete</key> <array> <dict> <key>All</key> <false/> <key>Comment</key> <string>Delete SHAKTOOH (hex=oemtab); hex SSDT=tablesig; 4271=0010AF (from "log show --last boot | grep ACPI")</string> <key>Enabled</key> <true/> <key>OemTableId</key> <data> U0hBS1RPT0g= </data> <key>TableLength</key> <integer>4271</integer> <key>TableSignature</key> <data> U1NEVA== </data> </dict> </array>
-
Ploddles post above shows overall C15 scores about like mine and even with a single RX580 (but the RX580 won't compare as well if tested in LuxMark or using in DaVinci).
- 3,995 replies
-
- 1
-
-
- amd vanilla patches
- amd kernel patches
- (and 3 more)
-
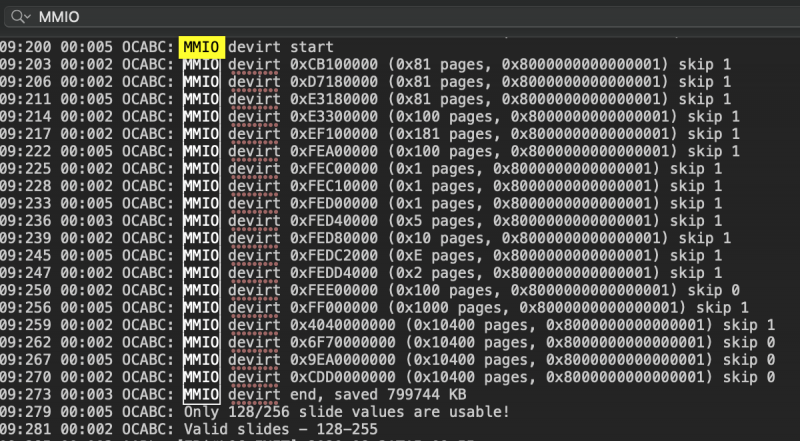
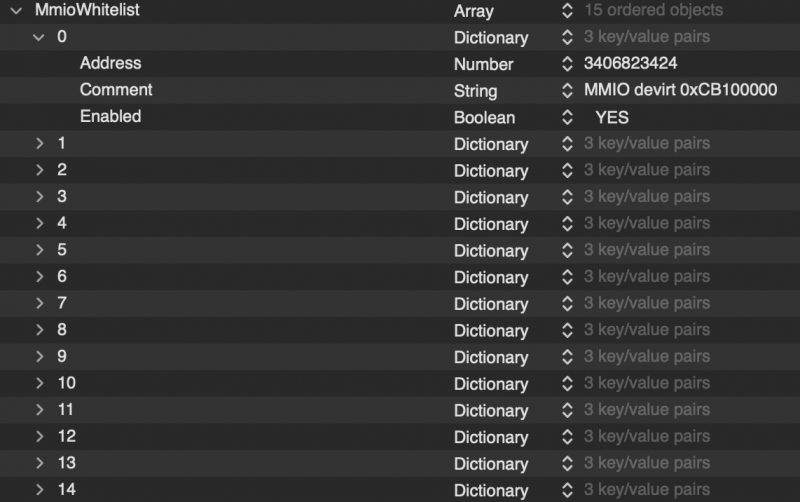
CREATING MMIOWHITELIST What I originally posted is unnecessarily cumbersome. There is no longer any need to test and re-boot after each modification. Instead, of re-doing the earlier post, I'll write an updated methodology here on how to make an MmioWhitelist (and link the original post to this one). Here are the instructions in a nutshell. First gather your debug text file, which is normally saved on the booted EFI partition. (If you're not certain how to create the debug text file, see the earlier MmioWhitelist post here.) Once you've gotten this debug text file, locate the area of interest within this file, by searching for "MMIO" as shown in the Spoiler below (an excerpt is taken from a file with a name such as "opencore-2020-08-31-150945.txt"). Excerpt from "opencore-2020-08-31-150945.txt": Copy and paste this section, placing in a new text file for processing and future reference: From this, copy the hex values, creating the following list, which may be in the same, new text file. (I've color-coded for purposes of description; you do not need to do this step). These are for my MSI Creator mobo with Above 4G enabled. The red values will be used; the green will not be used (don't even bother entering them into the MmioWhitelist section). That is, the bottom 4 entries do not seem to be necessary for MmioWhitelist. ***** Clarification (5/11/21): Vit9696, the main person behind OpenCore, recommended not using the last 4 entries. However, the most up-to-date method of creating the MMIOWhitelist suggests disabling all entries in the above Spoiler that say "skip 0" and enabling all entries that say "skip 1". This is not discussed below (it is shown in the final code example), but is probably the best method of choosing whether or not to enable or disable a given entry. The color codes have been accordingly updated. ***** Next, run calculations for each red hex value, creating another set of data, shown in white (the decimal conversion of the adjacent hex values). The bottom 11 hex values are in common with all of our mobos. If you have Above 4G enabled, they'll be on the bottom; if not, there will be only 2 values above 0xEF10000 and 2 other values below 0xEF10000, namely 0xFA180000 and 0xFA300000 (shown in orange in the 4G Disabled section). So there is a bit of a pattern... the differences between our mobos seem to lay in the top 4 values if Above 4G is enabled, or, the top 2 values, if Above 4G is disabled, (shown in yellow below for the MSI Creator mobo): These values will, in turn, be entered into the MmioWhitelist section in OC (again, these are my values; yours will be somewhat different) for each fo the 15 values. Note that all of these values will be enabled (set to "Yes"). Also note that these values are what were labelled above as "skip 1" ("skip 0" means that entry was set to "No" in MmioWhitelist). Since we've removed the bottom 4 entries, which would otherwise have been disabled (set to "No"), all values in our new MmioWhitelist will be enabled (again, set to "Yes"). And the code will look like this (Above 4G enabled):
- 3,995 replies
-
- 1
-
-
- amd vanilla patches
- amd kernel patches
- (and 3 more)
-
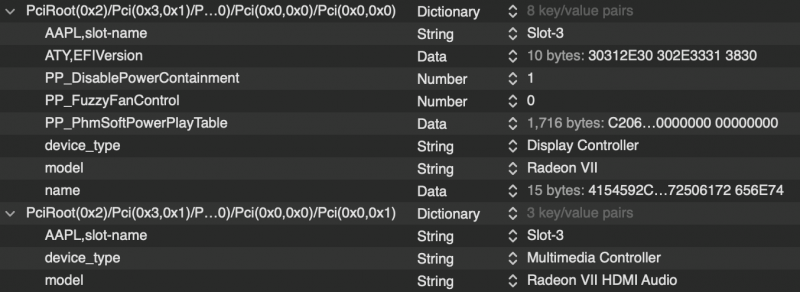
I've always added DevProper which some here don't like so I don't promote. But I've used before and after the custom DSDT file. I'll attach below as a plist file. To use, open in editor and copy/paste into your DevProp OC section. It is for dual Radeon VII in slots 1 & 3, which is what I recall you're using. These do inject some speed properties. I think they'll be okay with air-cooled. If it throttles or crashes during a stress test, let me know and I'll provide a less-energetic version. There are two sections for each GPU: one is for the display, the other for audio. The audio portion is simply descriptive. If anyone wishes to use for 1 Radeon VII, only use the slot-1. As far as OC, I have not. XMP is off. And none of these should much influence GPU performance. Until we trimmed the Kernel Patch list and I added the custom DSDT, my FPS were in the 60s. Now MarkLux has always been good and your values are the same as mine. So I have the feeling that your set up is just fine. (In my opinion, the tests are somewhat strange in and of themselves.) DevProp-Dual-RadeonVII.plist.zip
- 3,995 replies
-
- 1
-
-
- amd vanilla patches
- amd kernel patches
- (and 3 more)
-
I don't see anything to 'fix' on your DSDT file. Both of the GB DSDT file compile without errors and have the proper GPRW injections. I not certain that you need to use a Slide value. I don't believe any one is using; I know I am not. It is not necessary to use Above 4G; if not working ignore it. You do need to have a proper MMIO section, which is specific for your mobo. Show us the MmioWhitelist values and we can help you select the correct ones.
-
I'd already removed this when reducing the patch list down to 13 total patches. The GPU performance on C15 increased from a very low 67 to 97 FPS without Fix PAT. When I added the modified DSDT file, the GPU further increased to 140 FPS. Did you try the modified DSDT file? It should work since we use the same mobo. I derived it with Above 4G enabled, and did not check if this setting affects the DSDT file.
-
In looking it over, it has more in common with MSI than GB. However, all 3 have 90% in common with each other. None of the other 2 mobos (GB/ASrock) have the large Windows section at the end as described above for the MSI file. The ASRock does have the same compilation errors. I'll work to remove them and upload, probably tomorrow, for you to try. EDIT: I cleaned up the compilations errors and added several GPRW calls that were missing (same as with MSI). Let me know how it boots.
-
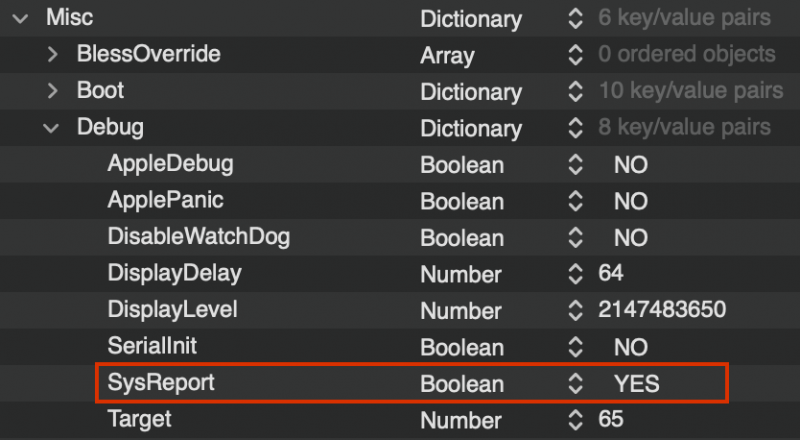
You can extract with OC using Debug version: set DisplayDelay to 64, Target to 65 and SysReport to "Yes". This will create a SysReport folder on the EFI partition. Inside this will be a DSDT file. I should mention that the derived DSDT file will change not only with mobo, but BIOS. So if BIOS is updated, the DSDT file manipulation must be re-done. *** Send me a DSDT file based on instructions in above post. Maybe I can quickly get rid of the same compilation errors and Windows stuff.
- 3,995 replies
-
- 1
-
-
- amd vanilla patches
- amd kernel patches
- (and 3 more)
-
I found some interesting things and posted here. Send me the X299 IORE file and I'll make one for you. I also have X299 system, using ASUS Prime Deluxe (1st edition).
-
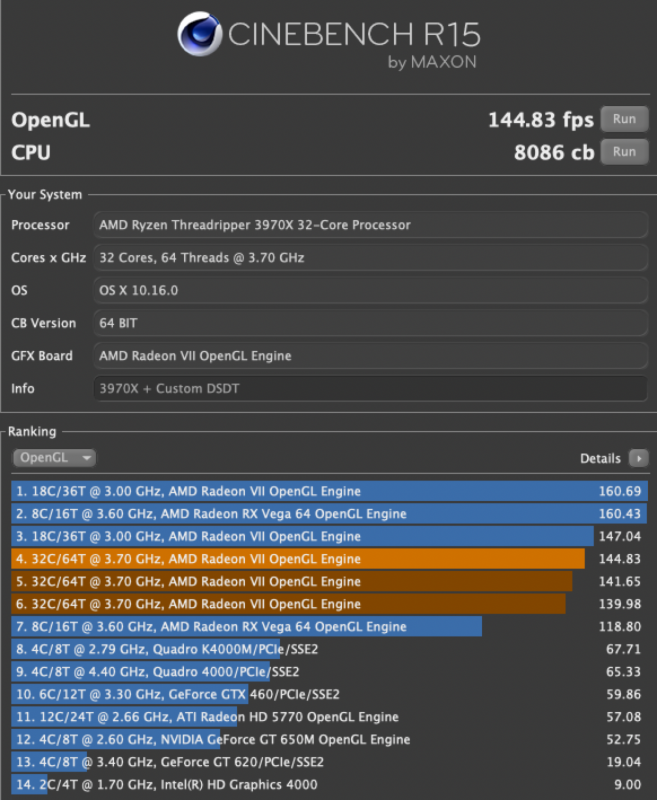
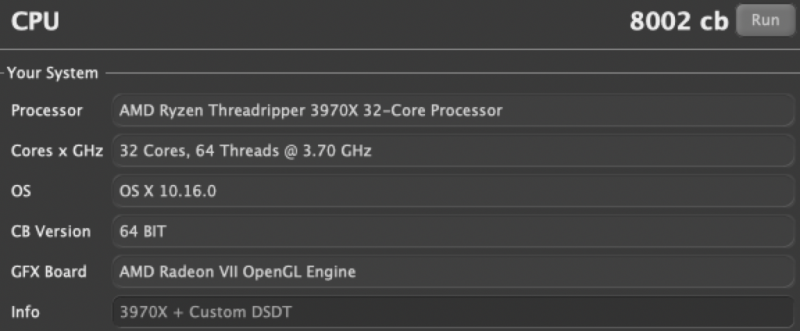
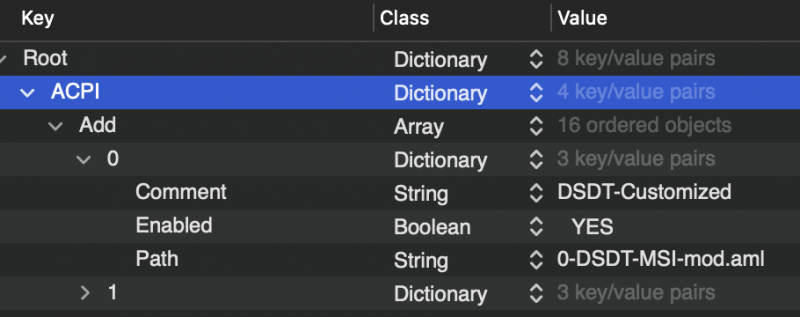
MSI Customized DSDT File While working on the USB problem for Thunderbolt, which is now fully working on meina222's GB mobo, I did a comparison of the GB DSDT and the MSI Creator DSDT to see if there are power injection differences. There were, plus some other differences. The basic differences were: a large section seemingly devoted to Windows (towards the end of the file; shown in Spoiler below) not at all present on GB, 10 fewer GPRW references on the MSI file, and some errors in 8 sections that would not compile (but were okay on GB). After removing the Windows section and applying the other fixes, I came up with a customized DSDT file. It booted easily with no apparent issues. (Note: if you're not booting into Windows via OC, this customized DSDT file won't matter. Boot into Windows from BIOS and this DSDT modified file will have zeros influence.) I believe this customized DSDT file will work on all MSI (and maybe even most TRX40, but I don't know as I cannot test; note: no GB user should use as it is a derivative). The customized DSDT file is attached below. When derived for my MSI, I did have Above 4G enabled; I don't know if this matters. Customized DSDT first in OC/ACPI: While this customized DSDT so far does not enable USB on TB on the MSI (I'm still working on it), it did surprisingly, raise test results as shown below. The FPS increased from 97 to 142 (previous results here). This is rather significant. Also, the CPU scores increased from 7700 to 8000. All results are bare metal in Big Sur ß6. One more comment. When going thru the DSDT file, there are many areas where the exact address of the MMIO sections we're using in MmioWhitelist are defined (as shown in Spoiler below for 0xFED00000). 2nd Run:
- 3,995 replies
-
- 3
-
-
- amd vanilla patches
- amd kernel patches
- (and 3 more)
-
It needs an SSDT for function. NVM23 should still work.
-
My understanding is that once firmware is flashed to enable a TB AIC to work in macOS, it will not work in Windows. I would suspect Linux may be a problem too.