Jump to content

Gengik84

Administrators
  • Posts

    20,279
  • Joined

  • Days Won

    286

Everything posted by Gengik84

  1. Device Properties 59[/color]120000 e FakeID 0x59128086 in Properties innanzi tutto va diciamo "invertito l'ordine delle coppie di numeri" omettendo 0x quindi ig-platform-id con Properties è AAPL,ig-platform-id 00 00 12 59 mentre per il FakeID si omette sempre 0x e anche 8086 sostituito da 0000 quindi sarà device-id 12 59 00 00 GFX0/IGPU[/b] PciRoot(0x0)/Pci(0x2,0x0) HDEF/HDAS PciRoot(0x0)/Pci(0x1f,0x3) oppure hardware datati PciRoot(0x0)/Pci(0x1b,0x0) esempio quando mettiamo layout 1 sul config, in Properties sarà quindi scriveremo 0c LayoutConverter.zip
  2. ok appena posso guardo e ti passo per provare qualcosa
  3. Non per nulla ma anche se poco usate diciamo in hack, MSI ha fatto un gran lavoro anno dopo anno... "tanto" di cappello... Sono nei primi posti per vendite in America.. di fatto non hanno una qualità scadente..ma anzi.... Questo giusto per fare un discorso generale :D
  4. ACPI first step If you have to use patched ACPI it is mandatory to put them inside this folder: EFI/OC/ACPI/Custom Then you have to define and enabled it as pictures below Next we have to define and enable to load it Successivamente definite e abilitate per il caricamento Esempio nome convertito.png You can drop also in other way, you can use table OEM "name" Open it with maciasl app and check it strTohex.zip strTohex.zip strTohex.zip
  5. Prima parte ACPI Qualora si usassero acpi patchate etc queste vanno collocate in EFI/OC/ACPI/Custom Successivamente definite e abilitate per il caricamento [/b] strTohex.zip Patch in questa parte possiamo inserire i Rename che per esempio usiamo su clover Per far si che vengano applicati correttamente a tutte le tabelle acpi, impostate come da immagine sottostante strTohex.zip SSDT-PM-fino a kabylake.zip SSDT-PM-Skylake-R.aml.zip SSDT-PM_Coffelake+.zip
  6. Hi people.. I will show some basic informations to start configuring OpenCore bootloader. This is EFI's structure EFI ├── BOOT │ └── BOOTx64.efi └── OC ├── ACPI │ └── Custom ├── Drivers ├── Kexts ├── OpenCore.efi └── Config.plist As you can see inside EFI folder we have two nested folders BOOT and OC ... This is a structure very similar to Clover bootloader one, inside BOOT we have BOOTx64.efi, this file is mandatory to have a working boot. Inside OC we have all necessary folders like ACPI,Drivers,Kexts inside ACPI we cand find Custom folder, this will be the place where we have to put our patched ACPI if our hack needs them. In Drivers folder we have to put all drivers we need to boot. Important NOTE:No x64 extension is needed for them You DO NOT use Clover's drivers , in OpenCore they are different (vBox is an exception alternative to HFS.plus Main Drivers are: AptioMemoryFix ApfsDriverLoader (mandatory if you have a disk in apfs format, otherwise you do not need of it HFS.plus or vBox Kexts: Obviously , here we will put extra kexts Open config.plist with a PlistEditor or with Xcode if installed in your system for good English translation.
  7. Ciao a tutti... Vi illustro alcune basi di questo bootloader. La struttura della EFI è questa EFI ├── BOOT │ └── BOOTx64.efi └── OC ├── ACPI ├── Drivers ├── Kexts ├── OpenCore.efi └── Config.plist Come vedete la EFI conterrà due Cartelle BOOT e OC ... diciamo identico a Clover che ha BOOT e CLOVER Dentro BOOT troviamo BOOTx64.efi che è appunto per il boot Dentro OC troviamo le rispettive cartelle: ACPI,Drivers,Kexts ACPI dove andranno messo le acpi patchate qualora si usassero Drivers: qui andranno messi i driver del bootloader. NOTA:non devono avere la nomenclatura x64 NON vanno messi i driver di clover salvo vBox in caso alla sostituzione di HFS.plus Driver base sono: AptioMemoryFix ApfsDriverLoader (qualora si usasse apfs, altrimenti si potrebbe omettere HFS.plus o vBox Kexts: qui vanno messi ovviamente i kext Iniziamo con il config, quindi apriamolo con un PlistEditor o chi c'è l'ha anche con Xcode
  8. non sono su ssdt ma su DSDT, hai un Haswell... nel caso elenca le porte da disattivare o allega ioreg della mappatura, appena riesco ci guardo
  9. seleziona 041-56507 10.14.4 18E227 macOS Mojave a me lo da al numero 4
  10. quando usi RenMe_downloader l'installer è completo e lo trovi dentro una dmg nella home
  11. prova tableLenght..metti il valore di ssdt originale... oemtableid non va bene quel valore Ha scritto dopo 19 secondi: dovresti mettere in caso xh_rvp08
  12. @iCanaro prova completo con Enabled YES anche se credo che non cambi
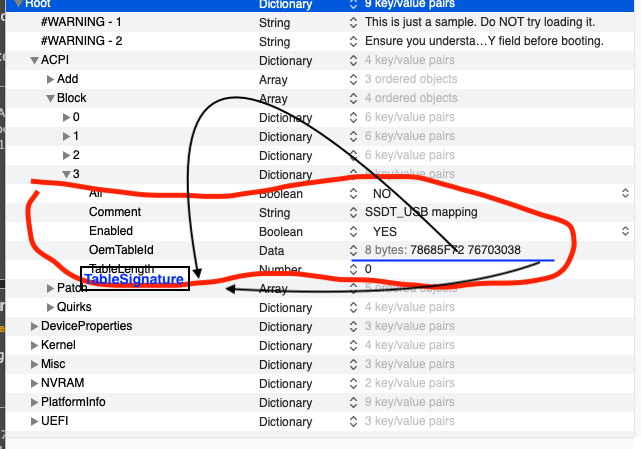
  13. esatto... qualsiasi sia la voce non cambia..nel senso che quello che ho detto prima nel caso va in tablesignature oppure si può usare Lenght come da Guida...etc etc Ha scritto dopo 2 minuti 4 secondi: @leook[/mention] devi metterlo sotto aggiungendo la chiave specifica oppure modifichi dove hai messo adesso in TableSignature ... Ha scritto dopo 5 minuti 22 secondi: ho modificato l'immagine così dovrebbe essere più chiaro
  14. no... se usi quello devi aggiungere la chiave tablesignature nel config sul primo post è presente
  15. puoi droppare come da guida usando Lenght per esempio preso dalla acpi originale e quindi non parcata/compilata oppure prova cosi usando TableSignature:78685F72 76703038
  16. abbi pazienza ma sono un po' impegnato.. e non ho indagato oltre comunque come ti ho detto il DSDT è ok..quel problema è strano fauna cosa, prepara una usb per installare, mettici la efi del disco fai sapere se la batteria risulta corretta in fase di installazione
  17. passami un attimo ssdt che usi per la mappatura
×
×
  • Create New...

Important Information

We have placed cookies on your device to help make this website better. You can adjust your cookie settings, otherwise we'll assume you're okay to continue.