Gengik84
-
Posts
20,282 -
Joined
-
Days Won
291
Content Type
Profiles
Forums
Events
Downloads
Everything posted by Gengik84
-
root del disco comunque stai sbagliando tu qualcosa...anche prima col Downloader non dico che lo suo tutti i giorni ma.... :D
-
Ciao... vai su faq, richiesta di supporto e allega il tutto per avviare da disco ti basta installare clover come hai fatto per la usb,successivamemente copiare/sotituire la eri del disco con la efi della usb
-
Ciao...elenca.. hai fatto modifiche? cambiato / aggiornato i driver? aggiornato clover?
-
UEFI Qui andremo a dichiarare i drivers in uso quelli base sono come da immagine sottostante [/b] se avete driver definiti sul config e questi non fossero nella relativa cartella Drivers avrete subito un errore inizio boot quindi o rimuovete la "voce" dal config oppure inserite il driver al suo posto Nota 2: se usate FV2 dovrete ovviamente aggiungere altri relativi driver

-
UEFI In this section we will declare efi drivers we use In this picture we show basic one driver If you have defined some drivers in your config but they are not present in Drivers folder, your system will hang on boot. To solve you have to remove or disable relative option in config.plist, or you can copy in Drivers folder that driver Note: If you use FV2 you have to add some drivers to have a working FV2
-
NVRAM
-
NVRAM
-
Pst riservato PlatformInfo
-
Pst riservato PlatformInfo
-
Nuova beta 4 build 18F127a
-
Kernel ADD: Qui ci vanno dichiarati i kext in uso nella EFI BundlePatch[/b]: "nome".kext Enabled: YES o NO per farlo caricare o meno ExecutablePatch: qui va indicato il percorso per l'eseguibile MatchKernel: questa funzione serve per diciarare versioni di osx specifiche dove il kext volete che sia caricato, è diciamo come clover quando si mette i kext in cartelle specifiche. Quale valore mettere? 18 indica Mojave.. antecendenti avranno 17 oppure 16 etc inserendo così il kext verrà caricato su tutte le build del relativo sistema operativo, per esempio da 10.14 a futura 10.14.6 (se fosse l'ultima) Se volessi scegliere una versione più definita di uno stesso macOS? bene.. per esempio attualmente l'ultima beta a oggi 10.14.5 beta 3 è 18.6 Come arrivare a questo? aprite il terminale e scrivete semplicemente [code]uname -r [/code] [/b]percorso a info.plist che nel 99% dei casi è sempre identico Block Quirks[/color] Qui troviamo alcune patch
-
Post riservato Misc
-
Post riservato Misc
-
Kernel ADD: In this section we have to declare all kext we use in EFI folder BundlePatch[/b]: "name".kext Enabled: YES or NO option to load it or not ExecutablePatch: it shows path for executable file MatchKernel: this is usefull to declare OSX in use or better to declare optimal OSX for kext, in clover we have different folders (10.12,10.13 and so on) where we put relative kext useful for installed OSX How to know which value we have to use in it? 18 value is for Mojave.. previous version have 17 or 16 IE inserting 18 our kext will be loaded on all Mojave release (from 10.14 to 10.14.6 if it exists) We have also the chance to define a specific OSX version in this way. today latest Mojave beta is 10.14.5 If we would like to choose a more precise OSX version? Well. today latest Mojave beta is 10.14.5 that is 18.6 How to achieve this task? Open a terminal windows and type: [code]uname -r [/code] [/b]info.plist path which is pretty surely (about 99% of situation)the same path Block Quirks[/color] Qui troviamo alcune patch
-
Ciao su quale osx? almeno così sposto anche il topic nella sezione corretta :D
-
Device Properties 59[/color]120000 and FakeID 0x59128086 First of all we have to invert numbers order two by two. You do not have to consider first 0x so, ig-platform-id with Properties is: AAPL,ig-platform-id 00 00 12 59 instead for FakeID value you have to omit 0x and also 8086 will be transformed to 0000 so we will have: device-id 00 00 12 59 GFX0/IGPU[/b] PciRoot(0x0)/Pci(0x2,0x0) HDEF/HDAS PciRoot(0x0)/Pci(0x1b,0x0) IE when we set layout to 1 in our config you will have this:
-
Device Properties 59[/color]120000 e FakeID 0x59128086 in Properties innanzi tutto va diciamo "invertito l'ordine delle coppie di numeri" omettendo 0x quindi ig-platform-id con Properties è AAPL,ig-platform-id 00 00 12 59 mentre per il FakeID si omette sempre 0x e anche 8086 sostituito da 0000 quindi sarà device-id 12 59 00 00 GFX0/IGPU[/b] PciRoot(0x0)/Pci(0x2,0x0) HDEF/HDAS PciRoot(0x0)/Pci(0x1f,0x3) oppure hardware datati PciRoot(0x0)/Pci(0x1b,0x0) esempio quando mettiamo layout 1 sul config, in Properties sarà quindi scriveremo 0c LayoutConverter.zip
-
ok appena posso guardo e ti passo per provare qualcosa
-
-
Non per nulla ma anche se poco usate diciamo in hack, MSI ha fatto un gran lavoro anno dopo anno... "tanto" di cappello... Sono nei primi posti per vendite in America.. di fatto non hanno una qualità scadente..ma anzi.... Questo giusto per fare un discorso generale :D
-
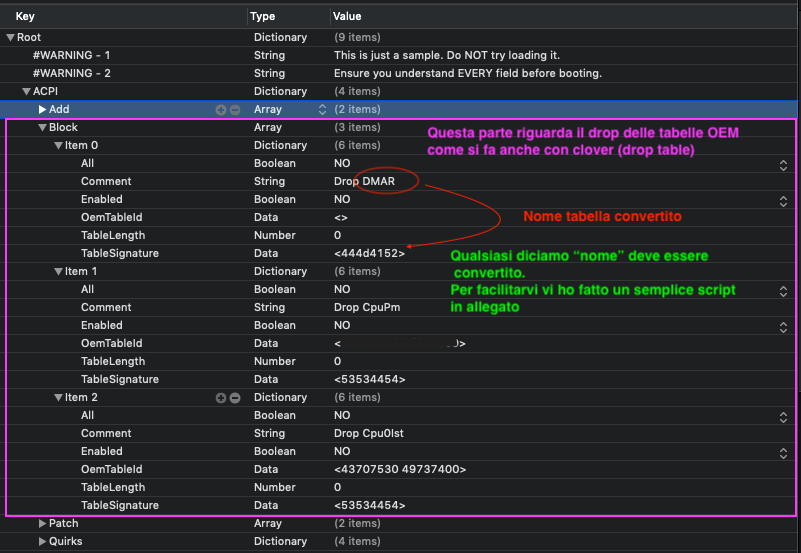
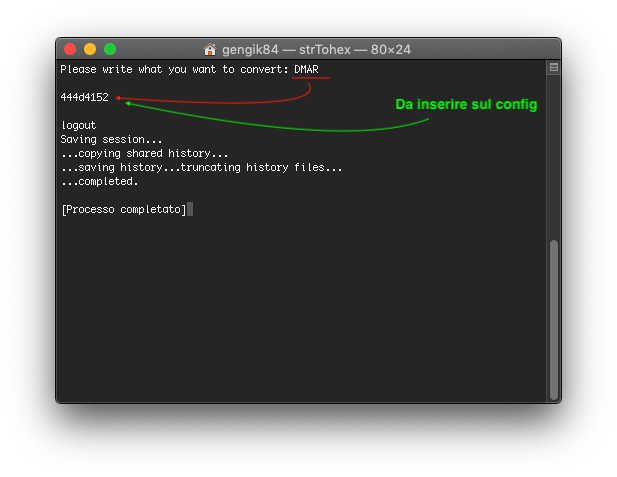
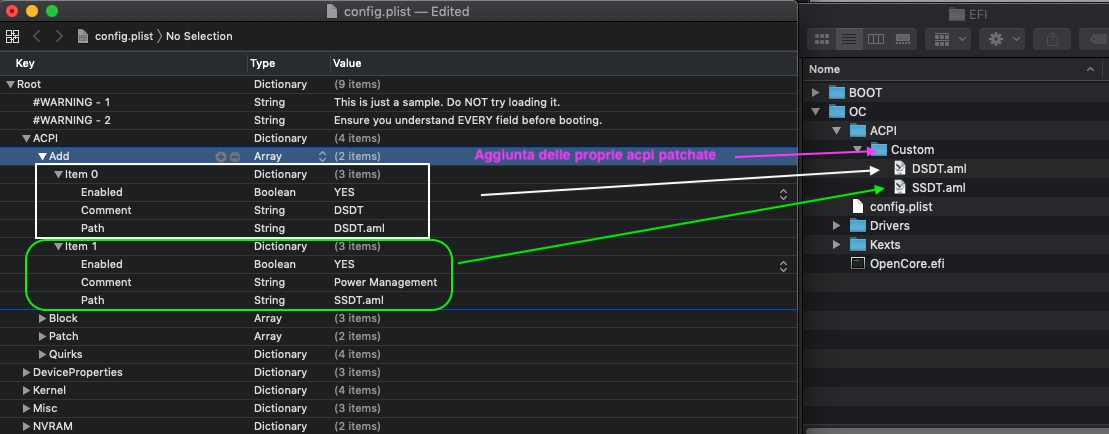
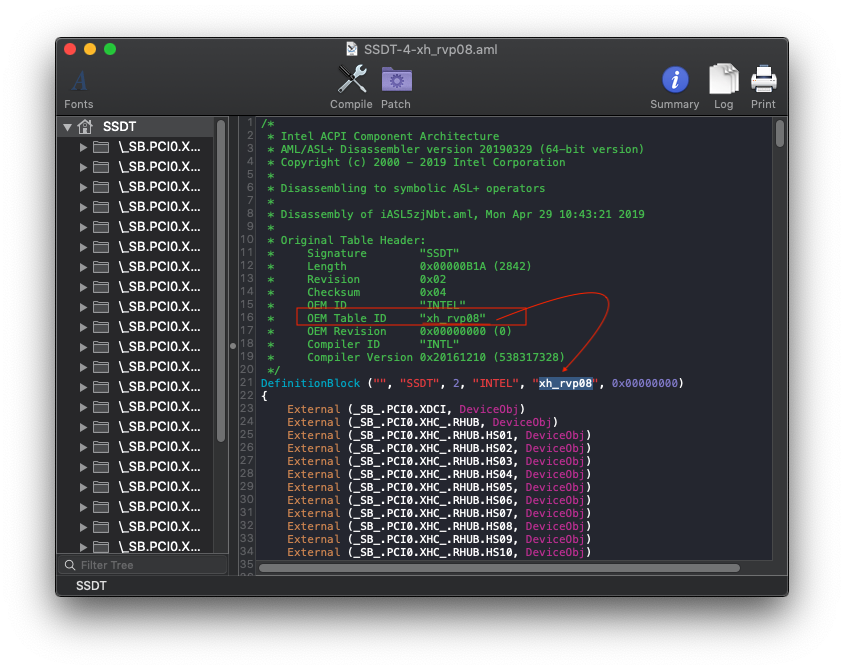
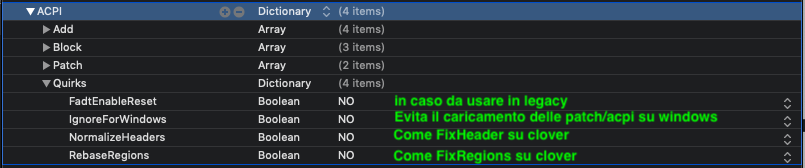
ACPI first step If you have to use patched ACPI it is mandatory to put them inside this folder: EFI/OC/ACPI/Custom Then you have to define and enabled it as pictures below Next we have to define and enable to load it Successivamente definite e abilitate per il caricamento Esempio nome convertito.png You can drop also in other way, you can use table OEM "name" Open it with maciasl app and check it strTohex.zip strTohex.zip strTohex.zip
-
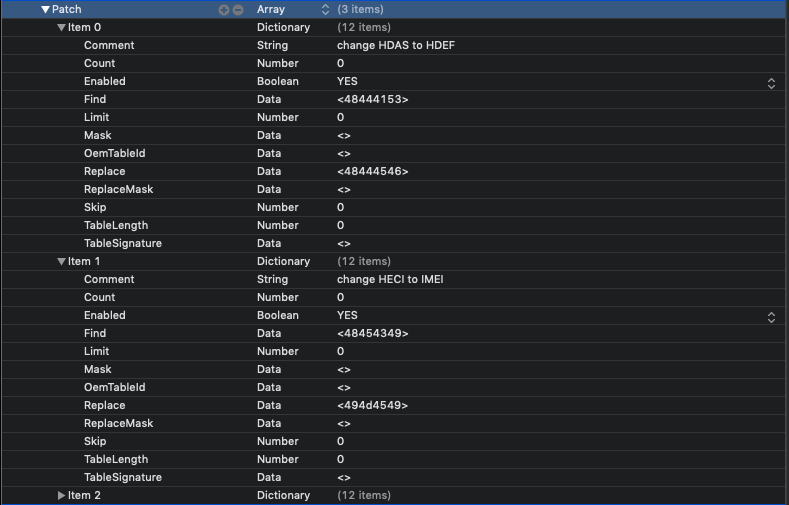
Prima parte ACPI Qualora si usassero acpi patchate etc queste vanno collocate in EFI/OC/ACPI/Custom Successivamente definite e abilitate per il caricamento [/b] strTohex.zip Patch in questa parte possiamo inserire i Rename che per esempio usiamo su clover Per far si che vengano applicati correttamente a tutte le tabelle acpi, impostate come da immagine sottostante strTohex.zip SSDT-PM-fino a kabylake.zip SSDT-PM-Skylake-R.aml.zip SSDT-PM_Coffelake+.zip
-
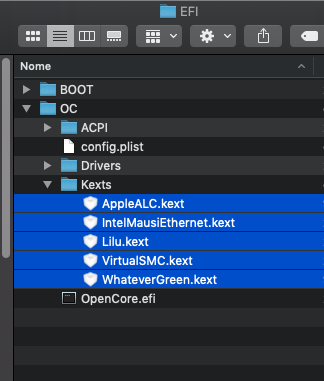
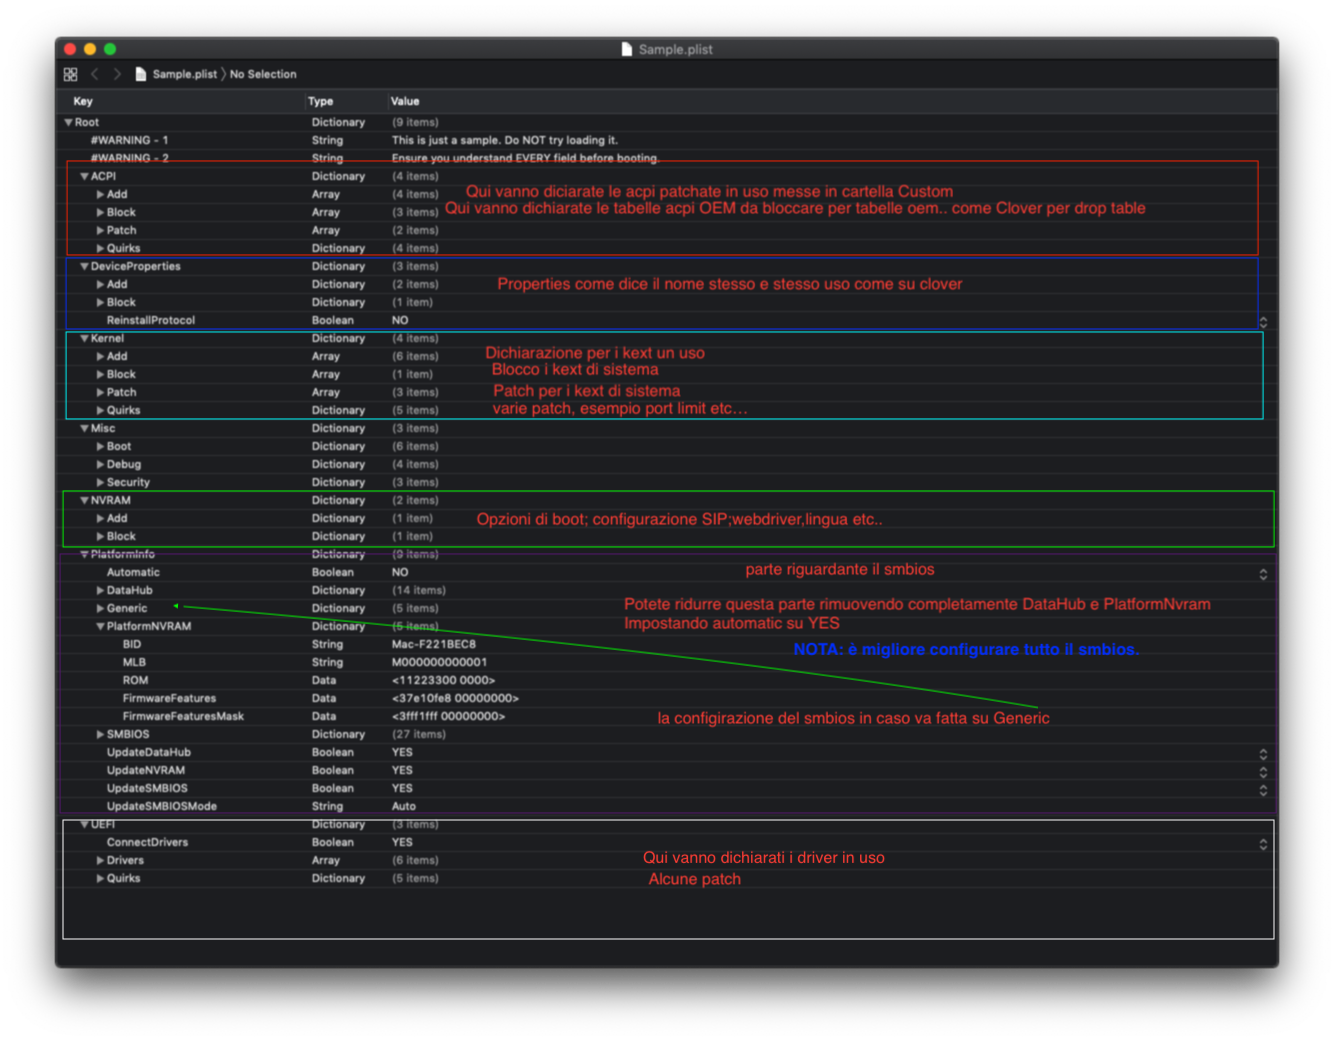
Hi people.. I will show some basic informations to start configuring OpenCore bootloader. This is EFI's structure EFI ├── BOOT │ └── BOOTx64.efi └── OC ├── ACPI │ └── Custom ├── Drivers ├── Kexts ├── OpenCore.efi └── Config.plist As you can see inside EFI folder we have two nested folders BOOT and OC ... This is a structure very similar to Clover bootloader one, inside BOOT we have BOOTx64.efi, this file is mandatory to have a working boot. Inside OC we have all necessary folders like ACPI,Drivers,Kexts inside ACPI we cand find Custom folder, this will be the place where we have to put our patched ACPI if our hack needs them. In Drivers folder we have to put all drivers we need to boot. Important NOTE:No x64 extension is needed for them You DO NOT use Clover's drivers , in OpenCore they are different (vBox is an exception alternative to HFS.plus Main Drivers are: AptioMemoryFix ApfsDriverLoader (mandatory if you have a disk in apfs format, otherwise you do not need of it HFS.plus or vBox Kexts: Obviously , here we will put extra kexts Open config.plist with a PlistEditor or with Xcode if installed in your system for good English translation.
-
Ciao a tutti... Vi illustro alcune basi di questo bootloader. La struttura della EFI è questa EFI ├── BOOT │ └── BOOTx64.efi └── OC ├── ACPI ├── Drivers ├── Kexts ├── OpenCore.efi └── Config.plist Come vedete la EFI conterrà due Cartelle BOOT e OC ... diciamo identico a Clover che ha BOOT e CLOVER Dentro BOOT troviamo BOOTx64.efi che è appunto per il boot Dentro OC troviamo le rispettive cartelle: ACPI,Drivers,Kexts ACPI dove andranno messo le acpi patchate qualora si usassero Drivers: qui andranno messi i driver del bootloader. NOTA:non devono avere la nomenclatura x64 NON vanno messi i driver di clover salvo vBox in caso alla sostituzione di HFS.plus Driver base sono: AptioMemoryFix ApfsDriverLoader (qualora si usasse apfs, altrimenti si potrebbe omettere HFS.plus o vBox Kexts: qui vanno messi ovviamente i kext Iniziamo con il config, quindi apriamolo con un PlistEditor o chi c'è l'ha anche con Xcode
-
non sono su ssdt ma su DSDT, hai un Haswell... nel caso elenca le porte da disattivare o allega ioreg della mappatura, appena riesco ci guardo