Leaderboard
Popular Content
Showing content with the highest reputation on 02/20/2022 in all areas
-
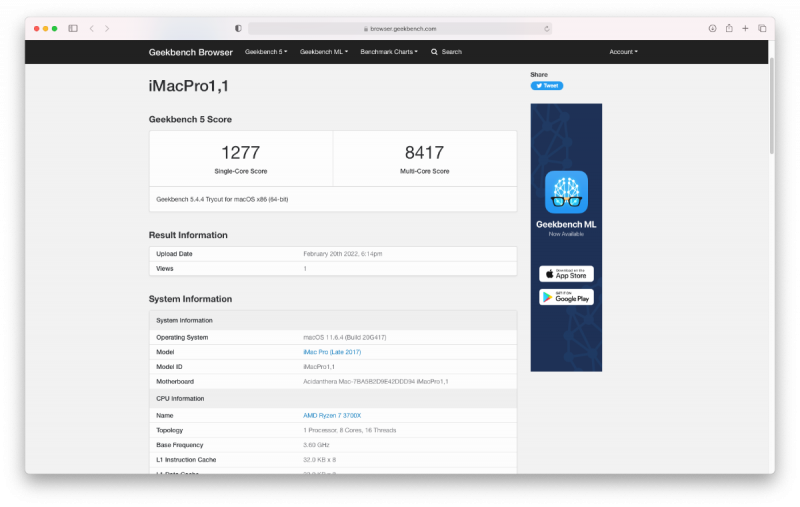
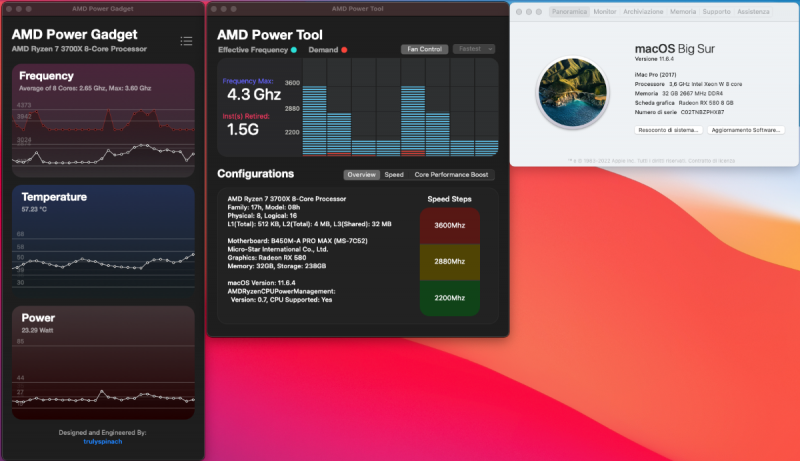
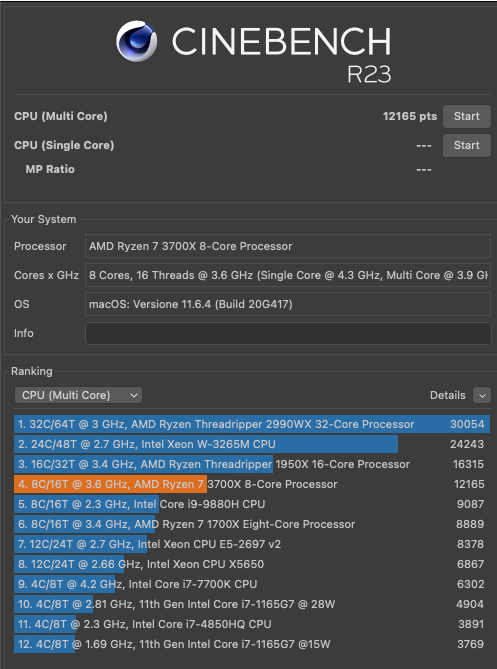
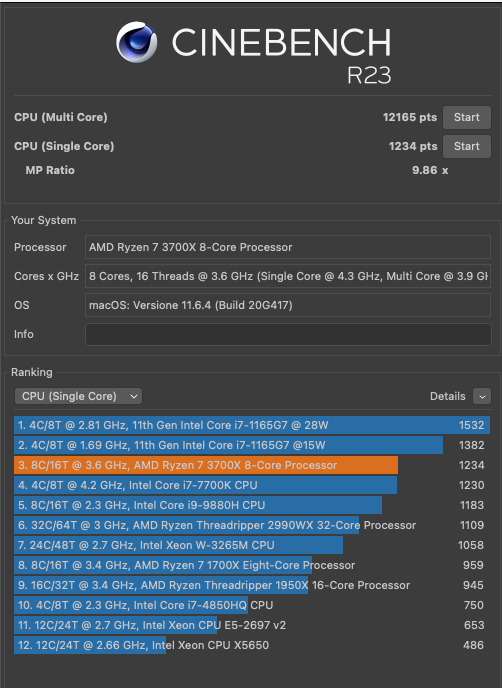
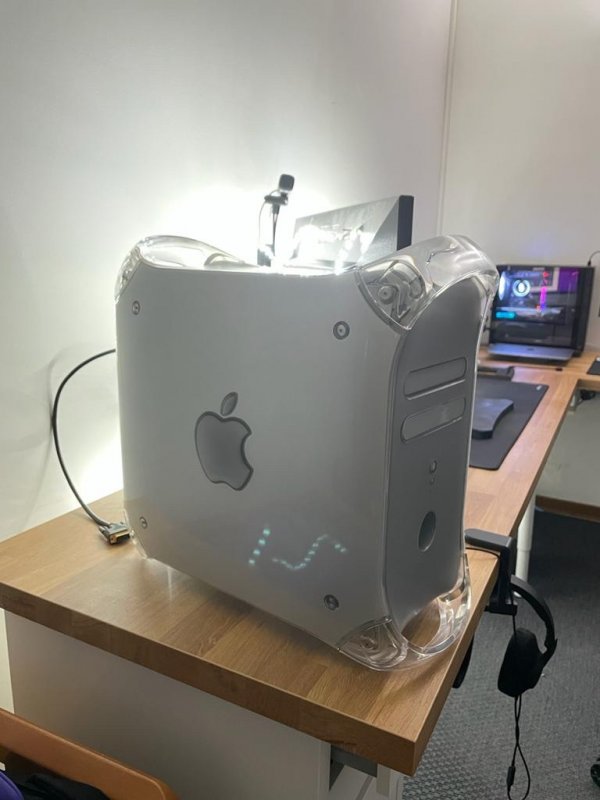
Ciao a tutti, dopo l'hack intel, complice il recupero di un case di un G4 Quicksilver e dell'hardware che mi era avanzato da un altro progetto, negli ultimi giorni mi sono cimentato nella mod del case per alloggiare i seguenti componenti: Cpu: Ryzen 7 3700X Mobo: MSI B450M-A PRO MAX GPU: RX 580 Sapphire 32GB DDR4 RAM Un misero 256GB Nvme di marca sconosciuta 😄 Con l'aiuto preziosissimo di @fabiosun e il tifo di @tomnic siamo riusciti in modo molto agile a portare a termine l'installazione di macOS BigSur utilizzando come base i config presenti in OCAT. Lascio qualche benchmark, qualche foto e la EFI. Tenete presente che non sarà il mio mainHack quindi non ci sono kext per bluetooth o wifi. Nel prossimo commit di OCAT sarà integrato anche il preset per questa configurazione. Devo dire che, ricordando il parto trigemellare che era stato il mio hack Intel in firma, questo è stato davvero una passeggiata di salute... Quasi che potrei farlo come esercizio di stile anche sul pc da gaming con 5950X, B550 e 6800XT 🥶 Per quanto riguarda la mod del case del G4, non ho fatto nulla di particolare se non rimuovere le lamiere inutili e praticare qualche foto per poi fissare la scheda madre al case. Purtroppo le temperature non sono ottimali e sicuramente andrà rivisto qualcosa in termini di airflow, posterò foto dell'interno quando avrò raggiunto uno stato di ordine interno e decenza 🙂 Prossimi upgrade? Sicuramente trovare una scheda video, dato che la Rx 580 con la quale ho eseguito l'installazione ora è ritornata sull'hack intel 😄 Penso di andare su una umile Rx 560... EFI_B450M-3700X-RX580.zip2 points
-
2 points
-
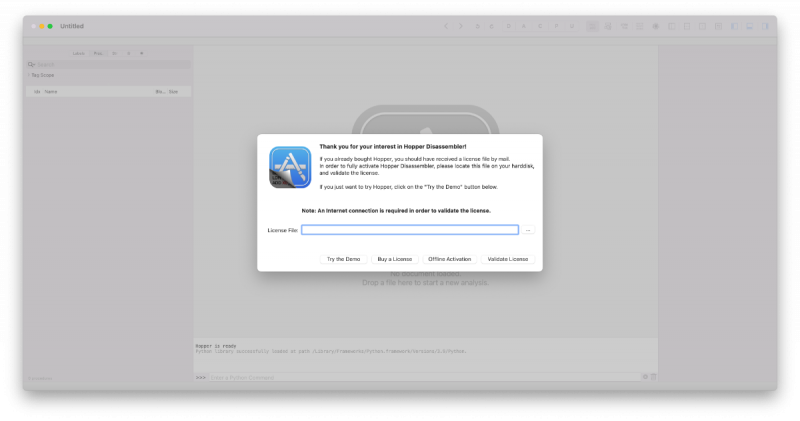
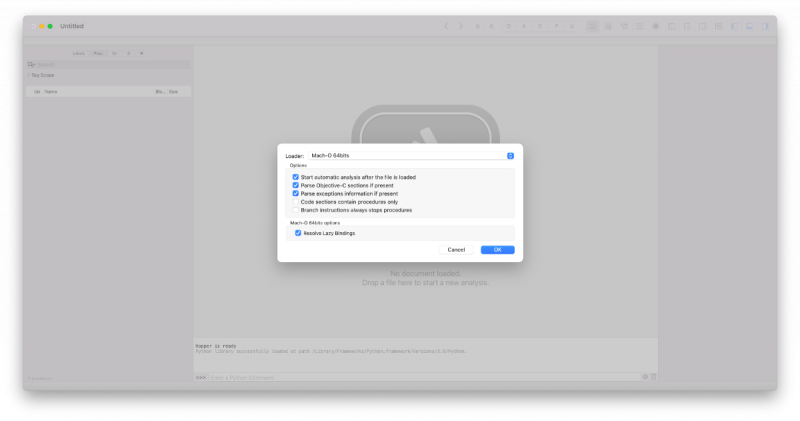
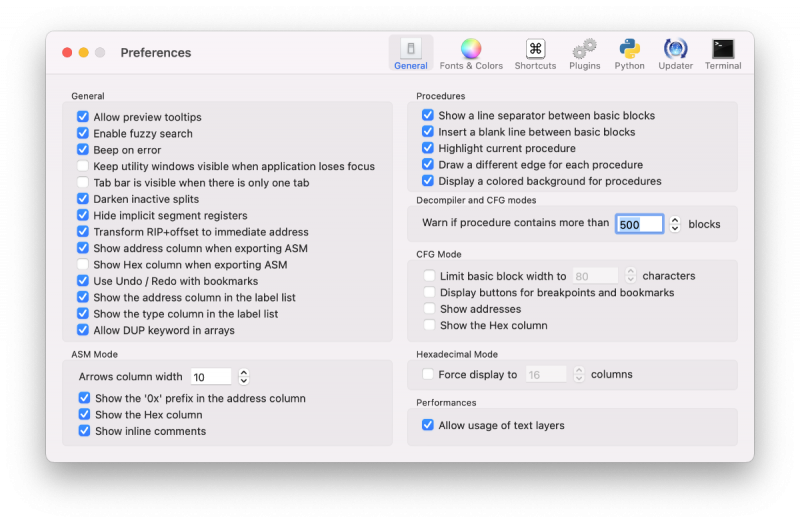
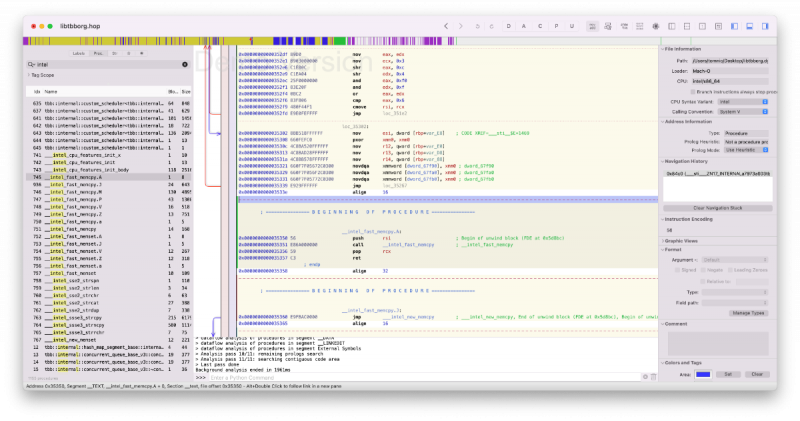
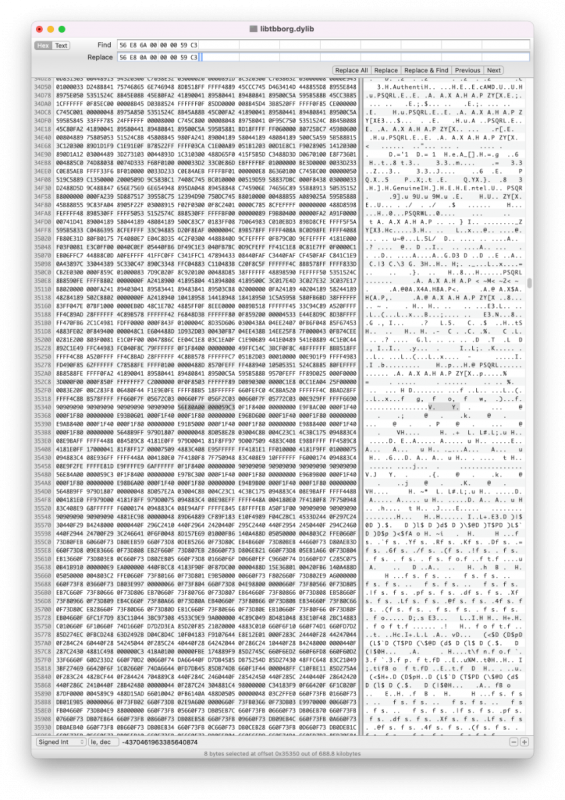
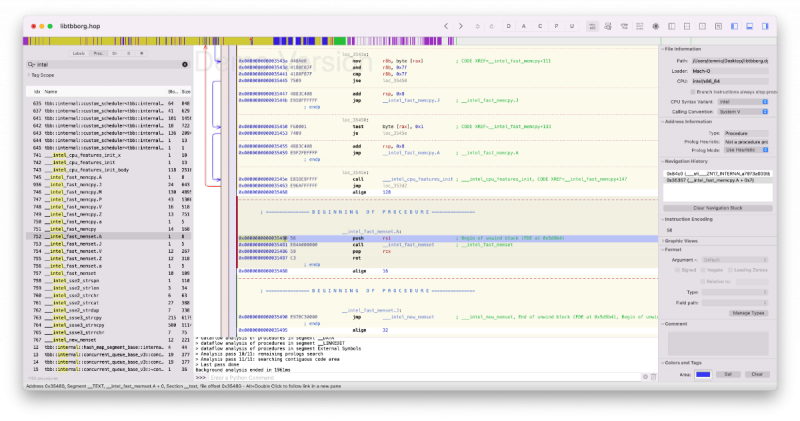
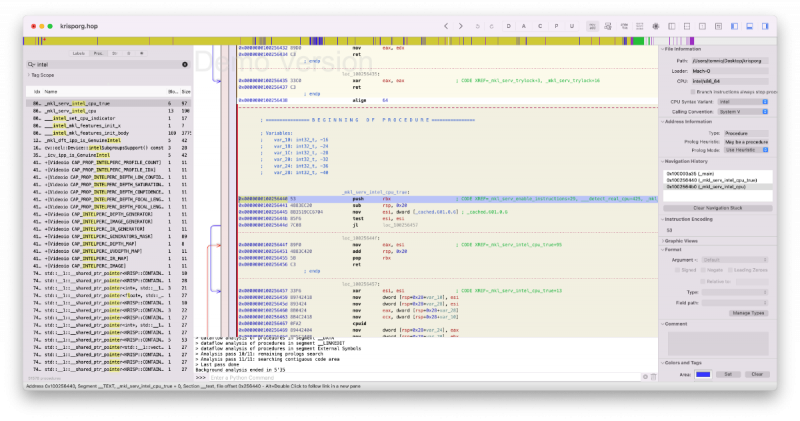
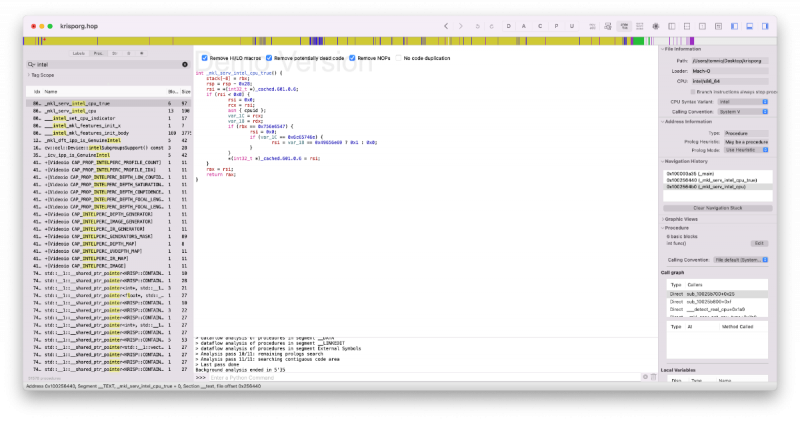
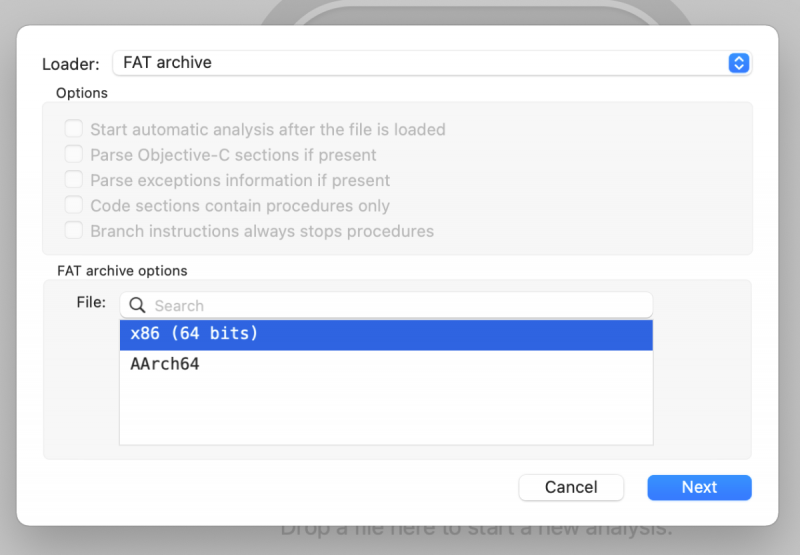
Note: There are at least two known variants of this method, https://github.com/Carnations-Botanica/IntelMKLFixup and https://github.com/JonathanFerraz/FriendlyAMD please remember to quote and/or write in this thread for discussing and talking with us about forking and developing this methodology. Work must be respected! Some History, facts and strategy Certain Mac apps use the infamous Intel MKL libraries, now called Intel OneAPI: those libraries are x86_64 compliant but in the macOS porting certain functions are intended to work only on genuine intel cpus: these are __intel_fast_memset.A and __intel_fast_memcpy.A. We can fool these libraries redirecting their calls to __intel_fast_memset.J and __intel_fast_memcpy.J which both work perfectly on AMD Hackintoshes, and as fast as possible given the fact that we lack AVX512. But we also need to fool them changing the function __mkl_serv_intel_cpu_true returning TRUE even when running on AMD cpus!!! This fix is based on Daniel de Kok's hint on his brilliant article https://danieldk.eu/Posts/2020-08-31-MKL-Zen.html given that the old trick of setting the environmental variable MKL_DEBUG_CPU_TYPE to 5 has been deprecated by Intel for obvious reasons on rather recent MKL libs implementations. Using only these three "patches" we can virtually make every Intel only app run on our AMD Hacks natively without using hypervisors and without bypassing or deleting important functions / files of our specific app. I'm trying to write a tutorial to make everybody who has a very minimal knowledge of x86_64 assembly and machine language code able to patch any offending binary for AMD cpus. The goal is trying to keep bare metal execution of macOS instead of circumventing any issue using macOS virtualization, which I think is more complex and can be used profitevoly only in high end configurations (16 cores or more, 64 gigs of ram or more). With modern kernel patches the execution of the mach vanilla kernel is virtually perfect, not losing any kind of GPU performance: https://github.com/AMD-OSX/AMD_Vanilla. The procedure in detail To start searching for the correct hex patterns we can use two really useful programs: one is Hexfiend (I use version 2.14.1), an Hex Editor for macOS, which is totally free, and the other one is Hopper (I use version 5.3.1-demo), a disassembler, which is not free but is sufficient for us to "look into" suspect binaries in the search of those three procedures in the demo version, which is free for 30 minutes. So fire up Hopper and click Try the demo: Drag and drop a "suspect" binary, like libtbb.dylib, found in numerous app like Autodesk Autocad 2022 and Maya 2022: Leave all the default options on, be sure to keep Mach-O 64bits as Loader selected (here you could select other type of architectures if found in the binary). Configure the preferences according to this screen: Now wait for some time to let Hopper disassemble all the binary (some minutes for the biggest ones), write to the top left side of the main windows the word "Intel", select Proc. next to the box you've just written and you should get this screen: Focus your attention to the list of the procedures in the left part of the window: you can clearly see __intel_fast_memcpy.A and __intel_fast_memset.A in this binary. Let's click on the first procedure: The first number of this part of the window is 0x000000000035350: it is the Offset (your position in the binary), the second, 56, is the Machine Language translation of its mnemonic Assembly command push rsi: it uses only one byte of memory... after the ; you can read a human readable comment. The second line, 0x000000000035351, one exact byte later, has 5 bytes of code: E8 6A 00 00 00, and it means call (E8) the procedure which starts 00 00 00 6A bytes ahead (byte's order of data is reversed in x86 machine language and the Assembly call function needs four signed bytes after it, positive for a jump ahead, negative for a jump backwards) which is __intel_fast_memcpy, confirmed by the comment. We need to change this line of code to call __intel_fast_memcpy.J, which starts 0A (ten in decimal) bytes ahead so that it will become: 0x000000000035351 E80A000000 call __intel_fast_memcpy.J ; ... You can easily verify that at the end the __intel_fast_memcpy.J calls the AMD compatible procedure ___intel_new_memcpy. Using a familiar approach with Clover / OC Kernel patches (excluding bit masks) we can say: Find: 56 E8 6A 00 00 00 59 C3 Replace: 56 E8 0A 00 00 00 59 C3 We can easily do this using Hexfiend, open it and drag your binary into its main window, go to the program's menu and select Edit -> Find -> Find..., choose hex, put Find values in the top write field, Replace values in the second one, hit Next and the found pattern should be highlighted, finally hit Replace: Note: only one instance of the Find pattern must be found and replaced. Save the patched binary (on the desktop for example for now), let's double check our work opening it with Hopper and clicking on the __intel_fast_memcpy.A procedure: Yes, the line 0x000000000035351 appears exactly as we wanted! Good work... If something looks different, try again following the instructions from the beginning of this tutorial or ask for further explanations in this thread: Next, we can go on patching the __intel_fast_memset.A procedure. Same kind of work, click on this procedure in Hopper and inpect the code: ...let's focus our attention to its code: ...similarly to the latest patching procedure we need to change the second line (offset 0x000000000035481) to: 0x000000000035481 E80A000000 call __intel_fast_memset.J ; ... ...in Find / Replace terms: Find: 56 E8 4A 00 00 00 59 C3 Replace: 56 E8 0A 00 00 00 59 C3 Use Hexfiend exactly as before remembering only to replace one instance of the found hex pattern, save the binary to the desktop, open it with Hopper, select the __intel_fast_memset.A procedure and double check the resulting patched code with Hopper: Great! Even this time the AMD compatible J revision is called correctly as expected with our simple patch, and this revision finally calls the AMD friendly ___intel_new_memset procedure. Overwrite the original unpatched binary with yours on the desktop, then don't forget to recodesign it with this terminal command: sudo codesign --force --deep --sign - /path/to/the/binary/file.ext Note: using the offsets to find the hex patterns is not always a good idea because the way Hopper and Hexfiend calculate them could be different and with the demo version of Hopper we cannot directly write changes to files. Now we must explain how to patch the __mkl_serv_intel_cpu_true procedure, let's try with the krisp binary: open it with Hopper. If Hopper finds a FAT binary select 64 bit Intel Architecture and then always Mach-O 64 bit structure. Always write Intel on the procedure searching box then wait for Hopper to stop decompiling everything... finally click on the __mkl_serv_intel_cpu_true string: ...switch to the "recompiled" c view in Hopper and we can see that this procedure does a specific series of tests on the CPU registers to find out if you're running your code on an authentic Intel processor. Focusing on the Machine language code, the original procedure is 53 48 83 EC 20 8B 35 19 CC 67 04... and so on (85 F6 7C 08...): _mkl_serv_intel_cpu_true: 0x0000000100256440 53 push rbx ; ... 0x0000000100256441 4883EC20 sub rsp, 0x20 0x0000000100256445 8B3519CC6704 mov esi, dword [_cached.601.0.6] ; ... 0x000000010025644b 85F6 test esi, esi 0x000000010025644d 7C08 jl loc_100256457 loc_10025644f: 0x000000010025644f 89F0 mov eax, esi ; ... 0x0000000100256451 4883C420 add rsp, 0x20 0x0000000100256455 5B pop rbx 0x0000000100256456 C3 ret ; endp What can we use as a replace? We can easily cheat creating a function which always returns true without any register testing at all and replacing the original one, so as you can see using Hopper this Assembly code (which is in x86 Machine Language 55 48 89 E5 B8 01 00 00 00 5D C3) _mkl_serv_intel_cpu_true: 0x0000000100219580 55 push rbp ; ... 0x0000000100219581 4889E5 mov rbp, rsp 0x0000000100219584 B801000000 mov eax, 0x1 0x0000000100219589 5D pop rbp 0x000000010021958a C3 ret ; endp ...is the same than this trivial C code program: function _mkl_serv_intel_cpu_true { return 0x1; } What if we do this Find / Replace? Find: 53 48 83 EC 20 8B 35 19 CC 67 04 Replace: 55 48 89 E5 B8 01 00 00 00 5D C3 Just like with the other two patched procedures above, open Hopper and drag your binary into its main window, go to the program's menu and select Edit -> Find -> Find..., choose hex, put Find values in the top write field, Replace values in the second one, hit Next and the found pattern should be highlighted, finally hit Replace... again make sure to do this only once and double check the results with Hopper opening the patched binary, the __mkl_serv_intel_cpu_true needs to appear as in this picture: Note that we can stop at 11 bytes in the find pattern since the replace ends with C3 which is a RET Assembly instruction: take it as "a kind of an END", so even if the original procedure was longer when we call the patched one the code beyond the 11 patched bytes won't be executed, ever! Always remember to overwrite the unpatched binary and recodesign the patched binary: sudo codesign --force --deep --sign - /path/to/the/binary/file.ext The final result is that even with an AMD CPU our patched Intel testing procedure always returns TRUE, fooling the binary that it is running on a Genuine Intel processor. Combining this with the two above patches virtually any problematic app for our AMD Hackintosh can be run without crashes, without deleting program functionalities, but only modifying what is needed, not any byte more, even with SIP enabled. How can I find which binaries do I need to patch? The crash log of our problematics apps are very useful to get a list of libraries to get patched: the info you get from the crashed thread is crucial. For example, if we try to run the latest Krisp we can get this crash log: ------------------------------------- Translated Report (Full Report Below) ------------------------------------- Process: krisp [56056] Path: /Applications/krisp.app/Contents/MacOS/krisp Identifier: ai.krisp.krispMac Version: 1.32.16 (1.32.16) Code Type: X86-64 (Native) Parent Process: launchd [1] User ID: 501 Date/Time: 2022-02-19 12:53:40.1955 +0100 OS Version: macOS 12.2.1 (21D62) Report Version: 12 Anonymous UUID: 904323A8-BF9D-B98D-DD83-B25231CAC583 Time Awake Since Boot: 480000 seconds System Integrity Protection: disabled Crashed Thread: 0 Dispatch queue: ai.krisp.vp Exception Type: EXC_BAD_ACCESS (SIGSEGV) Exception Codes: KERN_PROTECTION_FAILURE at 0x00007ff7b9356ff8 Exception Codes: 0x0000000000000002, 0x00007ff7b9356ff8 Exception Note: EXC_CORPSE_NOTIFY Termination Reason: Namespace SIGNAL, Code 11 Segmentation fault: 11 Terminating Process: exc handler [56056] VM Region Info: 0x7ff7b9356ff8 is in 0x7ff7b5b57000-0x7ff7b9357000; bytes after start: 58720248 bytes before end: 7 REGION TYPE START - END [ VSIZE] PRT/MAX SHRMOD REGION DETAIL MALLOC_MEDIUM (reserved) 7f9e1f800000-7f9e20000000 [ 8192K] rw-/rwx SM=NUL ...(unallocated) GAP OF 0x5995b57000 BYTES ---> STACK GUARD 7ff7b5b57000-7ff7b9357000 [ 56.0M] ---/rwx SM=NUL ... for thread 0 Stack 7ff7b9357000-7ff7b9b57000 [ 8192K] rw-/rwx SM=PRV thread 0 Thread 0 Crashed:: Dispatch queue: ai.krisp.vp 0 libtbbmalloc.dylib 0x10bdd22d1 _intel_fast_memset.A + 1 1 libtbbmalloc.dylib 0x10bdd22d6 _intel_fast_memset.A + 6 Thread 1: 0 libsystem_pthread.dylib 0x7ff81dc66fec start_wqthread + 0 As you can see the offending binary, libtbbmalloc.dylib, can easily be detected by the crashed thread, which is Thread 0 in this case, and even the offending procedure can be deduced clearly: _intel_fast_memset.A If you patch only this lib and this procedure and try to run again Krisp you will find new infos in the new crash log, _intel_fast_memcpy.A in the same libtbbmalloc.dylib, then running again and analyzing the last crashlog libtbb.dylib with _infel_fast_memset.A and then _intel_fast_memcpy.A and so on, till the app running error free just like on Intel hackintoshes. It's a process of trial and error. Sometimes the app seems to work perfectly but triggering one or more specific functions in its menu makes it hanging or crashing... Generally in the crash logs take note of all the libraries loaded in all the threads, exclude the Apple System ones which are always compatible, focus on the third party ones... 70% of the time they are part of the MKL suite, 10% part of the Intel Threading / IO system, 10% third party ones (for example GenericMacIntel.dylib or AVXMacIntel.dylib in Waves) and sometimes the main app binary is also a possible candidate to be patched. You may also need to search the possible offending files in "/Library/Application Support/Appname" or "~/Library/Application Support/Appname" if you can't figure out them in the canonical Application folder. Which applications work with these patches? The list of apps I've found and verified totally working by now is in this thread (the list is growing): Can we generalize / automatize this method? If you follow my tutorial point by point for every binary you will find out the EXACT pattern to be searched and replaced for each procedure incompatible with AMD to be patched. But during the patching of many possible binaries we can find out some variations in the Find hex pattern... for __mkl_serv_intel_cpu_true the most generic find is, besides being always 11 bytes long: Find: 53 48 83 EC 20 8B 35 xx yy zz ww where xx yy zz ww are generic bytes, different one from another, and the replace is always: Replace: 55 48 89 E5 B8 01 00 00 00 5D C3 With __intel_fast_memset.A and __intel_fast_memcpy.A functions we need to expand the search pattern to avoid patching wrong regions of our binary: Find: xx xx xx xx 56 E8 yA 00 00 00 59 C3 where xx are 4 bytes all equal to 90 or FF and y is a nybble (half a byte) equal to 6, 5, 4 or 3 Replace: xx xx xx xx 56 E8 0A 00 00 00 59 C3 We should use perl to do searching and replacing using this syntax, taking as an example a Waves 12 specific plugin to be patched, but we cannot use find/replace masks, only direct searching: sudo perl -i -pe 's|\x90\x90\x90\x90\x56\xE8\x4A\x00\x00\x00\x59\xC3|\x90\x90\x90\x90\x56\xE8\x0A\x00\x00\x00\x59\xC3|sg' /Applications/Waves/Plug-Ins\ V12/ArtistDlls1.14_12.7/1196704578.bundle/Contents/MacOS/GenericMacIntel.dylib s|\x90\x90\x90\x90\x56\xE8\x4A\x00\x00\x00\x59\xC3 is the find string byte by byte |\x90\x90\x90\x90\x56\xE8\x0A\x00\x00\x00\x59\xC3 is the replace string byte by byte We could try to create a Lilu's plugin, or an EFI module, to intercept and patch such patterns in memory on the fly, but this goes beyond my skills. I'll leave this possibility open to the most advanced coders / developers here. I hope everything is crystal clear... remember to post here your comments / doubts / improvements / critics: Tomnic2 points
-
1 point
-
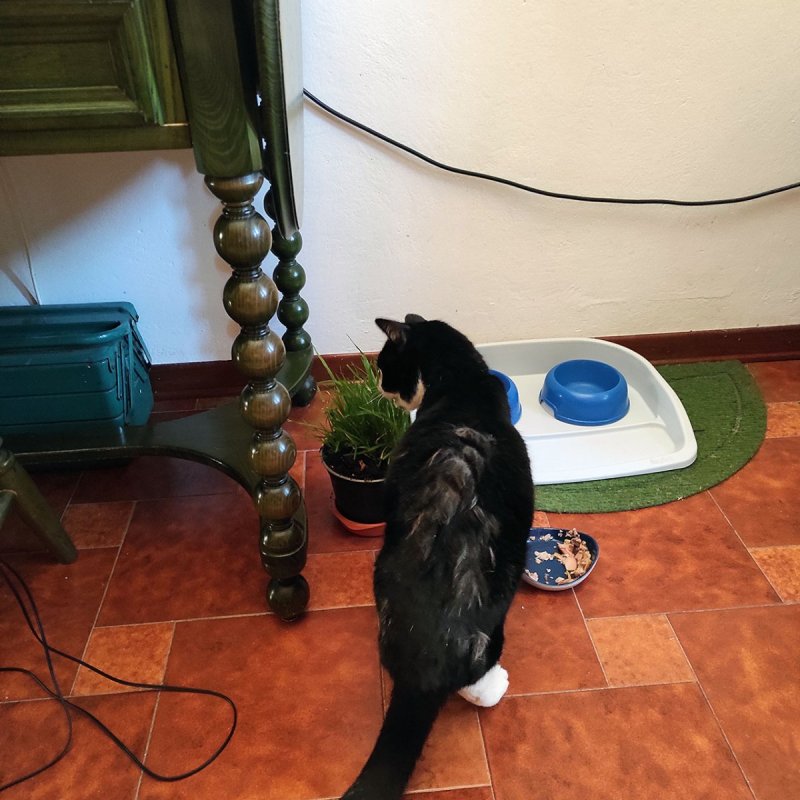
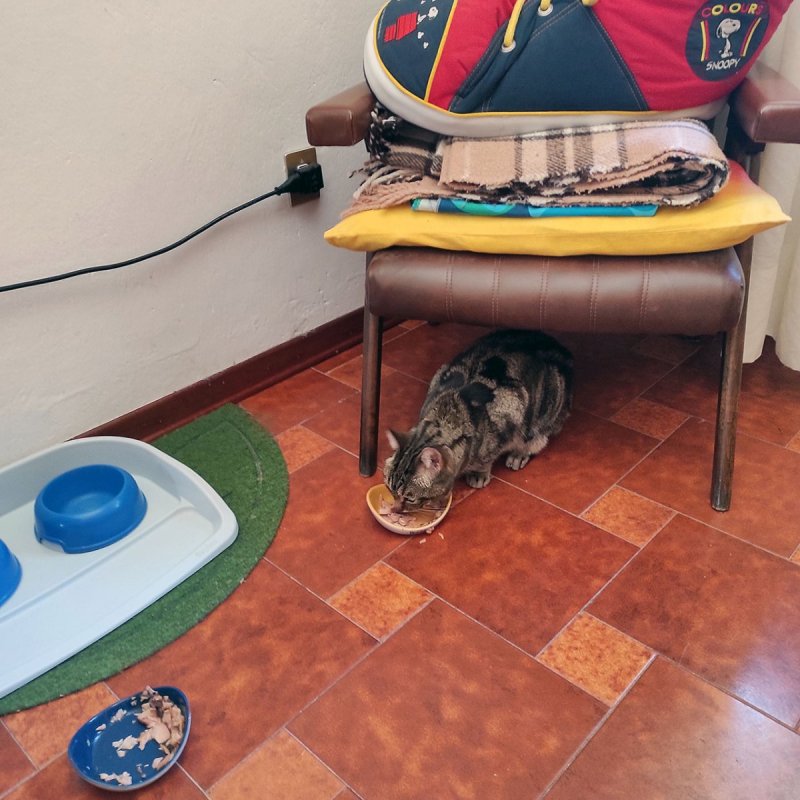
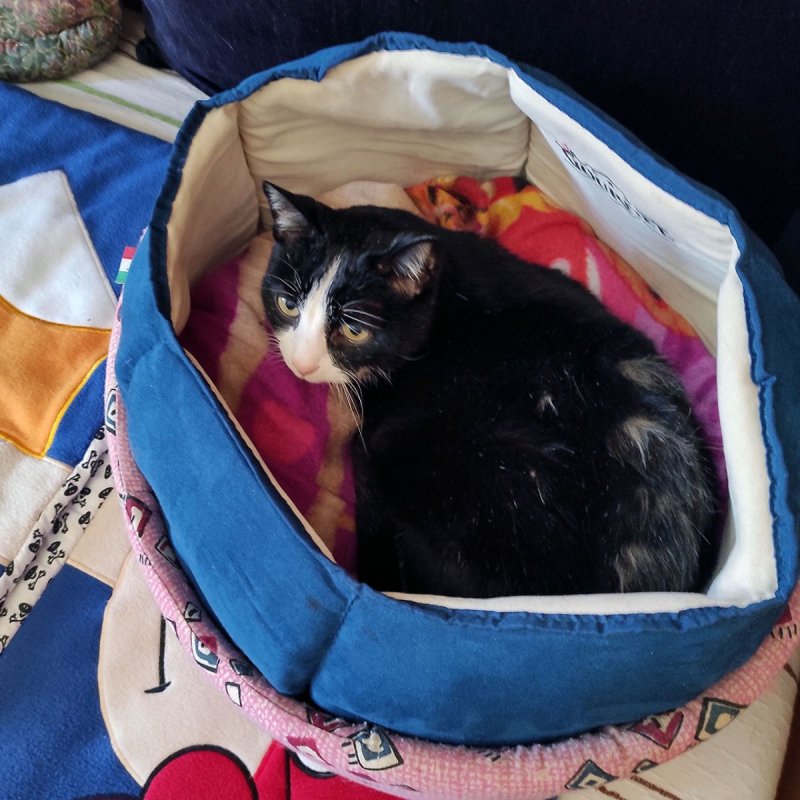
molto bello il tigrato! l'altro il tipico felix. ne ho uno uguale che chiamiamo pizzetto. sotto il mento una macchia nera. la casa nuova come l'hanno presa?1 point
-
io e angela stavamo seguendo una piccola colonia di 6 gatti tutti nati qui nei paraggi. residenti fissi da ormai 3 anni, da circa un mese, un po' perché in calore un bel po' che non abbiamo capito il motivo, sono "spariti". a giorni alterni (ormai raramente) qualcuno viene per cibarsi, poi si vedono in giro nel quartiere. alcuni, fra cui zoppino; gatto investito... merita una storia a parte, mangiava e dormiva in casa. lui sparito dai radar proprio. il mio va per i 4 anni. in salute, molto solo e molto annoiato. era abituato a zoppino causa forza maggiore non posso prenderne altri. fosse per me, altri 2 li prenderei senza dubbio. l'esperienza mi ha insegnato che il gatto è solitario e opportunista solo per una questione di sopravvivenza. se abbonda cibo e rifugio, in gruppo ci convivono bene e sono anche più sereni e meno annoiati. col senno di poi, se ci sarà occasione me adotterò 2 della stessa cucciolata. adesso ne è rimasto uno piccolo di pochi mesi che non si allontana e una piccola pantera nera bellissima figlia di una gatta nera che non ho più visto. era forestiera. veniva ogni tanto per cibo e poi per partorire visto che era un posto con risorse. edit il piccolo rimasto è uguale a quello bianco e grigio. questo era figlio di una gatta davvero presa male che sfornava 3-4 cucciolate all'anno. l'ultima cucciolata aveva sfornato 3 gattini estremamente prematuri e sotto peso. più morti che vivi. il superstite, che era più là che qua', ci siamo impegnati a farlo sopravvivere. si è fatto bellissimo anche se cieco ad un'occhio. la rinotracheite se li stava portando via tutte e due gli occhi 😕1 point
-
0 points
-
you have to replace them in proper address: /Applications/Adobe Photoshop 2022/Adobe Photoshop 2022.app/Contents/Frameworks /Applications/Adobe Photoshop 2022/Adobe Photoshop 2022.app/Contents/PlugIns/Required/Filters as usual0 points
-
@fabiosun@Fasullo Molte grazie per l'amichevole benvenuto e per i consigli e i link. Ieri ho letto per ore in questo forum e soprattutto ho guardato attentamente il tutorial. Proverò l'assistente VM oggi in ufficio (è l'unico posto dove ho un Mac). Con l'aiuto della Guida Dortania, ho impostato un Hackintosh basato su Intel circa un anno fa - dopo molte generazioni di "veri" Mac - e da allora funziona senza problemi e in modo assolutamente stabile. Ora vorrei impostare un server ProxMox come sistema di backup e soprattutto per l'uso di una vecchia applicazione che funziona solo sotto Mac OS El Capitan. Quindi ho bisogno di una combinazione di Installer.ISO, OpenCore e EFI con cui questo sia possibile. Spero di essere ancora in grado di farlo. Molti saluti dalla Germania 🙂 Thank you very much for the kind welcome and the tips and links. Yesterday I read for hours in this forum and especially had a close look at the tutorial. I will try the VM Assistant today in the office (that's the only place I have a Mac). With the help of the Dortania Guide, I set up an Intel-based Hackintosh about a year ago - after many generations of "real" Macs - and it has been running smoothly and absolutely stable ever since. Now I would like to set up a ProxMox server as a backup system and especially for the use of an old application that only runs under Mac OS El Capitan. So I need a combination of Installer.ISO, OpenCore and EFI with which this is possible. I hope that I will still be able to do this. Many greetings from Germany 🙂0 points
-
0 points
-
0 points


