Leaderboard


Popular Content
Showing content with the highest reputation on 05/10/2020 in Posts
-
Premesse: - non ho inventato niente... sono tutte info sparse in rete, le raduno qui per comodità nostra e dei frequentatori del forum. - se ci sono errori, imperfezioni, novità è gradita la segnalazione...i lavori sono sempre in corso. 🤞 Per tutte le marche di schede madri: Serial Port --> Disabled ✅ [GIGABYTE] - Load Optimized Defaults - M.I.T. -> Advanced Memory Settings Extreme Memory Profile (X.M.P.) : Profile1 oppure Auto - BIOS -> Fast Boot : Disabled - BIOS -> LAN PXE Boot Option ROM : Disabled - BIOS -> Storage Boot Option Control : UEFI - Peripherals -> Trusted Computing -> Security Device Support : Disable - Peripherals -> Network Stack Configuration -> Network Stack : Disabled - Peripherals -> USB Configuration -> Legacy USB Support : Auto - Peripherals -> USB Configuration -> XHCI Hand-off : Enabled - Chipset -> Vt-d : Disabled - Chipset -> Wake on LAN Enable : Disabled - Chipset -> IOAPIC 24-119 Entries : Enabled news 02-06-2019 Nei recenti BIOS della serie Z390 sezione Boot è comparsa la voce: CSM: impostare disable (thanks Baio77) ove presente: CFG-Lock impostare: Disabled se non è possibile vedi qui e qui come sbloccarlo Scheda video dedicata dGPU: - Peripherals -> Initial Display Output : PCIe 1 Slot - Chipset -> Integrated Graphics : Disabled Scheda video integrata iGPU: - Peripherals -> Initial Display Output : IGFX - Chipset -> Integrated Graphics : Enabled - Chipset -> DVMT Pre-Allocated :128Mb x Monitor 4K altrimenti impostare 64Mb ✅ [ASUS] - Load Optimized Defaults - AI Tweaker \ Ai Overclock tuner -> Auto - Advanced \ CPU Configuration -> Intel Virtualizaiton Technology: Enabled - Advanced \ CPU Configuration -> CPU -> Power Management Control -> CFG Lock: Disabled - Advanced \ System Agent (SA) Configuration -> Vt-d: Disabled - Advanced \ PCH Configuration -> IOAPIC 24-119 Entries: Enabled - Advanced \ Onboard Devices Configuration -> RGB LED Lighting -> When system is in sleep, hibernate or soft off states: OFF - Advanced \ AMP Configuration -> Power On By PCI-E/PCI - Advanced \ Network Stack Configuration -> Network Stack: Disabled - Advanced \ USB Configuration -> Legacy USB Support: Auto - Boot -> Fast Boot : Disabled - Boot -> Secure Boot -> OS Type : Other OS - Boot -> CSM (Compatibility Support Module) Launch CSM: Disabled Scheda video dedicata dGPU: - Advanced \ System Agent (SA) Configuration \ Graphics Configuration -> Primary Display: PCIE - Advanced \ System Agent (SA) Configuration \ Graphics Configuration -> iGPU Multi Monitor: Disabled Scheda video integrata iGPU: - Advanced \ System Agent (SA) Configuration \ Graphics Configuration -> Primary Display: IGFX (Optional) Hardware Acceleration - iGPU Multi-Monitor: Enabled will cause Primary Display to be set to IGFX. If you are using a dedicated graphics card change it back to PEG - Advanced \ System Agent (SA) Configuration\Graphics Configuration -> iGPU Multi-Monitor: Enabled - For DVMT Pre-Allocated to show in BIOS you may need to save & reenter BIOS after setting iGPU Multi-Monitor: Enabled - Advanced \ System Agent (SA) Configuration\Graphics Configuration -> DVMT Pre-Allocated :128Mb x Monitor 4K altrimenti impostare 64Mb ✅ [ASROCK] - Load Optimized Defaults - OC Tweaker \ DRAM Configuration -> Load XMP Setting : XMP 2.0 Profile 1 oppure Auto - Advanced \ CPU Configuration -> Intel Virtualization Technology : Enabled - Advanced \ Chipset Configuration -> Vt-d : Disabled - Advanced \ Chipset Configuration -> IOAPIC 24-119 Entries: Enabled - Advanced \ Storage Configuration -> Sata Mode Selection: AHCI - Advanced \ Super IO Configuration -> Serial Port: Disabled - Advanced \ USB Configuration -> Legacy USB Support : Enabled - Advanced \ USB Configuration -> PS/2 Simulator : Disabled - Advanced \ USB Configuration -> XHCI Hand-off : Enabled - Security \ Secure Boot -> Secure Boot: Disabled - Boot -> Fast Boot: Disabled - Boot -> Boot From Onboard LAN: Disabled Scheda video integrata iGPU: - Advanced \ Chipset Configuration -> Primary Graphics Adapter : Onboard - Advanced \ Chipset Configuration -> Share Memory : 128Mb x Monitor 4K altrimenti impostare 64Mb - Advanced \ Chipset Configuration -> IGPU Multi-Monitor : Enabled Scheda video dedicata dGPU: - Advanced \ Chipset Configuration -> Primary Graphics Adapter : PCI Express - Advanced \ Chipset Configuration -> IGPU Multi-Monitor : Disabled ✅ [MSI] - Save & Exit → Restore Defaults : Yes - Settings \ Advanced \ Integrated Peripherals → Network Stack : [Disabled] - Settings \ Advanced \Integrated Peripherals → Intel Serial IO : [Disabled] - Settings \ Advanced \ USB Configuration → XHCI Hand-off : [Enabled] - Settings \ Advanced \ USB Configuration → Legacy USB Support : [Auto] - Settings \ Advanced \ Windows OS Configuration → MSI Fast Boot : [Disabled] - Settings \ Advanced \ Windows OS Configuration → Fast Boot : [Disabled] - Overclocking → Extreme Memory Profile(X.M.P) : [Enabled] - Overclocking \ CPU Features → Intel Virtualization Tech : [Enabled] - Overclocking \ CPU Features → Intel VT-D Tech : [Disabled] - Settings \ Boot → Boot mode select : [LEGACY+UEFI] NB questa impostazione potrebbe essere legata al CSM, quindi in caso di problemi durante l'installazione o con schede video AMD impostare su UEFI - Settings \ Boot → Boot Option #1: UEFI: “macOS_flash_drive_name“ In base alla GPU che stai utilizzando, modifica le seguenti impostazioni: Scheda video dedicata (dGPU): Settings \ Advanced \ Integrated Graphics Configuration → Initiate Graphic Adapter : PEG Scheda video integrata Intel (iGPU): Advanced \ Integrated Graphics Configuration → Initiate Graphic Adapter : IGD - Settings \ Advanced \ Integrated Graphics Configuration → DVMT Pre-Allocated :128Mb x Monitor 4K altrimenti impostare 64Mb (64MB se è il massimo che puoi impostare) (Optional) Wake hackintosh from sleep thru Input: Advanced \ Wake Up Event Setup → Resume By USB Device : [Enabled] ✅ Resizable BAR Support disponibile su alcune schede madri Intel Z490, Z590 e successive e su AMD X570, B550 impostare su: Disabled ✅ su sitemi AMD se presente nel BIOS la voce "Above4G Decoding" abilitandola, potrebbe diventare superfluo i boot-arguments npci=0x2000 npci=0x3000 ✅ con schede video AMD il CSM deve essere su disable per tutte le marche di schede madri ✅ Settembre 2019 UPDATE 2: su alcuni bios recenti, primo visionato un portatile HP di bubbleg5, ssdt awac non può funzionare, quindi vi è un più idoneo: SSDT-RTC0 ✅ Aprile 2019 nota per: B360, B365, H310, H370, Q370, Z390 in generale per tutti le marche di schede madri: CLOVER Acpi/DSDT Patched Comment: Fix RTC _sta issue Find: 79001415 5F535441 00A00A93 Repl: 79001415 5A535441 00A00A93 OC ✅ [i consigli di vit9696] Before using AptioMemoryFix please ensure that you have: Most up-to-date UEFI BIOS firmware (check your motherboard vendor website). Fast Boot and Hardware Fast Boot disabled in BIOS if present. Above 4G Decoding or similar enabled in BIOS if present. WARNING: On some motherboards (notably ASUS WS-X299-PRO) this option causes adverse effects, and must be disabled. While no other motherboards with the same issue are known, consider this option to be first to check if you have erratic boot failures. VT-d disabled in BIOS if present (you could also drop ACPI DMAR table with a bootloader). No slide boot argument present in NVRAM or anywhere else (it is not necessary unless you cannot boot at all or see No slide values are usable! Use custom slide! message from AptioMemoryFix). CFG Lock (MSR 0xE2 write protection) disabled in BIOS if present (consider patching it otherwise if you have enough skills). See VerifyMsrE2 section for more details. CSM disabled in BIOS if present (you may need to flash GOP ROM on NVIDIA 6xx/AMD 2xx or older, using GopUpdate or AMD UEFI GOP MAKER could simplify things). EHCI/XHCI Hand-off enabled in BIOS only if boot stalls unless USB devices are disconnected. VT-x, Hyper Threading, Execute Disable Bit enabled in BIOS if present. While it may not be required, sometimes you have to disable Thunderbolt support, Intel SGX, and Intel Platform Trust in BIOS if present. When debugging sleep issues you may want to (temporarily) disable Power Nap and automatic power off, which appear to sometimes cause wake to black screen or bootloop issues on older platforms. The particular issues may vary, but in general you should check ACPI tables first. Here is an example of a bug found in some Z68 motherboards. To turn Power Nap and the others off run the following commands in Terminal: sudo pmset autopoweroff 0 sudo pmset powernap 0 sudo pmset standby 0 Note, that these settings may reset at hardware change and in certain other circumstances. To view their current values run pmset -g. Note, if you see a lot of Start/End lines in verbose mode you must ensure you do not have bootercfg variable stored in NVRAM. See this post for details. If it still does not help you could use the following command in Terminal (either with System Integrity Protection disabled or from Recovery HD): sudo nvram bootercfg="log=0 debug=0"1 point
-
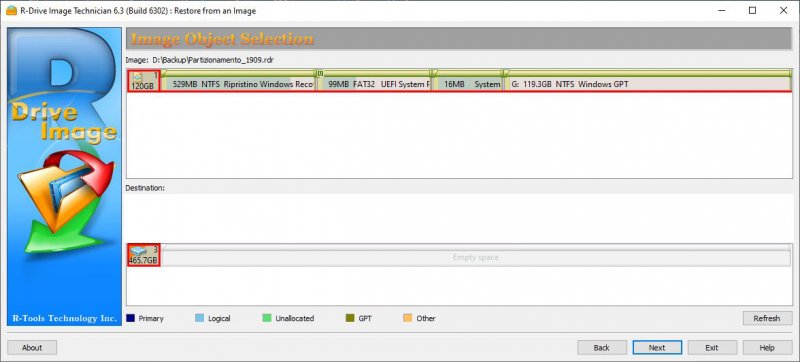
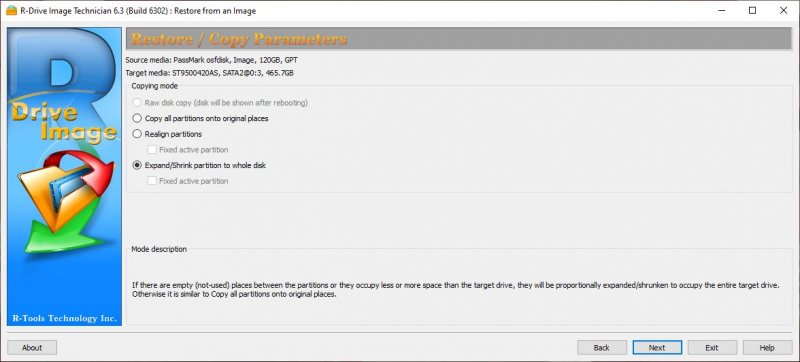
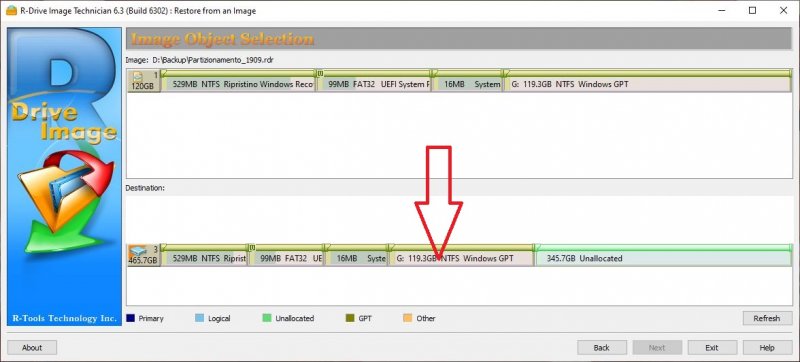
Ripristinando la sola Partizione di Sistema (di provenienza MBR o UEFI) il nostro Sistema si avvierà UEFI, BOOT, MSR e RIPRISTINO di default, come appena installati, BCD di Sistema e Recovery allineato. Creare un Immagine solo della propria Partizione di Sistema. Ripristinare l’immagine PARTIZIONAMENTO (440 Mb.) fornita, basta selezionare Sorgente e Destinazione, non importa se il Disco è installato o da inizializzare: Se vogliamo possiamo Espanderla subito all'intero Disco: Una volta che il nostro Disco è stato preparato, Ripristinare la propria Immagine nella Partizione Windows: - AVVIARE: - - Preparata anche un Immagine con il nuovo schema di Partizionamento messo in atto dalla versione 2004:
 1 point
 -
in caso puoi mettere il kext nvmefixup è probabile che dopo un update le usb non ti funzionino... in caso ricordatelo e poi sarai costretto a mapparle1 point
-
ma hai seguito la mia guida? non mi sembra, hai tutti i fix acpi selezionati. segui nuovamente e modifica, inoltre metti KernlPM e rimuovi AppleIntelCPUPM vai in download, scarica SSDT-Basic e mettilo in patched smbios imposta imac 19 aggiorna anche la tua firma inserendo il nuovo hardware1 point
-
After a week of messing around, I finally got my Threadripper 3970x, TRX40 Creator, MSI Radeon Vega 64 to work. I only have one video card. Here are the changes I had to make: /etc/default/grub: GRUB_CMDLINE_LINUX_DEFAULT="quiet amd_iommu=on textonly video=amdgpu video=efifb:off" <<< I need efifb:off or I get the BAR 0 error. *** Note: My monitor will not show anything past the Ramdisk message with video=efifb:off" set /etc/modprob.d/vlio: # Make vfio-pci a pre-dependency of the usual video modules softdep amdgpu pre: vfio-pci <<< Not sure if this is still needed options vfio-pci ids=1002:687f,1002:aaf8 disable_vga=1 options kvm_amd avic=1 <<< Not sure if this is still needed /etc/pve/qemu-server/101.conf hostpci0: 03:00,pcie=1,x-vga=on,romfile=MSI.RXVega64.8176.170719.rom <<< romfile goes in /usr/share/kvm/ *** Set the boot flag. Without the boot flag set, the display hangs up after the Ramdisk message. I also made the following BIOS changes, and I have not checked yet to see if they are still needed: 1. SR-IOV Support. 2. In bios under Advanced\AMD CBS\NBIO Common Options a. Enable AER Cap b. Enable ACS Enable. (not visible until a. is done) c. Turn on ARI Now when I power up the machine, It jumps to the PROXMOX screen, then I can click on the icon of my MacOS, and then I can boot up my new AMD Macintosh. Things I need to do: 1. Create a hook script for powering down my hardware. For example something that periodically checks to see if the vm is running and if not, send "shutdown -h now" command. 2. Everything else. I have days (weeks) of tinkering to do. Once again I would like to thank all of you for your posts!!!!1 point
-
Ciao se l'hardware è quello nella tua firma, la cpu non è compatibile.1 point
-
Prova a cambiare layout audio.1 point
-
allega ioreg per vedere se è tutto ok1 point
-
Basta togliere acpimanager e mettere questo nelle kext, giusto?0 points
-
assolutamente niente, puoi continuare ad usare ssdt che stai usando ho solo in prima istanza eseguito test per ssdt basic poi in seguito ho migrato da ssdt kaby_coffelake (che comunque era stato personalizzato da gengik) al ssdt-basic con una leggera personalizzazione per z370 e ho giochicchiato io con il popolamento di PCI0 points
-
no, non devi modificare nulla0 points
-
No no, tutto è utile, io a volte rileggo quello che scrivo nelle guide e non capisco quello che voglio dire 😄0 points